Using a Bissell Pet Pro carpet cleaner effectively involves understanding its features, proper usage, and maintenance. PETS.EDU.VN is here to guide you through each step, ensuring your carpets are clean and your home is fresh. With the right techniques and cleaning solutions, you can remove even the toughest pet stains and odors, revitalizing your carpets and creating a healthier environment for your family and pets. Let’s explore how to use this powerful cleaning tool and what benefits it offers.
1. Understanding Your Bissell Pet Pro Carpet Cleaner
Before diving into the cleaning process, it’s crucial to familiarize yourself with your Bissell Pet Pro carpet cleaner. Understanding the components and features of your machine will help you use it more efficiently and effectively.
1.1. Identifying the Parts and Functions
Take a moment to identify all the parts of your Bissell Pet Pro carpet cleaner. Here’s a quick overview:
- Handle: For pushing and maneuvering the cleaner.
- Clean Water Tank: Holds the clean water and cleaning solution mixture.
- Dirty Water Tank: Collects the dirty water extracted from the carpet.
- Power Switch: Turns the machine on and off.
- Cleaning Mode Switch: Selects the cleaning mode (Express Clean, Deep Clean, etc.).
- Spray Trigger: Dispenses the cleaning solution onto the carpet.
- Brush Roll: Agitates and cleans the carpet fibers.
- Hose and Tools: For spot cleaning and reaching difficult areas.
- CleanShot Pretreater: Targets and pretreats tough stains (if equipped).
Understanding the function of each part ensures you’re using the machine correctly and optimizing its performance.
1.2. Models and Their Features
The Bissell Pet Pro carpet cleaner comes in various models, each with unique features. Some popular models include:
- ProHeat 2X Revolution Pet Pro: Known for its powerful cleaning and quick drying capabilities.
- SpotClean Pet Pro: A portable cleaner ideal for spot treatments and small areas.
- Little Green ProHeat Portable Carpet Cleaner: Compact and easy to use for quick cleanups.
Each model has specific features, such as different brush roll designs, tank capacities, and included tools. Consult your user manual to understand the specific features of your model.
2. Assembling Your Bissell Pet Pro Carpet Cleaner
Proper assembly is essential for the safe and effective operation of your Bissell Pet Pro carpet cleaner. Follow these steps to assemble your machine correctly.
2.1. Attaching the Handle and Carry Handle
- Handle Insertion: Firmly insert the handle into the top of the machine until it clicks into place. This ensures the handle is securely attached and won’t come loose during use.
- Carry Handle Attachment: Align the carry handle with the slots on either side of the base until the piece clicks into place. This handle makes it easier to lift and move the machine.
 Attaching the carry handle securely
2.2. Securing the Carry Handle and Clean Water Tank
- Securing the Carry Handle: Use the screw taped to the handle to secure the carry handle to the machine. Use a Phillips-head screwdriver to tighten the screw firmly into the carry handle.
- Clean Water Tank Alignment: Align your clean water tank with the grooves on the machine before sliding it into place. Ensure the tank is seated fully into the machine for proper operation.
3. Selecting the Right Cleaning Mode
Choosing the correct cleaning mode is crucial for achieving the best results on your carpets. The Bissell Pet Pro carpet cleaner typically offers multiple cleaning modes to suit different needs.
3.1. Understanding the Cleaning Modes
- Express Clean: This mode is designed for a lighter clean and quicker drying time, typically around 30 minutes. It uses less water, making it ideal for quick touch-ups and lightly soiled areas.
- Deep Clean/Max Clean: This mode provides a more thorough clean by dispensing more water and cleaning solution. It’s best for heavily soiled carpets and areas with tough stains. Keep in mind that carpets will take longer to dry after using this mode.
- Area Rug Cleaning: Some models also offer a specific mode for cleaning area rugs. This mode is gentler on delicate fibers while still providing effective cleaning.
3.2. Choosing the Appropriate Mode for Your Needs
Consider the following factors when selecting a cleaning mode:
- Soil Level: For light dirt and quick cleanups, Express Clean is sufficient. For deep-seated dirt and tough stains, use Deep Clean/Max Clean.
- Drying Time: If you need the carpet to dry quickly, Express Clean is the best option. If drying time is not a concern, Deep Clean/Max Clean will provide a more thorough clean.
- Carpet Type: For delicate area rugs, use the Area Rug Cleaning mode or a lower setting to avoid damage.
4. Filling the Clean Water Tank
Properly filling the clean water tank with the correct mixture of water and cleaning solution is essential for optimal cleaning performance.
4.1. Removing the Clean Water Tank
To begin, remove the clean water tank from the machine. This tank is usually located on the top or front of the cleaner and can be easily detached by lifting or sliding it out.
4.2. Mixing Water and Formula
- Unscrew the Cap: Unscrew the cap from the tank to access the fill lines.
- Fill with Warm Water: Fill the tank with warm tap water (up to 140°F or 60°C) to the appropriate water line. Using warm water helps to dissolve the cleaning formula and improve cleaning performance.
- Add Cleaning Formula: Add your desired Bissell cleaning formula to the formula fill line. The amount of formula needed will vary depending on the cleaning mode you’ve selected.
4.3. Easy Fill Feature
Some Bissell Pet Pro models come with an easy fill feature for use with antibacterial formulas.
- Secure the Yellow Cap: Replace the yellow cap securely back onto the clean water tank.
- Insert Formula Bottle: Firmly insert the formula bottle into the cap on the tank.
- Squeeze Until Full: Squeeze the bottle until the formula reaches the easy fill line. This ensures the correct amount of formula is added to the water.
4.4. Choosing the Right Cleaning Formula
Using the right cleaning formula is crucial for achieving the best results and protecting your machine.
- Genuine Bissell Formulas: Always use genuine Bissell formulas in your machine. These formulas are specifically designed to work with Bissell carpet cleaners and can help reduce possible damage to internal components.
- Compatible Formulas: Some popular and compatible Bissell formulas include Clean + Refresh, PET Stain & Odor, PRO MAX Clean + Protect, PET PRO OXY Urine Eliminator, PET Stain Pretreat, PET PRO OXY Stain Destroyer, PET Pretreat + Sanitize, Pet Stain & Odor + Antibacterial, OXY Boost, and PET OXY Boost.
4.5. Reattaching the Clean Water Tank
Once the tank is filled, return it to the machine and slide it into place, ensuring that it is seated fully. A secure fit will prevent leaks and ensure proper operation.
5. Cleaning Carpets and Area Rugs
With your machine assembled, the cleaning mode selected, and the clean water tank filled, you’re ready to start cleaning your carpets and area rugs.
5.1. Preparing the Area
- Remove Solids: Before using your deep cleaner, remove any solid debris, such as pet hair, dirt, and other particles, with a dry vacuum cleaner. This will prevent clogs and ensure the machine operates efficiently.
- Move Furniture: Move any furniture that may obstruct your cleaning path. This will allow you to clean the entire carpet area thoroughly.
5.2. Operating the Machine
- Plug-In and Power On: Plug your machine into a properly grounded outlet and ensure the machine is set to your desired cleaning mode. Press the power button to turn the machine ON.
- Recline the Machine: Press the recline pedal with your foot to lower the machine into the cleaning position. This engages the brush roll and allows the machine to start cleaning.
5.3. Dispensing Cleaning Solution
Hold the spray trigger on the handle to dispense water and cleaning solution from your machine. Holding the spray trigger for about 10 seconds allows the machine to prime and wet the brush roll before cleaning. The machine will only dispense cleaning solution while the spray trigger is held.
5.4. Cleaning Techniques
- Forward and Backward Passes: Move the machine slowly forward while holding the spray trigger, and then slowly backward. Overlap each pass slightly to ensure even cleaning.
- Dry Passes: After dispensing the cleaning solution, make dry passes (without holding the trigger) to extract the dirty water. Continue making dry passes until no more water is visible entering the nozzle on the foot.
- Recommended Timing: Follow the recommended timing and patterns for each cleaning mode to optimize results.
| Cleaning Mode | Spray Trigger | Forward Pass | Backward Pass |
|---|---|---|---|
| Express Clean | Hold | Slow | Slow |
| Deep Clean | Hold continuously | Slow | Slow |
| Area Rug | Hold gently | Slow | Slow |
5.5. Using the CleanShot Pretreater
If your machine includes the CleanShot pretreater, use it for tough stains and set-in messes.
- Activate CleanShot: With the machine reclined, press the CleanShot button located on the machine foot. The button will display a green icon when it is ON and a red icon when it is OFF.
- Spray the Stain: Maneuver the machine as necessary to spray the stain until it is completely soaked.
- Soak the Stain: Press the CleanShot button to turn it OFF and allow the stain to soak for about 5 minutes.
- Extract and Clean: After the stain has soaked, move the machine over the stain to extract and continue cleaning as indicated.
5.6. Refilling the Clean Water Tank
You may need to refill the clean water tank several times during one cleaning session, depending on the size of the area and the soil level.
6. Cleaning with Hose and Tools
The hose and tool attachments are perfect for spot cleaning, upholstery, and reaching tight spaces.
6.1. Attaching the Hose and Tools
- Open the Hose Door: Lift the accessory hose door located on the foot of the machine.
- Insert the Hose: Insert the hose with the colored release clip facing away from the machine until it snaps into place.
- Attach the Tool: Attach your desired tool to the other end of the hose.
6.2. Cleaning Techniques
- Spray the Stain: For best results, hold the tool a few inches above the spot or stain and press the spray trigger to treat the stain.
- Scrub the Stain: Once the stain has been sprayed thoroughly, release the spray trigger and use the scrubbing portion of the tool to gently scrub the stain.
- Suction the Mess: After scrubbing the stain, suction up the mess by tilting the tool forward, allowing the suction channel to make solid contact with the surface. Slowly move the tool in a backwards direction over the mess.
- Repeat as Needed: Continue this process until the stain is removed.
6.3. Safety Precautions
Note that the brush rolls will continue to spin while the machine is upright, even when using the hose and tool attachments. Ensure your machine is placed on a surface that won’t be damaged by the rotating brush rolls.
7. Emptying and Cleaning the Dirty Water Tank
Regularly emptying and cleaning the dirty water tank is essential for maintaining your machine’s performance and preventing odors.
7.1. Recognizing When to Empty the Tank
If the dirty water tank gets full during cleaning, you may notice a change in the pitch of your machine’s sound and a loss of suction. This indicates that the dirty water tank needs to be emptied.
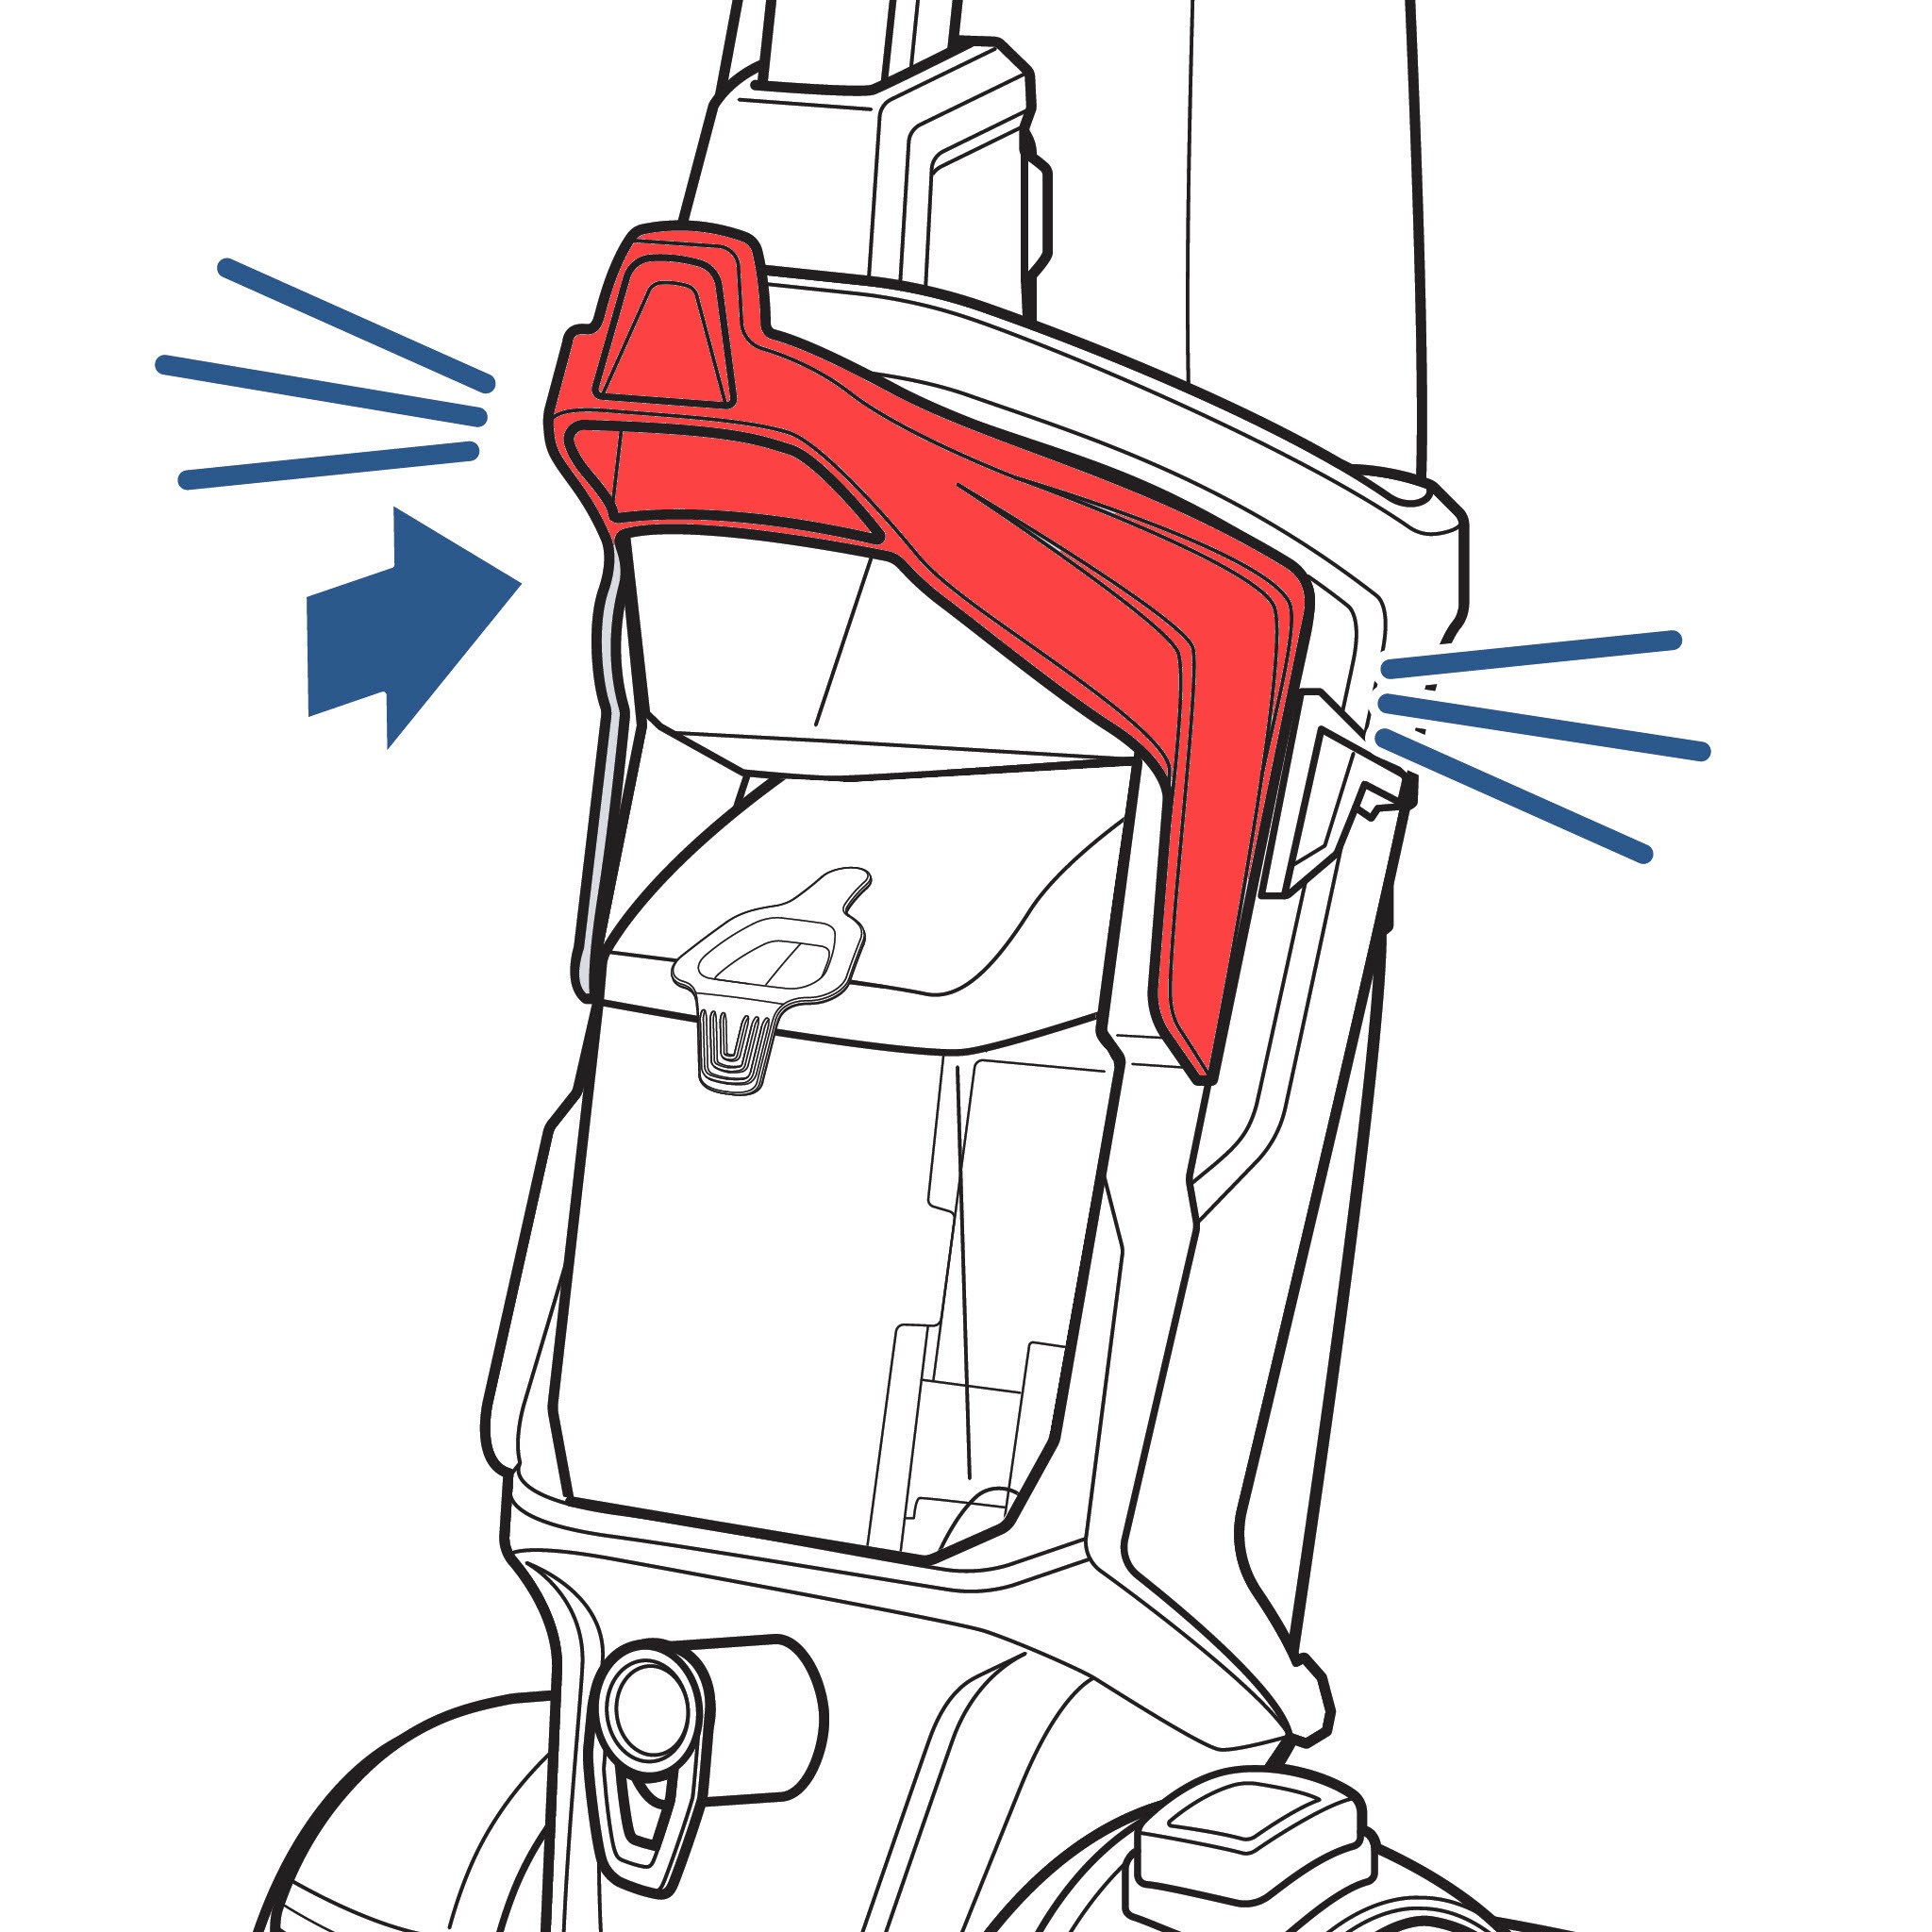
7.2. Removing the Dirty Water Tank
- Release the Tank: Press the tank handle on the dirty water tank downward and tilt the tank forward to remove it.
- Use Both Hands: Use both hands, one on the handle and one on the tank, to assist in removing the tank from the machine.
7.3. Emptying and Rinsing the Tank
- Pull the Rubber Tab: Empty the dirty water tank by pulling the rubber tab on the top of the tank and slowly tilting the tank.
- Close the Tab: Once the tank is empty, close the rubber tab and ensure it is sealed tight by pressing in both sides firmly. Failure to do so can result in improper machine function or leaking.
- Rinse the Tank: Rinse out the dirty water tank if it has any leftover residue.
7.4. Cleaning the Float Stack
- Unscrew the Ring: Unscrew the ring on the bottom of the tank and remove the float stack.
- Rinse the Float Stack: Rinse off the float stack, ensuring the colored portion can slide easily.
- Reinstall the Float Stack: Reinstall the float stack by aligning the arrow on the float stack with the one on the tank. Angle the bottom portion of the float stack to guide it smoothly into the dirty water tank.
- Twist the Ring Back On: Twist the ring back onto the tank, aligning the threads, and ensuring it is a tight seal to prevent water from leaking.
7.5. Cleaning the Red Filter
Before reinstalling the dirty water tank, clean the red filter below where the tank rests on the machine of any remaining dirt or debris.
7.6. Reinstalling the Dirty Water Tank
Return the tank to the machine by inserting the bottom end of the tank into the machine first, then angle the top end of the tank toward the machine until it clicks into place.
8. Maintaining Your Bissell Pet Pro Carpet Cleaner
Regular maintenance is crucial for prolonging the life of your Bissell Pet Pro carpet cleaner and ensuring it continues to perform at its best.
8.1. Cleaning the Brush Rolls
Regularly check and clean the brush rolls to remove any hair, fibers, or debris that may have accumulated. This will help maintain their effectiveness and prevent clogs.
8.2. Checking and Cleaning the Nozzles
Inspect the nozzles for any blockages and clean them as needed. Clogged nozzles can reduce suction and cleaning performance.
8.3. Cleaning the Filters
Clean the filters regularly to maintain proper airflow and suction. Refer to your user manual for the location and cleaning instructions for the filters.
8.4. Storing the Machine Properly
When not in use, store your Bissell Pet Pro carpet cleaner in a dry, clean place. Ensure all parts are properly assembled and secured before storing.
9. Troubleshooting Common Issues
Even with proper use and maintenance, you may encounter some common issues with your Bissell Pet Pro carpet cleaner. Here are some troubleshooting tips to help you resolve them.
9.1. Loss of Suction
- Check the Dirty Water Tank: Ensure the dirty water tank is not full.
- Clean the Filters: Clean the filters to remove any clogs.
- Inspect the Hose and Nozzles: Check the hose and nozzles for blockages and clear them if necessary.
9.2. No Cleaning Solution Dispensing
- Check the Clean Water Tank: Ensure the clean water tank is filled with water and cleaning solution.
- Prime the Pump: Hold the spray trigger for about 10 seconds to prime the pump.
- Check the Nozzles: Inspect the nozzles for any clogs and clear them if necessary.
9.3. Machine Not Turning On
- Check the Power Cord: Ensure the power cord is properly plugged into a grounded outlet.
- Check the Circuit Breaker: Check the circuit breaker to ensure it has not been tripped.
- Contact Customer Support: If the machine still does not turn on, contact Bissell customer support for assistance.
10. Safety Tips for Using Your Bissell Pet Pro Carpet Cleaner
Following these safety tips will help you avoid accidents and ensure a safe cleaning experience.
10.1. Read the User Manual
Always read and follow the instructions in the user manual before using your Bissell Pet Pro carpet cleaner.
10.2. Use the Right Cleaning Solutions
Only use genuine Bissell cleaning solutions that are specifically designed for your machine. Using other solutions may damage the machine or create hazardous conditions.
10.3. Keep Children and Pets Away
Keep children and pets away from the area being cleaned to prevent accidents.
10.4. Avoid Cleaning Electrical Cords
Never use the carpet cleaner to clean electrical cords or outlets.
10.5. Unplug the Machine Before Maintenance
Always unplug the machine from the outlet before performing any maintenance or troubleshooting.
11. Benefits of Using a Bissell Pet Pro Carpet Cleaner
Investing in a Bissell Pet Pro carpet cleaner offers numerous benefits, making it a worthwhile addition to your home cleaning arsenal.
11.1. Effective Pet Stain and Odor Removal
The Bissell Pet Pro carpet cleaner is specifically designed to tackle tough pet stains and odors, leaving your carpets fresh and clean.
11.2. Deep Cleaning for Carpets and Rugs
These cleaners provide a deep clean that removes dirt, allergens, and other debris from deep within the carpet fibers, improving the overall cleanliness of your home.
11.3. Convenience and Ease of Use
With features like multiple cleaning modes, easy-fill tanks, and hose attachments, Bissell Pet Pro carpet cleaners are designed for convenience and ease of use.
11.4. Improved Air Quality
By removing allergens and pollutants from your carpets, these cleaners can help improve the air quality in your home, creating a healthier living environment.
11.5. Cost-Effective Cleaning Solution
Investing in a carpet cleaner can save you money in the long run by reducing the need for professional cleaning services.
12. Real-World Applications and Case Studies
Let’s look at some real-world applications and case studies to illustrate the effectiveness of the Bissell Pet Pro carpet cleaner.
12.1. Removing Stubborn Pet Stains
Sarah, a pet owner with two dogs and a cat, struggled with persistent pet stains on her carpets. After using the Bissell Pet Pro carpet cleaner with the PET PRO OXY Urine Eliminator formula, she noticed a significant improvement. The cleaner effectively removed the stains and odors, leaving her carpets looking and smelling fresh.
12.2. Deep Cleaning High-Traffic Areas
John, a homeowner with a busy household, used the Bissell Pet Pro carpet cleaner to deep clean high-traffic areas in his home. The cleaner’s powerful suction and brush rolls effectively removed dirt and grime, revitalizing his carpets and improving the overall appearance of his home.
12.3. Spot Cleaning Accidents
Emily, a parent with young children, found the SpotClean Pet Pro to be invaluable for spot cleaning accidents. The portable cleaner allowed her to quickly and easily clean up spills and messes, preventing stains from setting in and keeping her carpets looking their best.
13. Expert Tips for Achieving the Best Results
To maximize the effectiveness of your Bissell Pet Pro carpet cleaner, consider these expert tips.
13.1. Pretreat Stains
For tough stains, pretreat the area with a stain remover before using the carpet cleaner. This will help loosen the stain and make it easier to remove.
13.2. Use the Right Cleaning Technique
Follow the recommended cleaning techniques for each cleaning mode to optimize results. Use slow, overlapping passes to ensure thorough cleaning.
13.3. Allow Carpets to Dry Completely
After cleaning, allow your carpets to dry completely before walking on them. This will help prevent dirt and debris from being tracked onto the clean carpets.
13.4. Ventilate the Room
Open windows and doors to ventilate the room while the carpets are drying. This will help speed up the drying process and prevent the buildup of moisture.
13.5. Regular Cleaning Schedule
Establish a regular cleaning schedule to maintain the cleanliness of your carpets and prevent the buildup of dirt and allergens.
14. Comparing Bissell Pet Pro Carpet Cleaners to Other Brands
When choosing a carpet cleaner, it’s helpful to compare Bissell Pet Pro carpet cleaners to other brands.
14.1. Bissell vs. Hoover
Bissell and Hoover are two popular brands of carpet cleaners. Bissell Pet Pro models often excel in pet stain and odor removal, while Hoover models may offer a wider range of features and accessories.
14.2. Bissell vs. Rug Doctor
Rug Doctor carpet cleaners are known for their professional-grade cleaning power. Bissell Pet Pro models, however, are typically more affordable and easier to use for everyday cleaning needs.
14.3. Features and Performance Comparison
| Feature | Bissell Pet Pro | Hoover | Rug Doctor |
|---|---|---|---|
| Pet Stain Removal | Excellent | Good | Very Good |
| Ease of Use | Very Good | Good | Good |
| Price | Affordable | Moderate | Expensive |
| Cleaning Power | Good | Good | Excellent |
| Additional Features | Multiple cleaning modes, easy-fill tanks | Wide range of accessories, spin scrub brushes | Professional-grade cleaning, large tank capacity |
15. Addressing Common Misconceptions
There are several common misconceptions about using carpet cleaners. Let’s address some of them.
15.1. Myth: Carpet Cleaners Damage Carpets
Fact: When used correctly with the right cleaning solutions, carpet cleaners do not damage carpets. In fact, they can help prolong the life of your carpets by removing dirt and debris that can cause wear and tear.
15.2. Myth: You Only Need to Clean Carpets When They Look Dirty
Fact: Carpets can harbor dirt, allergens, and other pollutants even when they look clean. Regular cleaning is essential for maintaining a healthy indoor environment.
15.3. Myth: All Cleaning Solutions Are the Same
Fact: Different cleaning solutions are designed for different types of stains and carpets. Using the wrong cleaning solution can damage your carpets or leave behind residue.
16. The Future of Carpet Cleaning Technology
The field of carpet cleaning technology is constantly evolving. Here are some emerging trends and innovations to watch for.
16.1. Smart Carpet Cleaners
Smart carpet cleaners with advanced sensors and automated cleaning programs are becoming increasingly popular. These cleaners can detect the level of dirt and adjust the cleaning settings accordingly.
16.2. Eco-Friendly Cleaning Solutions
There is a growing demand for eco-friendly cleaning solutions that are safe for the environment and your family. Many manufacturers are developing biodegradable and plant-based cleaning formulas.
16.3. Improved Brush Roll Technology
Innovations in brush roll technology are leading to more effective and efficient carpet cleaning. New designs and materials are helping to remove dirt and debris from deep within the carpet fibers.
17. Environmental Considerations
When using a carpet cleaner, it’s important to consider the environmental impact.
17.1. Choosing Eco-Friendly Cleaning Solutions
Opt for eco-friendly cleaning solutions that are biodegradable and free from harsh chemicals.
17.2. Conserving Water
Use the appropriate amount of water for each cleaning mode to conserve water and prevent excessive waste.
17.3. Proper Disposal of Waste Water
Dispose of waste water properly, following local regulations and guidelines.
18. Resources and Further Reading
For more information on using and maintaining your Bissell Pet Pro carpet cleaner, consult these resources.
18.1. Bissell User Manuals
Refer to the user manual for your specific model for detailed instructions and troubleshooting tips.
18.2. Online Forums and Communities
Join online forums and communities to connect with other Bissell Pet Pro users and share tips and advice.
18.3. Professional Cleaning Services
Consider hiring a professional cleaning service for deep cleaning and maintenance of your carpets.
19. FAQ: Answering Your Burning Questions
19.1. How Often Should I Clean My Carpets with a Bissell Pet Pro?
It’s generally recommended to deep clean your carpets every 6 to 12 months, depending on foot traffic and the presence of pets.
19.2. Can I Use Hot Water in My Bissell Pet Pro?
It is recommended to use warm tap water (up to 140°F or 60°C) in your Bissell Pet Pro. Using water that is too hot can damage the machine.
19.3. What Types of Cleaning Solutions Can I Use in My Bissell Pet Pro?
Only use genuine Bissell cleaning solutions that are specifically designed for your machine.
19.4. How Do I Prevent My Carpets from Getting Too Wet?
Use the Express Clean mode for lighter cleaning and make multiple dry passes to extract excess water.
19.5. Can I Use My Bissell Pet Pro on Hardwood Floors?
No, Bissell Pet Pro carpet cleaners are designed for use on carpets and rugs only. Using them on hardwood floors can cause damage.
19.6. How Do I Clean the Brush Rolls on My Bissell Pet Pro?
Remove the brush rolls and clean them with warm water and a mild detergent. Remove any hair or debris that may have accumulated.
19.7. What Should I Do If My Bissell Pet Pro Stops Spraying?
Check the clean water tank to ensure it is filled with water and cleaning solution. Prime the pump by holding the spray trigger for about 10 seconds. Inspect the nozzles for any clogs and clear them if necessary.
19.8. How Do I Store My Bissell Pet Pro?
Store your Bissell Pet Pro in a dry, clean place. Ensure all parts are properly assembled and secured before storing.
19.9. Can I Use My Bissell Pet Pro on Upholstery?
Yes, you can use your Bissell Pet Pro on upholstery with the hose and tool attachments.
19.10. How Do I Prevent My Bissell Pet Pro from Leaking?
Ensure all parts are properly assembled and secured. Check the tanks for any cracks or damage.
20. Conclusion
Effectively using a Bissell Pet Pro carpet cleaner can transform your home by removing tough pet stains and odors, deep cleaning your carpets, and improving indoor air quality. By understanding the features of your machine, following proper cleaning techniques, and maintaining it regularly, you can achieve the best results and prolong the life of your carpets. At PETS.EDU.VN, we’re dedicated to providing you with the knowledge and resources you need to create a clean and healthy environment for your family and pets.
Are you ready to take the next step in pet care and home cleanliness? Visit pets.edu.vn for more detailed guides, product reviews, and expert advice. Contact us at 789 Paw Lane, Petville, CA 91234, United States, or via WhatsApp at +1 555-987-6543. Let us help you create a cleaner, healthier, and happier home for you and your beloved pets.