Taking apart your Bissell pet carpet cleaner, specifically the ProHeat 2X Revolution Pet Pro, might seem daunting, but it’s a manageable task with the right guidance. At PETS.EDU.VN, we provide a comprehensive, easy-to-follow guide on how to disassemble your Bissell pet carpet cleaner, ensuring you can maintain and repair your device effectively. Understand the nuances of carpet cleaner maintenance, explore solutions to common issues, and discover how to keep your home spotless with our expert advice on carpet cleaning solutions and troubleshooting tips.
1. Understanding the Need to Disassemble Your Bissell Pet Carpet Cleaner
Why would you need to take apart your Bissell pet carpet cleaner? There are several reasons, including:
- Cleaning: Sometimes, a deep clean is necessary to remove stubborn dirt and debris that accumulate inside the machine.
- Maintenance: Regular maintenance can extend the life of your carpet cleaner. Disassembling allows you to inspect and clean individual components.
- Repair: If a part is broken or malfunctioning, disassembly is required to replace it.
- Shipping: When moving or shipping the cleaner, disassembling it can make it more compact and easier to handle.
Disassembling your Bissell ProHeat 2X Revolution Pet Pro can help you tackle these tasks effectively. Regular cleaning and maintenance can prevent issues and extend the life of your carpet cleaner. According to a study by the University of California, regular maintenance of household appliances can increase their lifespan by up to 30%.
2. Identifying Your Bissell Model: Why It Matters
Before you start, it’s crucial to identify your Bissell model number. The ProHeat 2X Revolution Pet Pro series includes models like 1964, 1986, 2007, 2283, 3586, 3587, 3589, and 3588. Knowing your specific model ensures you follow the correct disassembly steps, as minor variations may exist between models.
- Why model numbers matter: Different models may have slight variations in their construction.
- Where to find the model number: Typically located on a sticker on the back or bottom of the machine.
- Using the model number: Refer to the specific instructions for your model on PETS.EDU.VN to ensure accurate disassembly.
Identifying the correct model number is essential for accessing the most relevant and accurate information for your specific carpet cleaner. According to Bissell’s official website, using the correct model number ensures you get the right parts and instructions for your machine.
3. Essential Tools for Disassembly
Having the right tools on hand will make the disassembly process smoother and prevent damage to your carpet cleaner. Here’s what you’ll need:
- Phillips Head Screwdriver: For removing screws.
- Flat Head Screwdriver: For prying and unclipping parts.
- Optional Tools:
- Pliers: For gripping and pulling small parts.
- Soft Cloth: To protect surfaces from scratches.
- Small Containers: To keep screws and small parts organized.
Using the correct tools not only simplifies the process but also ensures you don’t damage any components. A survey by the American Home Appliance Manufacturers (AHAM) found that using the wrong tools is a common cause of appliance damage during DIY repairs.
4. Safety First: Preparing for Disassembly
Before you begin, ensure your safety by following these precautions:
- Unplug the Machine: Disconnect the carpet cleaner from the power outlet to prevent electrical shock.
- Empty the Tanks: Remove and empty both the clean water and dirty water tanks.
- Work in a Clean Area: Choose a well-lit, spacious workspace to avoid losing parts and ensure you have enough room to maneuver.
- Wear Gloves: Protect your hands from dirt and potential irritants.
Taking these safety measures will help prevent accidents and ensure a smooth disassembly process. According to the National Safety Council, following basic safety protocols can significantly reduce the risk of injury during home repairs.
5. Step-by-Step Guide: Disassembling Your Bissell ProHeat 2X Revolution Pet Pro
Here’s a detailed, step-by-step guide to disassembling your Bissell ProHeat 2X Revolution Pet Pro:
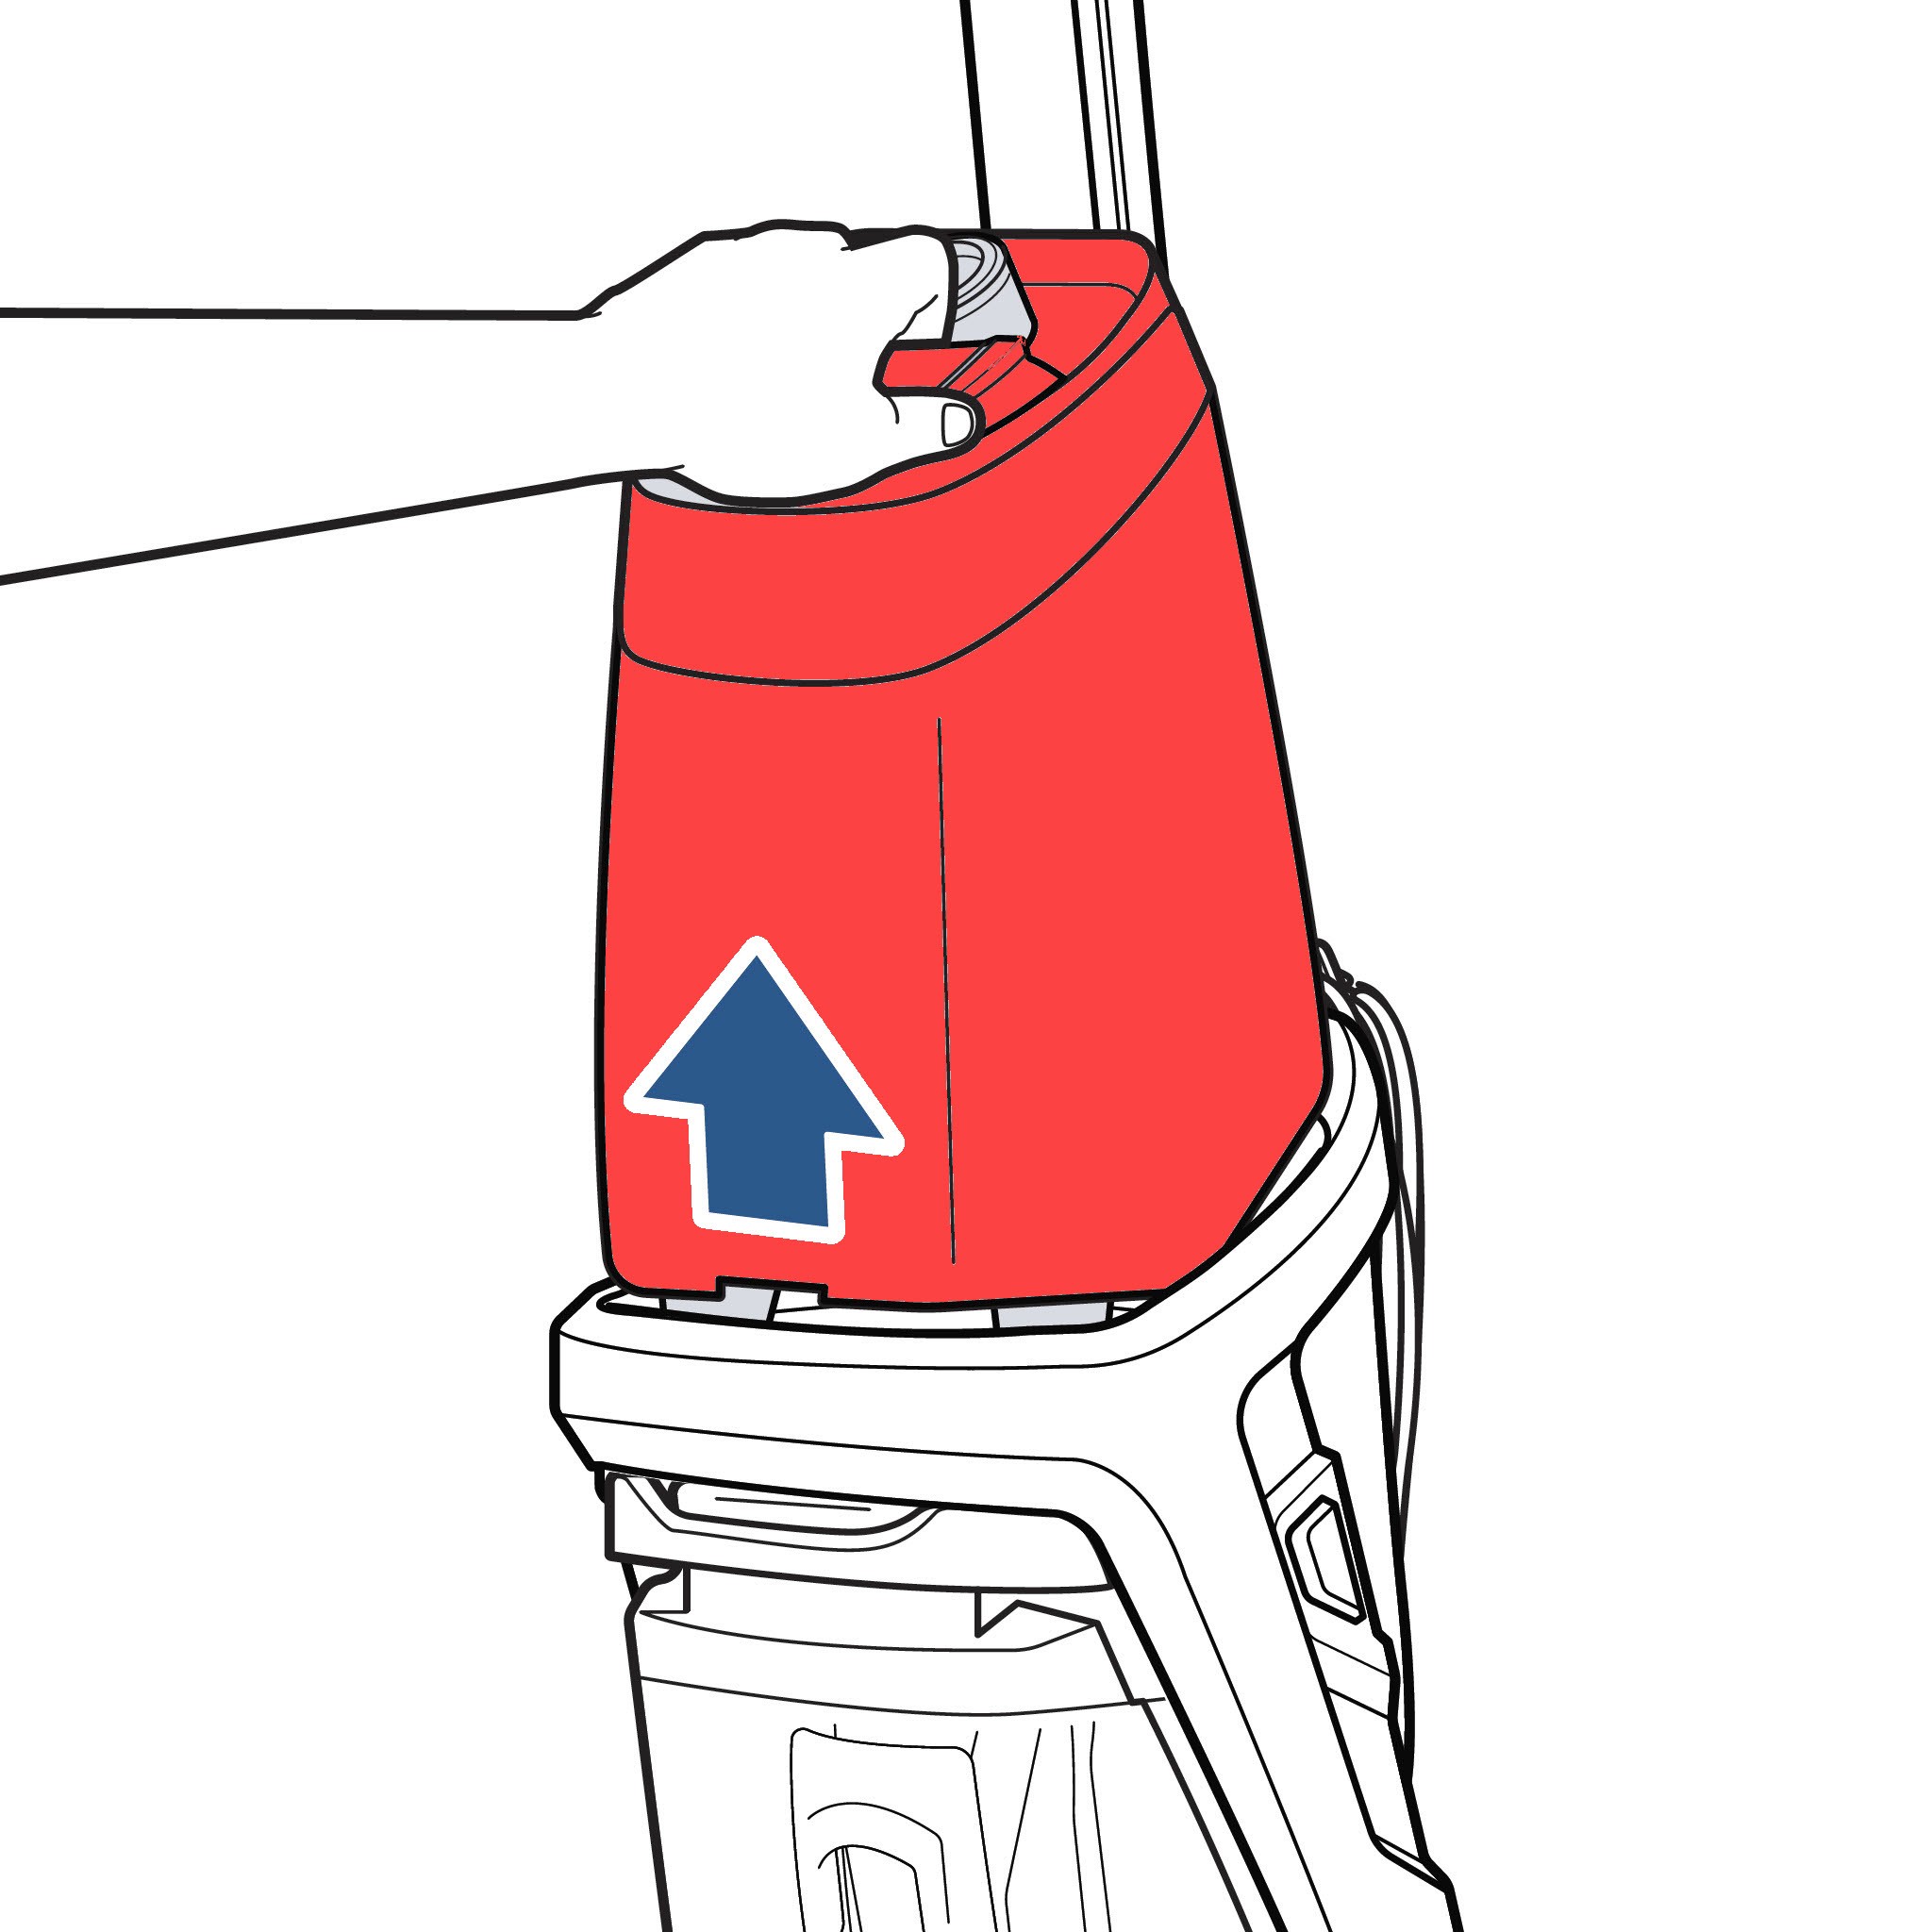
5.1. Removing the Tanks
- Clean Water Tank: Locate the clean water tank and lift it straight up to remove it.
- Dirty Water Tank: Release the dirty water tank by pressing the release button or lever, then lift it out.
5.2. Disassembling the Carry Handle
- Detach Power Cord: Remove the power cord from the carry handle.
- Remove Screw: Use a Phillips screwdriver to remove the screw from the carry handle.
- Pry Open: Insert a flat head screwdriver between the carry handle and the machine.
- Unclip Tabs: Gently pry to “pop” the carry handle tabs from the machine.
- Repeat: Repeat on the other side of the carry handle to fully remove it.
5.3. Removing the Main Handle
- Insert Screwdriver: Insert a flat head screwdriver into the handle removal latch.
- Pry and Pull: Pry back on the latch and pull on the handle simultaneously to remove it.
5.4. Emptying and Reinstalling Tanks
- Empty Clean Water Tank: Remove the cap and empty any remaining fluid.
- Empty Dirty Water Tank: Open the rubber tab and empty all fluid.
- Reinstall Tanks: Place the tanks back onto the machine.
These steps provide a basic disassembly, which is often sufficient for cleaning and basic maintenance. For more detailed disassembly, consult the service manual for your specific model on PETS.EDU.VN.
6. Advanced Disassembly: Accessing Internal Components
For more thorough cleaning or repairs, you may need to access internal components. Here’s how to proceed:
6.1. Removing the Nozzle
- Locate Screws: Find the screws holding the nozzle in place.
- Remove Screws: Use a Phillips screwdriver to remove the screws.
- Detach Nozzle: Gently detach the nozzle from the machine.
6.2. Accessing the Brush Roll
- Remove Nozzle (if not already done): Follow the steps above.
- Remove Brush Roll Cover: Locate and remove the cover, typically held by screws or clips.
- Remove Brush Roll: Lift out the brush roll for cleaning or replacement.
6.3. Disassembling the Motor Housing
- Remove External Parts: Ensure all external parts, such as handles and tanks, are removed.
- Locate Screws: Find the screws holding the motor housing together.
- Separate Housing: Carefully separate the housing to access the motor and other internal components.
Important Note: Disassembling the motor housing should only be done if you are comfortable with electrical components. Incorrect handling can cause damage or pose a safety risk.
7. Cleaning the Components
Once you’ve disassembled the carpet cleaner, cleaning the individual components is essential.
7.1. Washing the Tanks
- Rinse Thoroughly: Rinse both the clean water and dirty water tanks with warm water.
- Use Mild Soap: If necessary, use a mild soap to remove stubborn residue.
- Dry Completely: Ensure the tanks are completely dry before reassembling.
7.2. Cleaning the Nozzle and Brush Roll
- Remove Debris: Remove any hair, fibers, or debris from the nozzle and brush roll.
- Wash with Soap: Wash these parts with warm, soapy water.
- Inspect for Damage: Check for any signs of wear or damage and replace if necessary.
7.3. Cleaning the Filters
- Locate Filters: Find the filters, usually located near the tanks or motor.
- Rinse with Water: Rinse the filters with water to remove dirt and debris.
- Dry Completely: Allow the filters to air dry before reassembling.
According to a study by the University of Arizona, regular cleaning of household appliances can reduce allergen levels by up to 60%.
8. Reassembling Your Bissell Pet Carpet Cleaner
After cleaning or repairing the components, it’s time to reassemble your Bissell carpet cleaner.
8.1. Reattaching the Motor Housing
- Align Components: Carefully align the motor and other internal components.
- Secure Housing: Reattach the motor housing and secure it with screws.
- Ensure Proper Fit: Make sure all parts fit snugly and are properly connected.
8.2. Reinstalling the Brush Roll and Nozzle
- Place Brush Roll: Place the brush roll back into its housing.
- Secure Cover: Reattach the brush roll cover with screws or clips.
- Attach Nozzle: Reattach the nozzle and secure it with screws.
8.3. Reattaching the Handles and Tanks
- Reattach Main Handle: Slide the main handle back into place until it clicks.
- Reattach Carry Handle: Align the carry handle and snap it back into place, securing it with the screw.
- Reinstall Tanks: Place the clean water and dirty water tanks back onto the machine.
Reassembling your carpet cleaner carefully will ensure it functions correctly. Double-check all connections and screws to prevent leaks or malfunctions.
9. Troubleshooting Common Issues During Disassembly
Even with clear instructions, you might encounter some common issues during disassembly:
- Stripped Screws: Use a rubber band or steel wool between the screwdriver and screw to get a better grip.
- Stuck Parts: Apply gentle pressure and wiggle the part to loosen it. Avoid using excessive force.
- Lost Parts: Work in an organized area and use small containers to keep track of screws and small parts.
- Difficulty Reassembling: Refer to the disassembly steps in reverse order and ensure all parts are properly aligned.
If you encounter persistent issues, consult the service manual for your specific model on PETS.EDU.VN.
10. Maintenance Tips to Prevent Future Disassembly
Regular maintenance can minimize the need for frequent disassembly. Here are some tips:
- Rinse After Each Use: Rinse the tanks and nozzle after each use to prevent buildup.
- Clean Brush Roll Regularly: Remove hair and debris from the brush roll to maintain its effectiveness.
- Use Recommended Cleaning Solutions: Using the recommended cleaning solutions can prevent damage to internal components.
- Store Properly: Store the carpet cleaner in a clean, dry place to prevent mold and mildew growth.
According to Consumer Reports, regular maintenance can significantly extend the life of your carpet cleaner and maintain its performance.
11. Advanced Cleaning Solutions for Pet Owners
As pet owners, dealing with stains and odors is a common challenge. Here are some advanced cleaning solutions to consider:
11.1. Enzymatic Cleaners
Enzymatic cleaners contain enzymes that break down organic matter, such as pet urine and feces.
- How They Work: Enzymes digest the proteins and bacteria that cause odors and stains.
- Benefits: Effective for removing tough stains and odors, safe for use on most carpets.
11.2. Oxygen-Based Cleaners
Oxygen-based cleaners use the power of oxygen to lift stains and brighten carpets.
- How They Work: Oxygen molecules react with stains, breaking them down and lifting them from the carpet fibers.
- Benefits: Effective for removing coffee, wine, and other common stains, safe for use on colorfast carpets.
11.3. DIY Cleaning Solutions
You can also create your own cleaning solutions using common household ingredients:
- Vinegar and Baking Soda: Mix vinegar and baking soda to create a powerful stain remover.
- Hydrogen Peroxide: Use hydrogen peroxide to bleach stains and brighten carpets.
- Dish Soap and Water: Mix dish soap with water for a gentle cleaning solution.
Caution: Always test DIY solutions in an inconspicuous area before applying them to the entire carpet.
12. Professional Carpet Cleaning Services
Sometimes, despite your best efforts, professional carpet cleaning services are necessary.
12.1. When to Hire a Professional
- Severe Stains and Odors: If you’re unable to remove stains and odors with DIY or store-bought solutions.
- Large Areas: For cleaning large areas or entire homes.
- Specialty Carpets: For delicate or specialty carpets that require professional care.
12.2. Choosing a Professional Service
- Research: Look for reputable companies with positive reviews.
- Ask for Referrals: Ask friends, family, or neighbors for recommendations.
- Check for Certifications: Ensure the company is certified by industry organizations.
12.3. Preparing for a Professional Cleaning
- Remove Furniture: Clear the area of furniture and other items.
- Vacuum: Vacuum the carpet thoroughly before the professionals arrive.
- Communicate: Discuss any specific concerns or problem areas with the cleaning team.
13. Understanding Bissell Carpet Cleaner Technology
Bissell carpet cleaners incorporate several technologies to enhance cleaning performance. Understanding these features can help you maintain and troubleshoot your machine more effectively.
13.1. HeatWave Technology
- How It Works: Maintains a consistent water temperature throughout the cleaning process.
- Benefits: Enhances cleaning effectiveness by keeping the water hot.
13.2. Dual DirtLifter PowerBrushes
- How They Work: Two brush rolls rotate in opposite directions to lift and remove dirt.
- Benefits: Provides thorough and deep cleaning.
13.3. EdgeSweep Brushes
- How They Work: Brushes extend to the edges of the cleaning path to clean along baseboards and furniture.
- Benefits: Ensures edge-to-edge cleaning.
13.4. Express Clean Mode
- How It Works: Dries carpets in approximately 30 minutes.
- Benefits: Reduces drying time and minimizes disruption.
14. Bissell Pet Carpet Cleaner Accessories
Bissell offers a range of accessories to enhance the versatility of your carpet cleaner.
14.1. Stain Tool
- Purpose: For spot cleaning stains and spills.
- How to Use: Attach the tool to the hose and use it to spray and scrub stains.
14.2. Upholstery Tool
- Purpose: For cleaning upholstery and furniture.
- How to Use: Attach the tool to the hose and use it to clean sofas, chairs, and other upholstered items.
14.3. Bare Floor Cleaning Tool
- Purpose: For cleaning hard floors, such as tile and wood.
- How to Use: Attach the tool to the machine and use it to mop and clean hard floors.
14.4. Hose and Extension Wand
- Purpose: For reaching difficult areas, such as stairs and under furniture.
- How to Use: Attach the hose and wand to the machine and use them to clean hard-to-reach areas.
15. Safety Tips for Using Carpet Cleaning Solutions Around Pets
When using carpet cleaning solutions around pets, it’s essential to prioritize their safety.
15.1. Choose Pet-Friendly Solutions
- Read Labels: Look for cleaning solutions that are specifically labeled as pet-friendly.
- Avoid Harsh Chemicals: Avoid solutions containing harsh chemicals, such as bleach and ammonia.
- Consider Natural Alternatives: Consider using natural cleaning solutions, such as vinegar and baking soda.
15.2. Keep Pets Away During Cleaning
- Isolate Pets: Keep pets in a separate room while cleaning.
- Ventilate the Area: Open windows and doors to ventilate the area.
- Allow Time to Dry: Allow the carpet to dry completely before allowing pets back into the area.
15.3. Rinse Thoroughly
- Rinse with Water: Rinse the carpet thoroughly with water after cleaning to remove any residue.
- Use a Wet/Dry Vacuum: Use a wet/dry vacuum to remove excess water.
15.4. Monitor Your Pets
- Watch for Symptoms: Monitor your pets for any signs of illness or discomfort after cleaning.
- Contact a Veterinarian: Contact a veterinarian immediately if you suspect your pet has ingested cleaning solution.
16. Storing Your Bissell Pet Carpet Cleaner Properly
Proper storage can prolong the life of your Bissell pet carpet cleaner and prevent damage.
16.1. Empty Tanks
- Empty Clean Water Tank: Empty any remaining water from the clean water tank.
- Empty Dirty Water Tank: Empty the dirty water tank and rinse it thoroughly.
16.2. Clean Components
- Rinse Nozzle and Brush Roll: Rinse the nozzle and brush roll to remove any debris.
- Dry Components: Allow all components to dry completely before storing.
16.3. Store in a Dry Place
- Avoid Damp Areas: Store the carpet cleaner in a dry place to prevent mold and mildew growth.
- Protect from Extreme Temperatures: Protect the carpet cleaner from extreme temperatures, such as freezing or direct sunlight.
16.4. Wrap the Cord
- Wrap Securely: Wrap the power cord securely around the cord storage hooks.
- Prevent Damage: Avoid bending or twisting the cord, which can cause damage.
17. Understanding the Electrical Components of Your Bissell Carpet Cleaner
For advanced troubleshooting, understanding the electrical components of your Bissell carpet cleaner can be helpful.
17.1. Motor
- Function: Powers the brush roll and suction.
- Troubleshooting: If the motor is not working, check the power cord, switch, and motor brushes.
17.2. Switch
- Function: Turns the carpet cleaner on and off.
- Troubleshooting: If the carpet cleaner is not turning on, check the switch for damage or loose connections.
17.3. Power Cord
- Function: Supplies power to the carpet cleaner.
- Troubleshooting: If the carpet cleaner is not working, check the power cord for damage or loose connections.
17.4. Thermal Protector
- Function: Protects the motor from overheating.
- Troubleshooting: If the carpet cleaner shuts off suddenly, the thermal protector may have tripped. Allow the motor to cool down before restarting.
Caution: Working with electrical components can be dangerous. If you are not comfortable, consult a qualified technician.
18. Environmentally Friendly Carpet Cleaning Practices
Consider adopting environmentally friendly practices when cleaning your carpets.
18.1. Use Eco-Friendly Cleaning Solutions
- Look for Certifications: Look for cleaning solutions that are certified by environmental organizations.
- Avoid Harsh Chemicals: Avoid solutions containing harsh chemicals, such as phosphates and chlorine.
18.2. Conserve Water
- Use Minimal Water: Use the minimal amount of water necessary to clean your carpets.
- Consider Dry Cleaning: Consider dry carpet cleaning methods, which use little to no water.
18.3. Dispose of Waste Properly
- Recycle: Recycle empty cleaning solution bottles and other recyclable materials.
- Dispose of Hazardous Waste: Dispose of hazardous waste, such as used cleaning solutions, properly.
18.4. Reduce Chemical Use
- Spot Clean: Spot clean stains and spills instead of cleaning the entire carpet.
- Vacuum Regularly: Vacuum regularly to prevent dirt and debris from building up.
19. Safety Precautions When Handling Carpet Cleaners
Handling carpet cleaners requires certain safety precautions to prevent accidents and injuries.
19.1. Read the Manual
- Understand Instructions: Read the owner’s manual carefully before using the carpet cleaner.
- Follow Guidelines: Follow all safety guidelines and instructions provided by the manufacturer.
19.2. Use Proper Lifting Techniques
- Bend Your Knees: Bend your knees and keep your back straight when lifting the carpet cleaner.
- Avoid Twisting: Avoid twisting your body while lifting.
- Get Help: Get help if the carpet cleaner is too heavy to lift safely.
19.3. Prevent Tripping Hazards
- Keep Cords Out of the Way: Keep the power cord out of walkways and high-traffic areas.
- Use Cord Management: Use cord management devices to keep the cord organized and prevent tripping.
19.4. Avoid Electrical Hazards
- Use a Grounded Outlet: Plug the carpet cleaner into a grounded outlet.
- Avoid Wet Hands: Avoid touching the carpet cleaner with wet hands.
- Inspect the Cord: Inspect the power cord regularly for damage.
20. Bissell Pet Carpet Cleaner FAQs
Here are some frequently asked questions about Bissell pet carpet cleaners:
20.1. How often should I clean my carpets with a Bissell pet carpet cleaner?
It depends on your lifestyle and the amount of traffic your carpets receive. Generally, cleaning your carpets every 3-6 months is recommended.
20.2. Can I use any cleaning solution in my Bissell pet carpet cleaner?
No, only use cleaning solutions that are specifically designed for use in Bissell carpet cleaners. Using other solutions can damage the machine.
20.3. How do I prevent my Bissell pet carpet cleaner from leaving streaks?
Make sure to use the correct amount of cleaning solution and overlap your cleaning strokes. Also, ensure the brush roll is clean and in good condition.
20.4. Why is my Bissell pet carpet cleaner not picking up water?
Check the suction hose for clogs and ensure the dirty water tank is properly seated. Also, check the brush roll and nozzle for obstructions.
20.5. How do I clean the brush roll on my Bissell pet carpet cleaner?
Remove the brush roll from the machine and use scissors or a seam ripper to remove hair and debris. Wash the brush roll with warm, soapy water and allow it to dry completely before reinstalling.
20.6. Can I use my Bissell pet carpet cleaner on hardwood floors?
Yes, but you will need to use the appropriate attachment and cleaning solution. Bissell offers a bare floor cleaning tool that is designed for use on hardwood floors.
20.7. How do I store my Bissell pet carpet cleaner?
Empty the tanks, clean the components, and store the carpet cleaner in a dry place. Wrap the power cord securely around the cord storage hooks.
20.8. What do I do if my Bissell pet carpet cleaner starts making a loud noise?
Check the brush roll and nozzle for obstructions. Also, check the motor for damage or loose connections. If the noise persists, consult a qualified technician.
20.9. How do I unclog my Bissell pet carpet cleaner?
Check the suction hose, nozzle, and brush roll for clogs. Use a long, flexible object, such as a coat hanger or plumbing snake, to remove the clog.
20.10. Where can I find replacement parts for my Bissell pet carpet cleaner?
You can find replacement parts on the Bissell website or from authorized Bissell retailers. Be sure to have your model number handy when ordering parts.
By following this guide, you can confidently disassemble, clean, and maintain your Bissell ProHeat 2X Revolution Pet Pro carpet cleaner. Regular maintenance will prolong the life of your machine and keep your carpets clean and fresh.
Conclusion: Keeping Your Carpets Clean with PETS.EDU.VN
Taking apart your Bissell pet carpet cleaner may seem challenging, but with the right tools and guidance, it’s a manageable task. PETS.EDU.VN is dedicated to providing you with the information and resources you need to care for your home and pets. From understanding the intricacies of carpet cleaner maintenance to exploring solutions for common issues, we’re here to help.
Ready to dive deeper into the world of pet care and home maintenance? Visit PETS.EDU.VN today for more expert advice, step-by-step guides, and product recommendations. Contact us at 789 Paw Lane, Petville, CA 91234, United States, or reach out via WhatsApp at +1 555-987-6543. Let PETS.EDU.VN be your trusted partner in creating a clean and happy home for you and your furry friends. Explore additional resources on carpet cleaning, pet care, and home maintenance to ensure your living space is always at its best. Visit our website pets.edu.vn and discover the difference today!