Installing a pet fence is a fantastic way to provide your furry friend with a safe and secure outdoor space. PETS.EDU.VN offers expert guidance and resources to help you navigate the process with ease, ensuring your pet stays protected while enjoying the freedom to roam. Whether you’re considering an in-ground, wireless, or electric dog fence, this comprehensive guide will walk you through each step, from planning and preparation to installation and training. With practical tips and expert advice, you’ll be well-equipped to create a secure environment for your beloved pet.
1. Understanding Pet Fence Options
What are the different types of pet fences available?
Choosing the right type of pet fence is crucial for ensuring your pet’s safety and containment. There are several options available, each with its own set of benefits and drawbacks. Understanding these differences will help you make an informed decision that best suits your needs and your pet’s specific requirements.
- In-Ground Pet Fences: In-ground fences, also known as electric or wired fences, involve burying a wire around the perimeter of your property. A transmitter emits a radio signal through the wire, and your pet wears a collar that detects this signal. When your pet approaches the boundary, the collar emits a warning tone, followed by a static correction if they proceed further. In-ground fences are highly customizable and can be adapted to various yard sizes and shapes. They’re also a cost-effective option for large properties.
- Wireless Pet Fences: Wireless fences use a transmitter to create a circular boundary around your yard. The transmitter emits a radio signal, and your pet wears a collar that detects this signal. When your pet approaches the boundary, the collar emits a warning tone, followed by a static correction if they proceed further. Wireless fences are easy to install and portable, making them a good choice for temporary containment or for pet owners who move frequently. However, their circular shape may not be ideal for all yards, and they can be susceptible to interference from other electronic devices.
- Physical Pet Fences: Physical fences, such as chain-link, wood, or vinyl fences, provide a physical barrier to keep your pet contained. These fences are highly effective and offer a visual deterrent to keep other animals out of your yard. Physical fences require more effort to install than in-ground or wireless fences, but they offer a reliable and long-lasting containment solution.
- GPS Pet Fences: GPS pet fences use satellite technology to create a virtual boundary for your pet. You can set the boundary using a smartphone app, and your pet wears a collar that tracks their location via GPS. If your pet crosses the boundary, you’ll receive an alert on your phone, and the collar may emit a warning tone or vibration. GPS fences are ideal for large properties or for pet owners who want to track their pet’s location in real-time. However, they can be more expensive than other types of pet fences, and their accuracy may be affected by factors such as tree cover or building interference.
Choosing the right type of pet fence depends on your specific needs, your pet’s temperament, and the layout of your property. PETS.EDU.VN offers detailed information and expert advice to help you make the best choice for your furry friend.
2. Planning Your Pet Fence Installation
How do I plan the layout of my pet fence?
Careful planning is essential for a successful pet fence installation. Before you start digging or setting up any equipment, take the time to assess your property, identify any potential obstacles, and determine the best layout for your fence. This will help you avoid costly mistakes and ensure that your pet fence provides a safe and effective containment solution.
- Assess Your Property: Start by walking around your property and noting any potential obstacles, such as trees, shrubs, rocks, or underground utilities. These obstacles may affect the placement of your fence and require you to make adjustments to your layout.
- Determine Your Pet’s Needs: Consider your pet’s size, breed, temperament, and activity level. Some pets may require a larger containment area than others, while others may be more prone to testing the boundaries of the fence. Understanding your pet’s needs will help you determine the appropriate size and type of fence for your property.
- Identify Underground Utilities: Before you start digging, it’s crucial to identify any underground utilities on your property. Contact your local utility companies or call 811 to have them mark the location of underground lines. This will help you avoid damaging any utilities during the installation process.
- Consider Local Regulations: Check with your local authorities to determine if there are any regulations or restrictions regarding pet fences in your area. Some municipalities may have specific requirements for fence height, placement, or permits.
- Choose a Layout: Based on your property assessment and your pet’s needs, choose a layout for your fence. Common layouts include a perimeter fence around the entire property, a fence around the backyard only, or a fence to create specific “no-go” zones within your yard.
3. Marking Utilities and Obstacles
Why is it important to mark utilities and obstacles before installing a pet fence?
Marking utilities and obstacles is a critical step in the pet fence installation process. Failure to do so can result in serious injury, property damage, and costly repairs. By taking the time to identify and mark any underground utilities or potential hazards, you can ensure a safe and successful installation.
- Call 811: Before you start digging, call 811 to have your underground utility lines marked. This free service will send a professional to your property to locate and mark any underground lines with spray paint or flags. Allow several days for the utilities to be marked, as it may take up to a week for them to come out.
- Identify Private Utilities: In addition to public utilities, you may also have privately-installed utilities on your property, such as gas cylinders or a septic system. These utilities will not be marked by 811, so you’ll need to identify them yourself. If you’re unsure of the location of any private utilities, consult your property records or contact a professional for assistance.
- Mark Low-Voltage Lines and Sprinkler Systems: Also mark the location of any low-voltage power outdoor lighting lines or sprinkler systems. If you don’t know where these lines are located, make an educated guess. You don’t want to damage a sprinkler line or low voltage power line. You may decide if you wish to shut off the water and the power before you begin digging, if you aren’t certain where these lines are located.
- Separate Parallel Wires: If your dog fence wire is running parallel to any underground lines, make sure to separate your dog fence wire from them by about 4 feet. However, crossing underground lines perpendicular is no problem.
- Document the Locations: Once you’ve identified and marked all utilities and obstacles, create a map or diagram of your property showing their locations. This will serve as a reference guide during the installation process and help you avoid any potential hazards.
4. Understanding the Principles of Design
What design principles should I consider when planning my pet fence?
Understanding the principles of design is essential for creating an effective and reliable pet fence. By following these guidelines, you can minimize the risk of signal interference, prevent false activations, and ensure that your pet stays safely contained within the boundaries of the fence.
- Cross Utility Lines at Right Angles: You need to make certain that you don’t run wire close to a utility line for an extended stretch. This is because in some instances, a boundary wire running close to a utility wire can cause your dog fence collar to activate where it shouldn’t.
- Round Your Corners: The corner of your dog fence wire should be gradually rounded, avoiding any sharp 90 degree turns. Otherwise, the signal in that area could cancel out.
- Establish Separation Between Parallel Dog Fence Wires: Each length of boundary wire emits a signal. If they are running too close together, they will cancel each other out. For this reason, any boundary wires running parallel to each other need to be separated by at least 4 feet. In addition to this, if your neighbors have an electric dog fence, you need to keep your wires separated from theirs by about 6-10 feet.
- Avoid Metal Objects: Metal objects, such as fences, sheds, or metal siding, can interfere with the signal of your pet fence. Keep your fence wire at least 3-5 feet away from any metal objects to prevent signal distortion.
5. Diagramming Your Yard
How do I create a diagram of my yard for pet fence installation?
Creating a diagram of your yard is a helpful way to visualize your pet fence layout and identify any potential challenges before you start the installation process. A detailed diagram will help you determine the best placement for your fence wire, avoid obstacles, and ensure that your pet has access to the areas you want them to enjoy.
- Sketch Your Property: On a piece of graph paper, draw a rough sketch of your property. It should show any buildings, sidewalks, driveway, gardens, and underground utilities. This is so you can figure out where you would like your dog to have access to, and which parts you want him to not have access to.
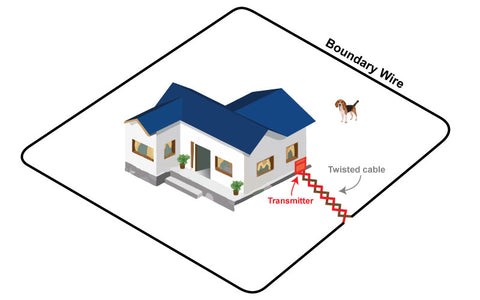
- Mark the Transmitter Location: Make a decision of where you are going to mount your transmitter box. Ideally, it should be located near a power outlet and must be protected from the elements. The garage is a great place, or perhaps an outside shed that has power going to it.
- Plan the Wire Layout: Next, determine where you will lay out your dog fence wire, using the diagrams below. Your dog fence needs to make a complete loop that starts and ends in the same location. You can use twisted wire to connect your two ends of boundary wire with your transmitter. When twisted wire is used in this way, it allows your dog to cross over it without receiving a correction.
6. Exploring Sample Layouts
What are some common pet fence layouts?
There are several common pet fence layouts, each designed to address different needs and property configurations. Exploring these layouts can help you choose the best option for your yard and ensure that your pet has a safe and enjoyable outdoor space.
6.1. Whole Yard Perimeter
What is a whole yard perimeter layout?
The most widely used layout for a dog fence makes a single loop around your property. Your dog has access to the entire property, and the twisted wire connects to the main control box. Your dog can travel all the way around your home with no escape points.
6.2. Backyard Only: The Double Loop
What is the double loop layout for a backyard only fence?
The challenge of enclosing your backyard only is that if you were to create a solid loop with your boundary wire around your backyard, your dog wouldn’t be able to get out the back door without being corrected. Logically, this is not what you want. What to do? The answer is a double loop. Here is how it works. You go around 3 sides of your yard, then double back on the first wire you put down, laying the wires parallel to each other. You just have to be sure to separate the parallel wires by at least 4 feet. If you don’t, you won’t get a nice strong signal along the boundary. In addition to this, you may have dead spots where there is no correction at all. Do you already have a fence in place? In this situation, you can simply begin by running your dog fence wire along the bottom of the fence, and then come back to the transmitter by running the wire along the top of the fence.
6.3. Double Loop on an Existing Fence
How can I use a double loop on an existing fence?
Perhaps you already have an existing fence and you just need to stop your dogs from jumping over it or trying to dig underneath it. Does your existing fence go around your backyard only? If so, the right layout for you is a double loop on an existing fence. Here is how it works. Starting at your transmitter, you run your first wire on the bottom of the fence. Then, you come back to your transmitter, running your wire along the top of your fence, which essentially separates your wires by 4 feet, coming back to your transmitter.
6.4. Over The House Method
What is the over the house method for containing a backyard?
Another thing you can do if you need to contain your backyard only is to run the dog fence wire up high over the back of your house. Begin by running the wire up a downspout on one side of the house, across the gutter, and down the downspout on either side of your house. This vertical height over the ground allows enough space for your dog to get in and out of the back door without being corrected. As always, you need to check your collar to make sure that it isn’t being triggered when your dog comes in and out. Also test rooms near the line of the gutter to make certain there is no signal spilling over into those rooms. If there is, turn down the setting of the boundary width on your transmitter until it doesn’t happen anymore.
6.5. Backyard Only: The Pinch Method
How does the pinch method work for a backyard only layout?
Again, the challenge of a backyard only layout is that you need the house side of the boundary to be inactive, so that your dog can enter and exit your home freely. In order for the fence to work, you must have a full loop of single (NOT TWISTED) wire. The pinch method is another approach you can take.
The way to make a complete loop, while only giving your dog access to the backyard is to make a loop that goes tight around the front of the house as well. This allows you to complete the loop. However, since it is running tight around the front of the house, it doesn’t allow space for your dog to roam in the front yard.
However, when you do this kind of layout, it is important to do a quick check with the collar inside of the house to make sure that the signal isn’t inadvertently spilling into the house in rooms where the dog will be living. Should there be a problem, just decrease the boundary width, or you can just move the wire a little further away from your house.
6.6. The Hourglass Layout
When is the hourglass layout a good choice?
In some cases, dog owners want their dog to be contained in their front and back yards but don’t want their dog to be able to cross freely in between the two. Notice that the 2 loops are connected to each other on the left hand side of this diagram and that they both meet up at the transmitter on the right hand side. As a side note, where the wires are close to each other, creating the center of the hourglass, you need to make sure that they are at least 10 feet apart so that there won’t be interference with the signal.
6.7. Avoidance Areas Within the Perimeter
How can I create “no-go” zones within my pet fence?
Giving your dog access to your property but not your garden or other areas is easy with an internal lake loop. Lake loops within the perimeter create “no go” zones by connecting to the main perimeter via twisted wire that your dog can freely cross without a correction. You can also use an extra dog fence transmitter of the same brand as your main loop transmitter to create a smaller distance based signal field than the one you have set for the containment barrier. Avoidance areas can be set to a much lower field range than your actual containment field. For example: Supposing you have a 100-pound Great Dane and you have a six-foot field set up to contain him, it might take six feet to keep him in the yard, but it would only take about a 6-inch field to make him avoid flower beds or off-limit areas. You could set two customized transmitters up sending out different ranges. The containment field would be six feet and the avoidance field would be connected to a different boundary wire system but only have a field range of 6 inches or so.
6.8. Gate or Escape Point Installations
How can I use a pet fence to prevent escapes from a gate?
In certain instances, the main purpose of the installation is to keep your beloved pet from escaping from a fence gate or opening. You can certainly make this happen with an electric dog fencing system. All of the fundamental rules of installation apply to installing a small section of protection as they would for a whole yard installation. This includes completing a loop, twisted wire and installing a main control panel next to an outlet. The illustrations below demonstrate how protection can be provided for almost any escape point on your property.
With this layout, you can simply run a piece of twisted wire from your main dog fence transmitter to the gate opening or escape point. Simply run a small loop around this area separating the wires by at least 2-4 feet. This area will now be active and prevent your dog from escaping through this area.
6.9. One-Sided Boundary
When is a one-sided boundary layout appropriate?
Perhaps you live in a rural setting, and all you need to do is protect your dog from going out into the road. In this case, the one-sided boundary layout is what you need. You simply run a long length of twisted wire from the transmitter, out to the road. Next, you create a long skinny loop, remembering to keep the parallel sections at least 4 feet apart so that the wires won’t interfere with each other. It is important to run your loop far enough along the road so that your dog won’t run around it. The only stipulation to this layout is that the twisted wire can only be half the length of the looped boundary wire. For example, if you have a loop that is 100 feet in a circle, you can only run 50 feet of wire back to the transmitter.
6.10. Avoidance Areas as the Main Function
How can I use a pet fence to create multiple “no-go” zones?
You can use your electric dog fence not only to keep your dog in but also to keep your dog out of sensitive areas of your property. Multiple loops connected by twisted wire can allow you to create multiple ‘no-go’ zones on your property. An unlimited amount of off limits areas can be created with this application. This type of install is ideal for somebody who already has a fenced in backyard and wants to keep the dog away from certain areas.
6.11. Two-Sided Layout
What is a two-sided layout and when should I use it?
This layout involves creating 2 separate double loops and connecting them with twisted wire. This allows your dog access in and out of the back of your house, plus it allows access to the back of your property. Should you have enough yard space, you can use a double loop approach to create a boundary that is three-sided. Just don’t forget to have the ends of it into the lake when doubling back so that your dog won’t be able to run around the side of the fence.
6.12. Waterfront Limited Water Access
How can I safely give my dog access to a waterfront with a pet fence?
If you have a lakefront property, or if you would like to give your dog access to the lake, you have several different options. Please note that there is no danger of your dog getting electrocuted while swimming. Your dog’s level of correction won’t change or pose any sort of safety threat. When you incorporate the lake, you need to know if your lakefront drops off, or gradually gets deeper. It depends on what you are trying to accomplish as to how you will lay the wire to incorporate the lake. When you are sinking the wire, it is recommended to run it into a water hose and sink it to the bottom of the lake. This will further protect the wire from fishing hooks and critters. Simply submerge your extra boundary wire into your lake at the distance out that you desire. Perhaps you just want your dog to just be able to walk into the lake a few feet for a drink, or to lay down and cool off in the water. Or, perhaps you prefer sinking the wire down 10 feet so that your dog can go for a deeper swim? Depending on your goal, you can decide how much wire you need to sink.
6.13. Waterfront Dock/Boathouse Option
How does the waterfront dock/boathouse option work?
This layout is a modification of the first, just incorporating a dock and a boathouse. In this situation, the lake isn’t incorporated in the planning of the fence.
6.14. Double Loop with Water Access
How can I use a double loop layout with water access?
If you have enough space in your yard, you can use a double back around to create a three-sided fence boundary. Set an extra length into the lake when doubling back so that your dog will not be able to easily run around the electric dog fence.
7. Step-by-Step Installation Guide
What are the steps involved in installing a pet fence?
Once you’ve planned your layout and gathered your materials, it’s time to install your pet fence. The installation process will vary depending on the type of fence you’ve chosen, but the following steps provide a general overview of the process:
- Install the Transmitter: Mount the transmitter in a dry, protected location, such as a garage or shed. Connect the transmitter to a power outlet and attach the boundary wire to the transmitter terminals.
- Lay the Boundary Wire: Dig a shallow trench along the planned route of your fence wire. Bury the wire in the trench, being careful to avoid any underground utilities or obstacles. Use a wire stapler or cable ties to secure the wire to existing fences or structures.
- Connect the Ground Wire: Attach the ground wire to a metal grounding rod and drive the rod into the ground near the transmitter. Connect the other end of the ground wire to the transmitter.
- Test the Fence: Turn on the transmitter and use a test light or voltmeter to check the signal strength along the boundary wire. Adjust the transmitter settings as needed to achieve the desired signal range.
- Install the Receiver Collar: Attach the receiver collar to your pet and adjust the fit so that it’s snug but not too tight. Test the collar by walking your pet near the boundary wire. The collar should emit a warning tone as your pet approaches the boundary and a static correction if they proceed further.
- Train Your Pet: Training is essential for ensuring that your pet understands the boundaries of the fence and avoids receiving corrections. Start by walking your pet along the boundary line on a leash, allowing them to hear the warning tone and experience the static correction. Gradually increase the amount of freedom your pet has within the fenced area, always supervising them closely.
8. Training Your Pet to Use the Fence
How do I train my pet to respect the boundaries of the fence?
Training is a crucial part of the pet fence installation process. Without proper training, your pet may not understand the boundaries of the fence and may be more likely to challenge it. A well-trained pet will respect the fence and stay safely contained within the designated area.
- Introduce the Collar: Start by introducing your pet to the receiver collar. Let them wear the collar for short periods of time, gradually increasing the duration as they become more comfortable with it.
- Walk the Boundary: With your pet on a leash, walk them along the boundary line. Allow them to hear the warning tone and experience the static correction if they approach the boundary. Use positive reinforcement, such as treats and praise, when your pet stays within the designated area.
- Use Boundary Flags: Place boundary flags along the fence line to provide a visual cue for your pet. Walk your pet along the boundary, using the flags as a guide. Reinforce the boundaries with treats and praise.
- Supervise and Correct: As your pet becomes more familiar with the fence, gradually increase the amount of freedom they have within the fenced area. Supervise them closely and correct them if they approach the boundary. Use a firm voice and a leash correction to reinforce the boundaries.
- Consistency is Key: Be consistent with your training and reinforcement. Always use the same commands and cues, and always reward your pet for good behavior. With patience and consistency, your pet will learn to respect the boundaries of the fence and stay safely contained within the designated area.
9. Troubleshooting Common Issues
What are some common issues that can arise with pet fences, and how can I fix them?
Even with careful planning and installation, pet fences can sometimes experience problems. Knowing how to troubleshoot common issues can help you keep your fence working properly and ensure that your pet stays safely contained.
- Weak Signal: A weak signal can be caused by a variety of factors, such as a broken wire, a loose connection, or interference from metal objects. Check the boundary wire for any breaks or damage and repair as needed. Make sure all connections are secure and that the wire is not running too close to any metal objects.
- False Activations: False activations occur when the receiver collar emits a correction even though your pet is not near the boundary wire. This can be caused by a faulty collar, interference from other electronic devices, or a weak battery. Try replacing the battery in the collar or moving the transmitter to a different location.
- Pet Challenges the Fence: Some pets may be more prone to challenging the boundaries of the fence, especially if they are highly motivated to escape. Make sure the fence is properly installed and that the signal strength is strong enough to deter your pet. Reinforce the boundaries with training and supervision.
- Collar Doesn’t Work: If the receiver collar is not working, check the battery and replace it if necessary. Make sure the collar is properly fitted and that the contact points are touching your pet’s skin. If the collar still doesn’t work, contact the manufacturer for assistance.
10. Maintaining Your Pet Fence
How do I maintain my pet fence to keep it working properly?
Regular maintenance is essential for keeping your pet fence working properly and ensuring that your pet stays safely contained. By following these simple tips, you can extend the life of your fence and minimize the risk of problems.
- Check the Boundary Wire: Inspect the boundary wire regularly for any breaks or damage. Repair any damaged sections of wire as soon as possible.
- Replace Batteries: Replace the batteries in the receiver collar regularly, following the manufacturer’s recommendations.
- Trim Vegetation: Keep vegetation trimmed around the boundary wire to prevent it from interfering with the signal.
- Test the Fence: Test the fence regularly to ensure that it’s working properly. Use a test light or voltmeter to check the signal strength along the boundary wire.
- Store the Transmitter: During periods of inactivity, such as during the winter months, store the transmitter in a dry, protected location.
Installing a pet fence is a worthwhile investment that can provide your furry friend with a safe and enjoyable outdoor space. By following the steps outlined in this guide, you can ensure a successful installation and create a secure environment for your beloved pet.
FAQ: Installing a Pet Fence
1. What is a pet fence, and how does it work?
A pet fence is a system designed to keep pets safely contained within a designated area. It typically involves a boundary wire that emits a radio signal and a receiver collar worn by the pet. When the pet approaches the boundary, the collar emits a warning tone, followed by a static correction if they proceed further.
2. What are the benefits of installing a pet fence?
A pet fence offers several benefits, including:
- Safety: Keeps pets safely contained and prevents them from running away or getting lost.
- Freedom: Allows pets to enjoy the outdoors without the risk of escape.
- Convenience: Eliminates the need for constant supervision.
- Protection: Protects pets from dangers such as traffic, predators, and other animals.
- Property Value: Can increase property value by adding a desirable feature for pet owners.
3. What types of pets can be contained with a pet fence?
Pet fences can be used to contain a variety of pets, including dogs, cats, and even rabbits. However, it’s important to choose a fence system that is appropriate for the size, breed, and temperament of your pet.
4. How much does it cost to install a pet fence?
The cost of installing a pet fence can vary depending on the type of fence, the size of your property, and whether you choose to install it yourself or hire a professional. In-ground fences typically cost between $300 and $1,500, while wireless fences range from $200 to $800.
5. Can I install a pet fence myself, or should I hire a professional?
Whether you can install a pet fence yourself depends on your DIY skills and the type of fence you choose. Wireless fences are typically easy to install, while in-ground fences require more effort and may involve digging trenches and burying wires. If you’re not comfortable with DIY projects, it’s best to hire a professional installer.
6. How long does it take to install a pet fence?
The time it takes to install a pet fence can vary depending on the type of fence and the size of your property. Wireless fences can typically be installed in a few hours, while in-ground fences may take a full day or more.
7. Is a pet fence safe for my pet?
When used properly, pet fences are safe for pets. The static correction emitted by the receiver collar is designed to be mild and harmless, but it’s important to train your pet properly to ensure that they understand the boundaries of the fence and avoid receiving corrections.
8. Can a pet fence be used on any type of property?
Pet fences can be used on a variety of properties, including large and small yards, rural properties, and waterfront properties. However, it’s important to choose a fence system that is appropriate for the specific characteristics of your property.
9. Will a pet fence work if my pet is very stubborn or has a high pain tolerance?
Some pets may be more challenging to train to respect the boundaries of a pet fence. In these cases, it may be necessary to use a higher level of static correction or to supplement the fence with additional training methods, such as positive reinforcement and leash corrections.
10. Where can I find more information about pet fences?
PETS.EDU.VN is a valuable resource for finding more information about pet fences. You can also consult with a professional pet fence installer or your veterinarian for personalized advice.
Navigating the world of pet care can be overwhelming, but PETS.EDU.VN is here to help. We understand the challenges pet owners face in finding reliable information and trustworthy services. Whether you’re seeking guidance on pet nutrition, need advice on addressing behavioral issues, or are looking for a reputable local vet, we’ve got you covered.
Ready to create a safe and happy environment for your furry friend? Visit PETS.EDU.VN today to explore our resources and discover the best solutions for your pet care needs! Our comprehensive guides, expert advice, and local service directories will empower you to make informed decisions and provide your pet with the best possible care.
Contact us: 789 Paw Lane, Petville, CA 91234, United States. Whatsapp: +1 555-987-6543. Or visit our website: pets.edu.vn.