Can You Put A Pet Door In A Screen Door? Yes, you absolutely can! Installing a pet door in a screen door is a fantastic way to grant your furry friend the freedom they deserve while keeping those pesky bugs out. PETS.EDU.VN is here to guide you through the process with our detailed guide, ensuring your pet enjoys their newfound independence safely and securely. Learn about pet access solutions, animal doors and flexible pet openings.
1. Understanding the Possibility of Installing a Pet Door in a Screen Door
Installing a pet door in a screen door is not only possible but also a popular DIY project for pet owners. It provides pets with the freedom to go outside without needing constant human assistance, while still maintaining a barrier against insects and other unwanted outdoor elements.
1.1. Benefits of a Pet Door in a Screen Door
- Pet Freedom: Allows pets to go outside as they please, reducing accidents indoors.
- Bug Control: Keeps insects out while allowing pets to enter and exit.
- Convenience: Eliminates the need to constantly open and close the door for your pet.
- Improved Pet Well-being: Provides pets with more autonomy and reduces boredom.
- Enhanced Home Security: Limits unauthorized entry by animals and people
1.2. Types of Screen Doors Suitable for Pet Door Installation
- Standard Screen Doors: These are the most common type and generally suitable for pet door installation.
- Sliding Screen Doors: These can also accommodate pet doors, often requiring a bit more customization.
- Heavy-Duty Screen Doors: Ideal if you have a larger or more active pet, providing added durability.
- Retractable Screen Doors: Not ideal for pet doors, as the mechanism can be damaged.
2. Essential Considerations Before Installation
Before diving into the installation process, it’s essential to consider a few key factors to ensure the project goes smoothly and meets both your and your pet’s needs.
2.1. Pet Size and Door Placement
- Accurate Measurements: Measure your pet from the floor to the top of their shoulders to determine the correct height for the pet door.
- Comfortable Clearance: Add a few inches to the measurement to ensure your pet can comfortably pass through the door without crouching.
- Door Height from Bottom: Determine the appropriate height to mount the bottom of the pet door, ensuring it aligns with your pet’s natural stride.
- Pet Breed Considerations: Different breeds may have varying body types; adjust measurements accordingly.
2.2. Choosing the Right Pet Door
- Size Matters: Select a pet door size that accommodates your pet’s width and height comfortably.
- Material Quality: Look for durable materials that can withstand regular use and exposure to the elements.
- Weather Resistance: Ensure the pet door is designed to seal properly and prevent drafts or leaks.
- Locking Mechanisms: Consider a pet door with a locking feature for added security and control over your pet’s access.
- Training Considerations: Simple flap designs are generally better, as complex systems may deter your pet.
2.3. Assessing Your Screen Door
- Condition of the Screen: Ensure the screen is in good condition, without tears or damage, as this will affect the pet door’s stability.
- Frame Material: Identify the material of your screen door frame (aluminum, wood, etc.) as this will influence the tools and techniques required for installation.
- Structural Integrity: Check that the screen door frame is sturdy enough to support the pet door without sagging or bending.
- Screen Mesh Type: Determine the type of mesh used in your screen (fiberglass, aluminum, etc.) to ensure compatibility with the pet door installation.
3. Tools and Materials Needed for the Installation
Having the right tools and materials on hand will make the installation process much smoother and more efficient. Here’s a comprehensive list:
3.1. Essential Tools
- Measuring Tape: For precise measurements of your pet and the screen door.
- Pencil: To mark cutting lines and screw locations.
- Scissors or Utility Knife: For cutting the screen mesh and protective tape.
- Screwdriver: To install the pet door frame securely.
- Drill: For making pilot holes, especially if the frame is metal or hard wood.
- Level: To ensure the pet door is installed straight.
- Safety Glasses: To protect your eyes during the cutting and drilling process.
- Gloves: To protect your hands and improve grip.
3.2. Materials to Gather
- Pet Door Kit: Choose a kit that fits your pet’s size and includes all necessary hardware.
- Protective Tape: To reinforce the edges of the screen around the pet door.
- Screen Magnets: Two screen magnets and two frame magnets for pet door installation.
- Replacement Screen Mesh (Optional): In case the existing screen needs repair.
- Fasteners (Screws, Bolts): Appropriate for the screen door frame material.
- Weather Stripping (Optional): For creating a tighter seal around the pet door.
Protective tape is carefully applied to the screen mesh, avoiding the magnets, to reinforce the area around the pet door.
3.3. Where to Purchase Supplies
- Home Improvement Stores: Such as Home Depot or Lowe’s, offer a wide range of pet doors and installation tools.
- Pet Supply Stores: Like Petco or PetSmart, specialize in pet doors and accessories.
- Online Retailers: Amazon and other online retailers provide numerous options, often with customer reviews to guide your choice.
- Local Hardware Stores: For specific tools and fasteners, local hardware stores can be a great resource.
4. Step-by-Step Installation Guide
Follow these steps to install a pet door in your screen door successfully. Each step includes detailed instructions and tips to help you along the way.
4.1. Step 1: Prep Your Door
- Remove the Screen Door: Take the screen door off its hinges or track and lay it flat on a clean surface.
- Inspect the Screen: Check for any tears or damage. If the screen is torn, consider replacing it before installing the pet door.
- Clean the Area: Wipe down the area where the pet door will be installed to ensure a clean surface for adhesion.
4.2. Step 2: Measure Your Pet
Accurately measure your pet’s height to ensure the pet door is placed at the correct level for comfortable use.
- Measure Height: Measure your pet’s height from the floor to the tallest part of their shoulders.
- Add Extra Inches: Add about 5 inches to this measurement to determine the ideal height for the bottom of the pet door opening.
- Mark the Door: Use painter’s tape to mark the desired height on the screen door frame.
4.3. Step 3: Attach the Screen Magnets
Secure the screen magnets to the bottom corners of the screen, ensuring they are aligned for proper closure.
- Position Magnets: Turn the screen door so the outside face is up.
- Remove Liner: Peel off the double-sided tape liner on the screen magnets.
- Attach Magnets: Affix the screen magnets to the bottom corners of the screen, ensuring they face up.
- Leave Space: Allow a small gap between the magnets and the screen door frame to prevent impact when the pet uses the door.
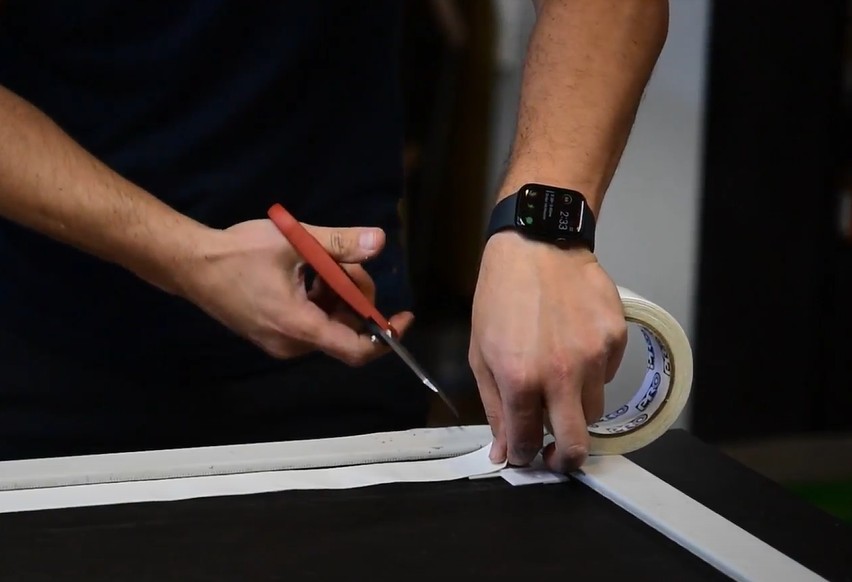
4.4. Step 4: Apply Bottom Layer of Tape
- Measure Tape: Cut a piece of protective tape to fit along the bottom edge of the screen, overlapping the edges of the screen magnets.
- Remove Liner: Peel off the liner from the protective tape.
- Apply Tape: Carefully apply the tape to the screen mesh, ensuring it covers the bottom edge and overlaps the screen magnets.
- Avoid Magnets: Ensure the tape does not cover the magnet faces.
4.5. Step 5: Apply Tape to Sides of Screen
Protective tape is applied along the sides of the door to create a clean opening for pet access.
- Measure and Cut Tape: Cut two strips of protective tape long enough to run from the upper lip of the screen magnet to the height mark.
- Apply Tape: Apply the tape along each side of the door, starting on the upper lip of the screen magnet and extending to the marked height.
- Ensure Alignment: Make sure the tape does not touch the screen door frame and is applied smoothly.
4.6. Step 6: Tape Opposite Side of Screen
Reinforcing the opening with tape on both sides ensures durability and prevents tearing of the screen.
- Flip the Door: Turn the screen door over to access the underside.
- Apply Tape: Apply tape over the backside of the bottom edge and sides, aligning it as closely as possible with the first layer.
- Avoid Overlapping: Ensure the tape does not overlap the frame or touch any hardware.
4.7. Step 7: Reinforce Screen Flap
Applying horizontal tape patches helps strengthen the screen flap, making it more resistant to wear and tear.
- Cut Tape Patches: Cut four small patches of tape.
- Apply Patches: Apply a patch horizontally over the top split of the screen, connecting the tape to the screen frame. The patch should overlap the side tape and extend halfway onto the frame.
- Repeat: Repeat this process on both sides of the screen.
4.8. Step 8: Remove Screen Spline
- Locate Spline: Find the end of the spline (usually in one of the lower corners of the screen frame).
- Pry Out Spline: Use a screwdriver or pointy tool to pry the end of the spline out of the screen frame.
- Pull Out Spline: Remove the rest of the spline below the patches by hand, working down one side, across the bottom, and up the other side.
- Cut Spline: Use scissors to cut the spline directly beneath the patches on each side of the screen.
- Remove Material: Pull out the screen material where you removed the spline, allowing it to swing freely.
- Trim Excess: There will be extra screen material that will be trimmed in a later step.
4.9. Step 9: Reinstall Screen Door
- Reattach Door: Put the screen door back into the doorway, ensuring it sits properly on its hinges or track.
- Alternative Setup: If preferred, you can simply stand the door upright for the next steps.
4.10. Step 10: Attach the Frame Magnets
Attaching frame magnets ensures the pet door closes securely and remains aligned with the screen magnets.
- Remove Liner: Peel off the liner on the tape for the frame magnets.
- Attach Magnets: Allow the frame magnets to attach to the screen magnets face to face.
- Secure Placement: With the flap hanging, apply a small amount of tension and attach the sticky side of the frame magnets so that the two magnet faces connect when the flap closes.
4.11. Step 11: Trim Excess Screen Material
- Trim Edges: Use scissors or a utility knife to trim any excess screen material along the edges of the opening.
- Alternative Finish: If desired, you can leave the excess screen material intact for extra bug protection.
5. Troubleshooting Common Issues
Even with careful planning, you may encounter some challenges during the installation process. Here are some common issues and how to address them:
5.1. The Pet Door Doesn’t Close Properly
- Magnet Alignment: Check that the magnets are aligned correctly and that there is no debris blocking their connection.
- Tape Interference: Ensure that the tape is not interfering with the magnets’ ability to meet.
- Frame Stability: Verify that the screen door frame is not warped or bent, which can affect the alignment of the door.
- Hinge Adjustment: Try adjusting the hinges of the screen door to ensure it hangs straight and allows the magnets to connect properly.
5.2. The Pet Is Hesitant to Use the Door
- Positive Reinforcement: Encourage your pet with treats and praise as they approach the door.
- Hold the Flap: Initially, hold the flap open so your pet can see through and get used to the opening.
- Familiar Scents: Place some of your pet’s favorite toys or treats outside the door to entice them.
- Gradual Training: Start with the door propped open and gradually lower it as your pet becomes more comfortable.
5.3. The Screen Mesh Is Tearing
- Reinforcement: Apply additional layers of protective tape around the edges of the opening.
- Mesh Replacement: Consider replacing the entire screen mesh with a more durable material.
- Avoid Sharp Edges: Ensure that the edges of the pet door frame are smooth and do not have any sharp points that could snag the screen.
- Monitor Use: Supervise your pet’s use of the door initially to prevent any rough handling that could cause tears.
6. Maintenance and Care Tips
Proper maintenance will keep your pet door functioning smoothly and extend its lifespan.
6.1. Regular Cleaning
- Wipe Down: Periodically wipe down the pet door and frame with a damp cloth to remove dirt and debris.
- Mild Soap: Use a mild soap solution for tougher stains or grime.
- Avoid Harsh Chemicals: Do not use harsh chemicals that could damage the materials or harm your pet.
- Check Magnets: Ensure the magnets are clean and free of any obstructions.
6.2. Inspecting for Wear and Tear
- Check the Flap: Look for any signs of wear and tear on the flap, such as cracks or tears.
- Examine Tape: Ensure that the protective tape is still securely attached and has not peeled away.
- Test Magnets: Verify that the magnets are still strong and effectively hold the door closed.
- Inspect Frame: Check the frame for any signs of damage or instability.
6.3. Replacing Parts
- Flap Replacement: If the flap is damaged, replace it promptly to maintain the door’s functionality.
- Magnet Replacement: Replace any weak or damaged magnets to ensure a secure closure.
- Tape Replacement: Reapply protective tape as needed to reinforce the edges of the opening.
- Frame Repair: Repair any damage to the frame to maintain the door’s structural integrity.
7. Enhancing Pet Door Security
While a pet door offers convenience, it’s essential to ensure it doesn’t compromise your home security.
7.1. Security Features
- Locking Mechanisms: Choose a pet door with a secure locking mechanism to prevent unauthorized entry.
- Reinforced Frames: Opt for a pet door with a reinforced frame that is difficult to break or tamper with.
- One-Way Entry: Consider a pet door that only allows entry from the outside, preventing anyone from reaching in to unlock the door.
7.2. Placement Considerations
- Avoid Obvious Locations: Install the pet door in a less visible location, such as the backyard, rather than the front of the house.
- Secure Surroundings: Ensure that the area around the pet door is well-lit and free of hiding spots.
- Alarm Systems: Integrate the pet door with your home alarm system to alert you of any unauthorized use.
7.3. Training and Monitoring
- Train Your Pet: Train your pet to use the door properly and not to invite other animals inside.
- Monitor Usage: Keep an eye on your pet’s usage of the door and be aware of any unusual activity.
- Neighborhood Watch: Participate in a neighborhood watch program to increase awareness of potential security threats.
8. Advanced Options and Customizations
For those looking to take their pet door installation to the next level, here are some advanced options and customizations to consider.
8.1. Electronic Pet Doors
- Microchip Activation: Electronic pet doors can be programmed to recognize your pet’s microchip, allowing only them to enter.
- Timed Access: Set specific times for when the door can be used, providing greater control over your pet’s access.
- Smart Home Integration: Integrate the pet door with your smart home system for remote monitoring and control.
8.2. Custom Frame Designs
- Matching Aesthetics: Design a custom frame that matches the style and color of your screen door.
- Enhanced Durability: Use durable materials such as aluminum or reinforced wood for added strength.
- Decorative Elements: Add decorative elements such as trim or molding to enhance the appearance of the pet door.
8.3. Professional Installation
- Expert Assistance: Hire a professional installer for a seamless and secure pet door installation.
- Custom Solutions: Professionals can provide custom solutions tailored to your specific needs and preferences.
- Warranty: Professional installations often come with a warranty, providing peace of mind and protection against any issues.
9. Addressing Common Misconceptions
There are several misconceptions about installing pet doors in screen doors. Let’s address some of the most common ones:
9.1. Myth: It’s Too Difficult to Do Yourself
- Reality: While it requires some effort, installing a pet door in a screen door is a manageable DIY project for most homeowners.
- Guidance: With the right tools, materials, and a step-by-step guide like the one provided by PETS.EDU.VN, you can successfully complete the installation.
9.2. Myth: It Will Ruin the Screen Door
- Reality: When done correctly, installing a pet door will not ruin the screen door.
- Protection: Reinforcing the edges with protective tape and choosing the right size pet door can help maintain the door’s integrity.
9.3. Myth: It’s Not Secure
- Reality: Pet doors can be secure if you take the necessary precautions.
- Security Measures: Choosing a pet door with locking mechanisms and integrating it with your home security system can enhance security.
9.4. Myth: All Pets Will Use It Immediately
- Reality: Some pets may take time to adjust to using a pet door.
- Training: Patience and positive reinforcement can help your pet become comfortable using the door.
10. Frequently Asked Questions (FAQs)
10.1. Can you put a pet door in a screen door?
Yes, it’s definitely possible. With the right tools and careful installation, you can add a pet door to most screen doors, offering your pet greater freedom.
10.2. What size pet door do I need for my dog?
Measure your dog from the floor to the highest point of their back (usually the shoulders). Add a few inches to this measurement for clearance. Also, measure your dog’s width at the widest point to ensure they can comfortably pass through the door.
10.3. Will a pet door in a screen door affect my home’s energy efficiency?
A well-installed pet door with good weather sealing can minimize energy loss. Look for models with magnetic closures or insulated flaps to help maintain your home’s temperature.
10.4. How do I train my pet to use the new door?
Use positive reinforcement. Lure your pet through the door with treats and praise. You might need to hold the flap open initially to help them get used to it.
10.5. What if my screen door frame is made of metal?
Installing a pet door in a metal frame is possible, but it requires more care. Use a drill with a metal-drilling bit to create pilot holes before screwing in the pet door frame.
10.6. Can I install a pet door in a sliding screen door?
Yes, but it may require a bit more customization. You might need to purchase a pet door specifically designed for sliding doors, which often comes as a panel that fits into the track.
10.7. How do I keep bugs out when my pet uses the door?
Choose a pet door with a tight seal and magnetic closure to prevent bugs from entering. Regular maintenance and cleaning will also help ensure a good seal.
10.8. What if my pet is hesitant to use the door?
Patience is key. Make the door inviting by placing familiar toys or treats nearby. You can also try having another person stand outside and call your pet through the door.
10.9. How do I secure the pet door to prevent unwanted entry?
Select a pet door with a locking mechanism. Some models come with a slide-in panel that you can use to block the opening when needed.
10.10. Where can I find reliable pet care advice and services?
For trusted pet care information, visit PETS.EDU.VN. We offer a wide range of resources and can connect you with local pet care services.
Installing a pet door in a screen door is a rewarding project that enhances your pet’s quality of life and offers convenience for you. By understanding the essential considerations, following a detailed installation guide, and addressing potential issues, you can create a secure and functional pet door that both you and your furry friend will love.
Are you ready to enhance your pet’s freedom and your own convenience? Visit PETS.EDU.VN today for more expert advice, product recommendations, and local pet care services. Our comprehensive resources will help you make informed decisions and provide the best care for your beloved pet. Contact us at 789 Paw Lane, Petville, CA 91234, United States or via Whatsapp at +1 555-987-6543. Let pets.edu.vn be your trusted partner in pet care!