Making your own Chia Pet is absolutely achievable and a delightful project, blending creativity with gardening. At PETS.EDU.VN, we’re excited to guide you through the process of crafting personalized, verdant companions, offering a unique and engaging experience that merges art with nature, and providing you with the knowledge to create a thriving green pet. Explore the wonders of DIY Chia Pets and discover the joys of nurturing your own living art, enhancing your understanding of plant care, creative arts, and sustainable living.
1. What Exactly Is A Chia Pet And Why Make One?
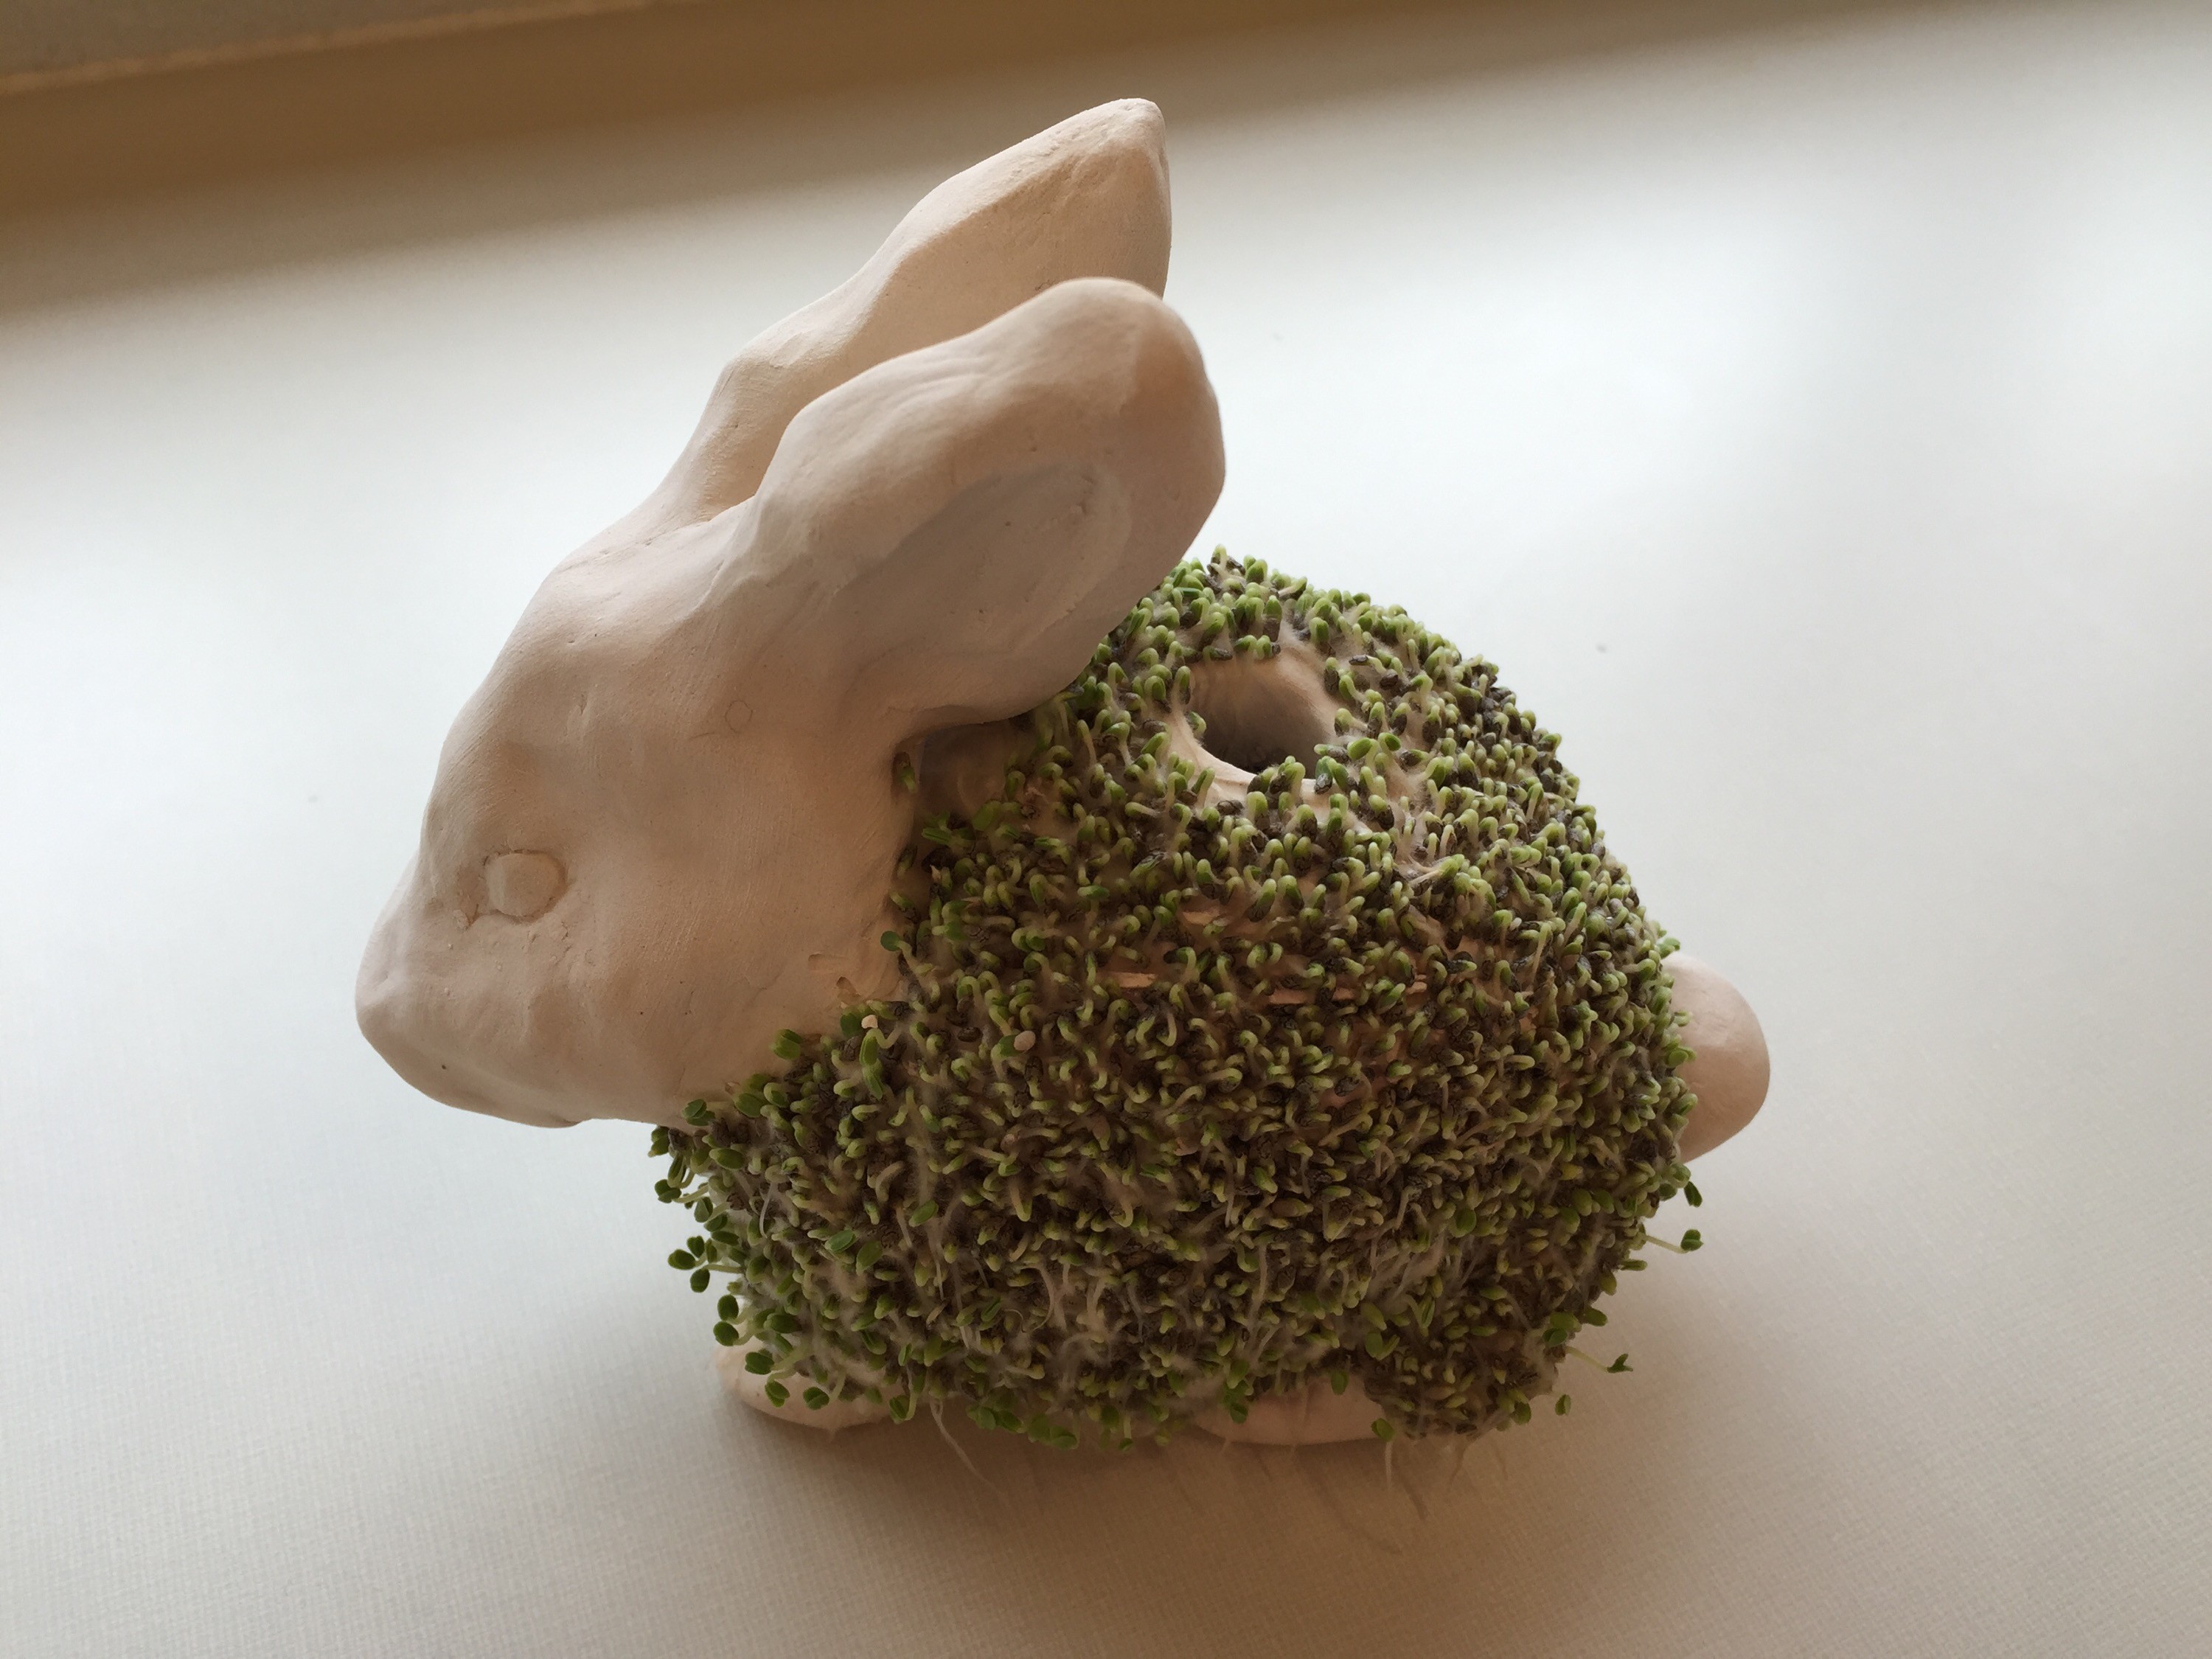
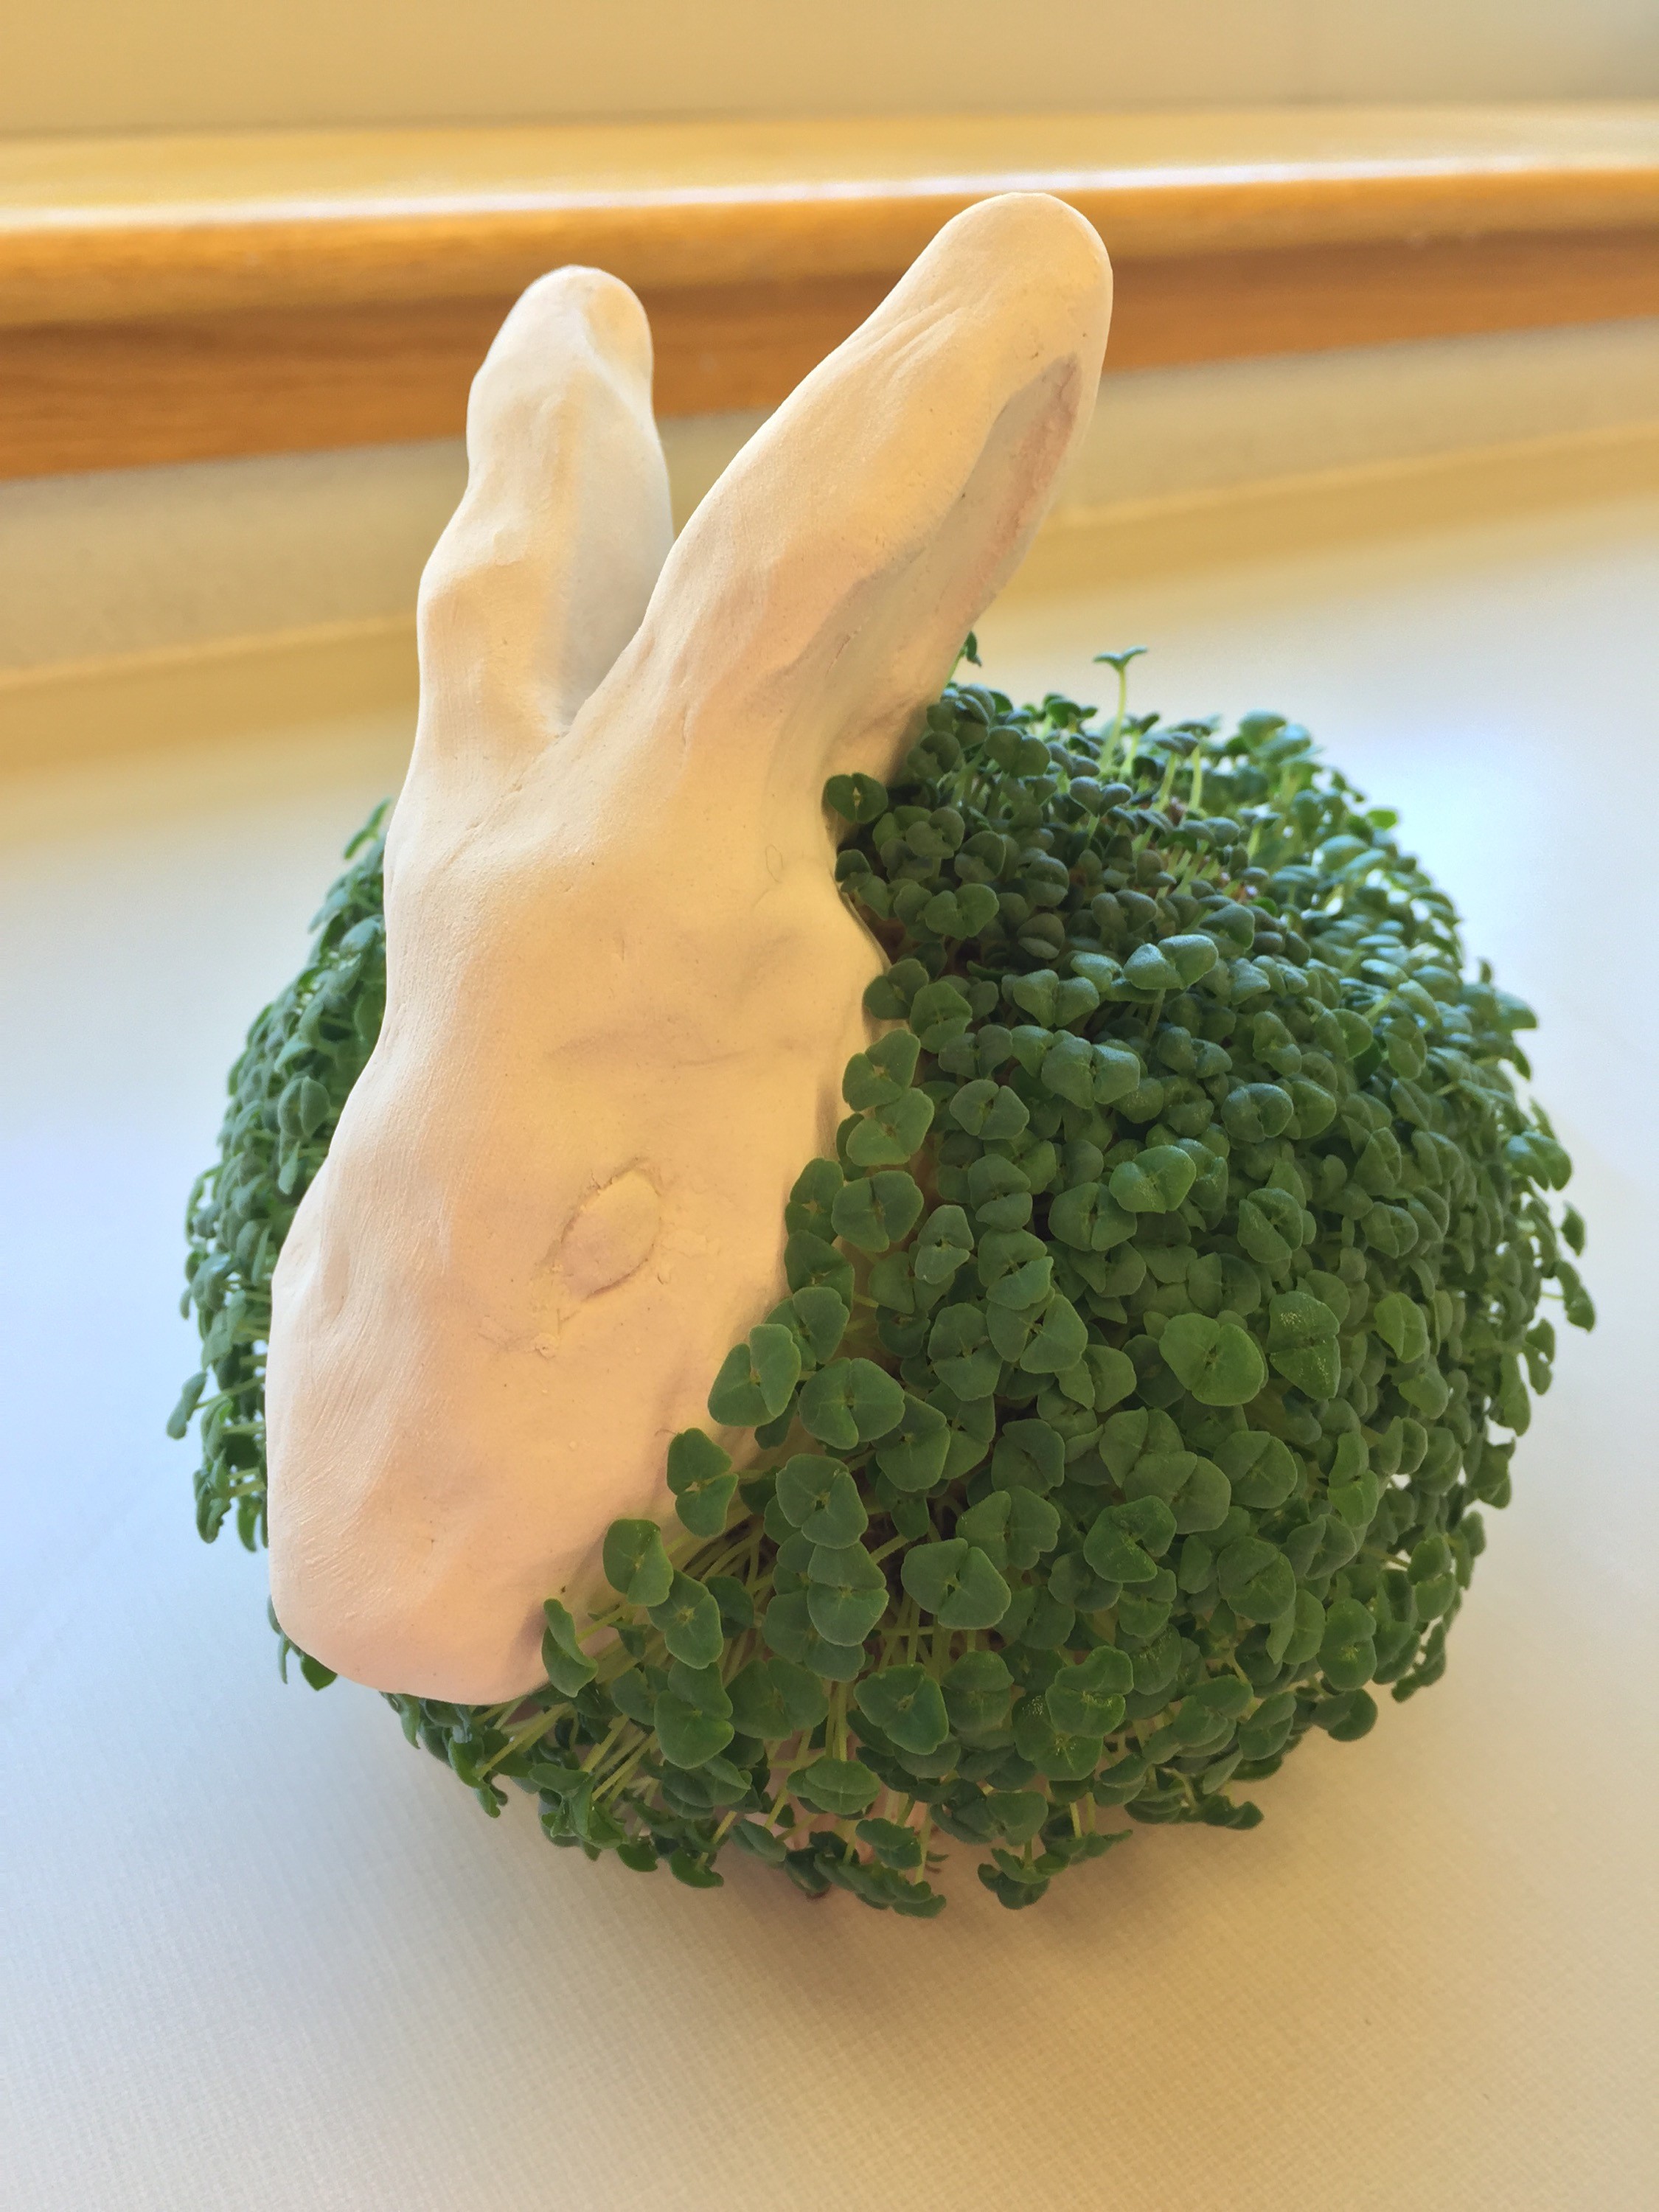
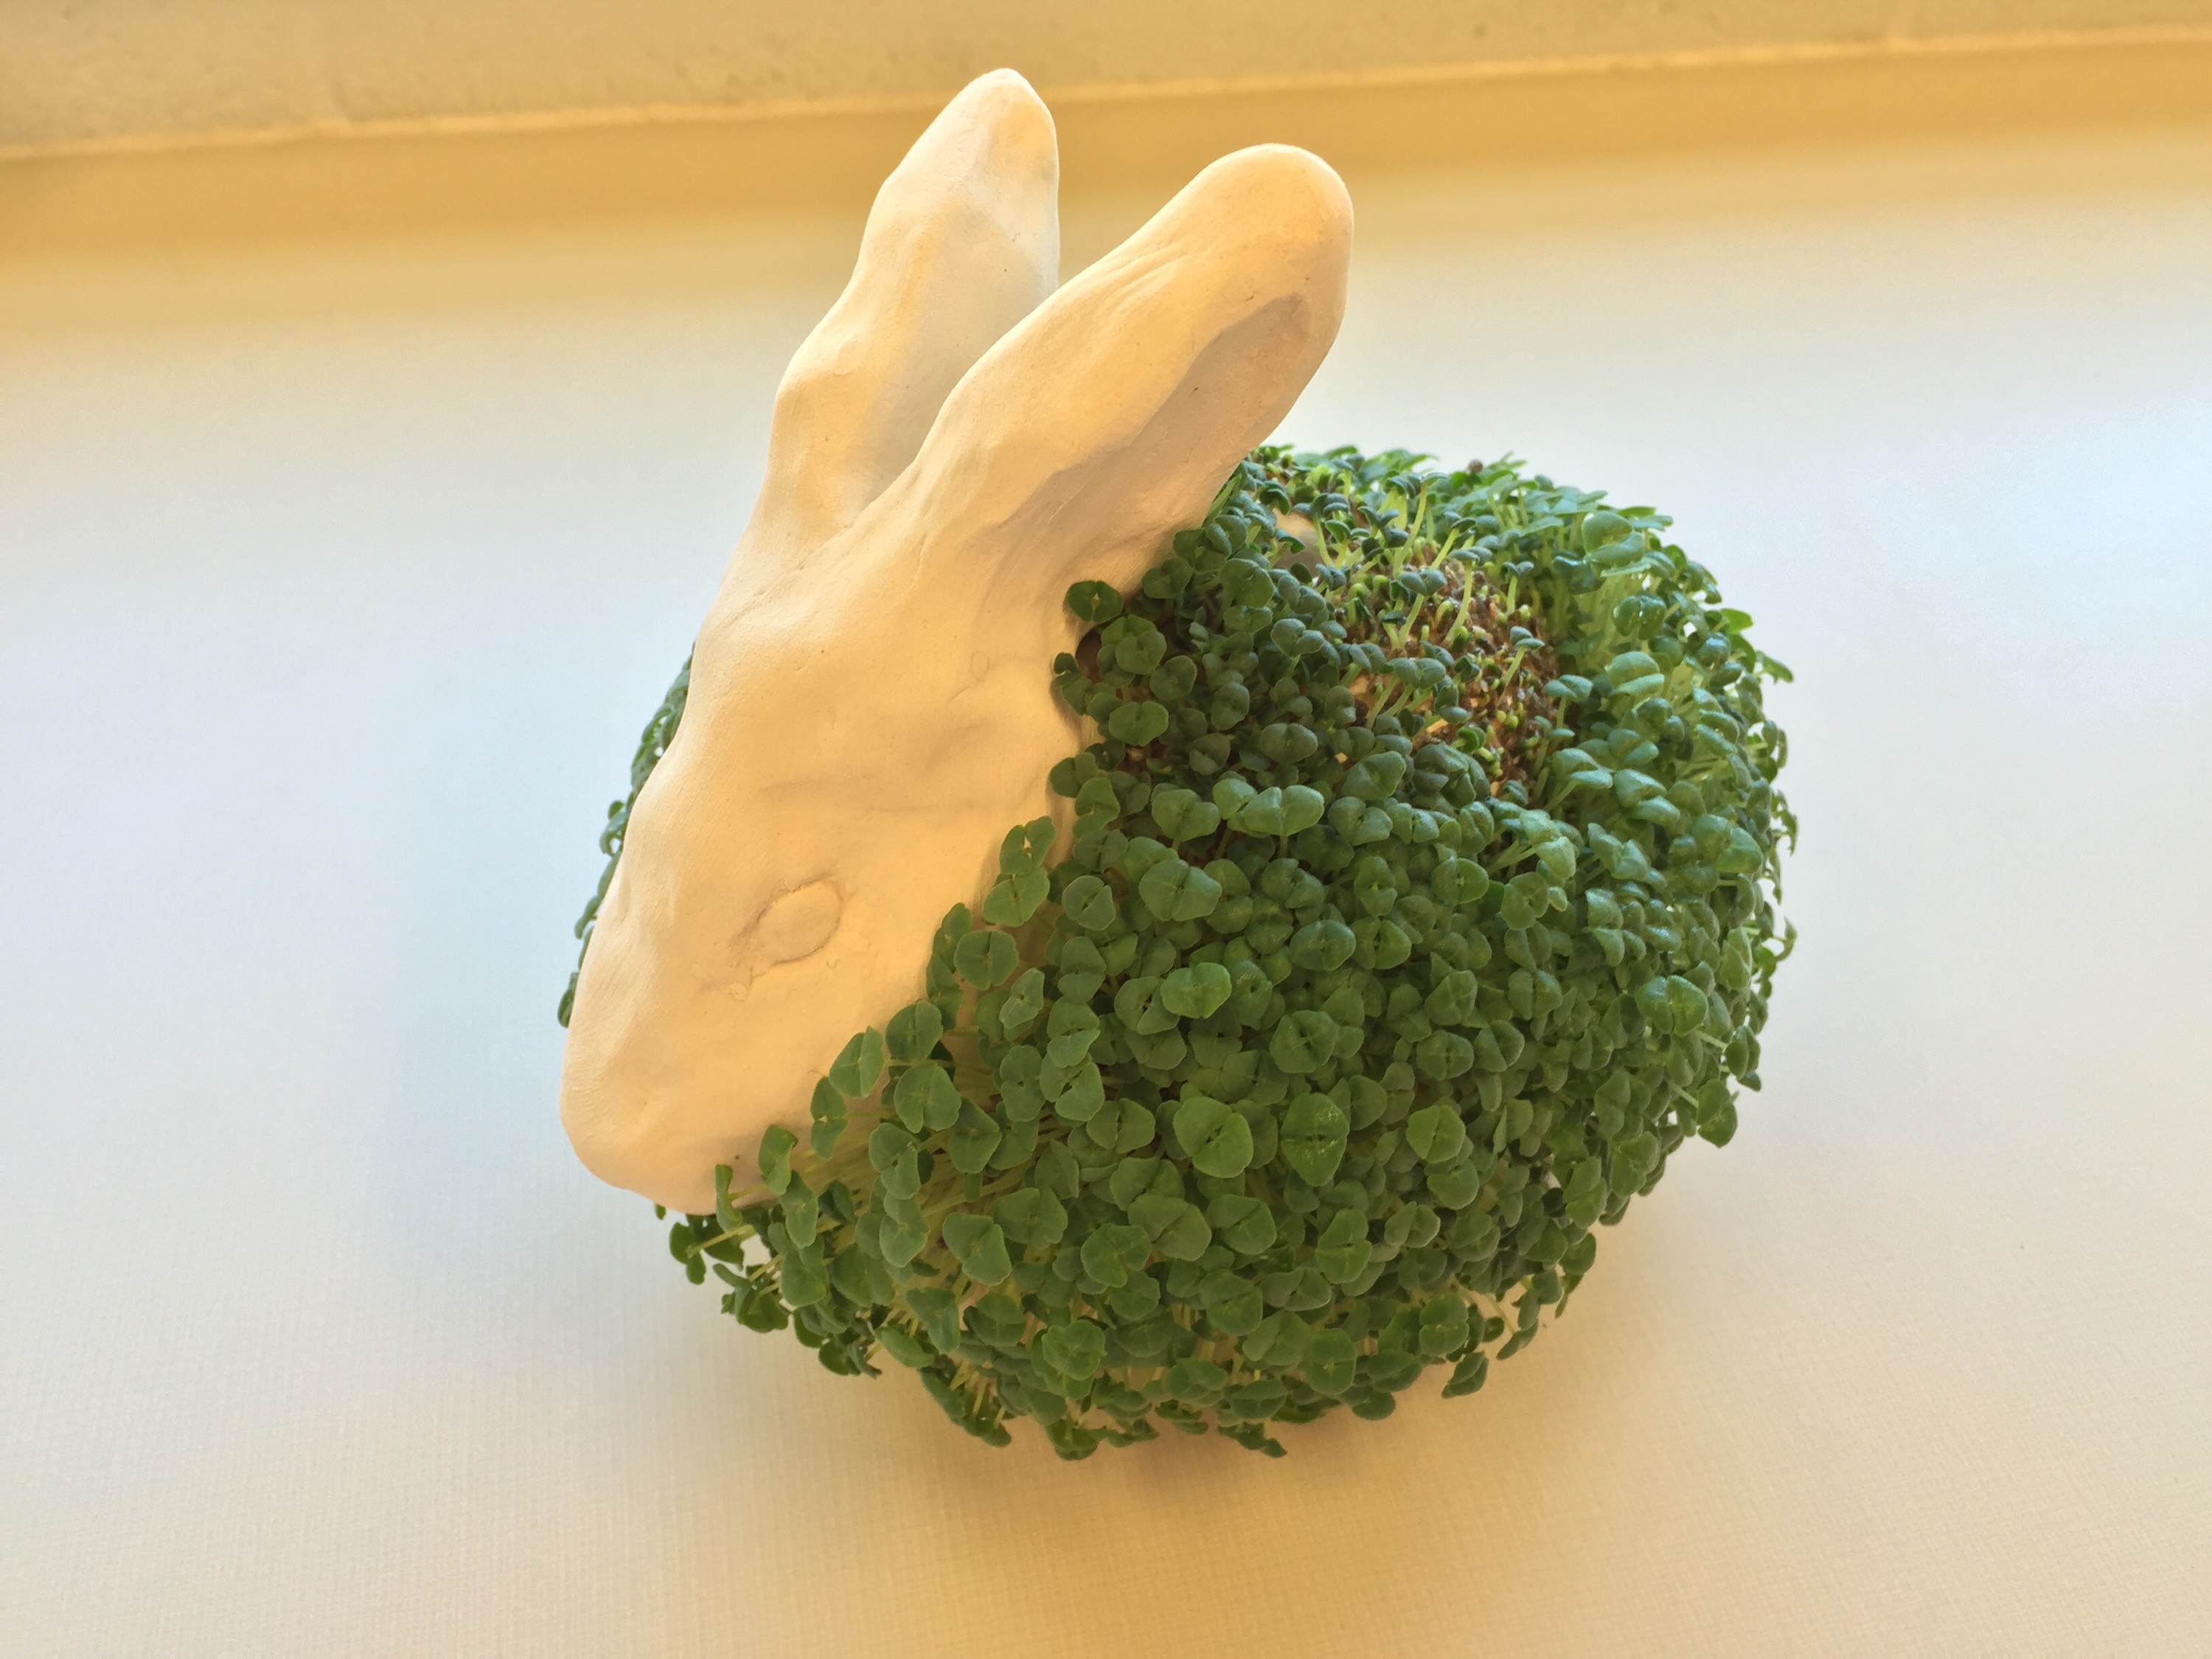
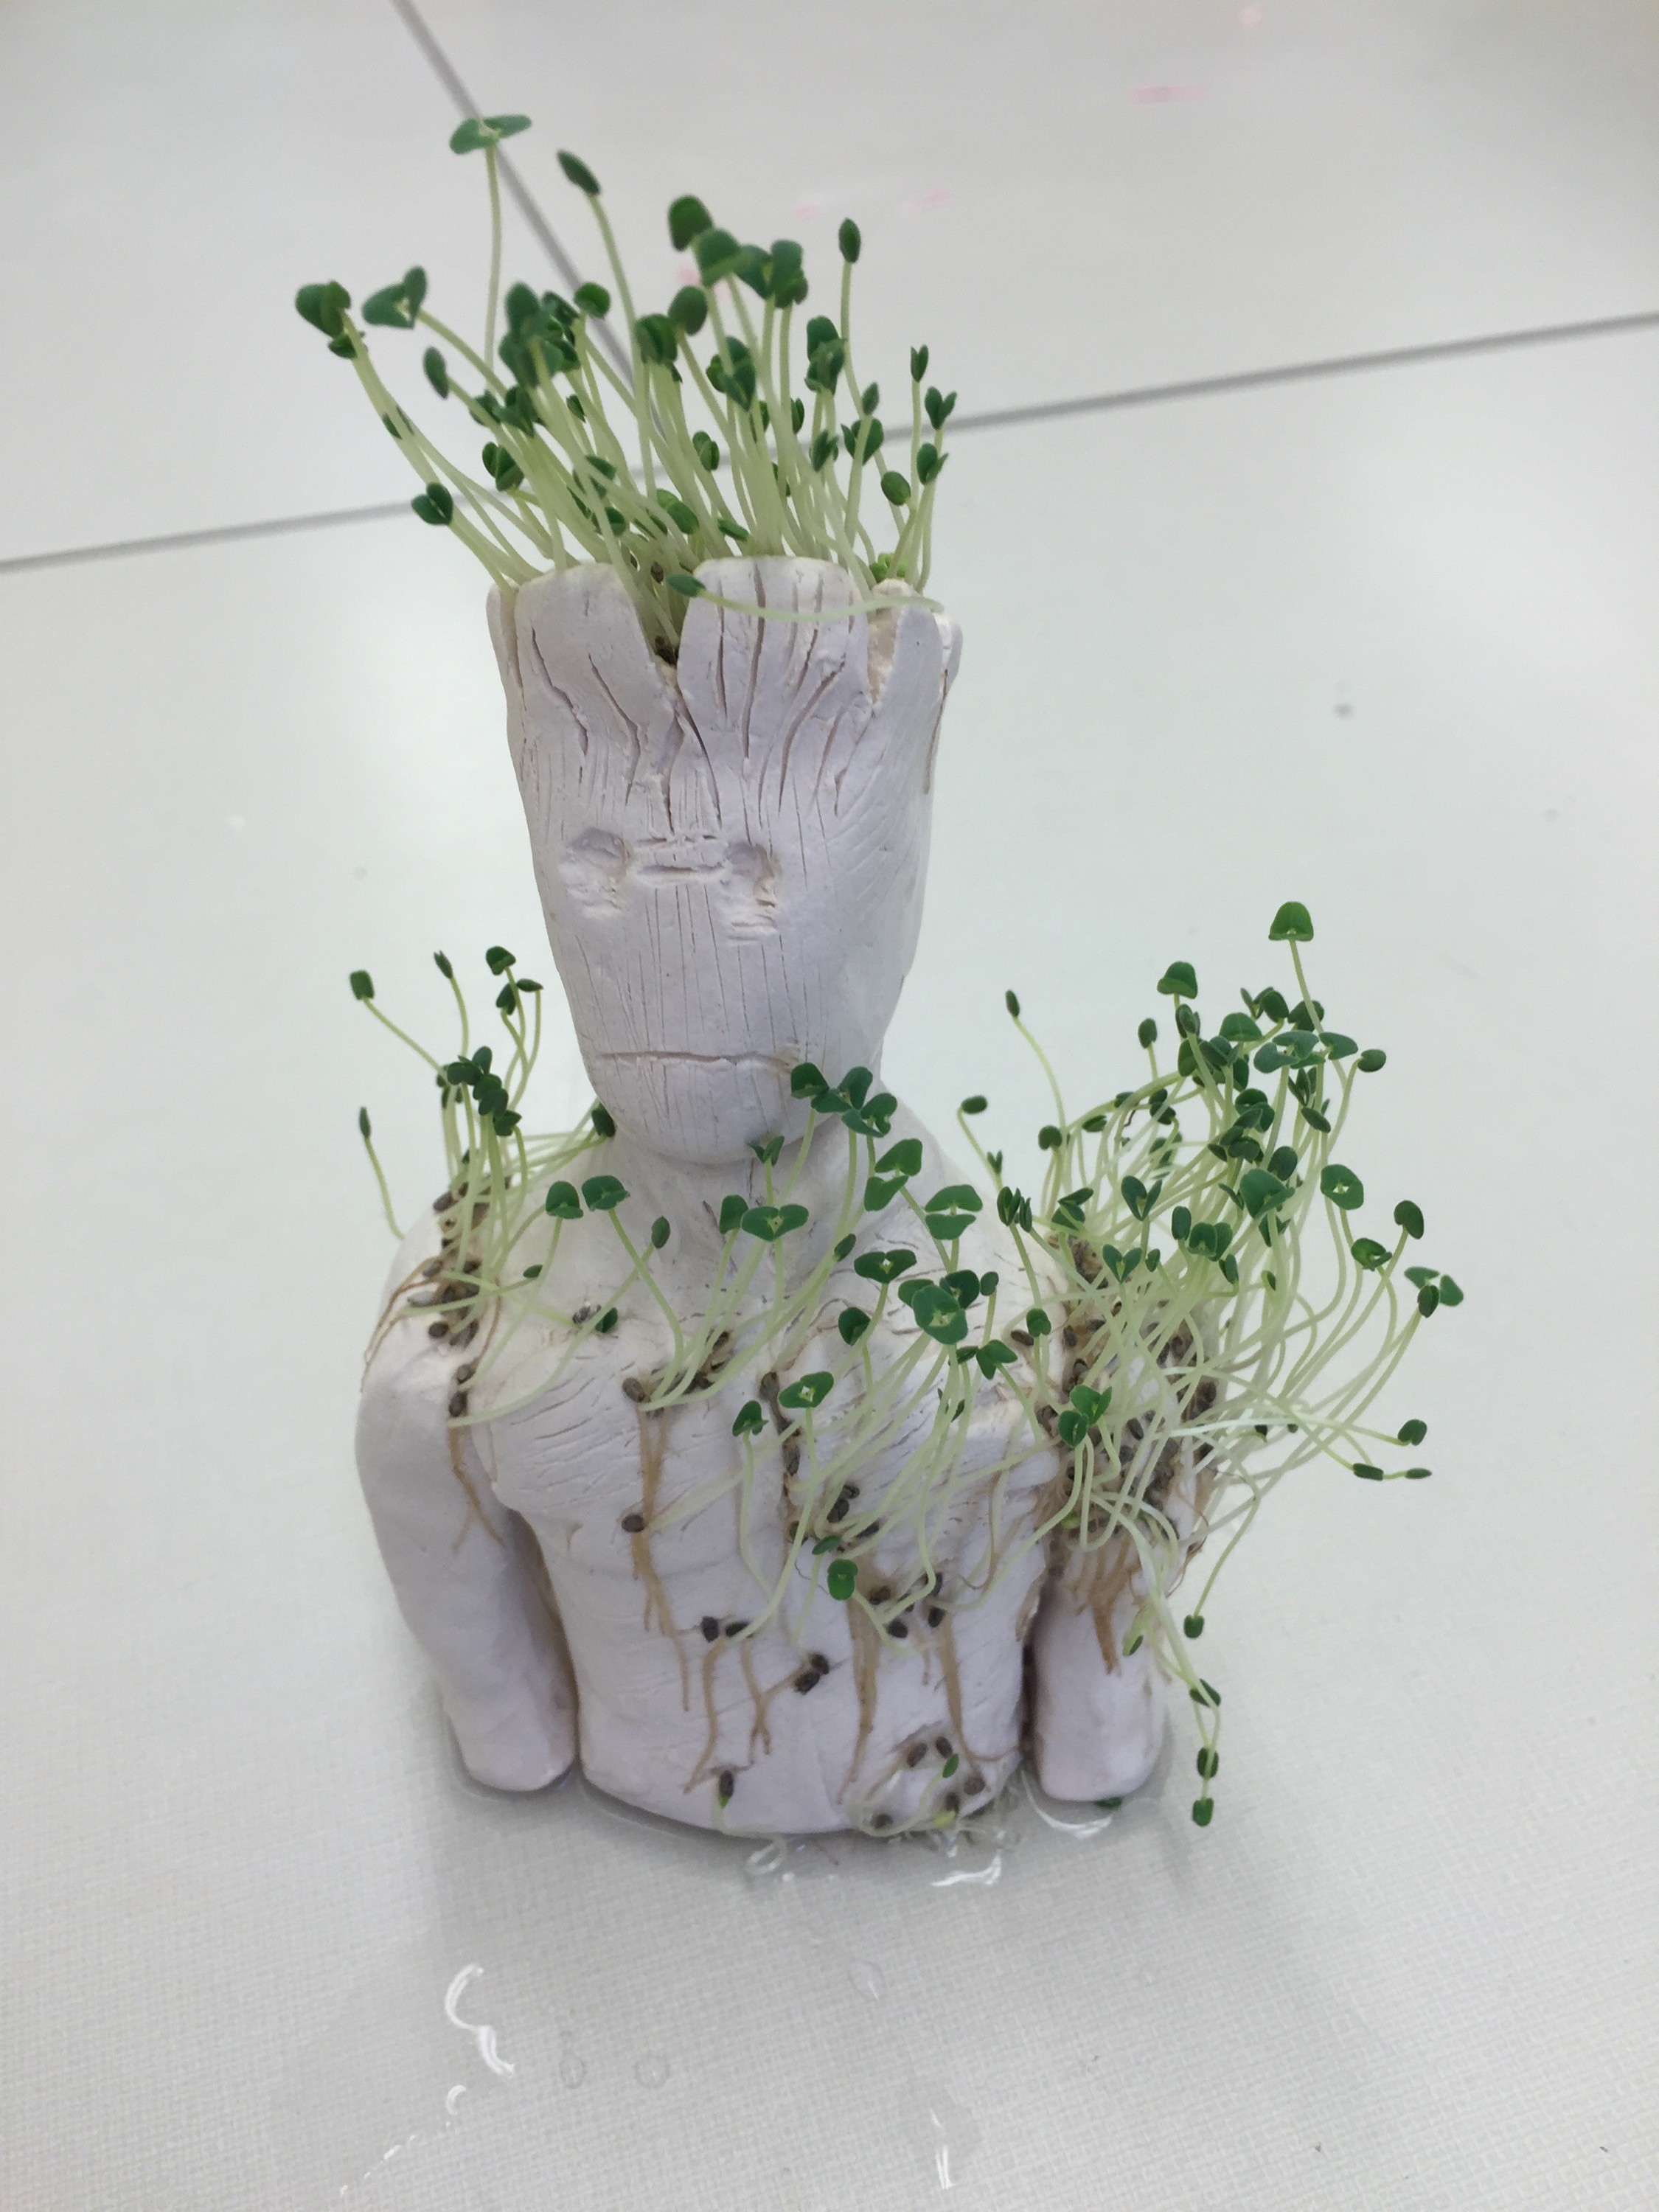
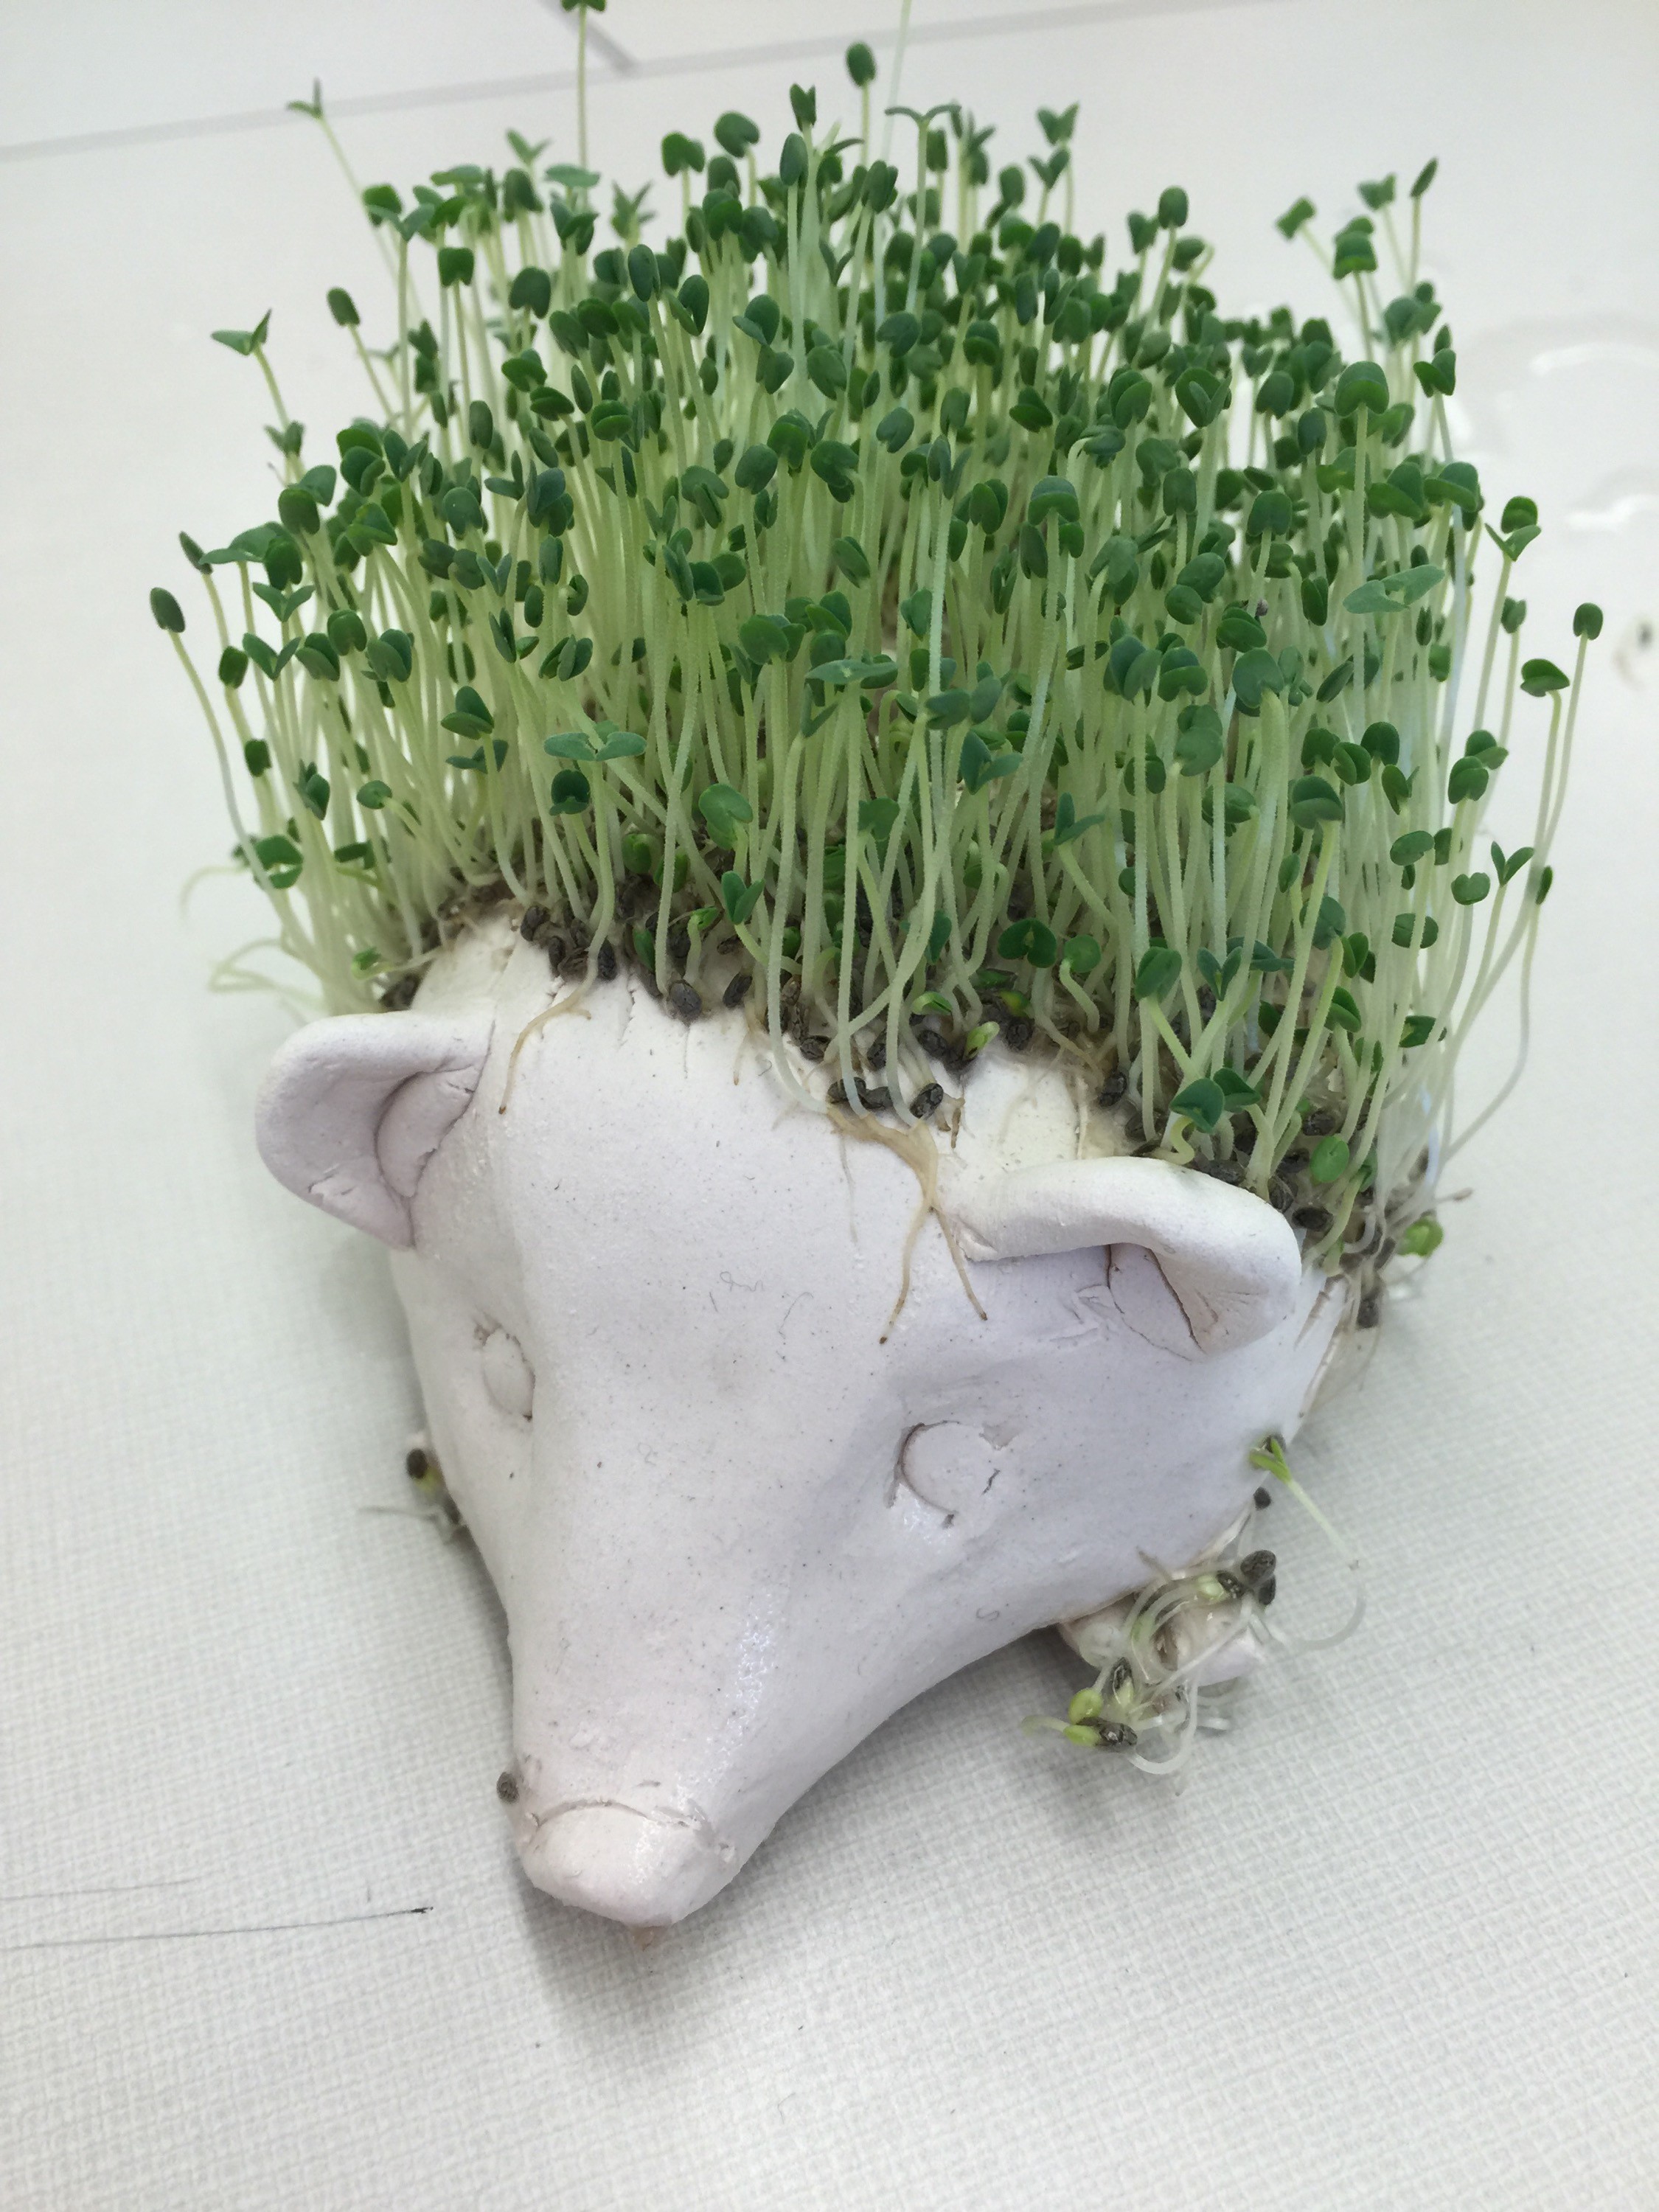
A Chia Pet is a terra cotta figurine used to sprout chia seeds, where the sprouts grow into a quirky resemblance of animal fur or human hair. The charm lies in its simplicity and the joy of watching seeds transform into lush greenery.
1.1. Why You Should Consider Making Your Own Chia Pet
- Creative Expression: Crafting your own Chia Pet allows for unique designs that reflect personal interests.
- Educational Fun: It’s an engaging way to learn about plant germination and care.
- Eco-Friendly: Homemade Chia Pets can promote sustainable practices by using eco-friendly materials.
- Therapeutic Activity: Gardening and crafting have proven therapeutic benefits, reducing stress and enhancing mental well-being. A study by the University of Exeter found that gardening for just 30 minutes a day can significantly lower stress levels.
- Personalized Decor: A homemade Chia Pet adds a personal touch to your home decor, making it more inviting and lively.
1.2. Historical and Cultural Significance of Chia Pets
Chia Pets originated in the early 1980s and quickly became a cultural phenomenon, symbolizing a blend of novelty gardening and pop culture. They represent an era of playful creativity and have maintained their appeal through nostalgic charm.
2. Planning Your DIY Chia Pet Project
2.1. Idea Generation: What Kind of Pet Will You Grow?
Consider themes that excite you. Animals, cartoon characters, or abstract shapes can all serve as inspiration. Sketching your ideas can help visualize the final product.
- Animals: Cats, dogs, turtles, or rabbits.
- Characters: Inspired by favorite books, movies, or comics.
- Abstract Shapes: Geometric forms or nature-inspired designs.
2.2. Material Selection: Choosing the Right Clay
- Terra Cotta Clay: Ideal for its porous nature, which helps retain moisture.
- Air-Dry Clay: Convenient for projects without a kiln, but requires sealing to hold water.
- Polymer Clay: Can be used for decorative elements but not for the entire structure due to its non-porous nature.
2.3. Essential Supplies Checklist
| Supply | Description | Where to Buy | Estimated Cost (USD) |
|---|---|---|---|
| Clay | Terra cotta or air-dry clay | Craft stores, online retailers | $10-20 |
| Chia Seeds | Organic chia seeds | Grocery stores, health stores | $5-10 |
| Carving Tools | For shaping and detailing the clay | Craft stores, online retailers | $10-15 |
| Waterproof Sealant | Non-toxic sealant for air-dry clay | Hardware stores, craft stores | $8-12 |
| Paint & Glazes | Optional, for decorating (ensure non-toxic) | Craft stores | $10-20 |
| Small Brush | For applying seeds and sealant | Craft stores | $3-5 |
| Water Container | For soaking seeds and watering the pet | Household item | – |
| Spray Bottle | To keep the seeds moist | Household item | – |
| Protective Gloves | To protect your hands during the process | Hardware stores, craft stores | $5-10 |
| Work Surface Cover | To keep your workspace clean | Hardware stores, craft stores | $5-10 |
| Baking Sheet (Oven) | If you are using clay that needs to be baked. | Household item | – |
| Kiln | If you are using clay that needs to be fired, you will need access to a kiln. | Local pottery studio | $30-50 |

2.4. Sourcing High-Quality Chia Seeds
- Organic: Opt for organic seeds to avoid pesticides.
- Viability: Ensure the seeds are fresh for optimal germination.
- Bulk Buying: Consider buying in bulk for cost savings.
3. Step-by-Step Guide to Building Your Chia Pet
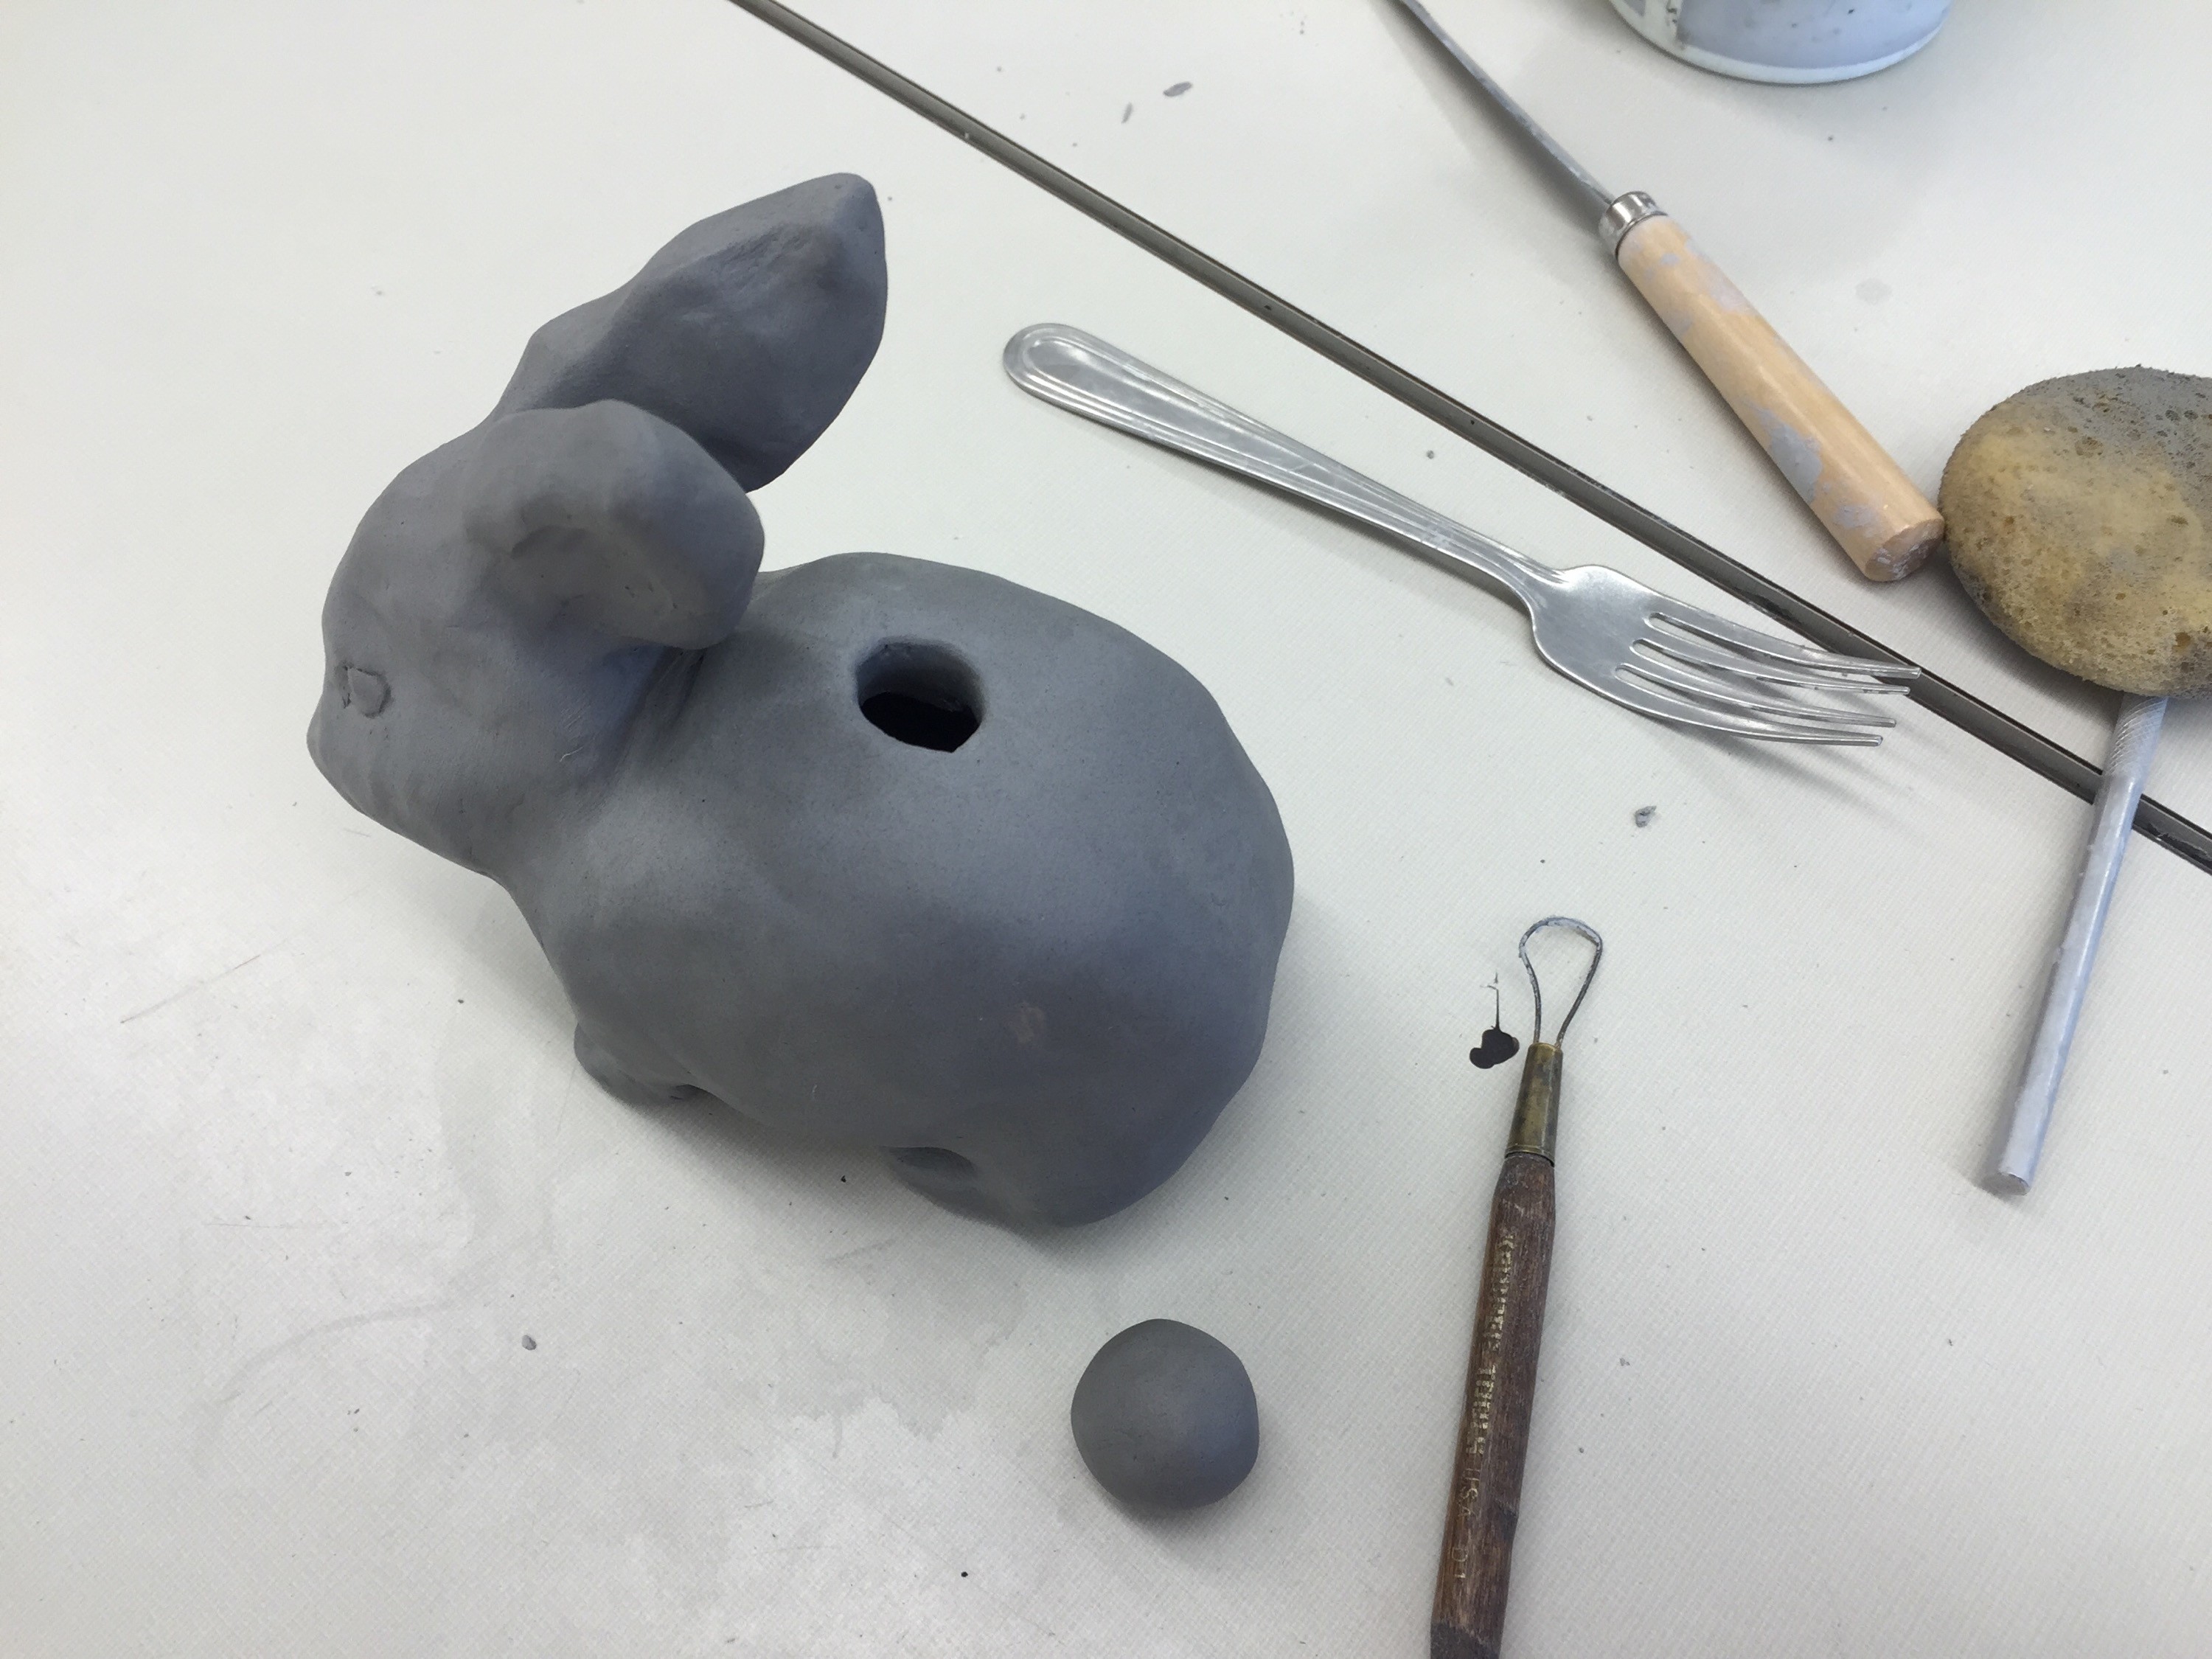
3.1. Sculpting the Clay Base
- Forming the Basic Shape: Start by molding the clay into the desired shape, ensuring a hollow interior.
- Creating Texture: Add texture to the surface to help seeds adhere better.
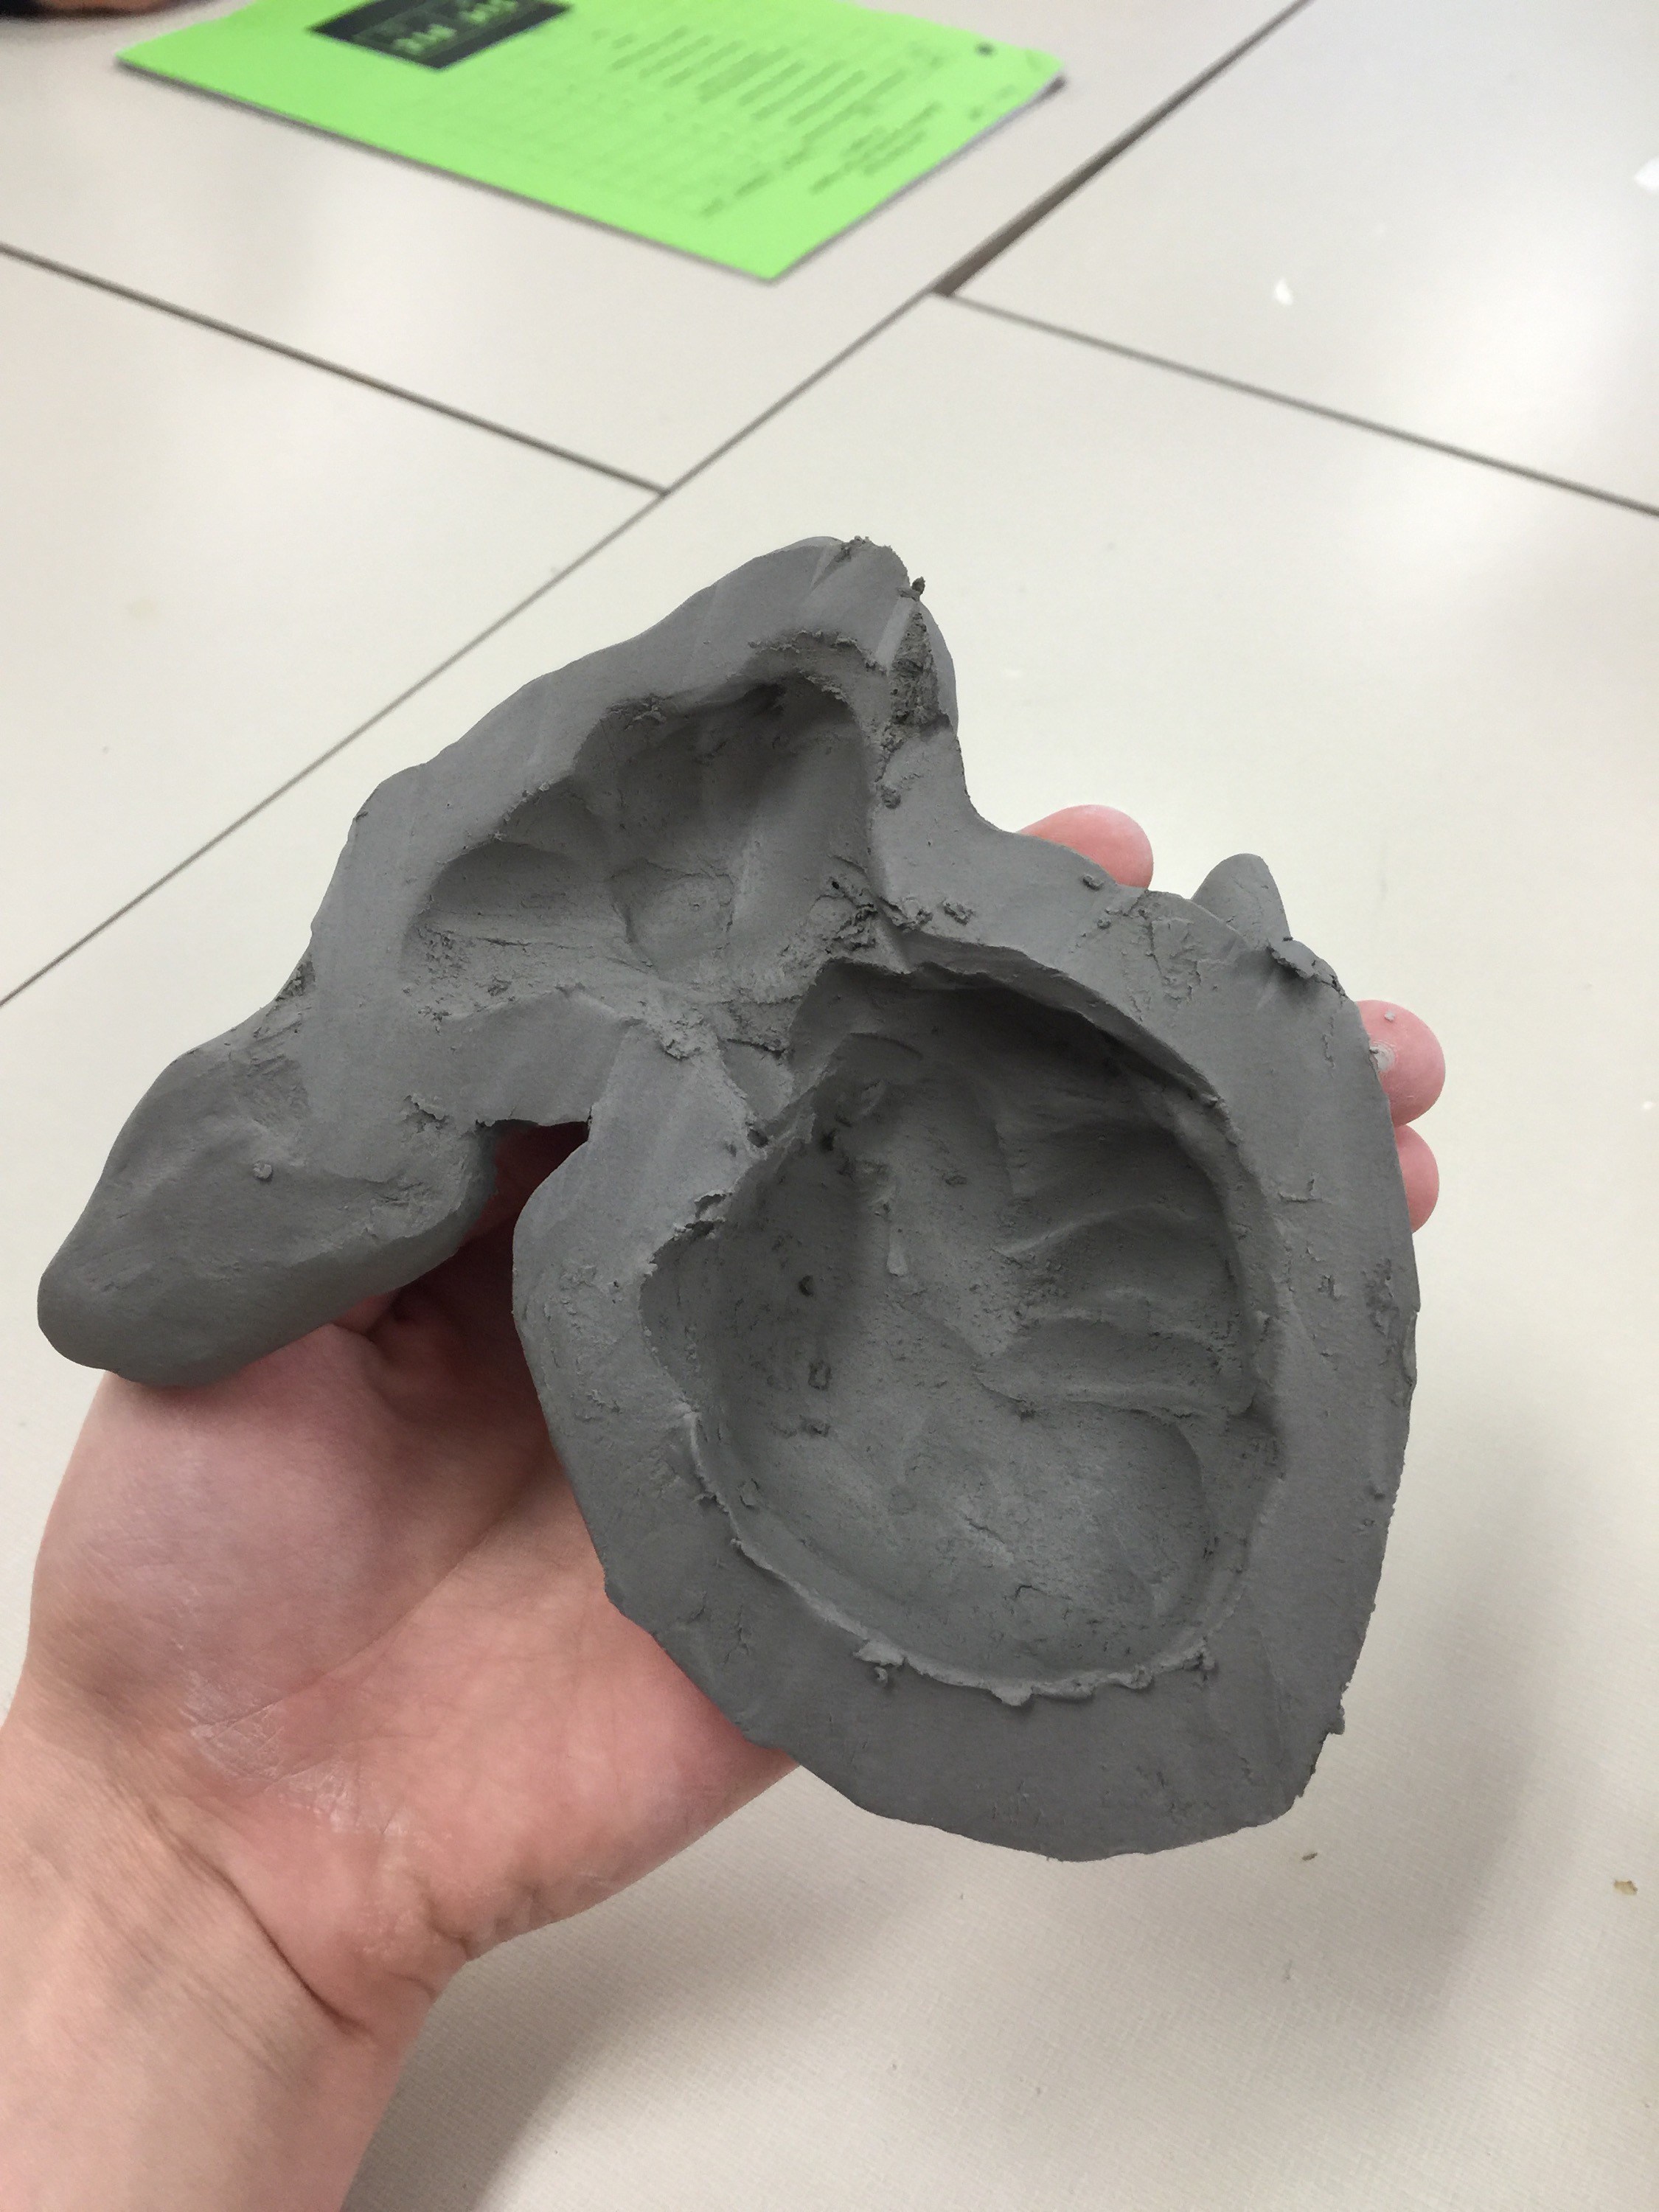
- Hollowing Out the Interior: The clay needs to be hollowed out for several reasons. One because clay shouldn’t be thicker than your thumb or it will dry unevenly causing it to crack or explode in the kiln. Secondly, since we are making chia pets, the pet needs to have a place to hold water for the seeds.
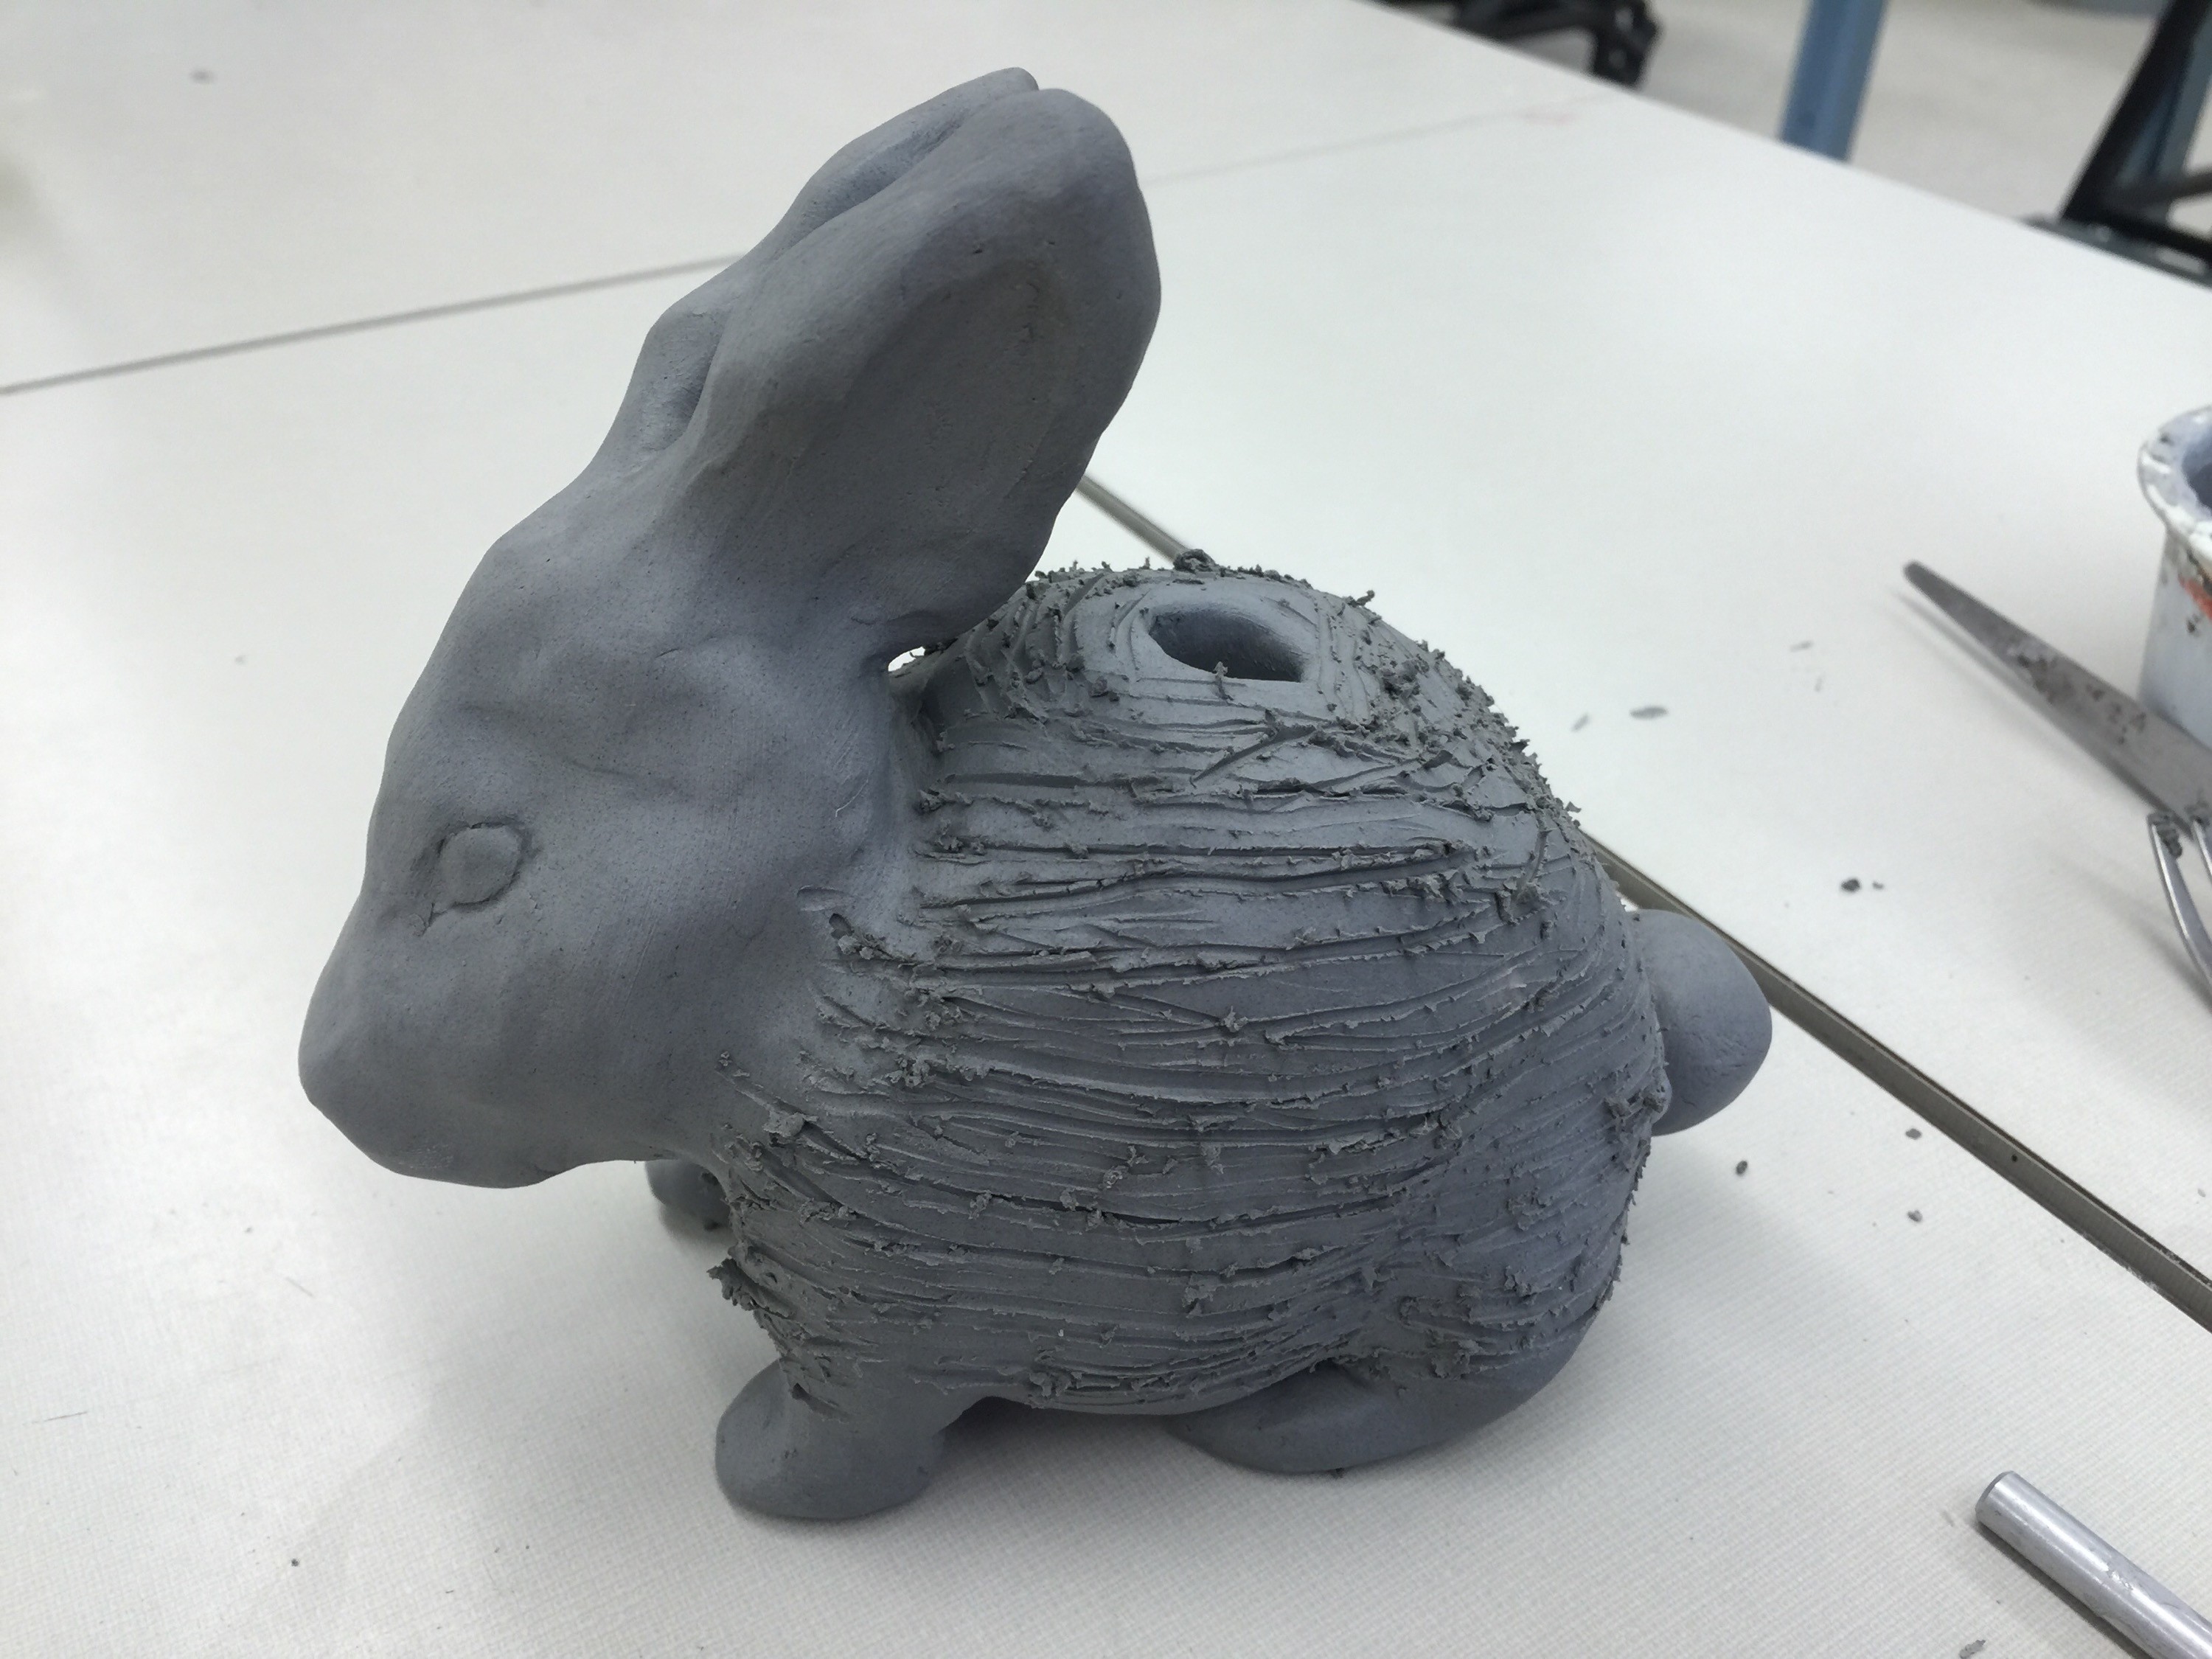
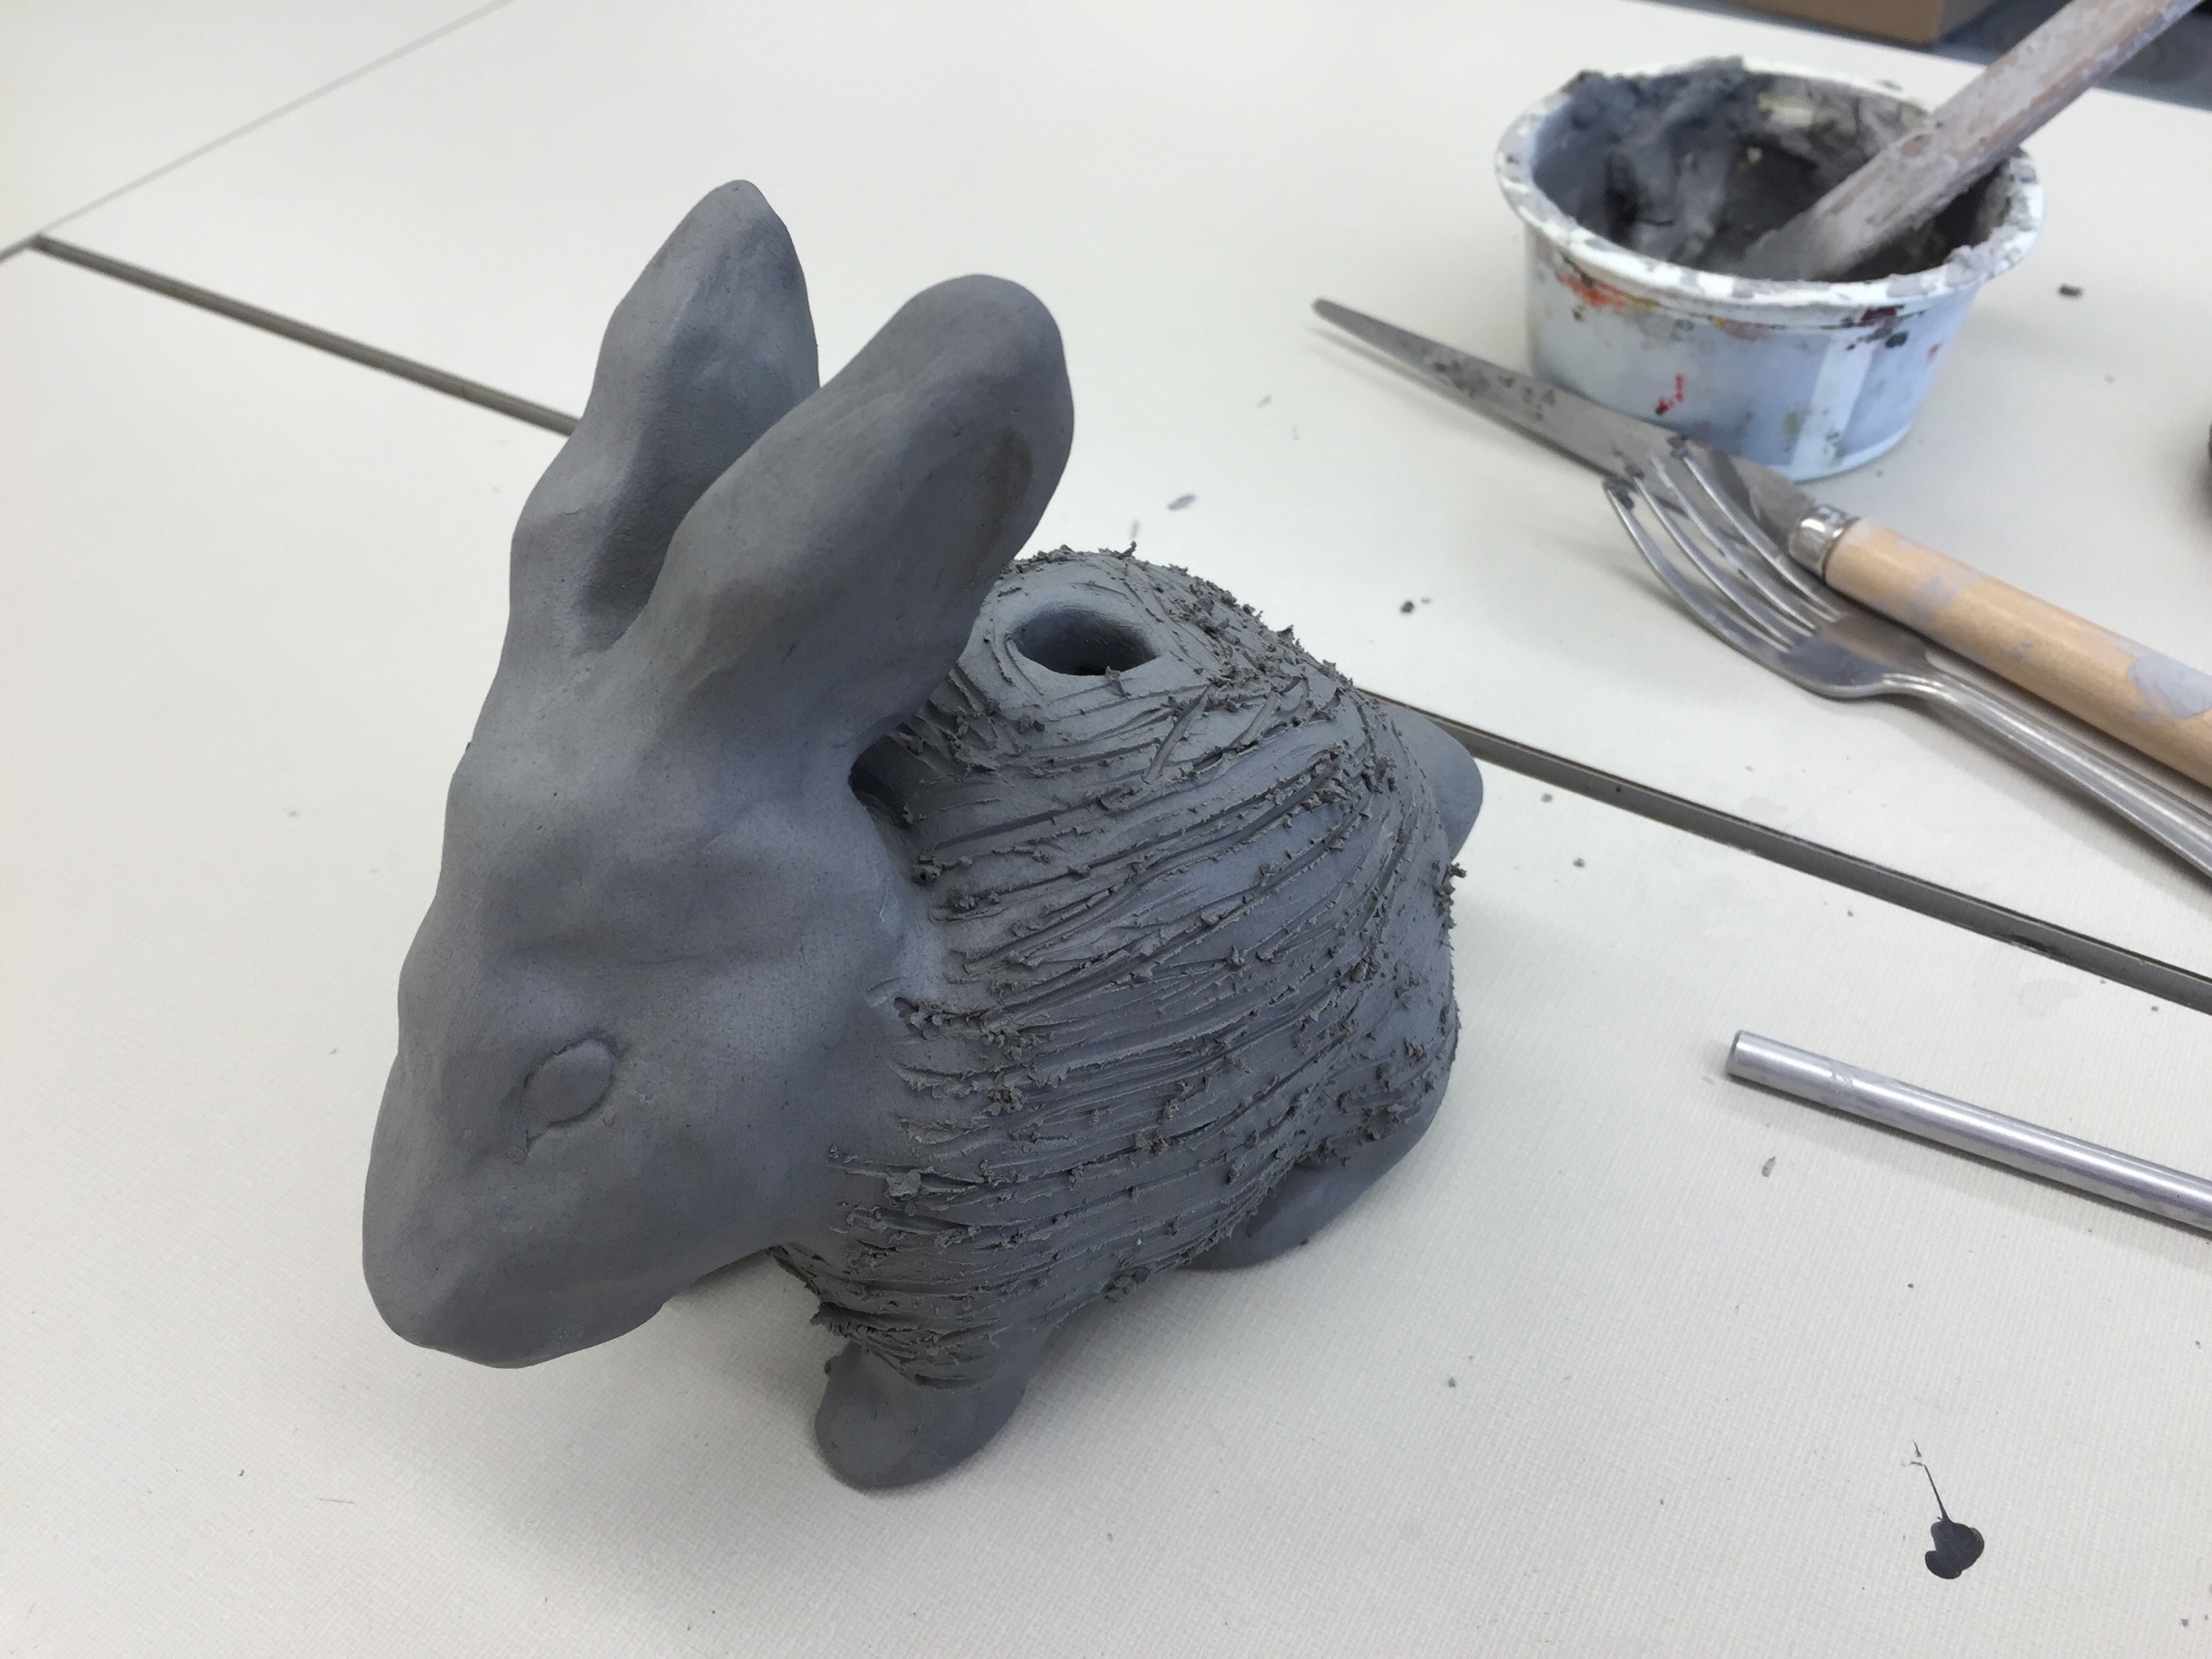
3.2. Preparing the Surface for Seed Adhesion
- Scoring: Scratch the surface where seeds will be applied to create grooves.
- Creating a Water Reservoir: Design a small depression to hold water, keeping seeds moist.
- Grooves: After the hole is made I scratched grooves everywhere I intended to put chia. The grooves give the seeds something to cling to when you apply them later and retain a mini pool of water.
3.3. Drying and Firing (if applicable)
- Slow Drying: Allow the clay to dry slowly to prevent cracks, typically over several days.
- Kiln Firing: If using terra cotta, fire the clay in a kiln according to the clay’s instructions.
3.4 Sealing the Clay: Waterproofing for Longevity
- Applying Sealant: Apply a non-toxic, waterproof sealant to the entire clay structure to prevent water damage.
- Multiple Coats: Apply multiple coats, allowing each to dry thoroughly before applying the next.
- Check for Coverage: Ensure every part of the clay is covered to prevent mold and ensure long-term use.
3.5. Decorating Your Chia Pet (Optional)
- Painting: Use non-toxic paints to add color and detail.
- Glazing: Apply a waterproof glaze for a glossy finish.
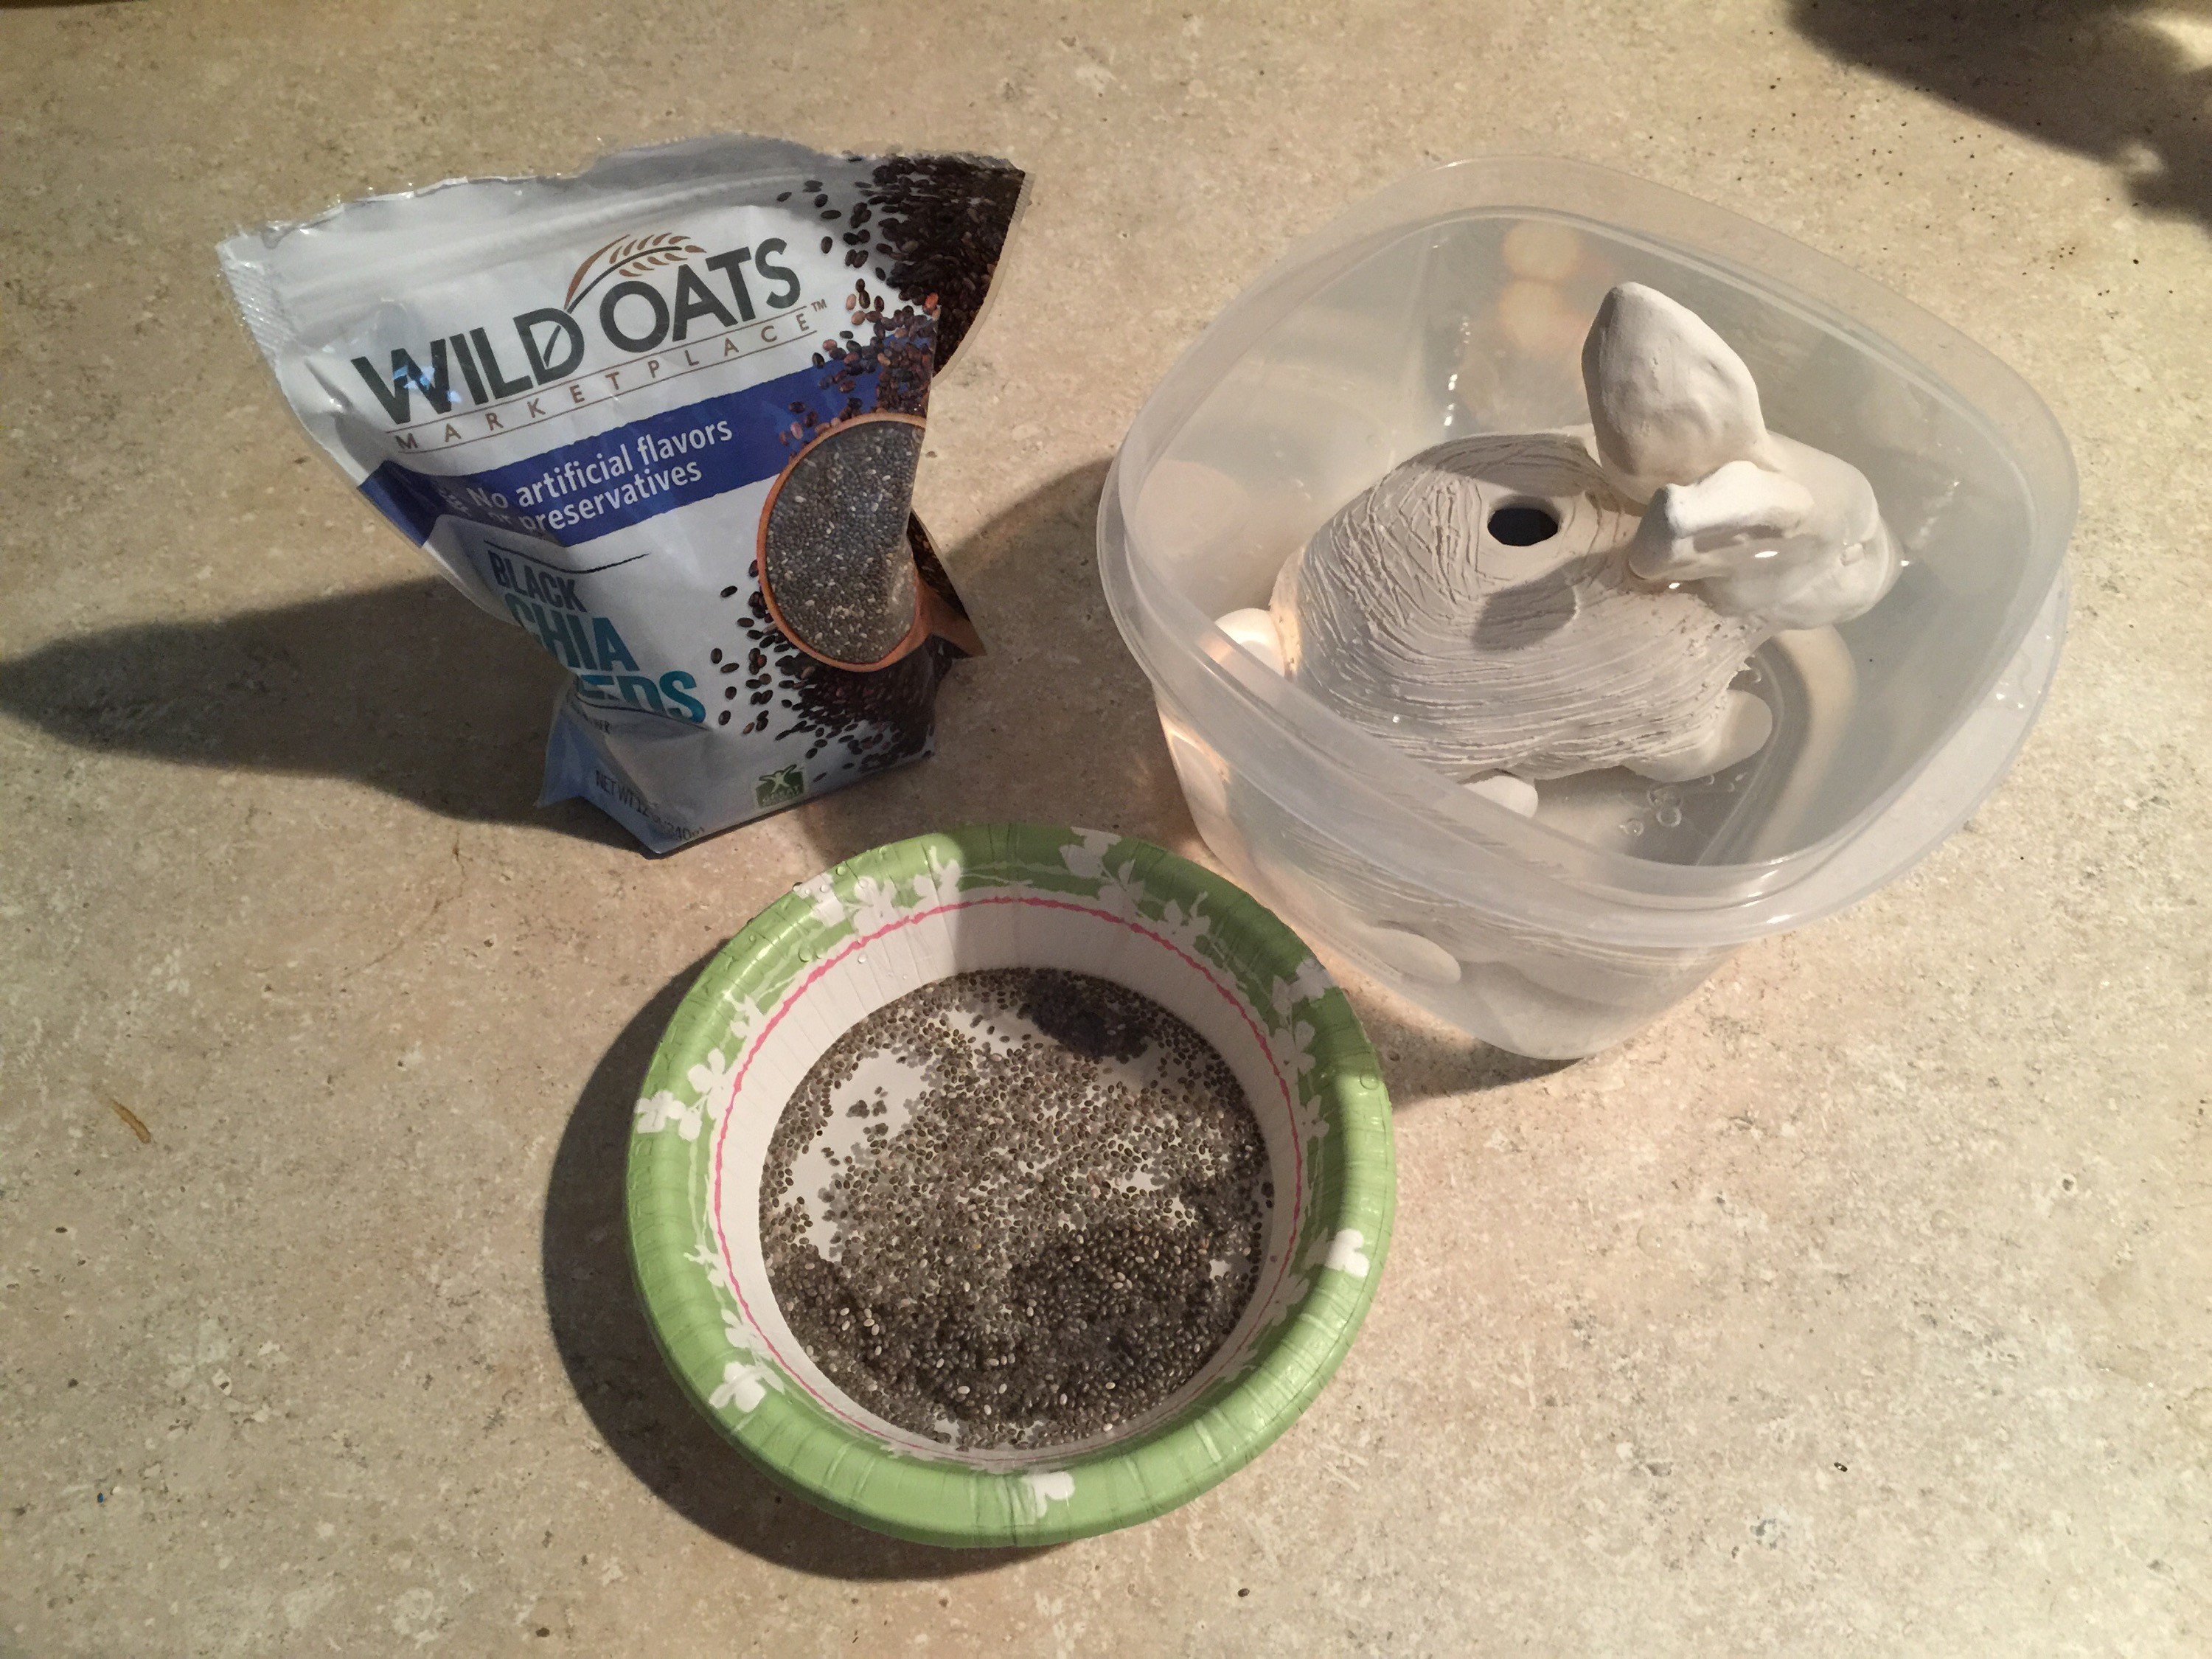
3.6. Applying the Chia Seeds
- Soaking Seeds: Soak chia seeds in water for at least 30 minutes to create a gel-like coating.
- Applying the Paste: Spread the chia seed paste onto the prepared surface.
- Securing Seeds: Gently press the seeds onto the clay to ensure they stick.
4. Growing Your Chia Pet: Care and Maintenance
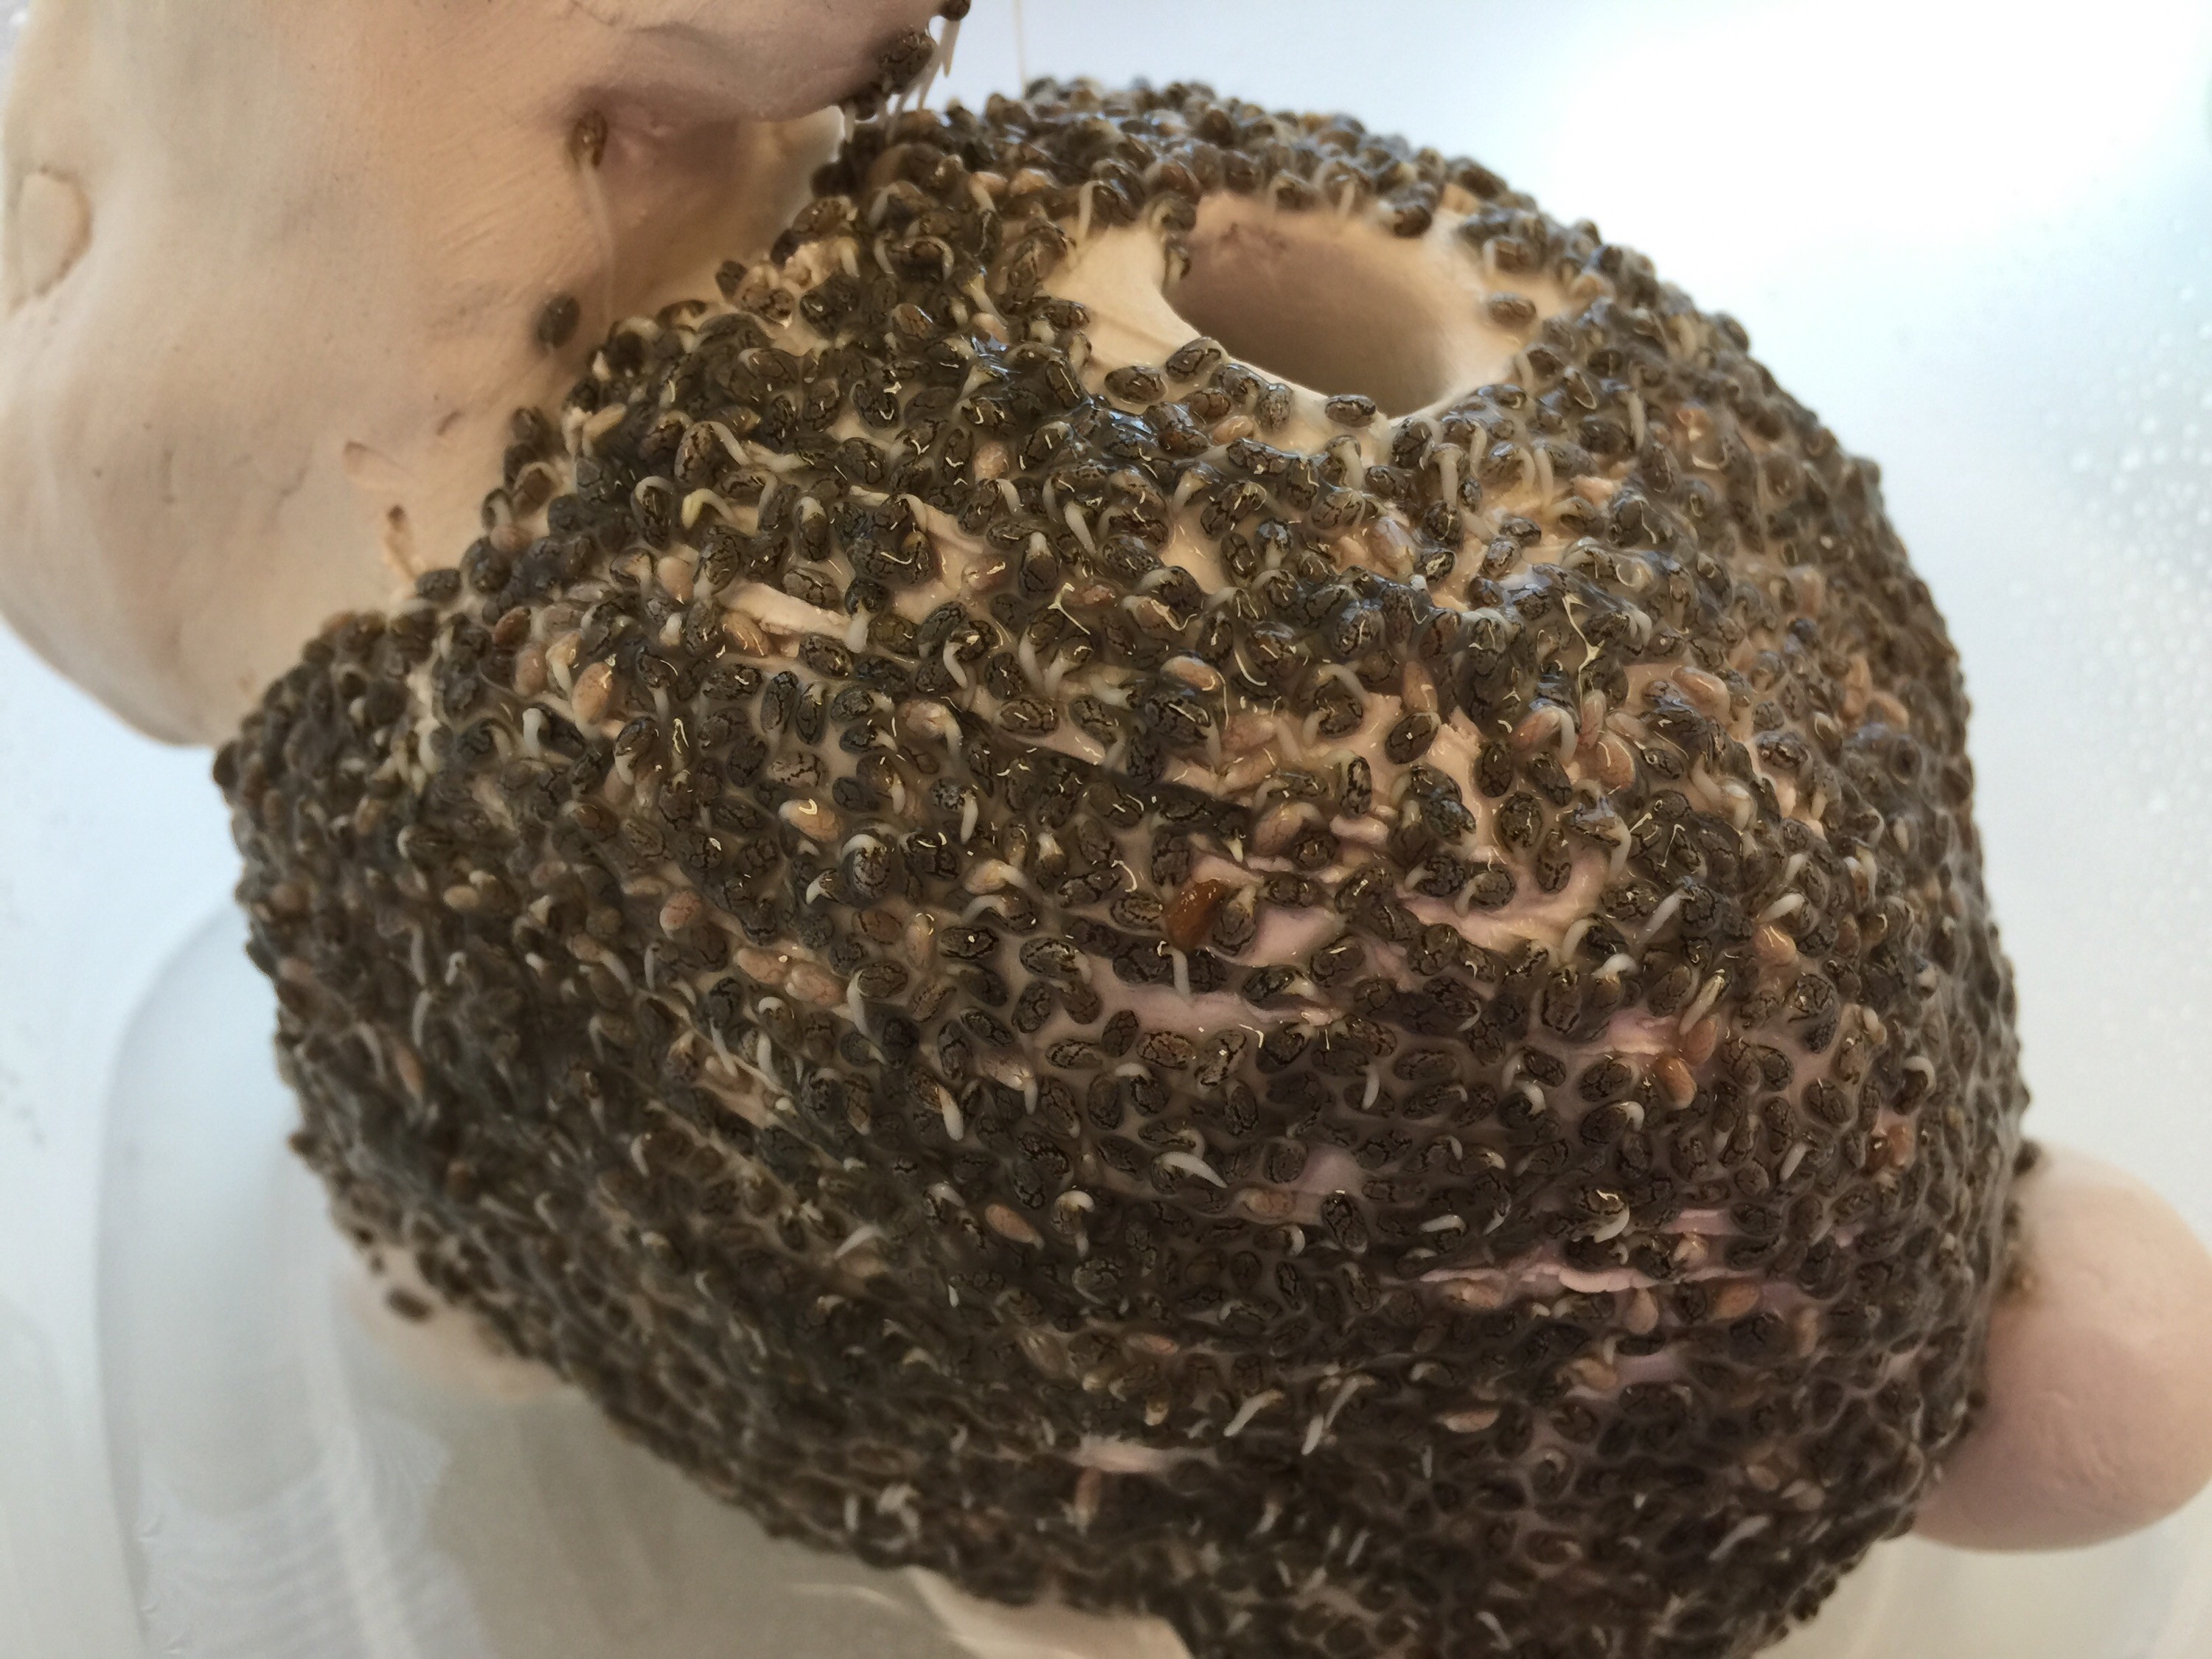
4.1. Initial Seed Germination
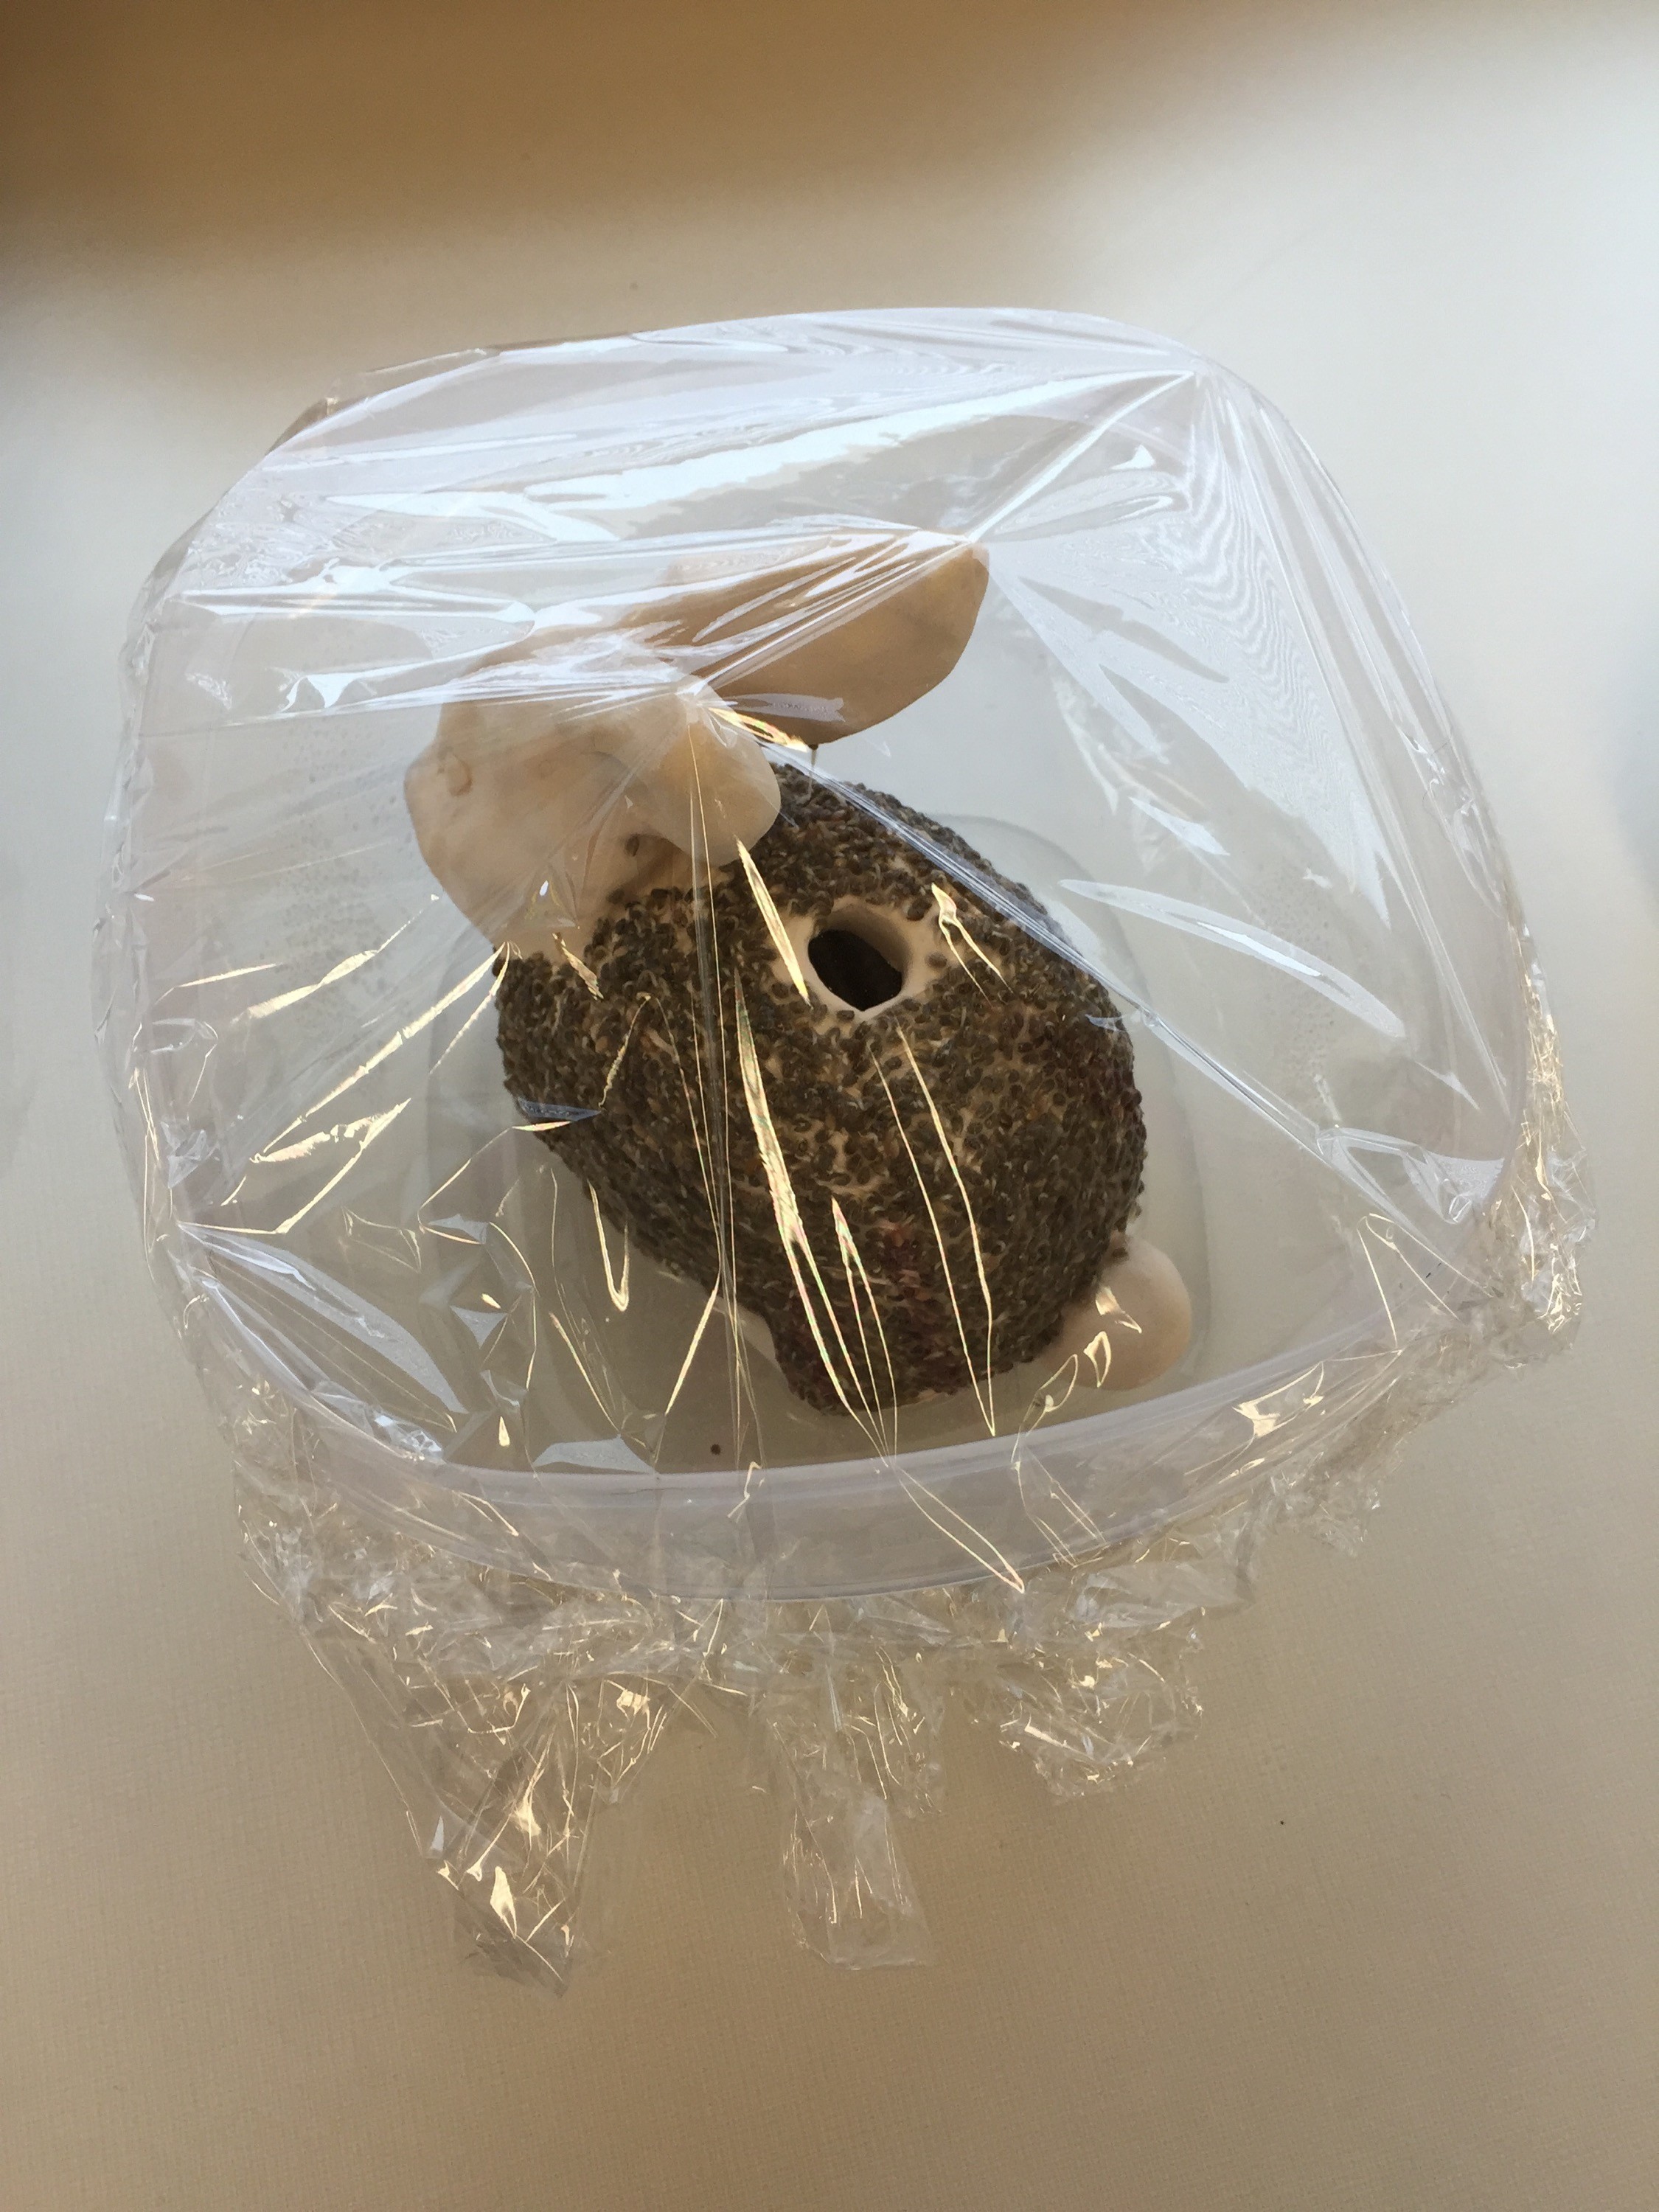
- Humidity: Cover the Chia Pet with plastic wrap to maintain humidity during the initial germination phase.
- Light: Place in indirect sunlight to encourage growth.
- Watering: Keep the seeds moist by spraying with water regularly.
4.2. Daily Watering Techniques
- Spray Bottle: Use a spray bottle to gently mist the seeds daily.
- Water Reservoir: Ensure the water reservoir is always filled to provide constant moisture.
4.3. Ideal Light Conditions
- Indirect Sunlight: Avoid direct sunlight, which can dry out the seeds too quickly.
- Artificial Light: Supplement with artificial light if natural light is insufficient.
4.4. Troubleshooting Common Issues
- Mold: Ensure good air circulation and avoid overwatering to prevent mold.
- Uneven Growth: Rotate the Chia Pet to ensure even light exposure.
- Seed Displacement: Gently reapply seeds if they fall off.
4.5 Maintaining Your Chia Pet: Pruning and Refreshing
- Pruning Sprouts: Trim overgrown sprouts to maintain the desired shape and encourage denser growth.
- Refreshing Seeds: Reapply fresh chia seeds every few weeks to keep the growth vibrant.
- Cleaning the Base: Periodically clean the clay base to prevent mold and algae buildup.
5. Advanced Techniques and Creative Ideas
5.1. Using Different Types of Seeds
Experiment with alfalfa, flax, or cress seeds for varied textures and colors.
5.2. Creating Multi-Layered Designs
Apply different seeds to create patterns and textures.
5.3. Incorporating Additional Decorative Elements
Add stones, beads, or small figurines for extra flair.
5.4 Seasonal Themes: Designing for Holidays and Special Events
- Holiday Designs: Create Chia Pets shaped like pumpkins for Halloween, Christmas trees for Christmas, or hearts for Valentine’s Day.
- Seasonal Planting: Use seeds that sprout in seasonal colors to match the time of year.
- Event-Based Themes: Design Chia Pets for birthdays, anniversaries, or other special occasions.
6. The Science Behind Chia Pet Growth
6.1. Understanding Chia Seed Germination
Chia seeds contain enzymes that activate upon contact with water, initiating germination.
6.2. The Role of Water and Light
Water hydrates the seeds, while light provides the energy for photosynthesis.
6.3. Soil vs. Clay: What Works Best?
Clay retains moisture effectively, providing a stable environment for seed growth.
6.4 Nutritional Benefits of Chia Sprouts: A Healthy Harvest
- Rich in Nutrients: Chia sprouts are packed with omega-3 fatty acids, fiber, and antioxidants.
- Edible Sprouts: Harvest and add chia sprouts to salads, sandwiches, or smoothies for a nutritional boost.
- Health Benefits: Regular consumption can improve digestive health and provide sustained energy. According to a study published in the “Journal of Agricultural and Food Chemistry,” chia seeds are an excellent source of dietary fiber and antioxidants.
7. Chia Pets and Sustainability
7.1. Eco-Friendly Materials for DIY Projects
Use recycled clay and organic seeds to minimize environmental impact.
7.2. Reducing Waste with Reusable Designs
Create durable Chia Pets that can be replanted multiple times.
7.3. Composting Old Sprouts
Compost the sprouts after they’ve finished growing to enrich your garden.
7.4. Educating Through Activity: Teaching Children About Sustainable Living
- Hands-On Learning: Involve children in the process to teach them about plant life cycles and sustainability.
- Eco-Consciousness: Encourage the use of sustainable materials and practices.
- Responsibility: Teach children to care for their Chia Pets, fostering a sense of responsibility and environmental stewardship.
8. Chia Pets in Education and Therapy
8.1. Educational Benefits for Children
Chia Pets offer hands-on learning about plant life cycles and responsibility.
8.2. Therapeutic Uses for Mental Well-Being
Gardening and crafting can reduce stress and improve mental health.
8.3. Incorporating Chia Pets into the Classroom
Use Chia Pets as a teaching tool to demonstrate biological processes.
8.4 Art Therapy: Expressing Emotions Through Creative Gardening
- Creative Outlet: Use Chia Pet design as a medium for expressing emotions and creativity.
- Mindfulness: The repetitive tasks of planting and caring for a Chia Pet can promote mindfulness and relaxation. A study by the American Horticultural Therapy Association found that horticultural therapy can significantly reduce symptoms of anxiety and depression.
- Personal Growth: Observe the growth of the Chia Pet as a metaphor for personal growth and resilience.
9. Where to Find Inspiration and Resources
9.1. Online Communities and Forums
Join online groups to share ideas and get advice from other Chia Pet enthusiasts.
9.2. Books and Tutorials
Explore books and online tutorials for advanced techniques and design ideas.
9.3. Local Craft Stores and Workshops
Attend local workshops to learn from experts and find unique materials.
9.4 Showcasing Your Creation: Sharing Your Chia Pet with the World
- Social Media: Share your Chia Pet creations on platforms like Instagram, Facebook, and Pinterest.
- Local Competitions: Enter your Chia Pet in local gardening or craft competitions.
- Community Events: Display your Chia Pet at community fairs and events to inspire others.
10. Frequently Asked Questions (FAQ) About Making Chia Pets
10.1. What kind of clay is best for a Chia Pet?
Terra cotta clay is the best choice due to its porosity, which helps retain moisture, but air-dry clay can also work if sealed properly.
10.2. How long do chia seeds take to sprout?
Chia seeds typically sprout within 3-7 days under optimal conditions.
10.3. Can I use other types of seeds besides chia seeds?
Yes, you can experiment with alfalfa, flax, or cress seeds for different textures and colors.
10.4. How often should I water my Chia Pet?
Water your Chia Pet daily, keeping the seeds consistently moist but not waterlogged.
10.5. What do I do if mold starts growing on my Chia Pet?
Ensure good air circulation and avoid overwatering to prevent mold. If mold appears, gently clean the affected area with a mild fungicide.
10.6. How do I prevent my Chia Pet from cracking?
Dry the clay slowly and evenly to prevent cracks, and avoid exposing it to extreme temperature changes.
10.7. Is it safe to eat chia sprouts from my Chia Pet?
Yes, chia sprouts are safe to eat and are packed with nutrients. Just ensure they are grown in a clean environment and free from mold.
10.8. Can I reuse my Chia Pet?
Yes, you can reuse your Chia Pet by replanting fresh chia seeds after the initial sprouts have finished growing.
10.9. How do I decorate my Chia Pet?
Use non-toxic paints or glazes to decorate your Chia Pet, ensuring they are waterproof to protect the clay.
10.10. Where can I find chia seeds for my Chia Pet?
Chia seeds can be found at most grocery stores, health food stores, and online retailers. Look for organic options to avoid pesticides.
11. Real-Life Success Stories: Inspiring Chia Pet Creations
11.1. Case Study 1: A Teacher’s Classroom Project
A teacher used Chia Pets to teach students about plant biology, resulting in increased engagement and understanding of the subject.
11.2. Case Study 2: A Senior Citizen’s Therapeutic Garden
An elderly individual found relief from arthritis by engaging in the therapeutic activity of creating and caring for Chia Pets.
11.3. Case Study 3: A Community Garden Initiative
A community garden used Chia Pets to raise awareness about sustainable gardening practices.
11.4 From Hobby to Business: Monetizing Your Chia Pet Skills
- Etsy Shop: Create and sell your unique Chia Pet designs on Etsy to reach a global audience.
- Local Markets: Participate in local craft fairs and markets to showcase and sell your creations.
- Custom Orders: Offer custom Chia Pet designs for special events and personalized gifts.
12. The Future of DIY Chia Pets: Trends and Innovations
12.1. Smart Chia Pets with Automated Watering Systems
Integrate technology to create Chia Pets that automatically water and monitor growth conditions.
12.2. 3D-Printed Chia Pets
Use 3D printing to create intricate and customized Chia Pet designs.
12.3. Vertical Chia Pet Gardens
Design vertical Chia Pet gardens for space-saving and visually stunning displays.
12.4 Augmented Reality (AR) Chia Pets: Bringing Your Creation to Life
- Interactive Displays: Use AR technology to create interactive displays that show the growth process of your Chia Pet.
- Educational Apps: Develop AR apps that provide information about chia seeds, plant care, and sustainable practices.
- Virtual Customization: Allow users to virtually customize their Chia Pets with different seeds, designs, and decorative elements.
13. PETS.EDU.VN: Your Partner in Pet and Plant Care
13.1. Comprehensive Guides and Resources
Find detailed guides and resources on PETS.EDU.VN to help you care for your Chia Pet and other plants.
13.2. Expert Advice and Support
Get expert advice and support from our team of horticulturalists and plant care specialists.
13.3. Community Forum for Sharing Tips and Ideas
Join our community forum to share your experiences and learn from other plant enthusiasts.
13.4. Explore More at PETS.EDU.VN
At PETS.EDU.VN, we understand the challenges pet owners face in finding reliable information and the desire to provide the best care for their beloved companions. That’s why we offer a comprehensive range of services, including detailed guides on pet care, expert advice on nutrition and health, and a supportive community where you can connect with other pet lovers. Visit PETS.EDU.VN to discover more and enhance your pet care journey.
Address: 789 Paw Lane, Petville, CA 91234, United States. Whatsapp: +1 555-987-6543. Website: PETS.EDU.VN
13.5 Exclusive Offers: Discounts and Promotions for PETS.EDU.VN Members
- Seed Discounts: Enjoy exclusive discounts on high-quality chia seeds and other planting supplies.
- Workshop Vouchers: Receive vouchers for local gardening and crafting workshops.
- Free Consultations: Get free consultations with our plant care experts to address any questions or concerns.
14. Essential Tips for a Thriving Chia Pet
14.1. Choosing the Right Location
Select a spot with indirect sunlight and good air circulation.
14.2. Monitoring Moisture Levels
Keep the seeds consistently moist but not waterlogged.
14.3. Protecting from Pests and Diseases
Regularly inspect your Chia Pet for signs of pests or diseases.
14.4 Winter Care: Keeping Your Chia Pet Alive During Cold Months
- Indoor Placement: Move your Chia Pet indoors to protect it from frost and cold temperatures.
- Supplemental Lighting: Provide supplemental lighting to compensate for shorter daylight hours.
- Reduce Watering: Reduce watering frequency to prevent overhydration in cooler temperatures.
15. Conclusion: Embrace the Joy of DIY Chia Pets
Creating your own Chia Pet is a rewarding experience that combines creativity, education, and sustainability. With the right materials, techniques, and care, you can enjoy a thriving green companion that brings joy to your home or classroom. At PETS.EDU.VN, we’re committed to providing you with the resources and support you need to succeed in all your pet and plant care endeavors, so you can have the expertise to grow a healthy Chia Pet.
15.1 Call to Action: Start Your Chia Pet Project Today!
- Gather Supplies: Visit your local craft store or shop online for the necessary materials.
- Design Your Pet: Sketch out your ideas and choose a theme that inspires you.
- Share Your Progress: Post photos of your Chia Pet project on social media and tag PETS.EDU.VN to share your creation with our community. Explore the joys of DIY Chia Pets and enhance your understanding of plant care, creative arts, and sustainable living with pets.edu.vn.