Does your small dog or cat struggle to reach their favorite window perch or cuddle spot on the couch? Pet Stairs can be the perfect solution, offering a safe and gentle way for them to navigate your home. Beyond functionality, pet stairs can also be a stylish and personalized addition to your pet-friendly living space. This guide provides a free crochet pattern to create comfortable and attractive pet stairs, ensuring your beloved companion can access their favorite spots with ease and in style.
Why Choose Crochet Pet Stairs?
Pet stairs offer numerous benefits for both you and your furry friend. For pets, especially smaller breeds, senior animals, or those with joint issues like arthritis, jumping can be difficult and even harmful over time. Pet stairs eliminate this strain, providing a low-impact alternative to reach elevated areas.
Benefits of Pet Stairs:
- Joint Health: Reduces stress on joints, preventing potential injuries and discomfort, particularly crucial for breeds prone to hip dysplasia or older pets.
- Accessibility: Allows pets of all sizes and abilities to reach sofas, beds, window seats, and other high places independently.
- Independence: Fosters a sense of independence and confidence in pets, knowing they can navigate their environment without struggle.
- Safety: Prevents risky jumps that could lead to falls and injuries, especially important on hard floors or for pets with limited mobility.
- Comfort: Crocheted stairs, especially when filled with soft foam, offer a comfortable and inviting surface for pets to use and even relax on.
- Customization: Crochet allows for endless customization in color, texture, and style, letting you create pet stairs that seamlessly blend with your home decor.
- DIY Satisfaction: Creating your own pet stairs is a rewarding DIY project, offering a sense of accomplishment and a personalized touch for your pet’s comfort.
Beyond their practical use, crochet pet stairs add a touch of warmth and personality to your home. They are far more visually appealing than many commercially available plastic or carpeted pet stairs, and the handmade aspect adds a unique charm. Furthermore, crafting them yourself can be a cost-effective alternative to purchasing pre-made stairs, especially if you already have some yarn and basic crochet supplies.
Materials You’ll Need to Crochet Your Pet Stairs
To embark on this rewarding DIY project, gather the following materials. Choosing the right materials is key for both the durability and comfort of your pet stairs.
For the Stair Form:
- Project Foam: 5 inch project foam is ideal for creating sturdy yet comfortable steps. The original pattern uses Fairfield Project Foam, known for its balance of softness and firmness. Two pieces are recommended for this project.
- Spray Adhesive: Elmer’s Craft Bond Spray Adhesive or a similar spray glue designed for foam and upholstery is necessary to assemble the foam stair form. A stronger option like 3M Super 77 may provide even better hold and require less glue.
- Rotary Cutter (Optional but Recommended): A Clover rotary cutter or a similar tool can significantly ease and improve the precision of cutting the foam. Alternatively, a bread knife can be used with careful, slow cutting.
- Ruler or Measuring Tape: Essential for accurate measurement and marking of the foam before cutting.
- Marker or Pen: To mark cutting lines on the foam.
For the Crochet Cover:
- Yarn: Red Heart With Love yarn or a similar sturdy, machine-washable yarn in your desired colors. The pattern uses two colors (Color A and Color B) for visual appeal and design. Choose a yarn that is soft enough for your pet’s comfort but durable enough to withstand regular use.
- Crochet Hook: The pattern likely uses a hook size appropriate for the chosen yarn weight. Refer to the gauge section of the pattern for specific hook size recommendations.
- Stitch Markers: Helpful for marking corners and key points during the crochet process, especially for seaming.
- Yarn Needle: For weaving in ends and seaming crochet pieces together.
- Scissors: For cutting yarn.
Optional Materials:
- Batting: Fairfield Batting or similar batting can be used to add extra cushioning or shape to the stairs if desired.
- Non-Slip Material: Consider adding non-slip fabric or spray to the bottom of the finished stairs for added stability, especially on smooth floors.
Having all materials prepared beforehand will streamline your crafting process and ensure a smoother, more enjoyable DIY experience.
Fairfield Project Foam, the recommended material for the inner structure of these crochet pet stairs, known for its ideal firmness and comfort.
Getting Started: Understanding the Crochet Pattern
Before diving into the crochet instructions, familiarize yourself with the pattern details and ensure you have a good understanding of the basics.
Skill Level: Intermediate. This project involves 3-dimensional crochet, chevron patterns, and seaming, making it suitable for crocheters with some experience.
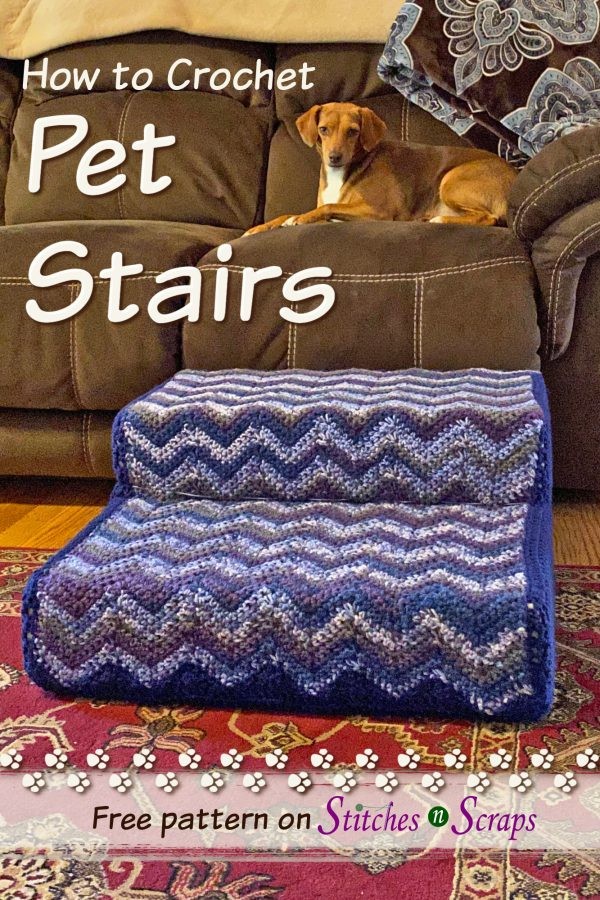
Size: Finished stairs will measure approximately 24 inches wide x 24 inches deep x 10 inches tall. Adjustments can be made to the pattern to customize the size, but ensure the foam form is adjusted accordingly.
Gauge: 10 double crochet stitches x 6.5 rows = 4 inches. Checking your gauge is crucial to ensure your finished cover fits the foam form correctly. If your gauge differs, adjust your hook size to match the pattern gauge.
Abbreviations (US Terms):
- ch = chain
- sc = single crochet
- hdc = half double crochet
- dc = double crochet
- tr = treble crochet
- sc2tog = single crochet next 2 stitches together
- sc3tog = single crochet next 3 stitches together
- st(s) = stitch(es)
Special Stitches:
- Single Crochet 2 Together (sc2tog): (Insert hook, yarn over and pull up a loop) in each of next 2 stitches, yarn over and pull through all 3 loops on hook. This is a decrease stitch.
- Single Crochet 3 Together (sc3tog): (Insert hook, yarn over and pull up a loop) in each of next 3 stitches, yarn over and pull through all 4 loops on hook. This is a double decrease stitch.
Understanding these abbreviations and stitch techniques will make following the pattern instructions significantly easier. It’s advisable to practice the special stitches if you are not already familiar with them.
Step-by-Step Crochet Pet Stairs Pattern
Follow these detailed instructions to create your own set of crochet pet stairs. The pattern is divided into sections for clarity: creating the foam stair form, crocheting the main cover section, crocheting the side panels, and assembly.
1. Stair Form Construction
Measure the Foam
- On your project foam piece, measure and draw a line 12 inches from one short edge, going all around the top, sides, and bottom.
- This marking will divide the foam into two sections: a 12 x 24 x 5 inch piece and a 24 x 24 x 5 inch piece.
- Double-check your measurements to ensure accuracy before cutting.
Cut the Foam
- Safety First: Cutting foam can be messy. Work outdoors or in a well-ventilated area that is easy to clean.
- Cut along the marked line straight down through the foam.
- Use a rotary cutter and ruler to score a clean line all around, then use a bread knife to complete the cut. Cut slowly and carefully to maintain a straight edge. Alternatively, a band saw or electric knife can be used if available.
Glue the Foam Pieces
- Ventilation: Ensure you are in a well-ventilated area or outdoors when using spray glue. Follow the safety instructions on your chosen glue product.
- Position the smaller foam section on top of the larger section, aligning the cut edges at the back. Make any necessary adjustments to ensure a snug fit.
- Identify the surfaces that will be glued together (the bottom of the smaller piece and the top of the larger piece).
- Apply spray glue to the designated surfaces according to the glue’s instructions. Ensure adequate coverage for a strong bond. For Elmer’s Spray Glue, multiple coats might be needed for a secure hold.
- Carefully place the smaller foam piece onto the larger piece, aligning the cut edges.
- Allow the glue to set and cure completely before moving the foam form. The pattern recommends waiting 24 hours for Elmer’s Craft Bond Spray Adhesive.
2. Crochet Cover – Main Section
The main section of the cover is crocheted in rows and incorporates color changes and shaping to fit the stair form.
Top Back Panel
- With Color A (Yarn A), chain 62.
- Row 1: Single crochet (sc) in the 2nd chain from the hook and in each chain across. (61 sc)
- Rows 2-9: Chain 3 (counts as double crochet – dc), turn, double crochet in the next stitch and in each stitch across. (61 dc)
- Gauge Check: After Row 9, the piece should measure approximately 24 inches wide x 5.75 inches tall. Adjust hook size if needed to achieve gauge.
- Row 10 (Chevron Row): Chain 1, sc in the first stitch, sc in the next stitch, half double crochet (hdc) in the next 2 stitches, dc in the next stitch, treble crochet (tr) in the next stitch, dc in the next stitch, hdc in the next 2 stitches, sc in the next stitch, repeat the following sequence across to the last stitch: (slip stitch (sl st) in the next stitch, sc in the next stitch, hdc in the next 2 stitches, dc in the next stitch, tr in the next stitch, dc in the next stitch, hdc in the next 2 stitches, sc in the next stitch), end with sc in the last stitch. Change to Color B (Yarn B) and fasten off Color A. (This row creates 6 chevron points)
Top & Front Panel
- With Color B (Yarn B):
- Row 11: Chain 1, turn, single crochet 2 together (sc2tog), single crochet in the next 3 stitches, 3 single crochet in the next stitch (increase), single crochet in the next 3 stitches, repeat the following sequence across to the last 2 stitches: (single crochet 3 together (sc3tog), single crochet in the next 3 stitches, 3 single crochet in the next stitch, single crochet in the next 3 stitches), end with single crochet in the last 2 stitches. (61 stitches)
- Rows 12-85: Repeat Row 11.
- Marker Placement: Place stitch markers at each end of Rows 11, 37, 48, 74, and 85. These markers will align with the corners of the side pieces during seaming.
- Change to Color A (Yarn A) and fasten off Color B.
Bottom & Bottom Back Panel
- With Color A (Yarn A):
- Row 86 (Chevron Row): Chain 3 (counts as tr), treble crochet in the same stitch, double crochet in the next stitch, half double crochet in the next 2 stitches, single crochet 3 together, half double crochet in the next 2 stitches, double crochet in the next stitch, repeat the following sequence across to the last stitch: (3 treble crochet in the next stitch, double crochet in the next stitch, half double crochet in the next 2 stitches, single crochet 3 together, half double crochet in the next 2 stitches, double crochet in the next stitch), end with 2 treble crochet in the last stitch. (61 stitches)
- Rows 87-131: Chain 3 (counts as dc), turn, double crochet in the next stitch and in each stitch across.
- Row 132: Chain 1, single crochet in each stitch across. Fasten off.
- Marker Placement: Place stitch markers at each end of Row 123.
3. Crochet Cover – Sides (Make 2)
Create two identical side panels for the pet stairs cover.
- With Color A (Yarn A), chain 62.
- Row 1: Double crochet (dc) in the 4th chain from hook and in each chain across. (60 dc)
- Rows 2-8: Chain 3, turn, double crochet in the next stitch and in each stitch across. (60 dc)
- Row 9 (Step Shaping): Chain 3, turn, double crochet in the next 29 stitches, leaving the remaining stitches unworked. (30 dc)
- Rows 10-16: Chain 3, turn, double crochet in the next stitch and in each stitch across. (30 dc). Fasten off.
- Repeat steps 1-5 to make a second side panel.
4. Assembly and Finishing
Seaming the Cover
- Placement: Place the main cover section on a flat surface or directly onto the foam stair form.
- Pinning: Align the stitch markers on one side panel with the corresponding corners on the main section. Pin or clip the side panel in place, starting from the front corner and extending around the side and back. The back sections of the side panels should meet in the middle of the back of the main section.
- Seaming: Using a yarn needle and Color A yarn, sew the side panel to the main section using your preferred seaming method (e.g., whip stitch or mattress stitch). Ensure a secure and neat seam all the way around the side panel.
- Repeat steps 2-3 for the second side panel. Leave the back opening unseamed for now.
- Weaving Ends: Weave in all loose yarn ends neatly using a yarn needle.
- Turning Right Side Out: If you seamed the cover flat, carefully turn it right side out so that the seams are on the inside. If you seamed it directly on the foam, remove the cover and then turn it right side out.
Drawstring and Back Closure
- Insert Foam Form: Carefully insert the foam stair form into the crocheted cover through the open back.
- Drawstring Preparation: Cut a length of Color B yarn approximately 80 inches long (adjust as needed for your yarn and tension).
- Running Stitch: Starting at one end of the back opening, use the Color B yarn and a yarn needle to sew large running stitches around the side, front, and other side of the cover, approximately midway up the sides. End at the other end of the back opening.
- Lacing Back Opening: Starting from the ends of the back opening and meeting in the middle, use the Color B yarn to lace the back opening closed using large whip stitches, similar to lacing shoes.
- Tightening and Securing: Pull the drawstring ends snugly while lacing to tighten the cover and create a crisp line defining the steps. Tuck in any excess fabric for a neat finish.
- Tie and Trim: Tie the drawstring ends in a bow at the back to secure the closure. Trim any excess yarn if necessary.
To remove the cover for washing, simply untie the bow, undo the back lacing, and pull out the foam stair form. Machine wash the crochet cover according to the yarn care instructions and reassemble once dry.
Tips for Success and Customization
- Yarn Choice: While Red Heart With Love is recommended, feel free to experiment with other sturdy, machine-washable yarns. Consider using thicker yarns for a quicker project and a chunkier look.
- Color Play: Customize the colors to match your home decor or your pet’s personality. Use stripes, color blocking, or even intarsia for more intricate designs.
- Non-Slip Base: For added safety, especially on hardwood or tile floors, attach non-slip fabric to the bottom of the finished stairs or apply a non-slip spray.
- Glue Strength: If you find Elmer’s Craft Bond Spray Adhesive insufficient, consider using a stronger foam-specific spray glue like 3M Super 77 for a more permanent bond.
- Step Height Adjustment: While the pattern is for two steps, you can adjust the height and number of steps by modifying the foam form and adjusting the crochet pattern accordingly. Ensure the proportions remain suitable for your pet’s size.
- Embellishments: Add personal touches like crocheted appliques, embroidery, or buttons to further customize your pet stairs.
Caring for Your Crochet Pet Stairs
Maintaining your crochet pet stairs is easy thanks to the removable and machine-washable cover.
- Washing: When needed, remove the crochet cover from the foam form. Machine wash the cover in cold water on a gentle cycle. Tumble dry on low or air dry to prevent shrinkage and maintain yarn quality.
- Spot Cleaning: For minor spills or dirt, spot clean the cover with a mild detergent and damp cloth.
- Foam Care: The foam form should generally not need cleaning. If it does get soiled, spot clean gently with a damp cloth and mild soap, allowing it to air dry completely before reassembling the cover.
- Regular Checks: Periodically check the stairs for any signs of wear and tear, both on the crochet cover and the foam form. Repair any loose seams or damage promptly to ensure safety and longevity.
By following this comprehensive guide and free crochet pattern, you can create a beautiful, functional, and personalized set of pet stairs for your furry companion. Enjoy the process of crafting these cozy steps and watching your pet confidently reach new heights!