The Bissell Revolution Pet Pro is a powerful tool for pet owners looking to keep their homes clean and fresh, and understanding How To Use Bissell Revolution Pet Pro ensures you get the best results, removing tough stains and odors effectively. PETS.EDU.VN offers a wealth of information to guide you through every step, ensuring a spotless and healthy home for you and your furry friends. Regular carpet cleaning and pet stain removal are key to a happy, healthy home.
1. Understanding Your Bissell Revolution Pet Pro
Before diving into the cleaning process, familiarizing yourself with the parts and functions of your Bissell Revolution Pet Pro is crucial. This knowledge ensures you use the machine effectively and safely.
1.1 Key Components of the Bissell Revolution Pet Pro
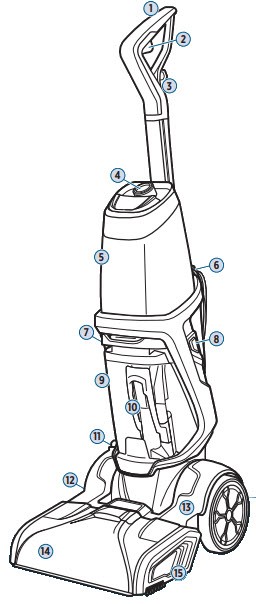
The Bissell Revolution Pet Pro is engineered with several key components working together to deliver optimal cleaning performance.
- Handle: Provides a comfortable grip and allows for easy maneuvering of the machine.
- Clean Water Tank: Holds the clean water and cleaning solution mixture.
- Dirty Water Tank: Collects the dirty water extracted from your carpets.
- Power Cord: Supplies the necessary electrical power to operate the machine.
- Spray Trigger: Dispenses the cleaning solution onto the carpet.
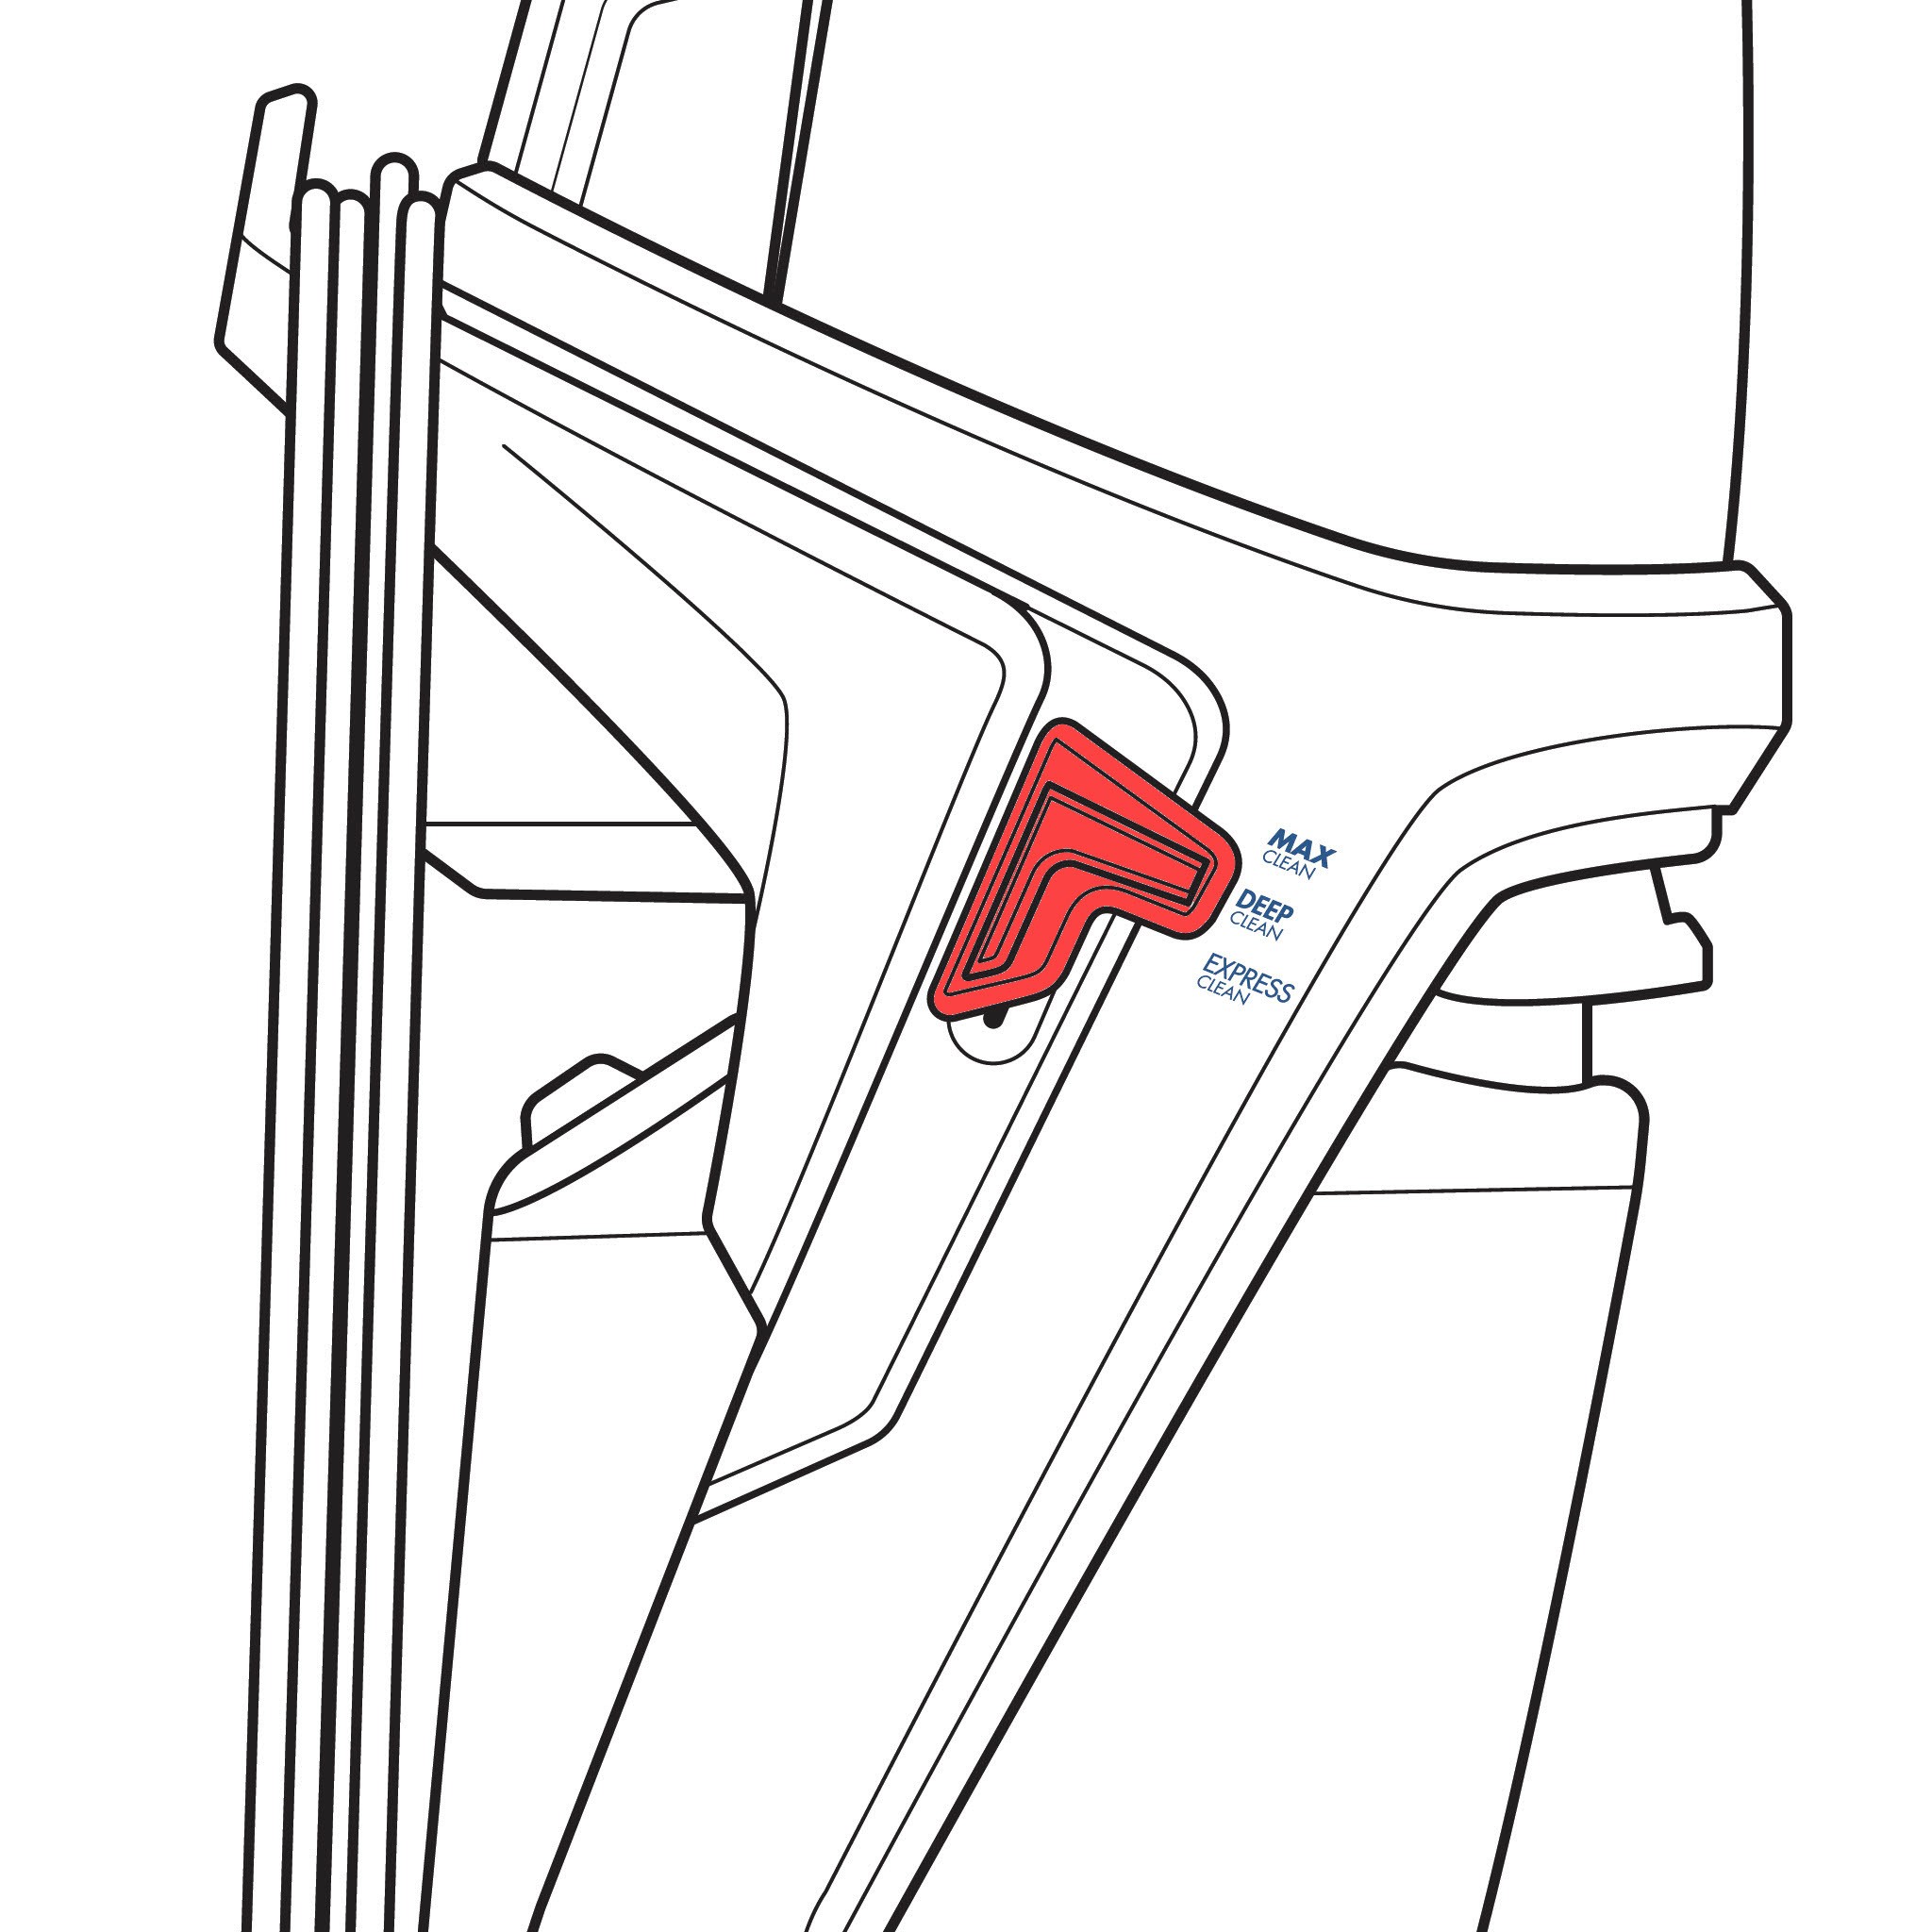
- Cleaning Mode Switch: Allows you to select the appropriate cleaning mode for your needs.
- Brush Roll: Agitates the carpet fibers to loosen and lift dirt and stains.
- Hose and Tools: Provides targeted cleaning for upholstery, stairs, and hard-to-reach areas.
Understanding these components and their functions is the first step in mastering how to use Bissell Revolution Pet Pro.
1.2 Model Variations
The ProHeat 2X Revolution Pet Pro series includes various models such as 1964, 1986, 2007, 2283, 3586, 3587, 3589, and 3588. While the core functionality remains the same, standard accessories and specific features may vary. Always refer to your model’s user manual for detailed information.
Understanding the various components is crucial for effective pet stain treatment.
Familiarizing yourself with the parts legend ensures efficient carpet deep cleaning.
2. Assembling Your Bissell Revolution Pet Pro
Proper assembly is essential for the optimal performance of your Bissell Revolution Pet Pro. Follow these steps to ensure your machine is ready for use.
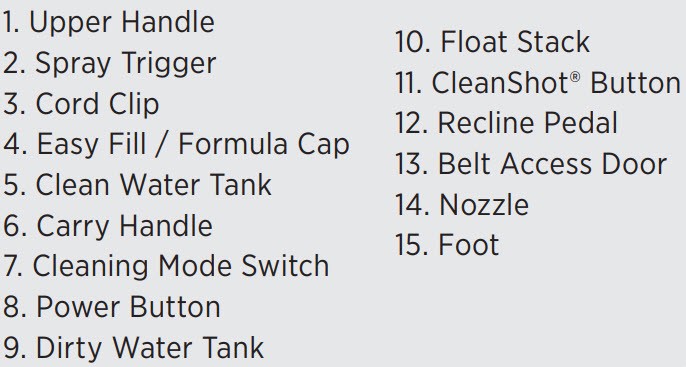
2.1 Handle and Carry Handle Installation
- Handle Insertion: Firmly insert the handle into the top of the machine until it clicks into place. This ensures the handle is securely attached for comfortable use.
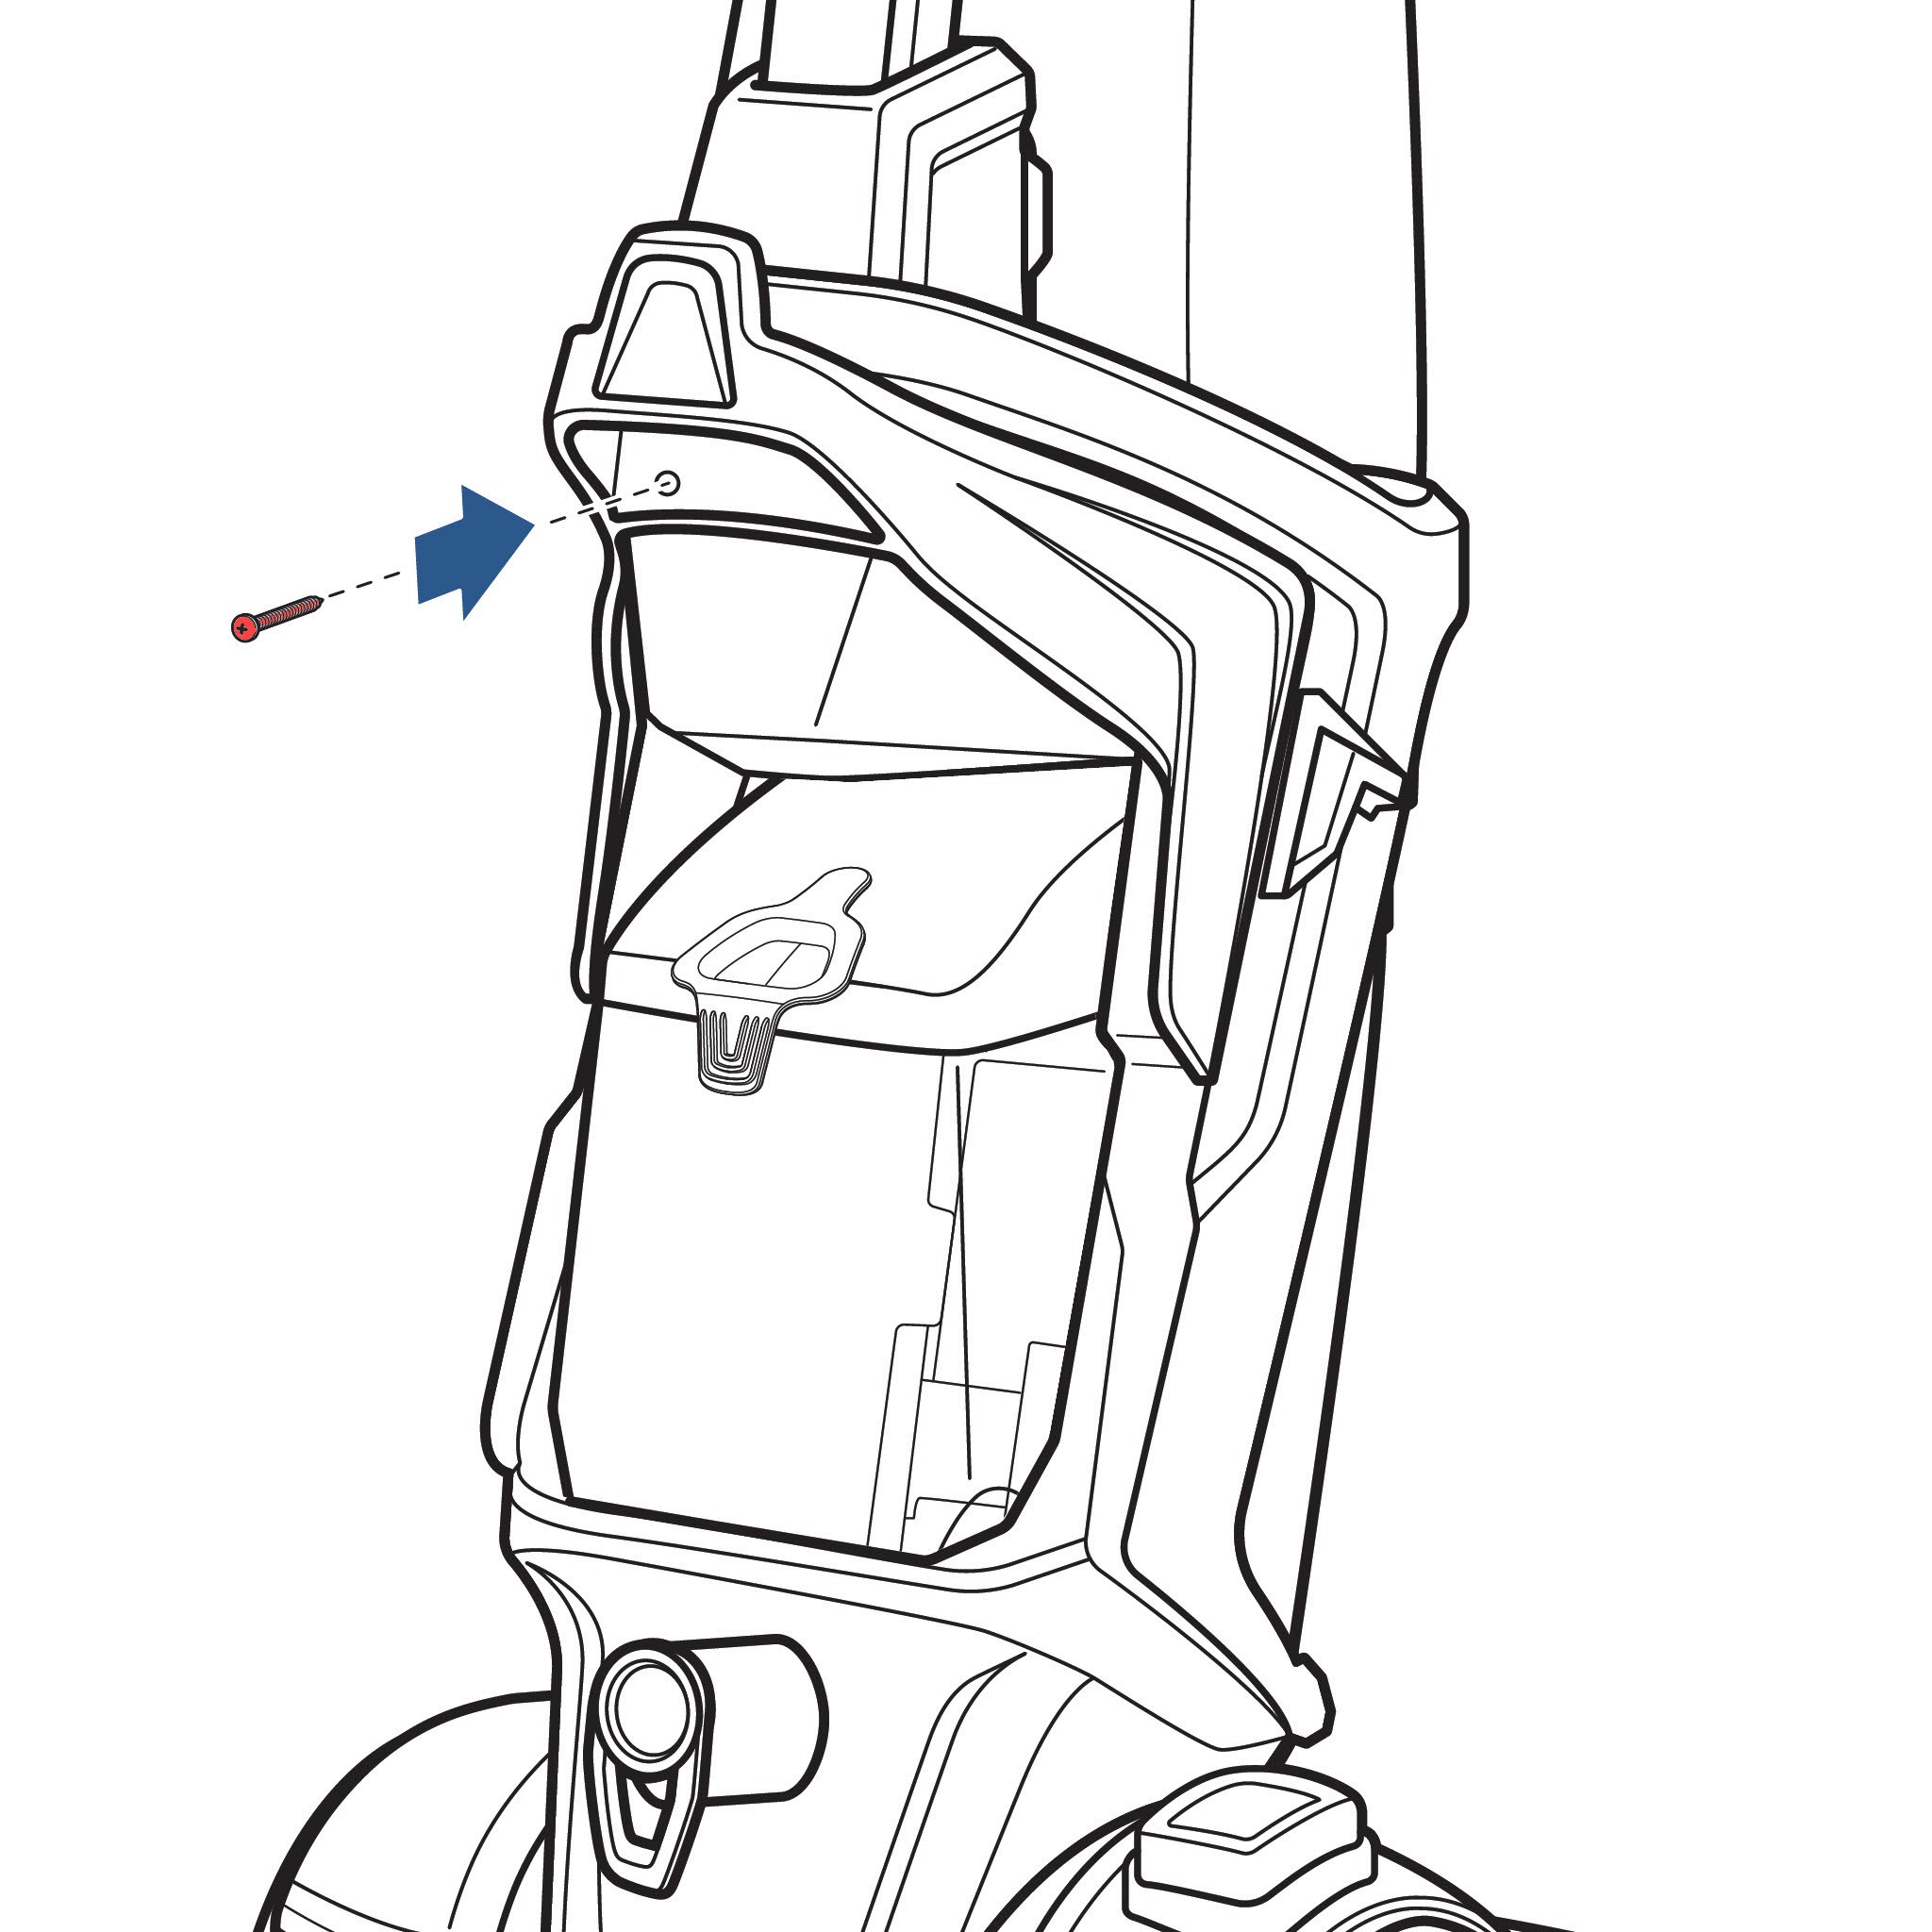
- Carry Handle Attachment: Align the carry handle with the slots on either side of the base until the piece clicks into place.
- Securing the Carry Handle: Use the screw taped to the handle and a Phillips-head screwdriver to secure the carry handle tightly.
Proper handle installation is crucial for effective carpet cleaning.
Ensure the carry handle is securely attached for easy transport.
Securing the carry handle ensures safe lifting and movement of the machine.
2.2 Clean Water Tank Installation
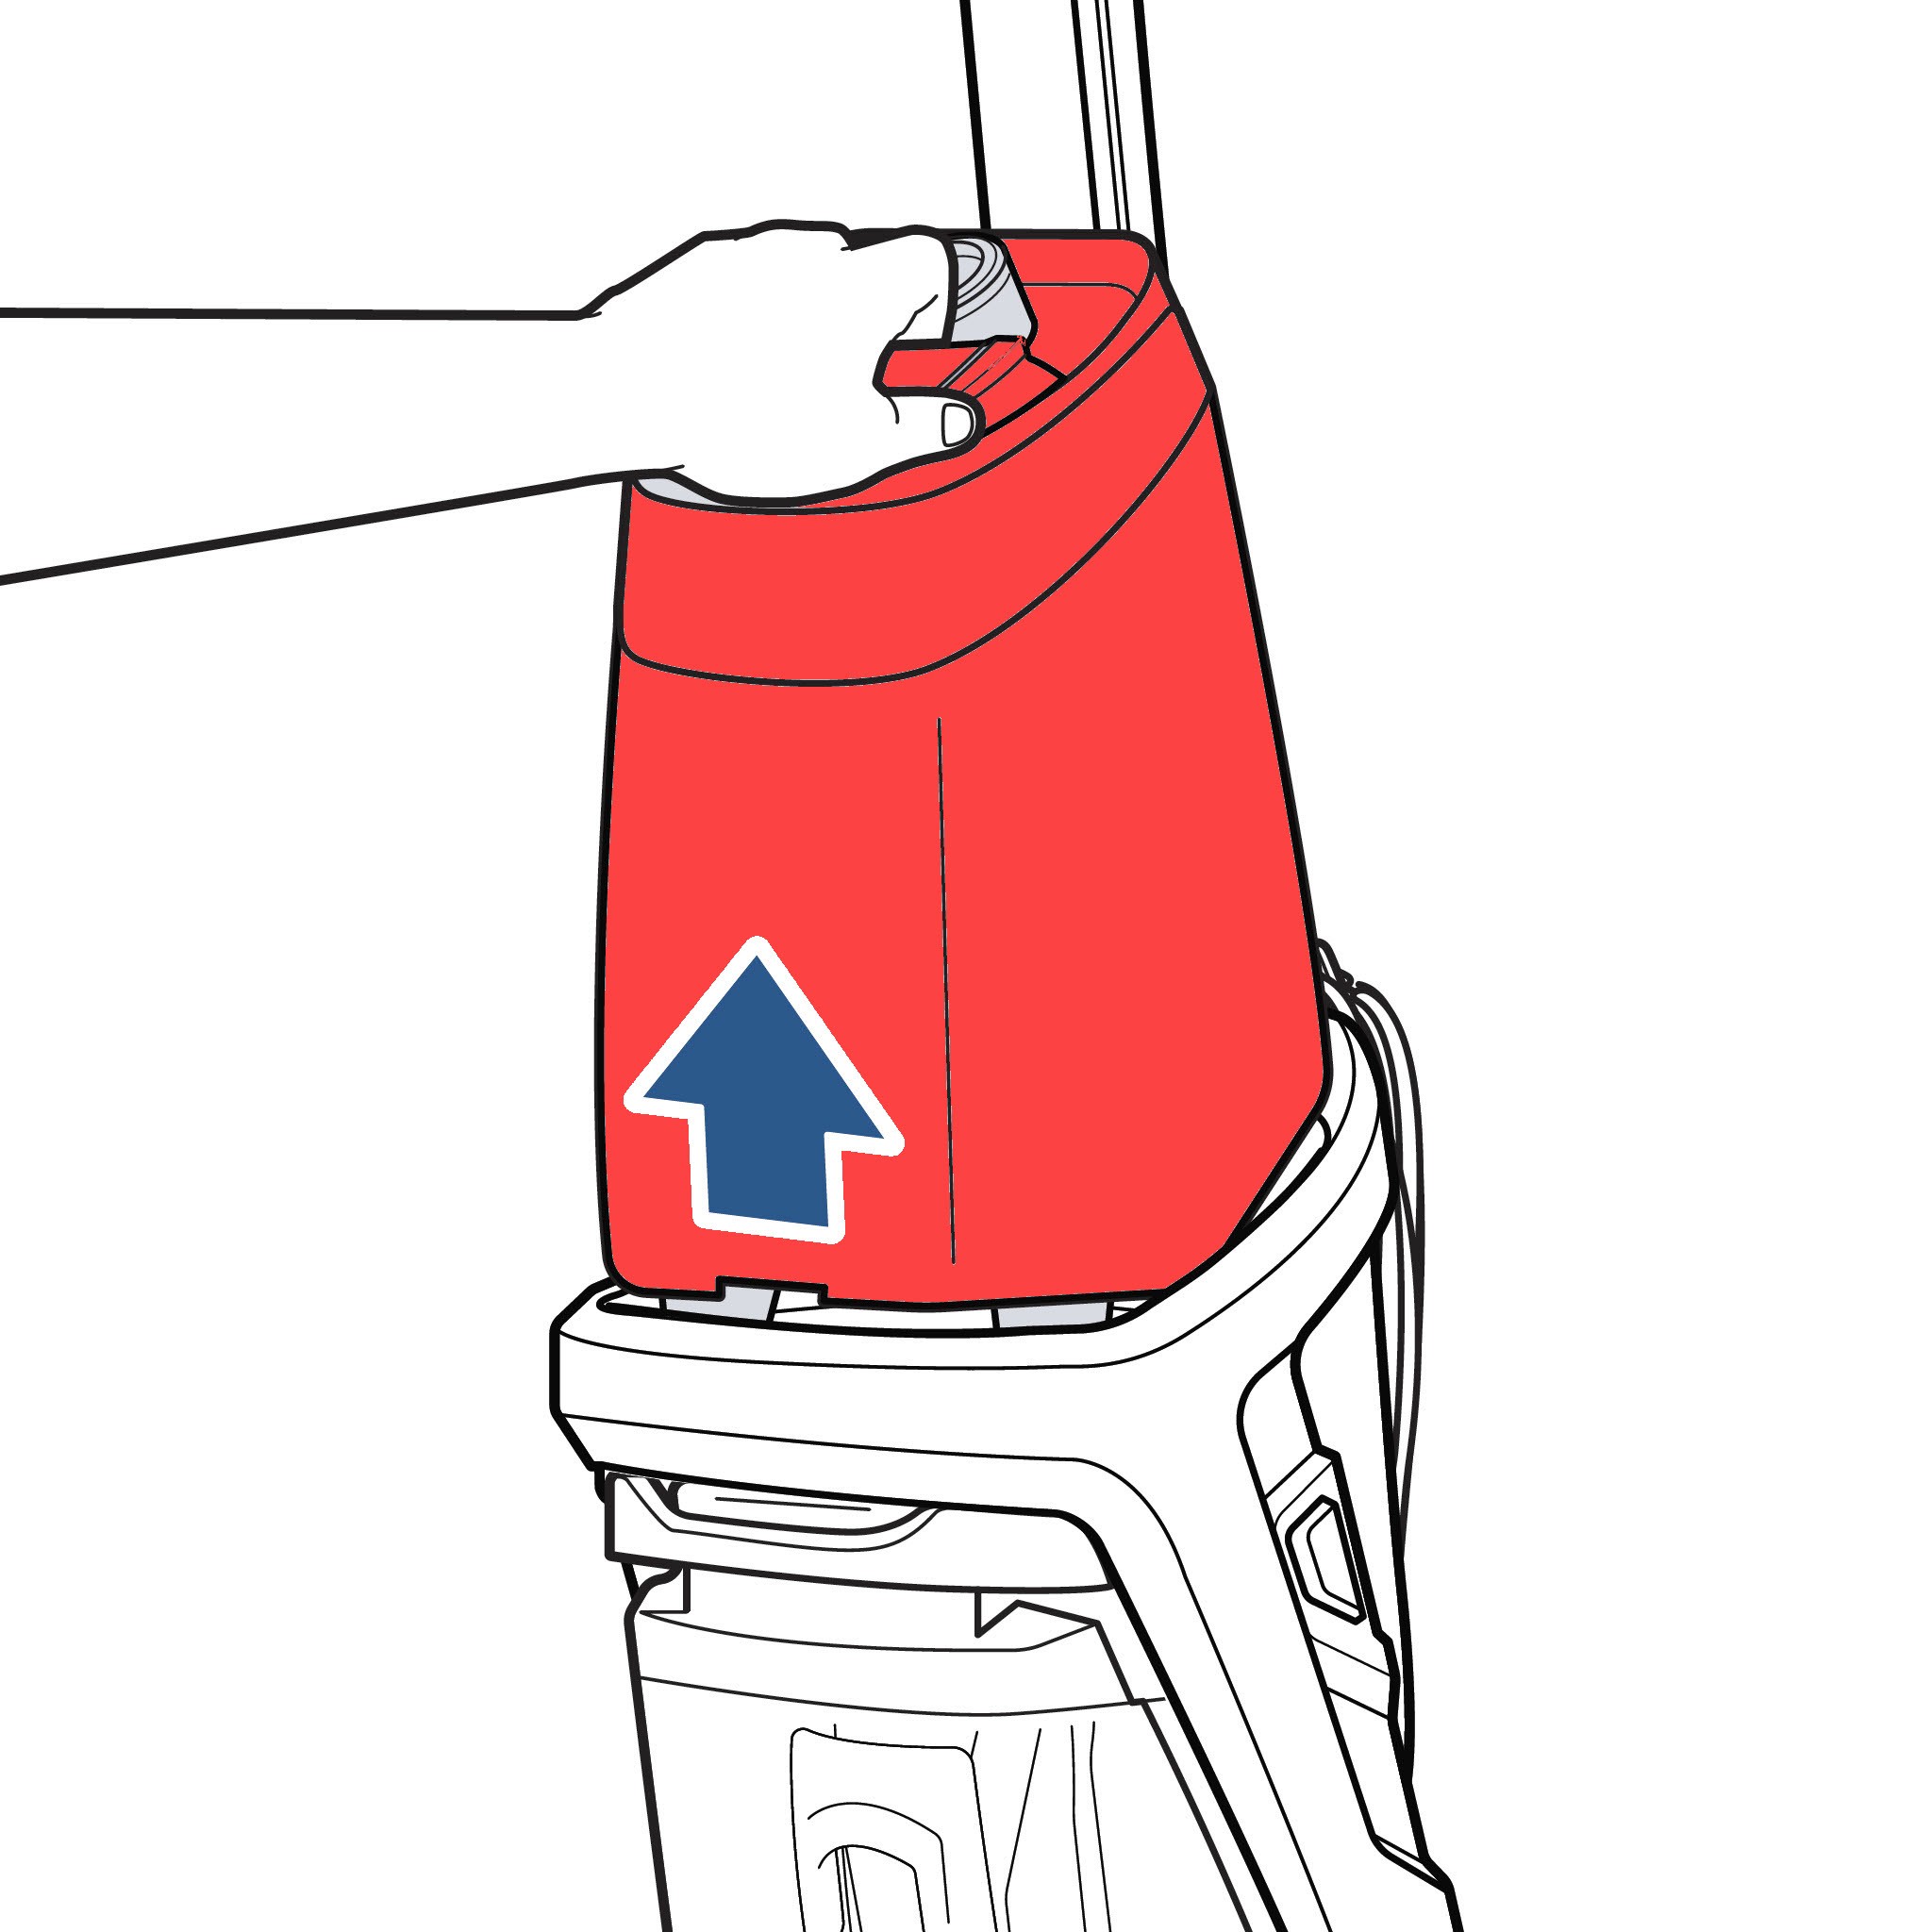
- Alignment: Align your clean water tank with the grooves on the machine.
- Sliding into Place: Slide the tank into place, ensuring it is seated fully. This step is critical for preventing leaks and ensuring proper solution dispensing during operation.
3. Selecting the Right Cleaning Mode
The Bissell Revolution Pet Pro offers multiple cleaning modes to cater to different cleaning needs. Choosing the right mode ensures effective cleaning while optimizing drying time.
3.1 Express Clean Mode
The Express Clean mode is designed for lighter cleaning tasks and provides a quick drying time of approximately 30 minutes when used as recommended. It is ideal for regular maintenance and quick cleanups.
3.2 Deep Clean or MAX Clean Mode
The Deep Clean or MAX Clean mode delivers a more intensive clean by dispensing significantly more water and cleaning solution. This mode is perfect for tackling tough stains and heavily soiled areas, though it requires a longer drying time.
Selecting the appropriate cleaning mode ensures efficient stain and odor removal.
4. Filling the Clean Water Tank
Properly filling the clean water tank with the correct mixture of water and cleaning solution is crucial for achieving optimal cleaning results.
4.1 Clean Water Tank Removal
Remove the clean water tank from the machine by lifting it straight up.
4.2 Unscrewing the Cap
Unscrew the cap from the tank to prepare for filling.
4.3 Understanding Fill Lines
Your clean water tank features different fill lines to accommodate various cleaning modes and formulas.
- Express Clean Lines: Use these lines when using the Express Clean mode with regular formula.
- MAX/Deep Clean Lines: Use these lines for MAX or Deep Clean modes with regular formula.
- Easy Fill Lines: Use these lines when using the ANTIBACTERIAL formula with the easy fill system.
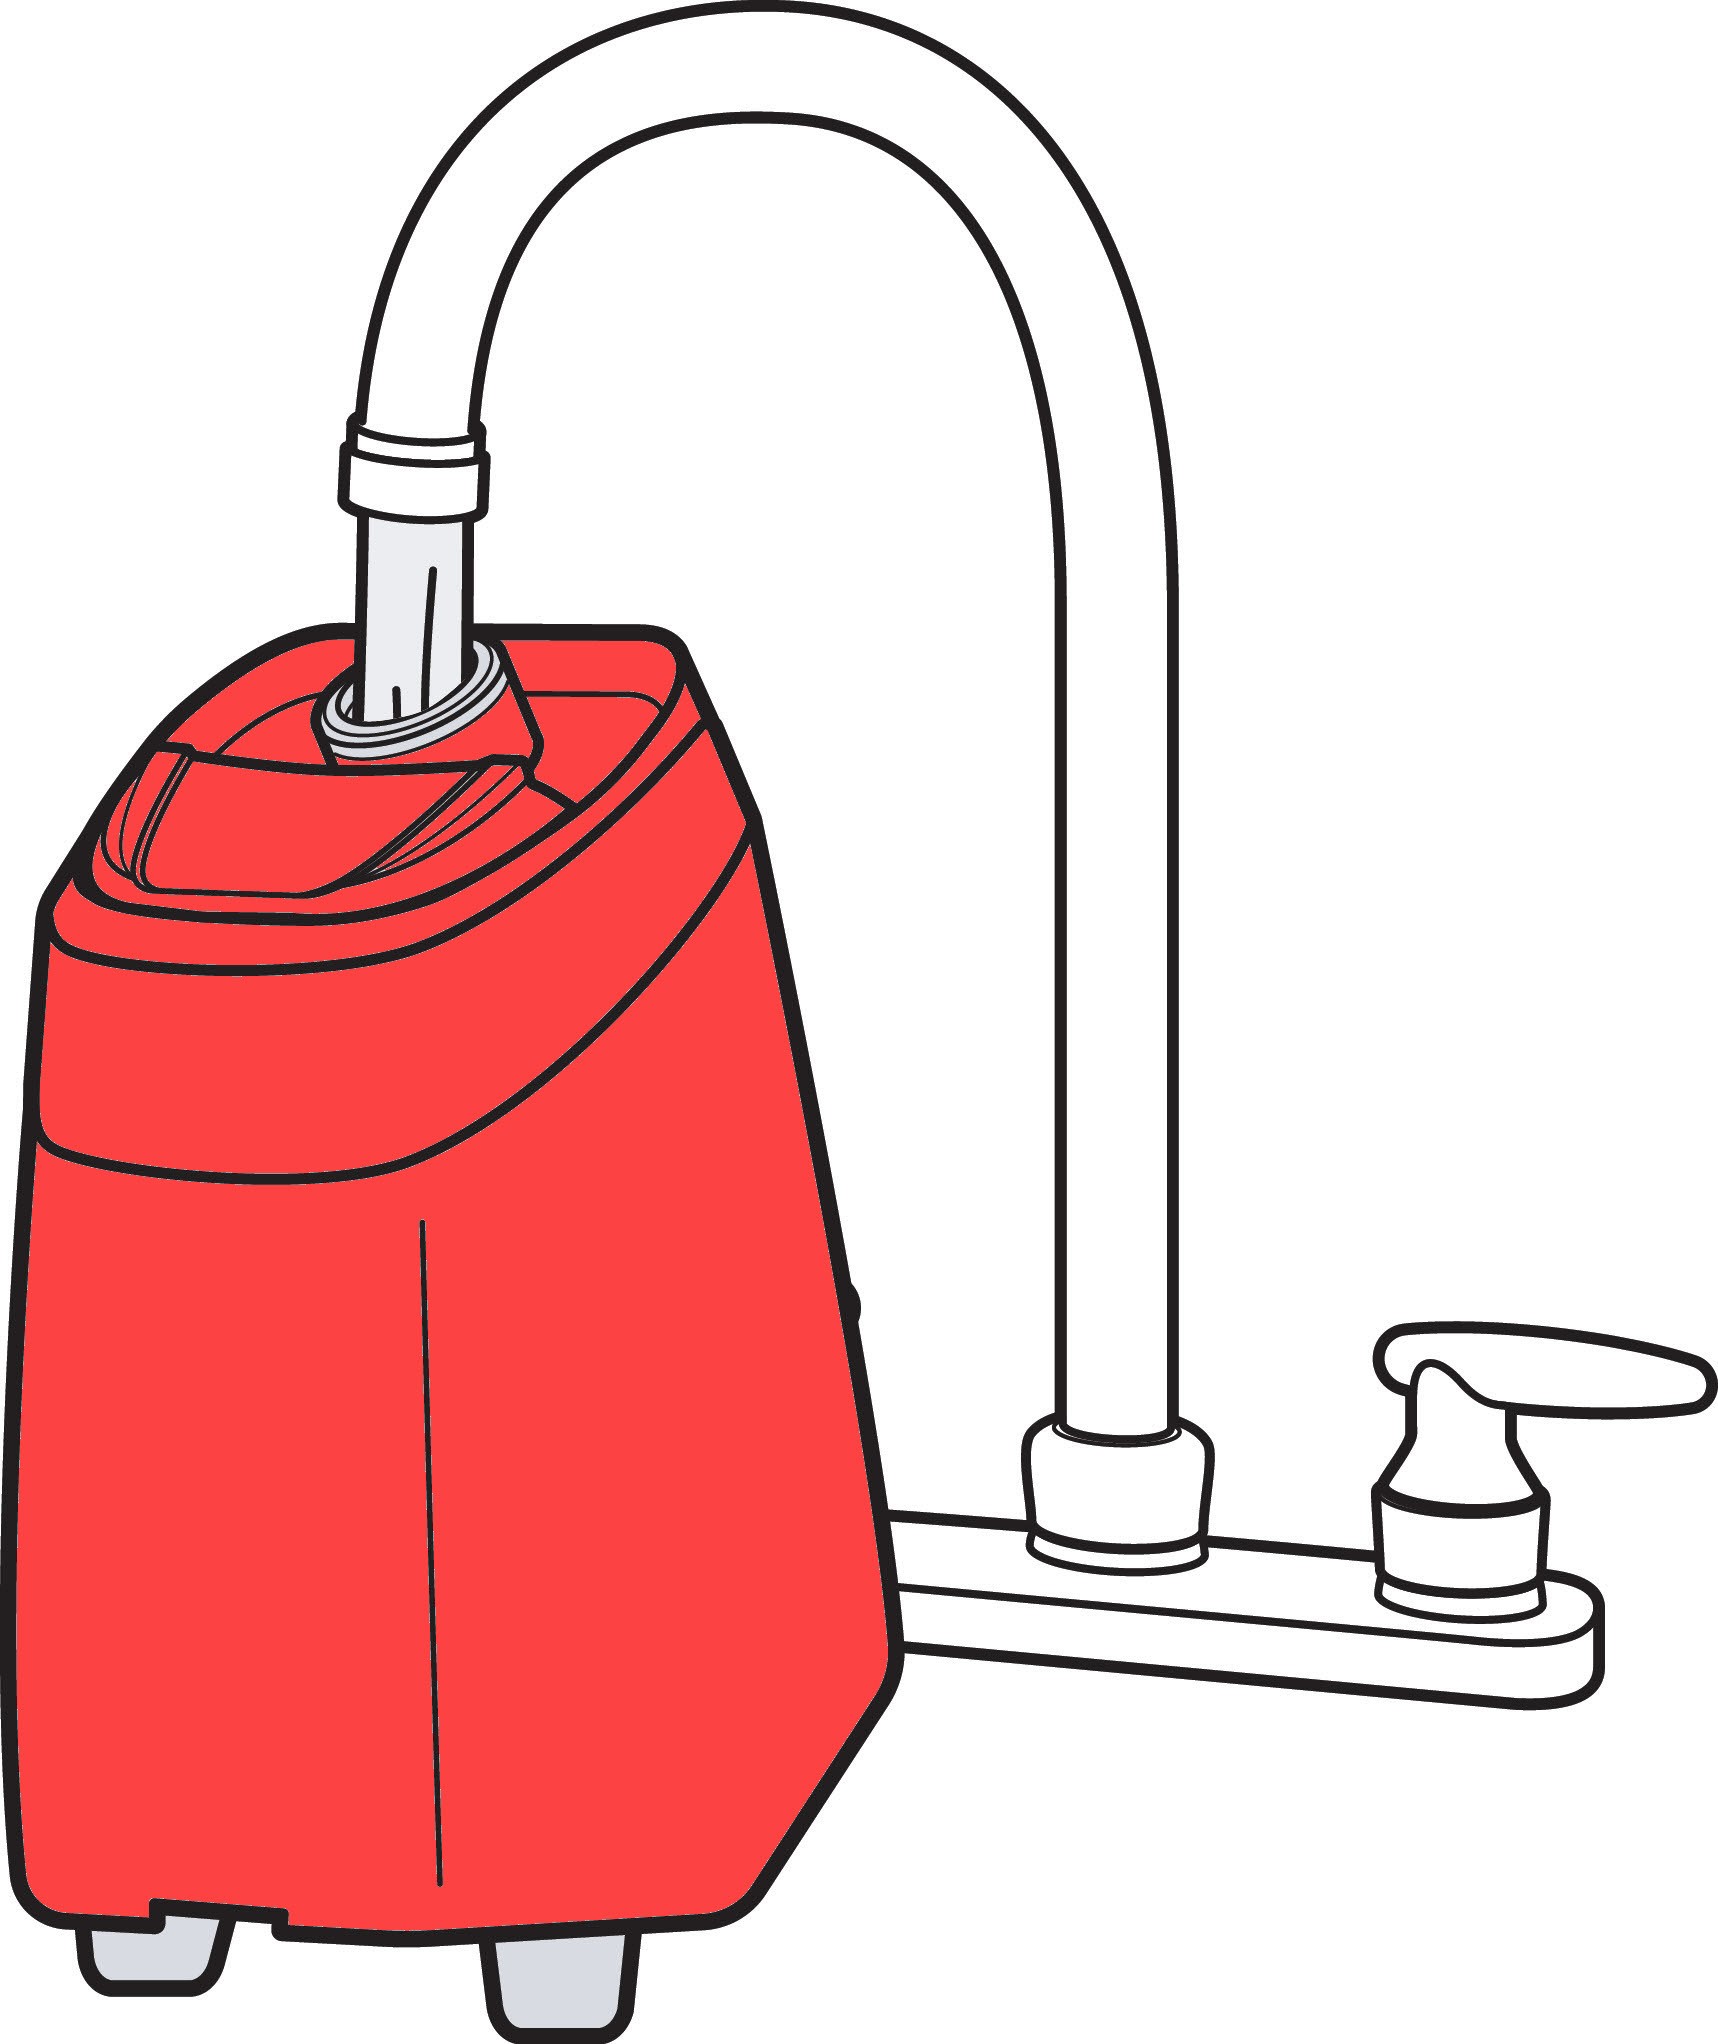
4.4 Filling with Water and Formula
- Water Temperature: Use warm tap water (up to 140°F or 60°C MAX) for the best cleaning results. Hotter water may deform the tank.
- Filling to Water Line: Fill the tank with water to the appropriate WATER line based on your chosen cleaning mode.
- Adding Formula: Add your desired Bissell formula to the FORMULA fill line.
4.5 Using the Easy Fill System
The Bissell Revolution Pet Pro may come with an easy fill feature for use with ANTIBACTERIAL formula.
- Secure Yellow Cap: Ensure the yellow cap is securely placed back onto the clean water tank.
- Insert Formula Bottle: Firmly insert the formula bottle into the cap on the tank.
- Squeeze Bottle: Squeeze the bottle until the formula reaches the easy fill line.
Proper tank removal is essential for refilling and maintenance.
Using the correct fill lines ensures proper formula concentration for effective cleaning.
Filling the tank correctly with warm water and formula is crucial for best results.
4.6 Recommended Formulas
Always use genuine Bissell formulas to reduce possible damage to internal components and optimize machine performance. Compatible Bissell formulas include:
- Clean + Refresh
- PET Stain & Odor
- PRO MAX Clean + Protect
- PET PRO OXY Urine Eliminator
- PET Stain Pretreat
- PET PRO OXY Stain Destroyer
- PET Pretreat + Sanitize
- Pet Stain & Odor + Antibacterial
- OXY Boost
- PET OXY Boost
These formulas are specifically designed to work with your Bissell Revolution Pet Pro, ensuring the best possible cleaning results and prolonging the life of your machine.
5. Cleaning Carpets and Area Rugs
With your Bissell Revolution Pet Pro assembled and the clean water tank filled, you’re ready to start cleaning your carpets and area rugs.
5.1 Pre-Cleaning Preparations
- Dry Vacuuming: Before using your deep cleaner, remove any solids with a dry vacuum cleaner in the desired cleaning area. This prevents clogs and ensures efficient cleaning.
- Proper Outlet: Plug your machine into a properly grounded outlet.
5.2 Powering On and Reclining
- Select Cleaning Mode: Ensure the machine is set to your desired cleaning mode using the switch on the side of the machine.
- Power Button: Press the power button on the side of the machine to turn it ON.
- Recline Pedal: Press the recline pedal with your foot to begin cleaning.
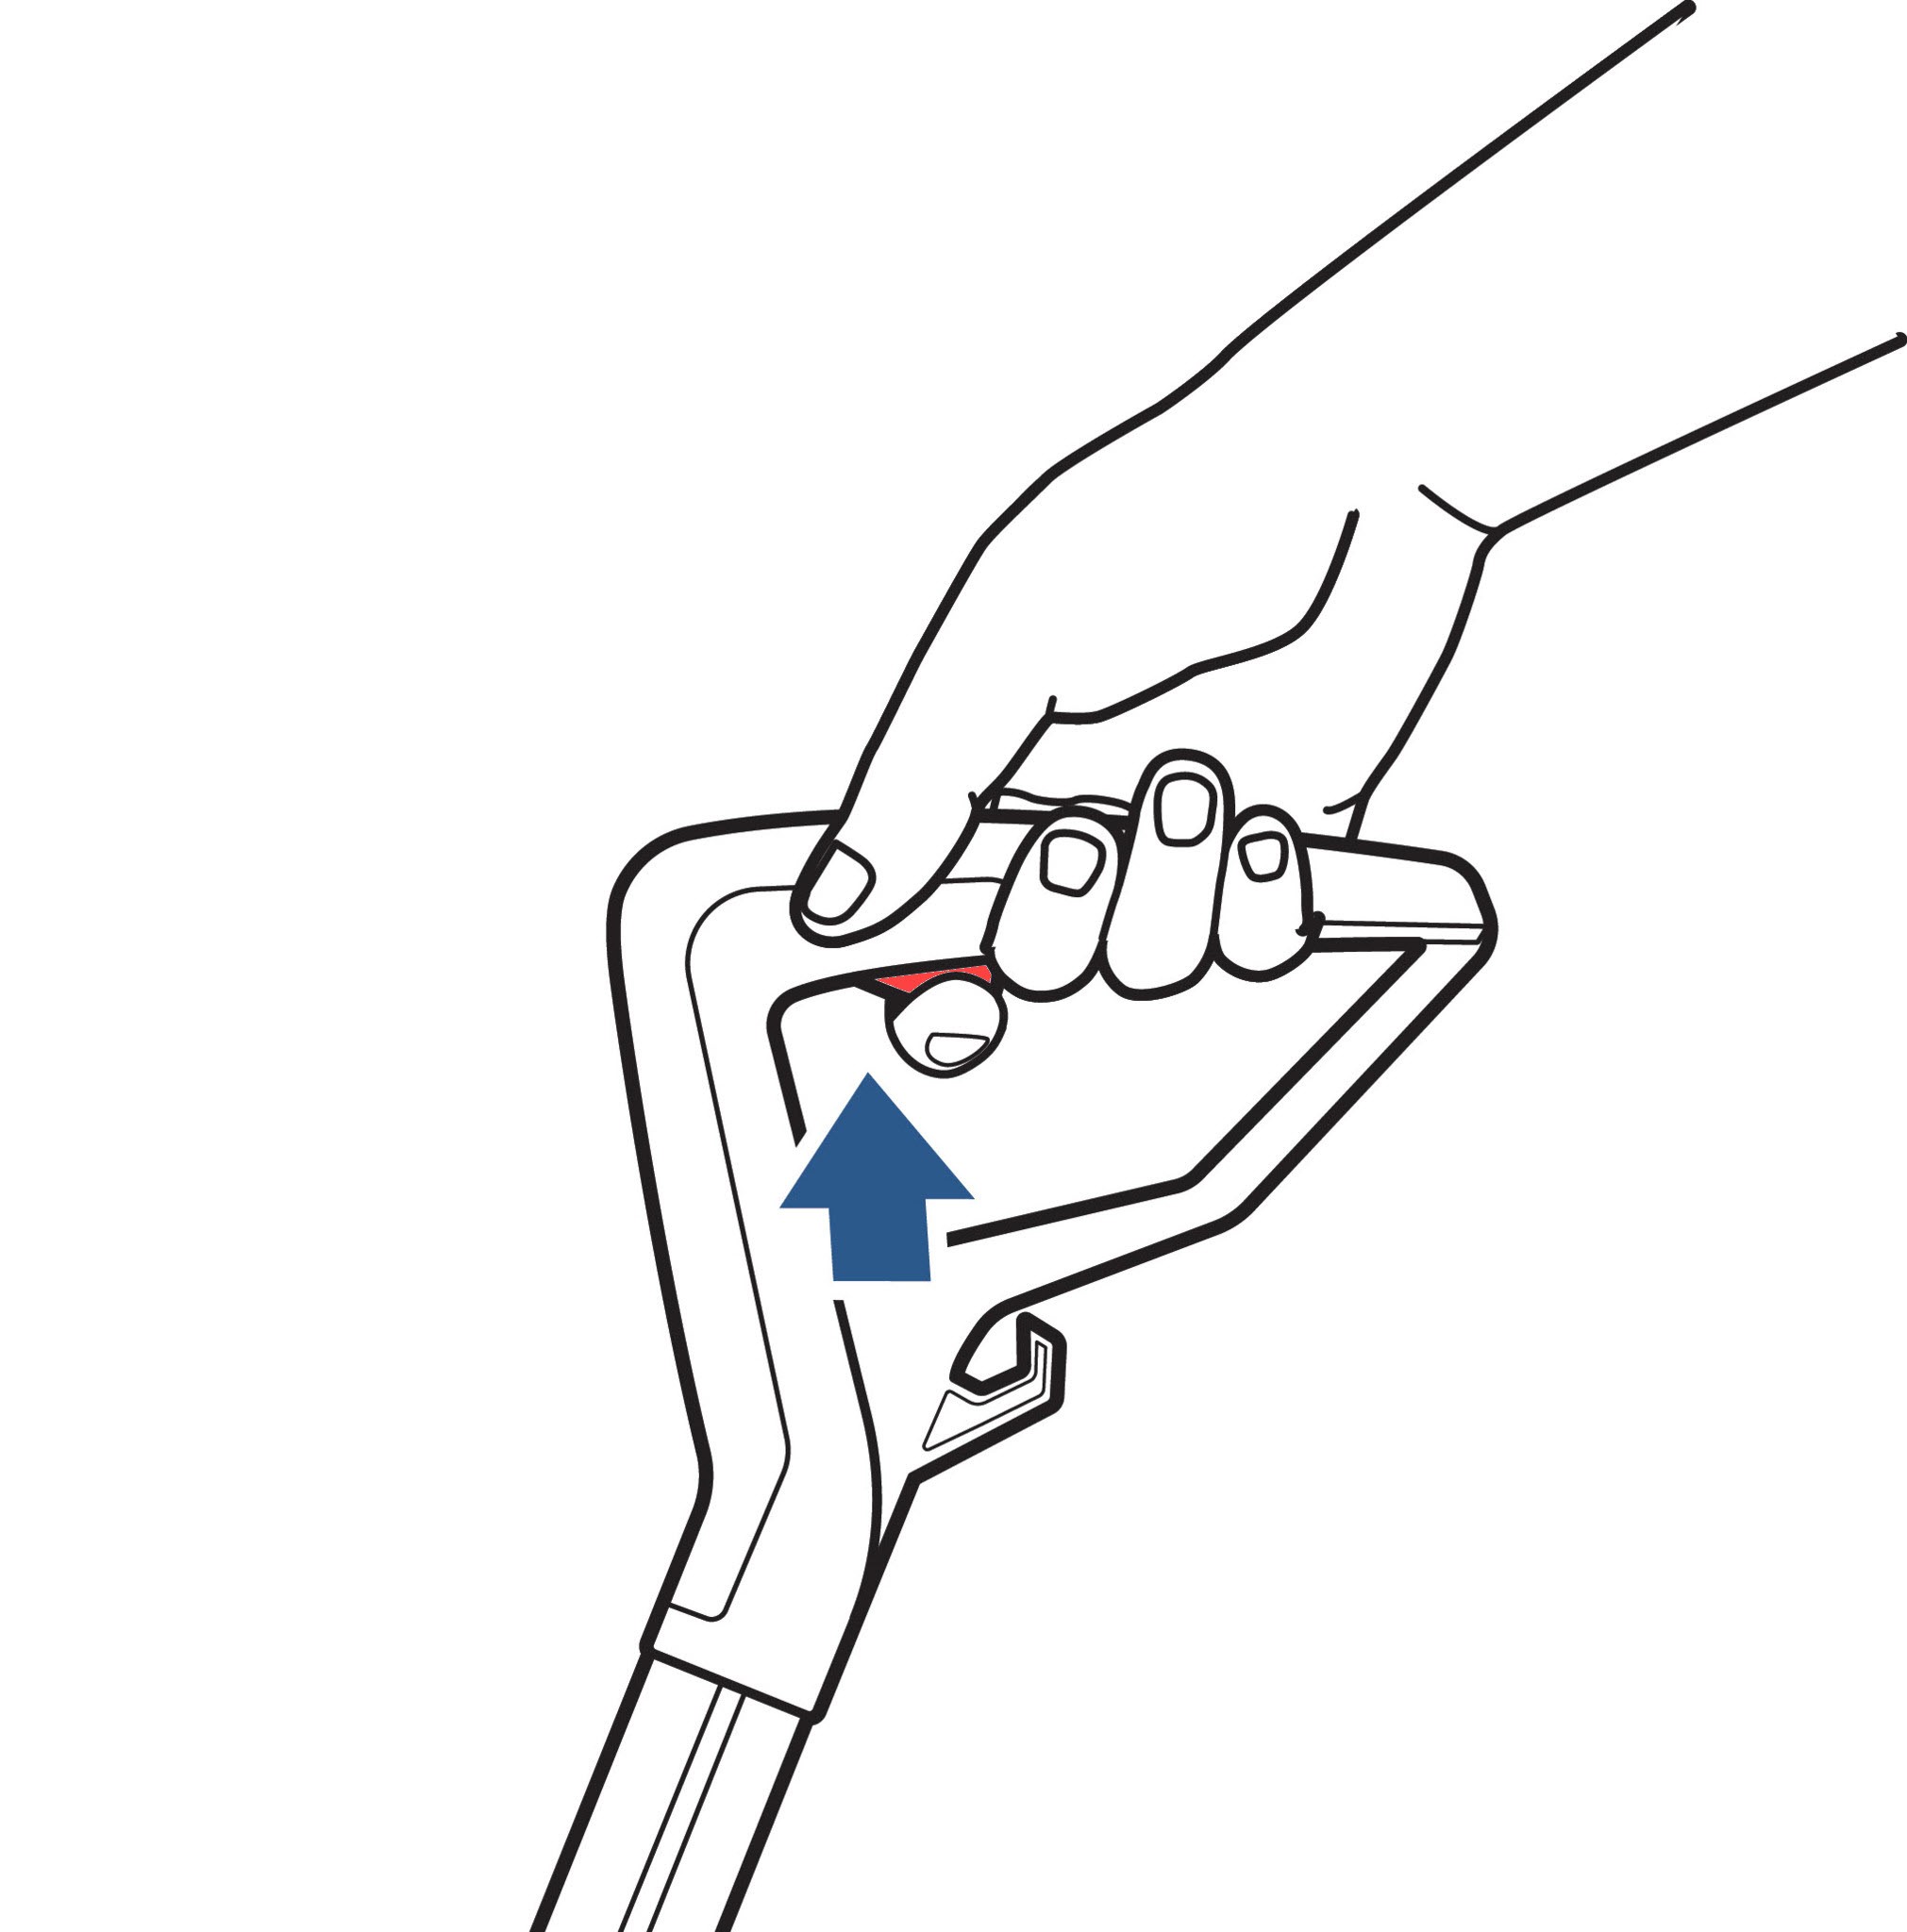
5.3 Dispensing Cleaning Solution
- Spray Trigger: Hold the spray trigger on the handle to dispense water and cleaning solution.
- Priming the Machine: Hold the spray trigger for 10 seconds to prime the machine and wet the brush roll before cleaning. Note that the machine will only dispense cleaning solution while the spray trigger is held.
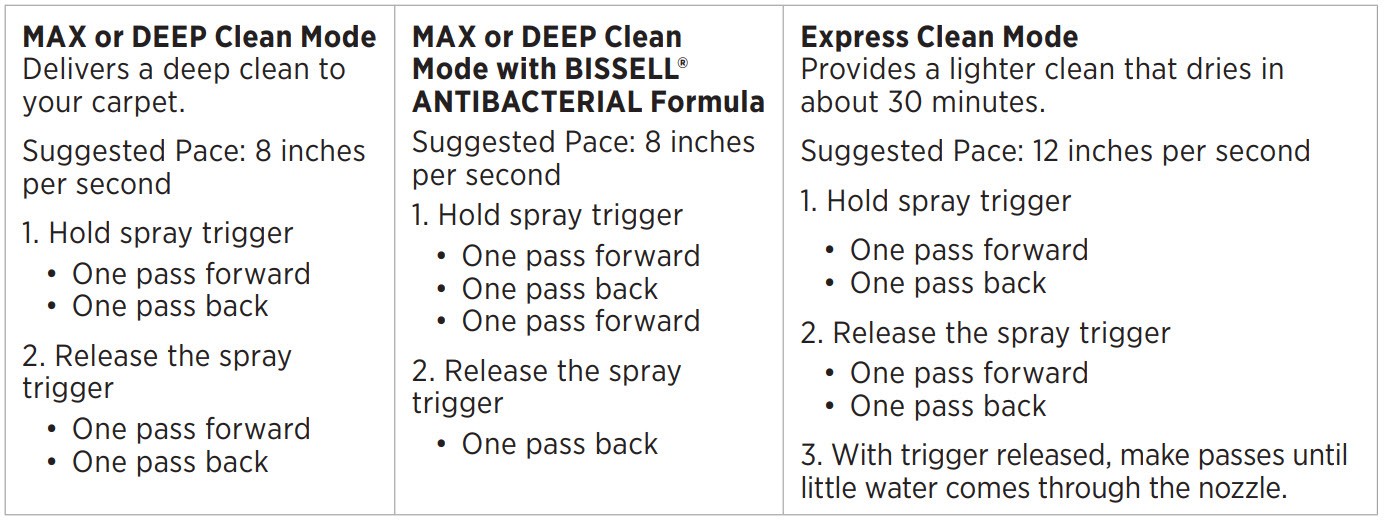
5.4 Cleaning Techniques
Follow these recommended timing and patterns depending on the cleaning mode to optimize results:
| Cleaning Mode | Spray Trigger | Forward Passes | Backward Passes | Drying Time (Approximate) |
|---|---|---|---|---|
| Express Clean | Hold trigger for 1 pass, release for the next | Slow, Overlapping | Slow, Overlapping | 30 Minutes |
| MAX/Deep Clean | Hold trigger for both forward and backward passes | Slow, Thoroughly Wetting | Slow, Thoroughly Extracting | Several Hours |

Properly turning on the machine is the first step in effective cleaning.
Reclining the machine activates the brush rolls for deep cleaning.
Using the spray trigger dispenses the cleaning solution onto the carpet.
Following the recommended cleaning guidelines ensures optimal results.
5.5 Dry Passes
Continue making dry passes (using the machine without holding the trigger) until no more water can be seen entering the nozzle on the foot.
5.6 Refilling the Clean Water Tank
You may need to refill the clean water tank several times during one cleaning session, depending on the size and soil level of the area you are cleaning.
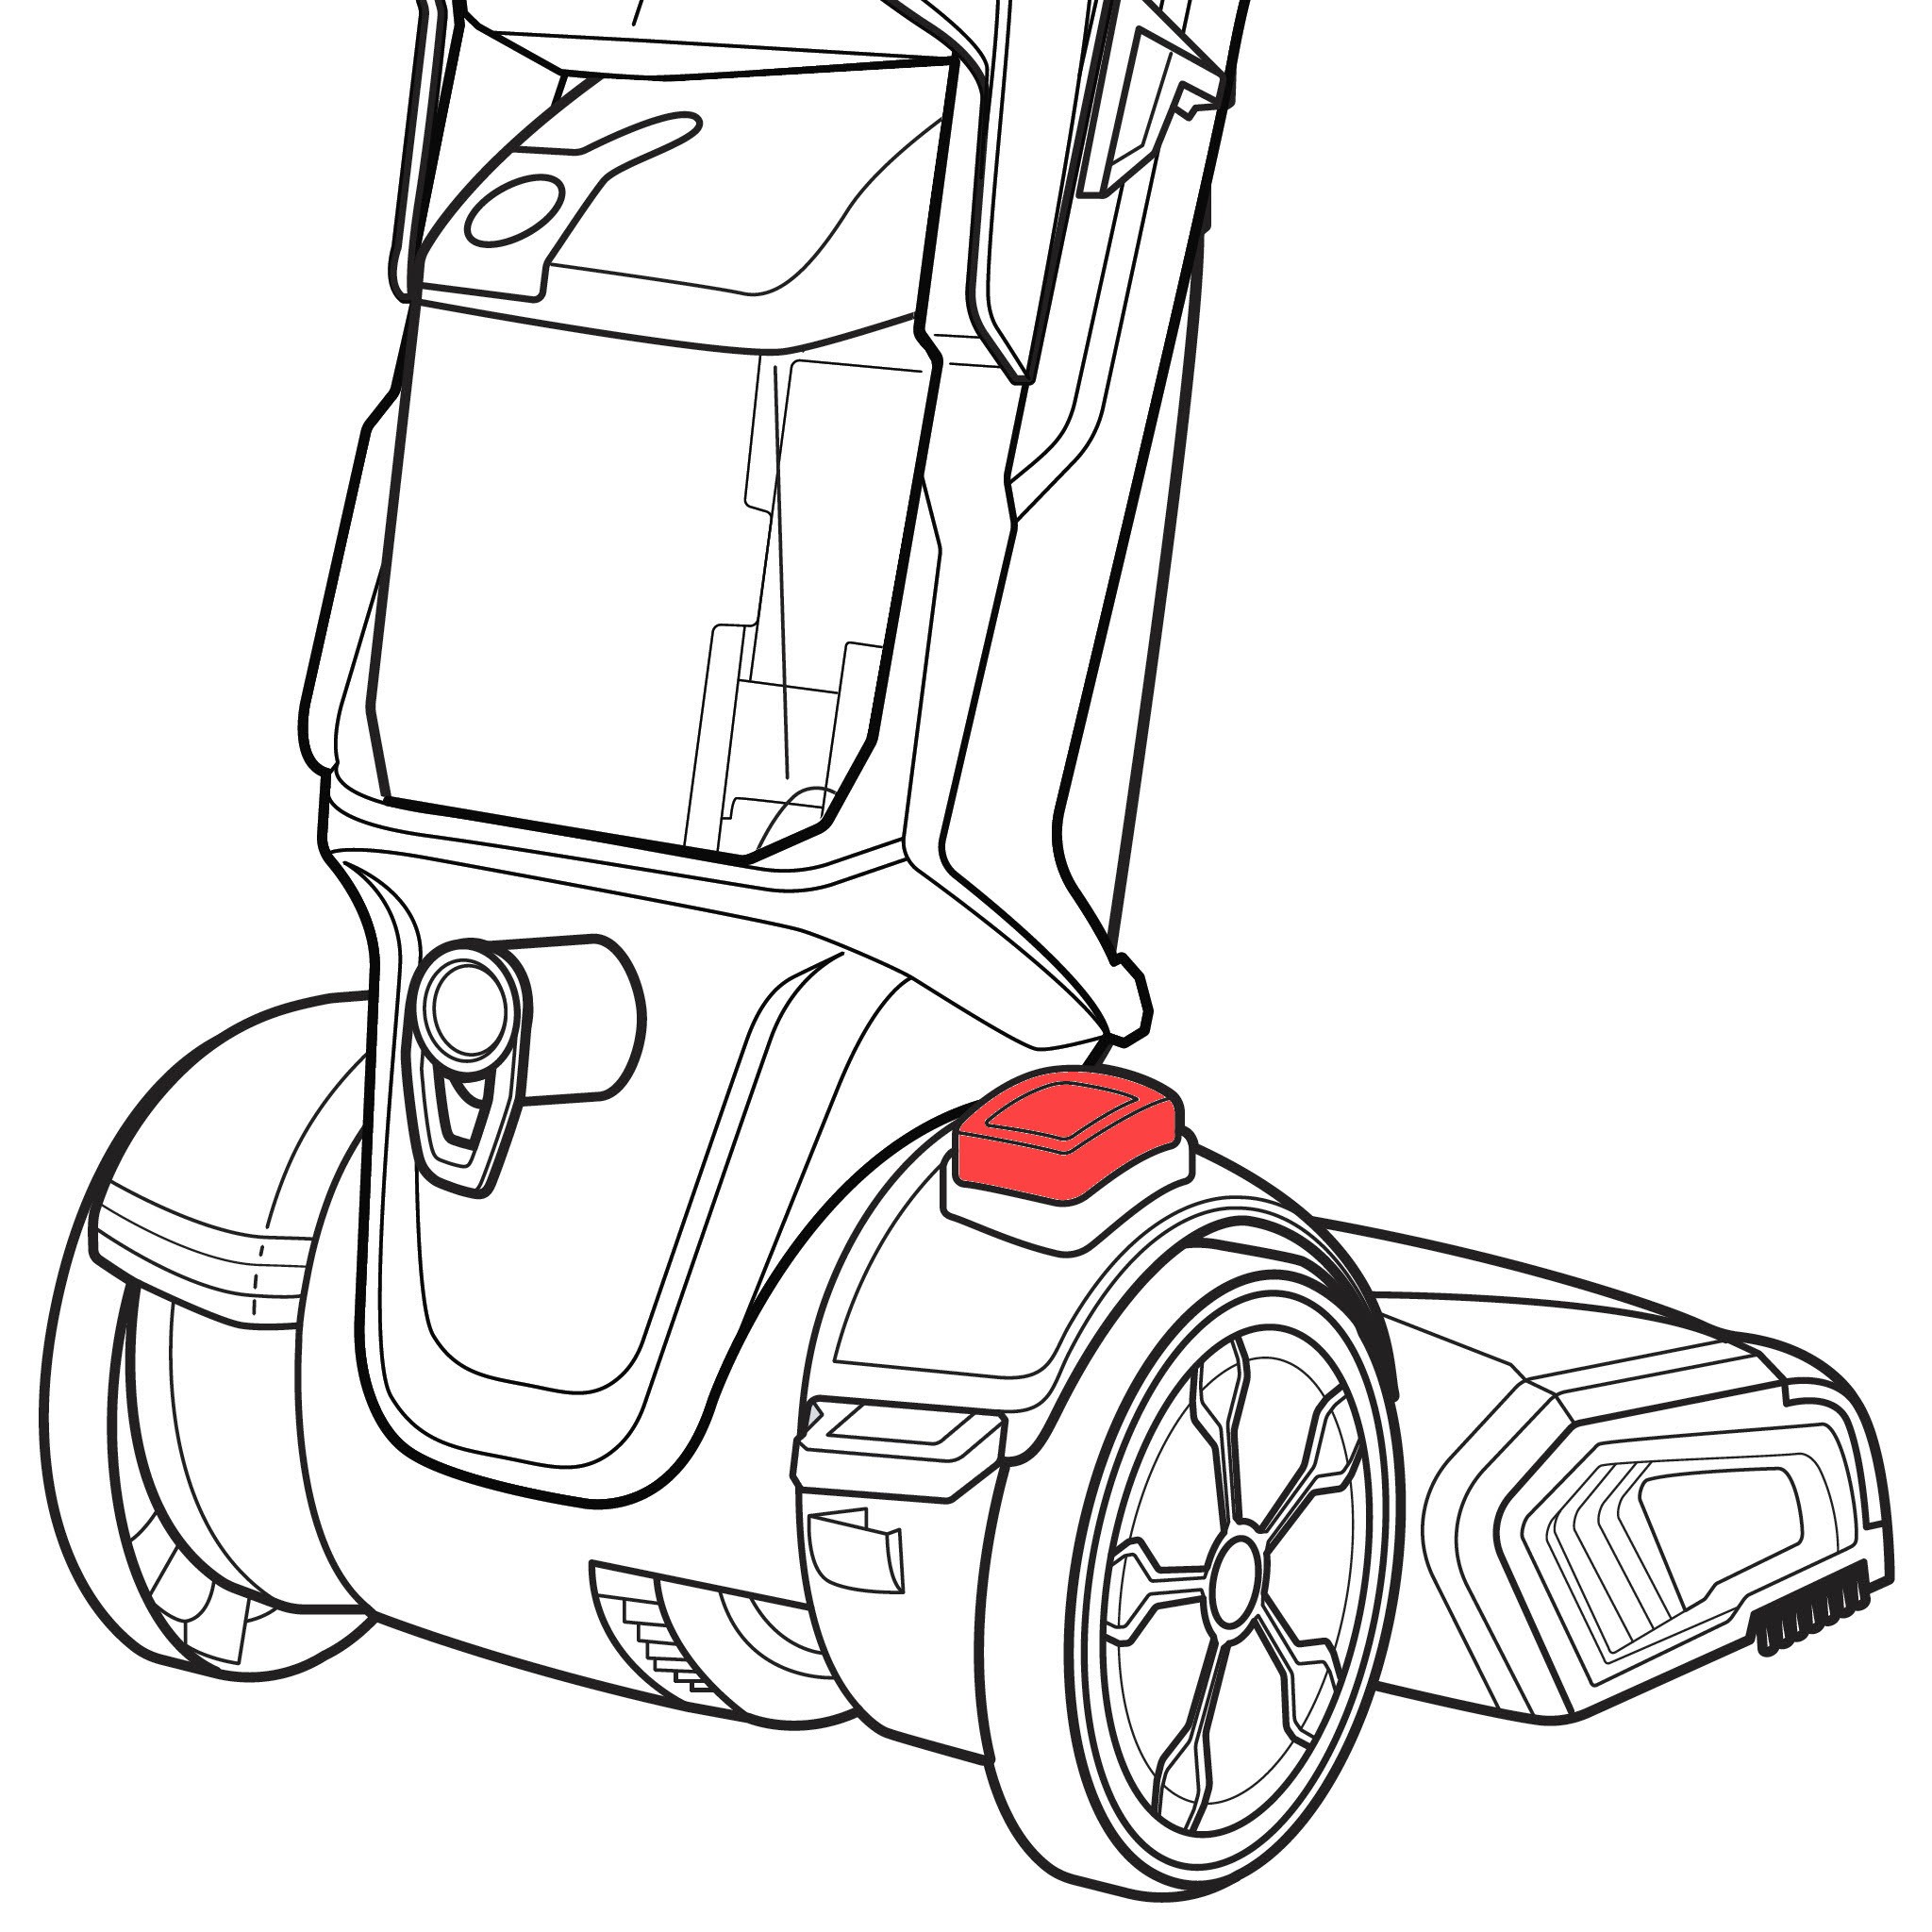
5.7 Using CleanShot® Pretreater
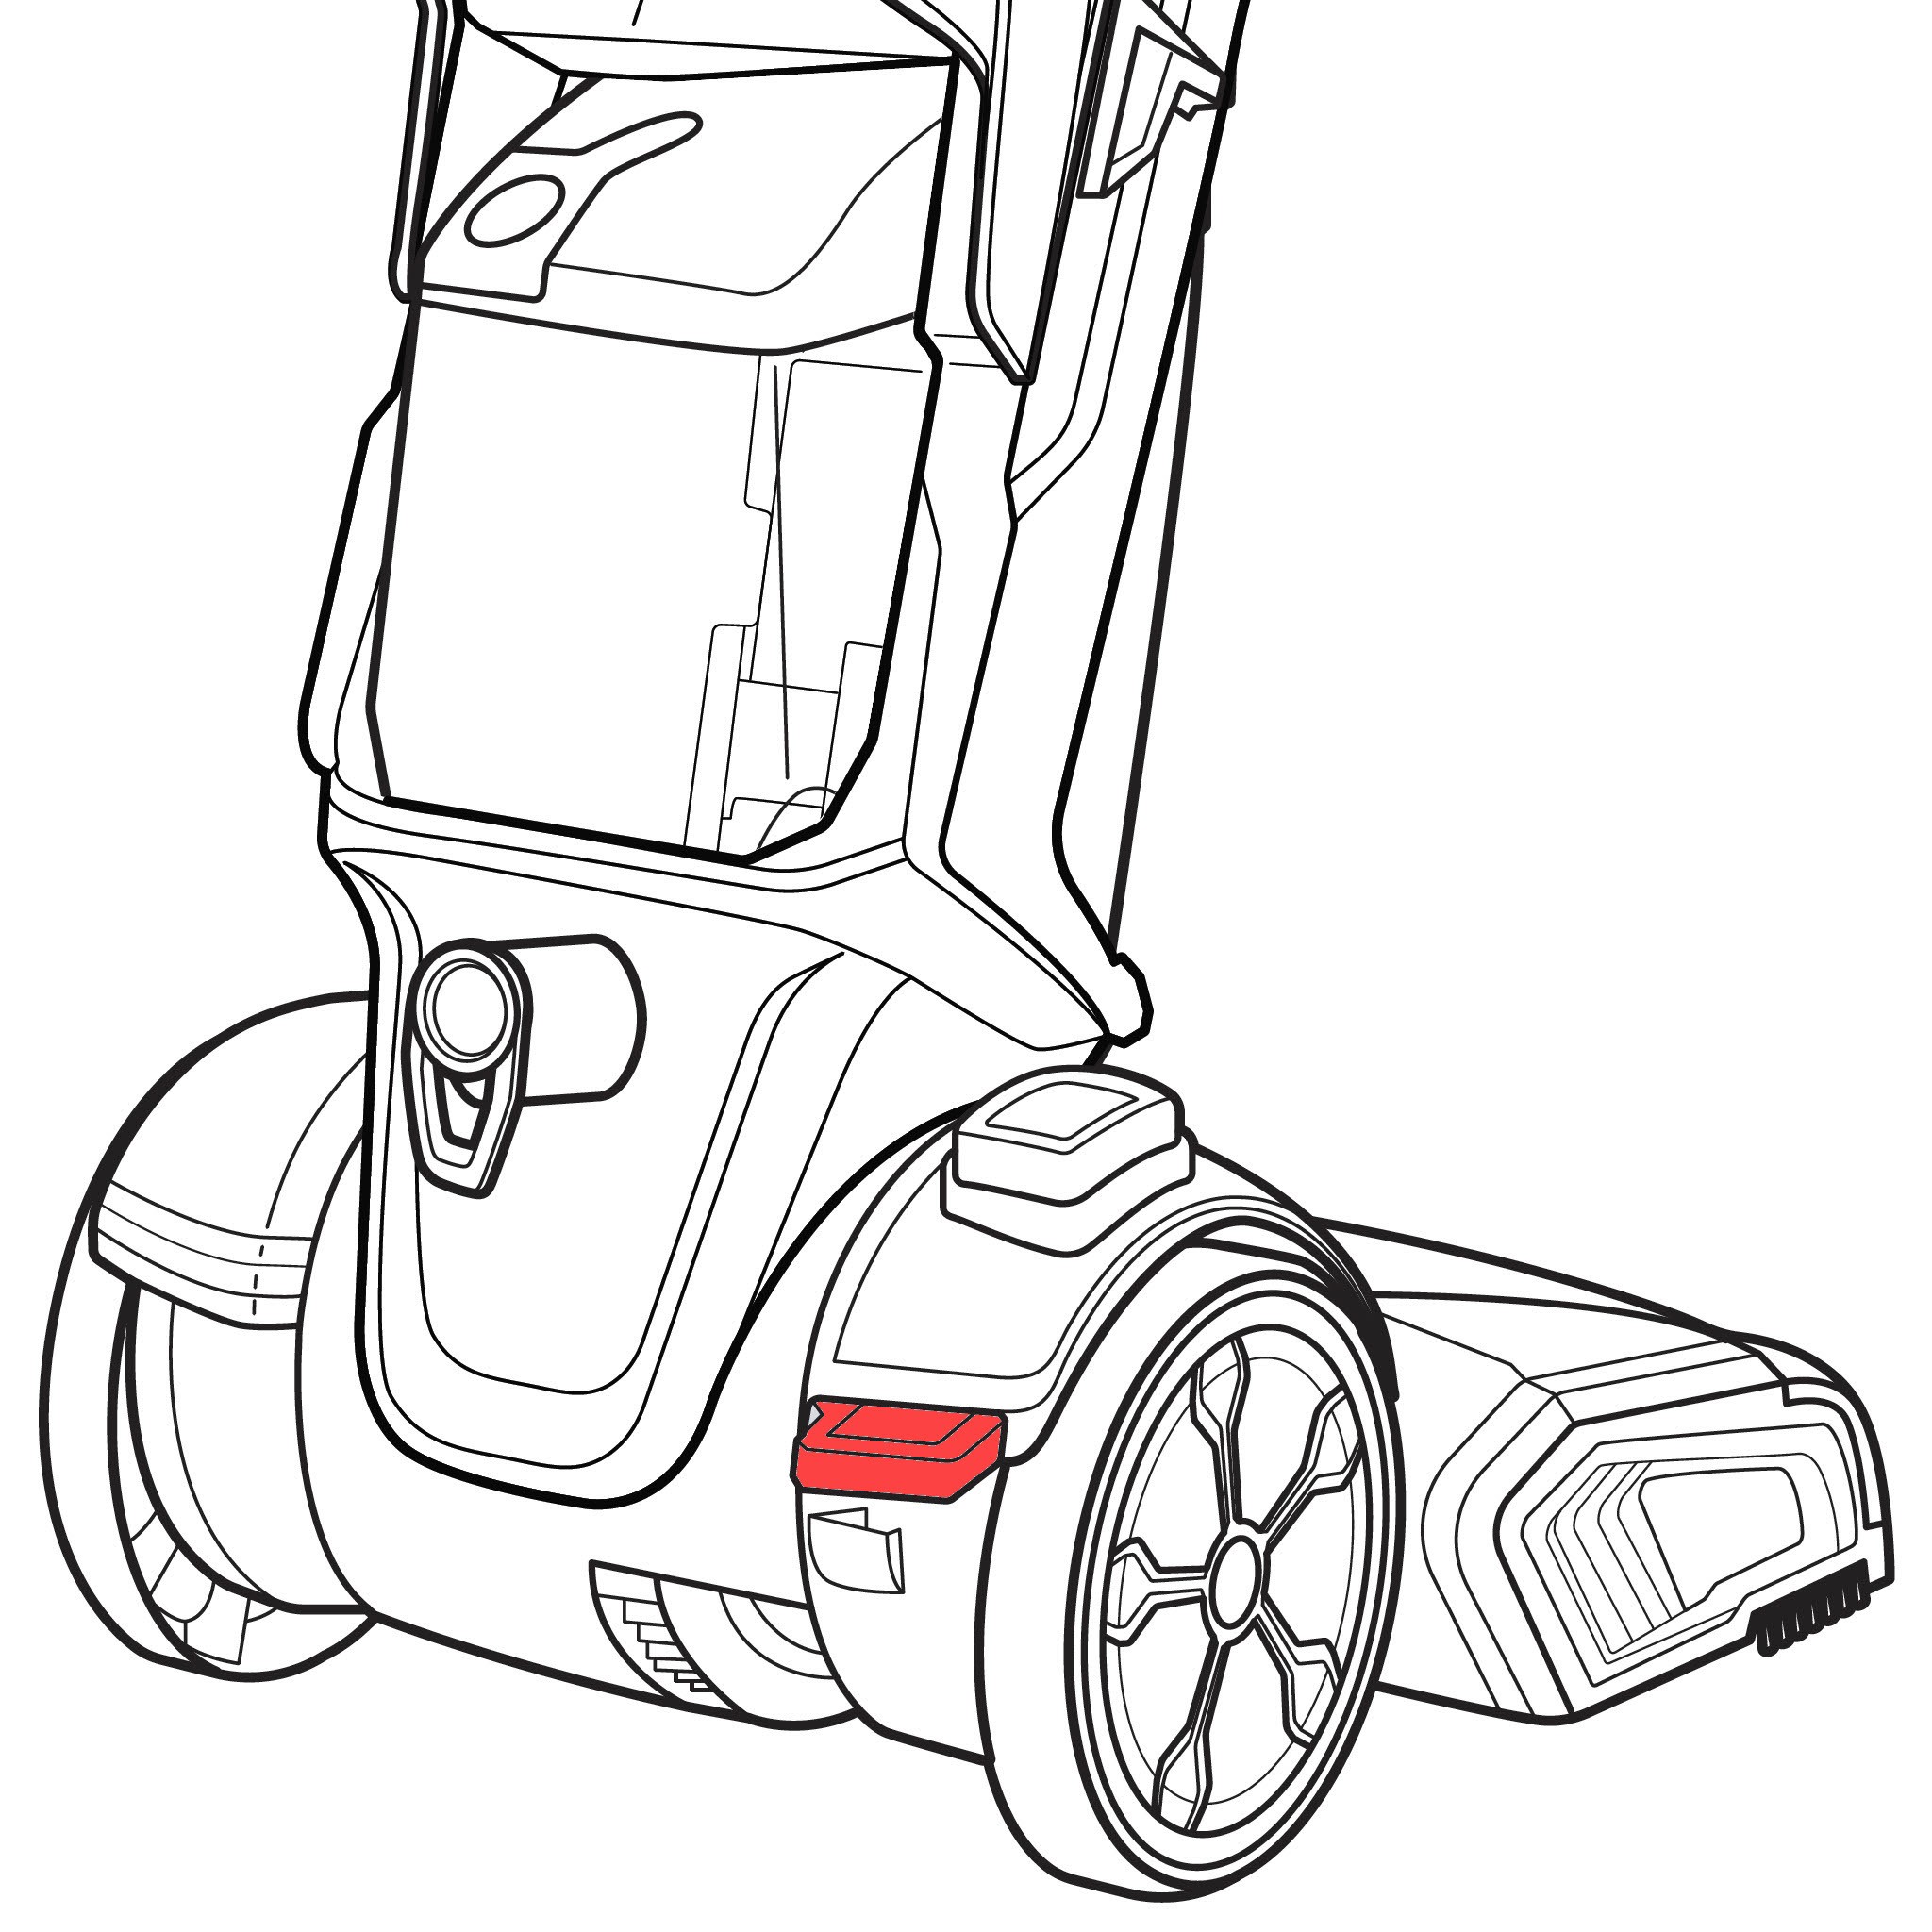
Some models of the Bissell Revolution Pet Pro include the CleanShot® Pretreater for use on tougher stains.
- Turn On CleanShot®: With the machine reclined, press the CleanShot® button located on the machine foot. A green icon with an “I” indicates it is ON, while a red icon with an “O” indicates it is OFF.
- Spraying the Stain: Maneuver the machine to spray the stain until it is completely soaked.
- Turn Off CleanShot®: Press the CleanShot® button to turn it OFF.
- Soak Time: Allow the stain to soak for 5 minutes.
- Extract and Clean: Move the machine over the stain to extract and continue cleaning as indicated in the cleaning guidelines.
The CleanShot button activates the pre-treatment function for tough stains.
Spraying the stain thoroughly with CleanShot ensures deep penetration and effective removal.
6. Cleaning with Hose and Tools
The Bissell Revolution Pet Pro is not only for carpets; it also offers the flexibility to clean upholstery, stairs, and other hard-to-reach areas with the included hose and tools.
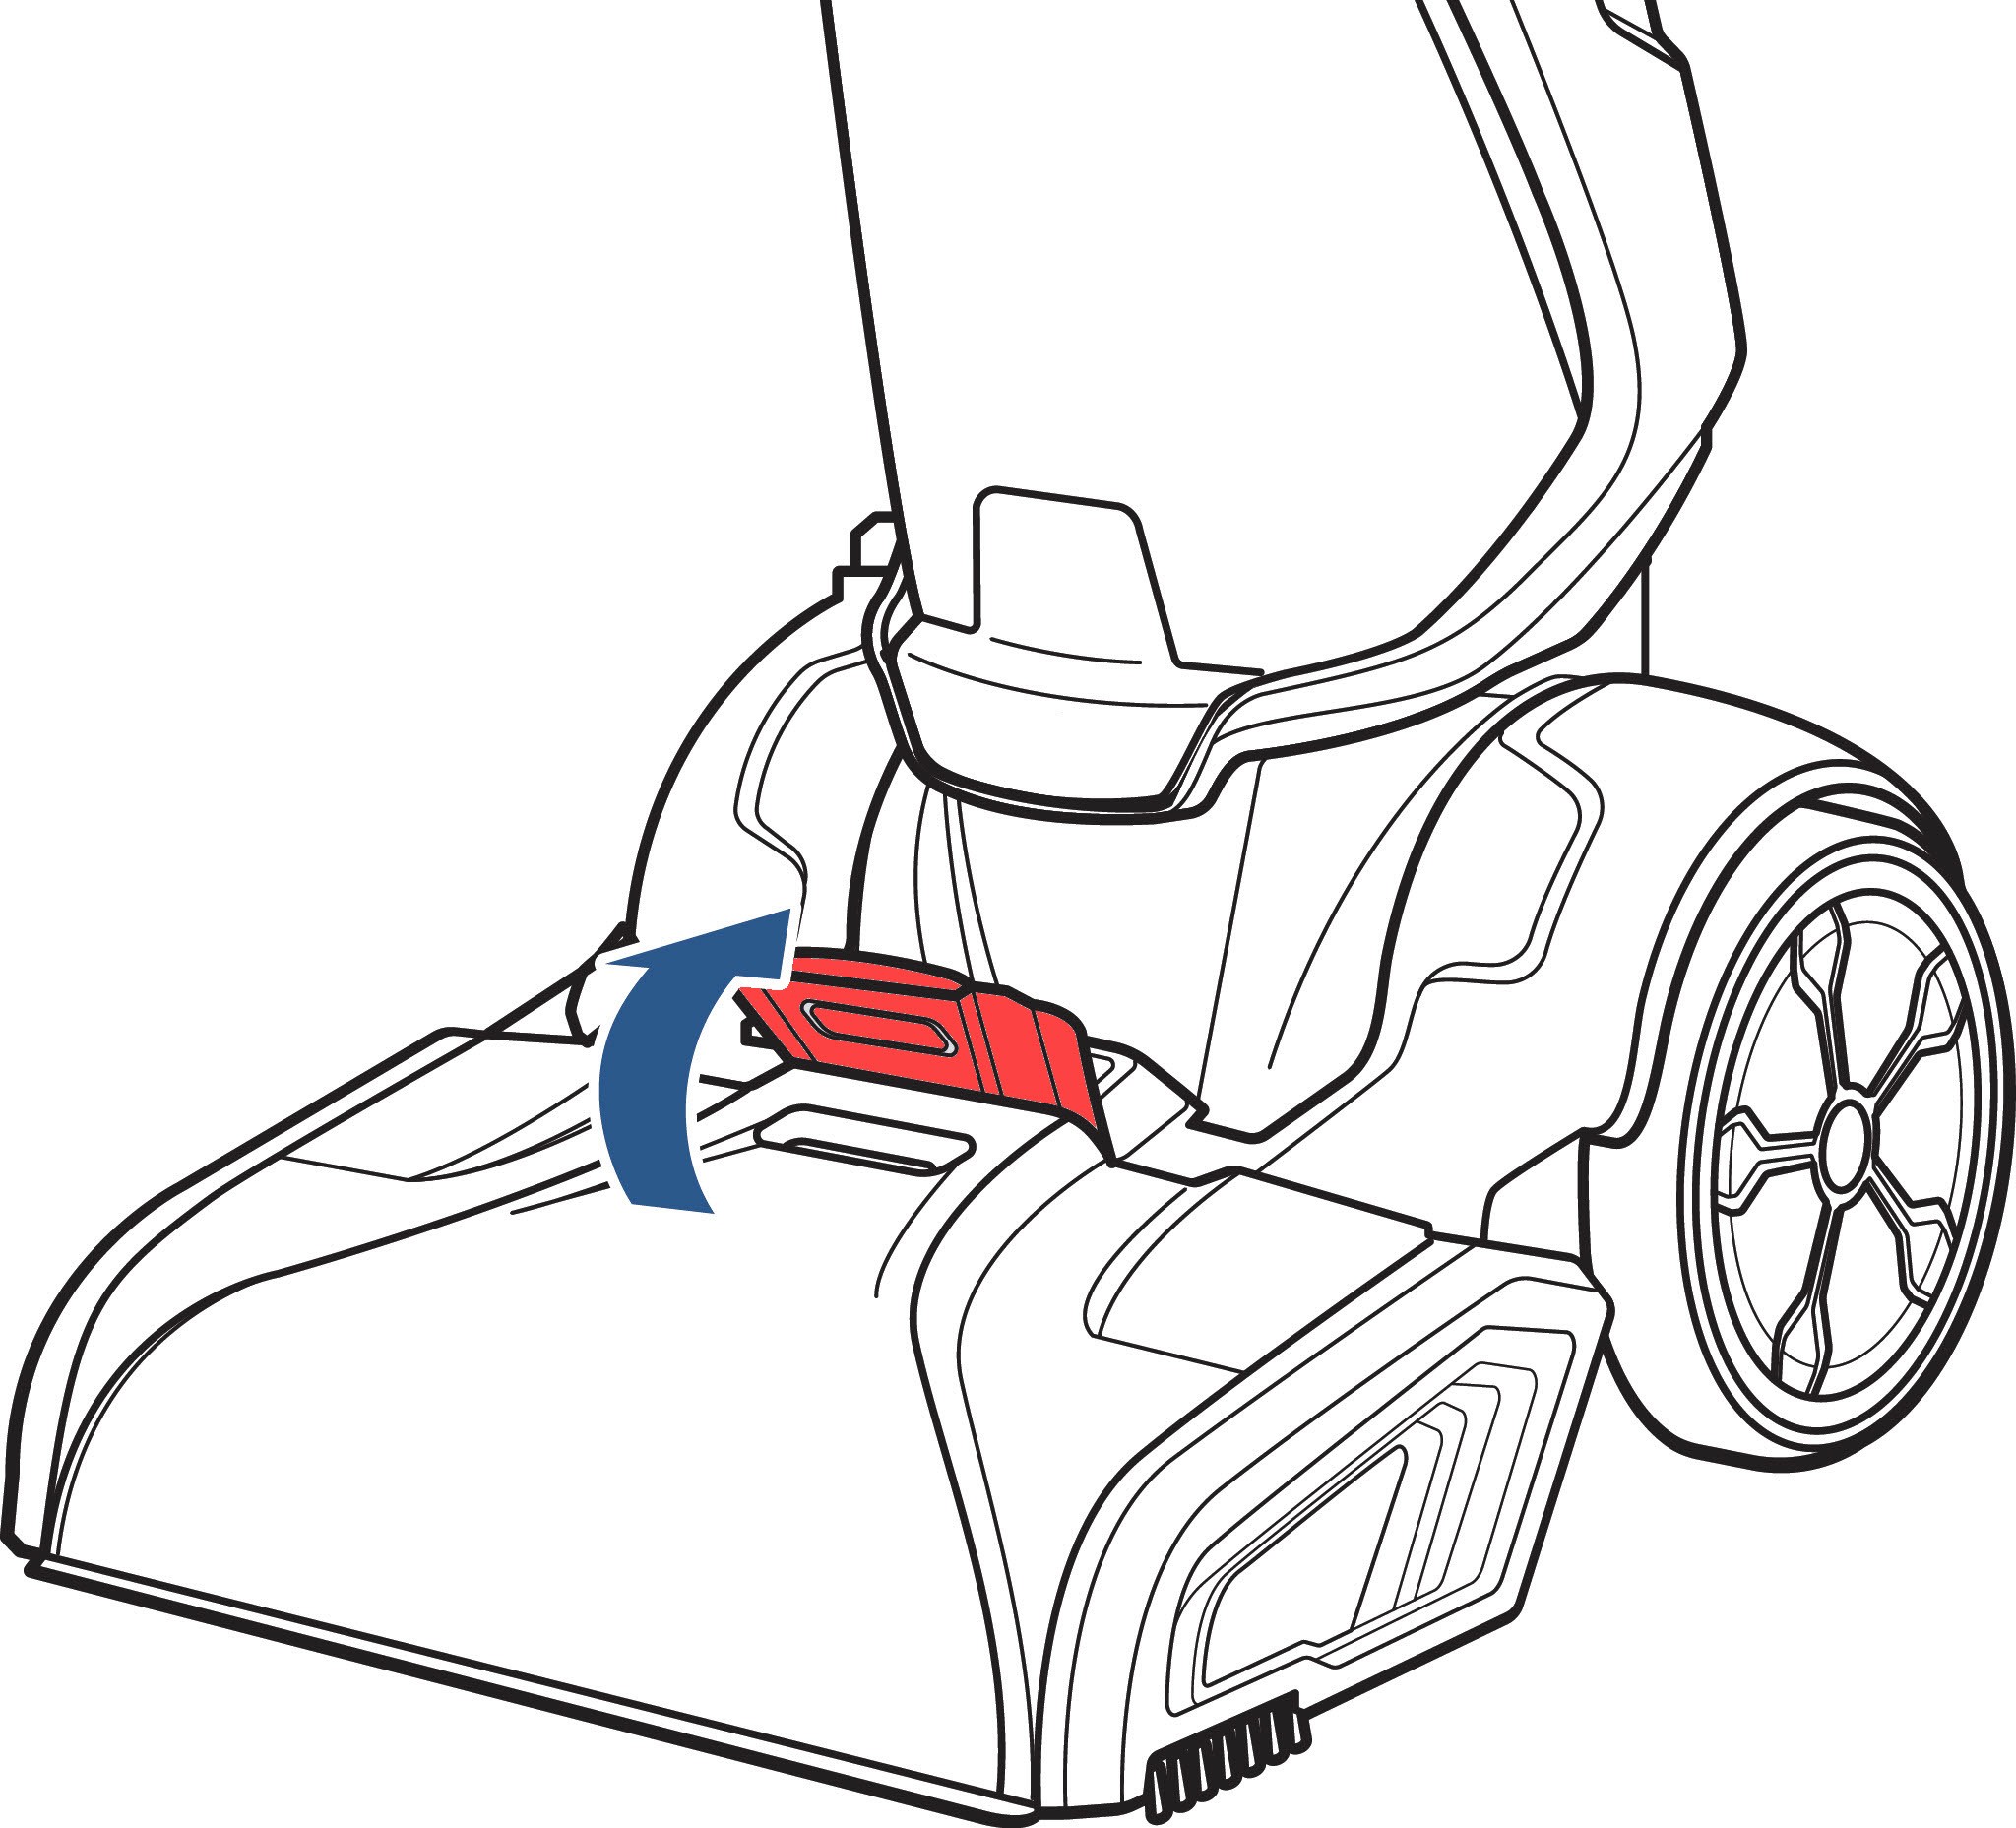
6.1 Attaching the Hose and Tools
- Open Hose Door: Lift the accessory hose door located on the foot of the machine.
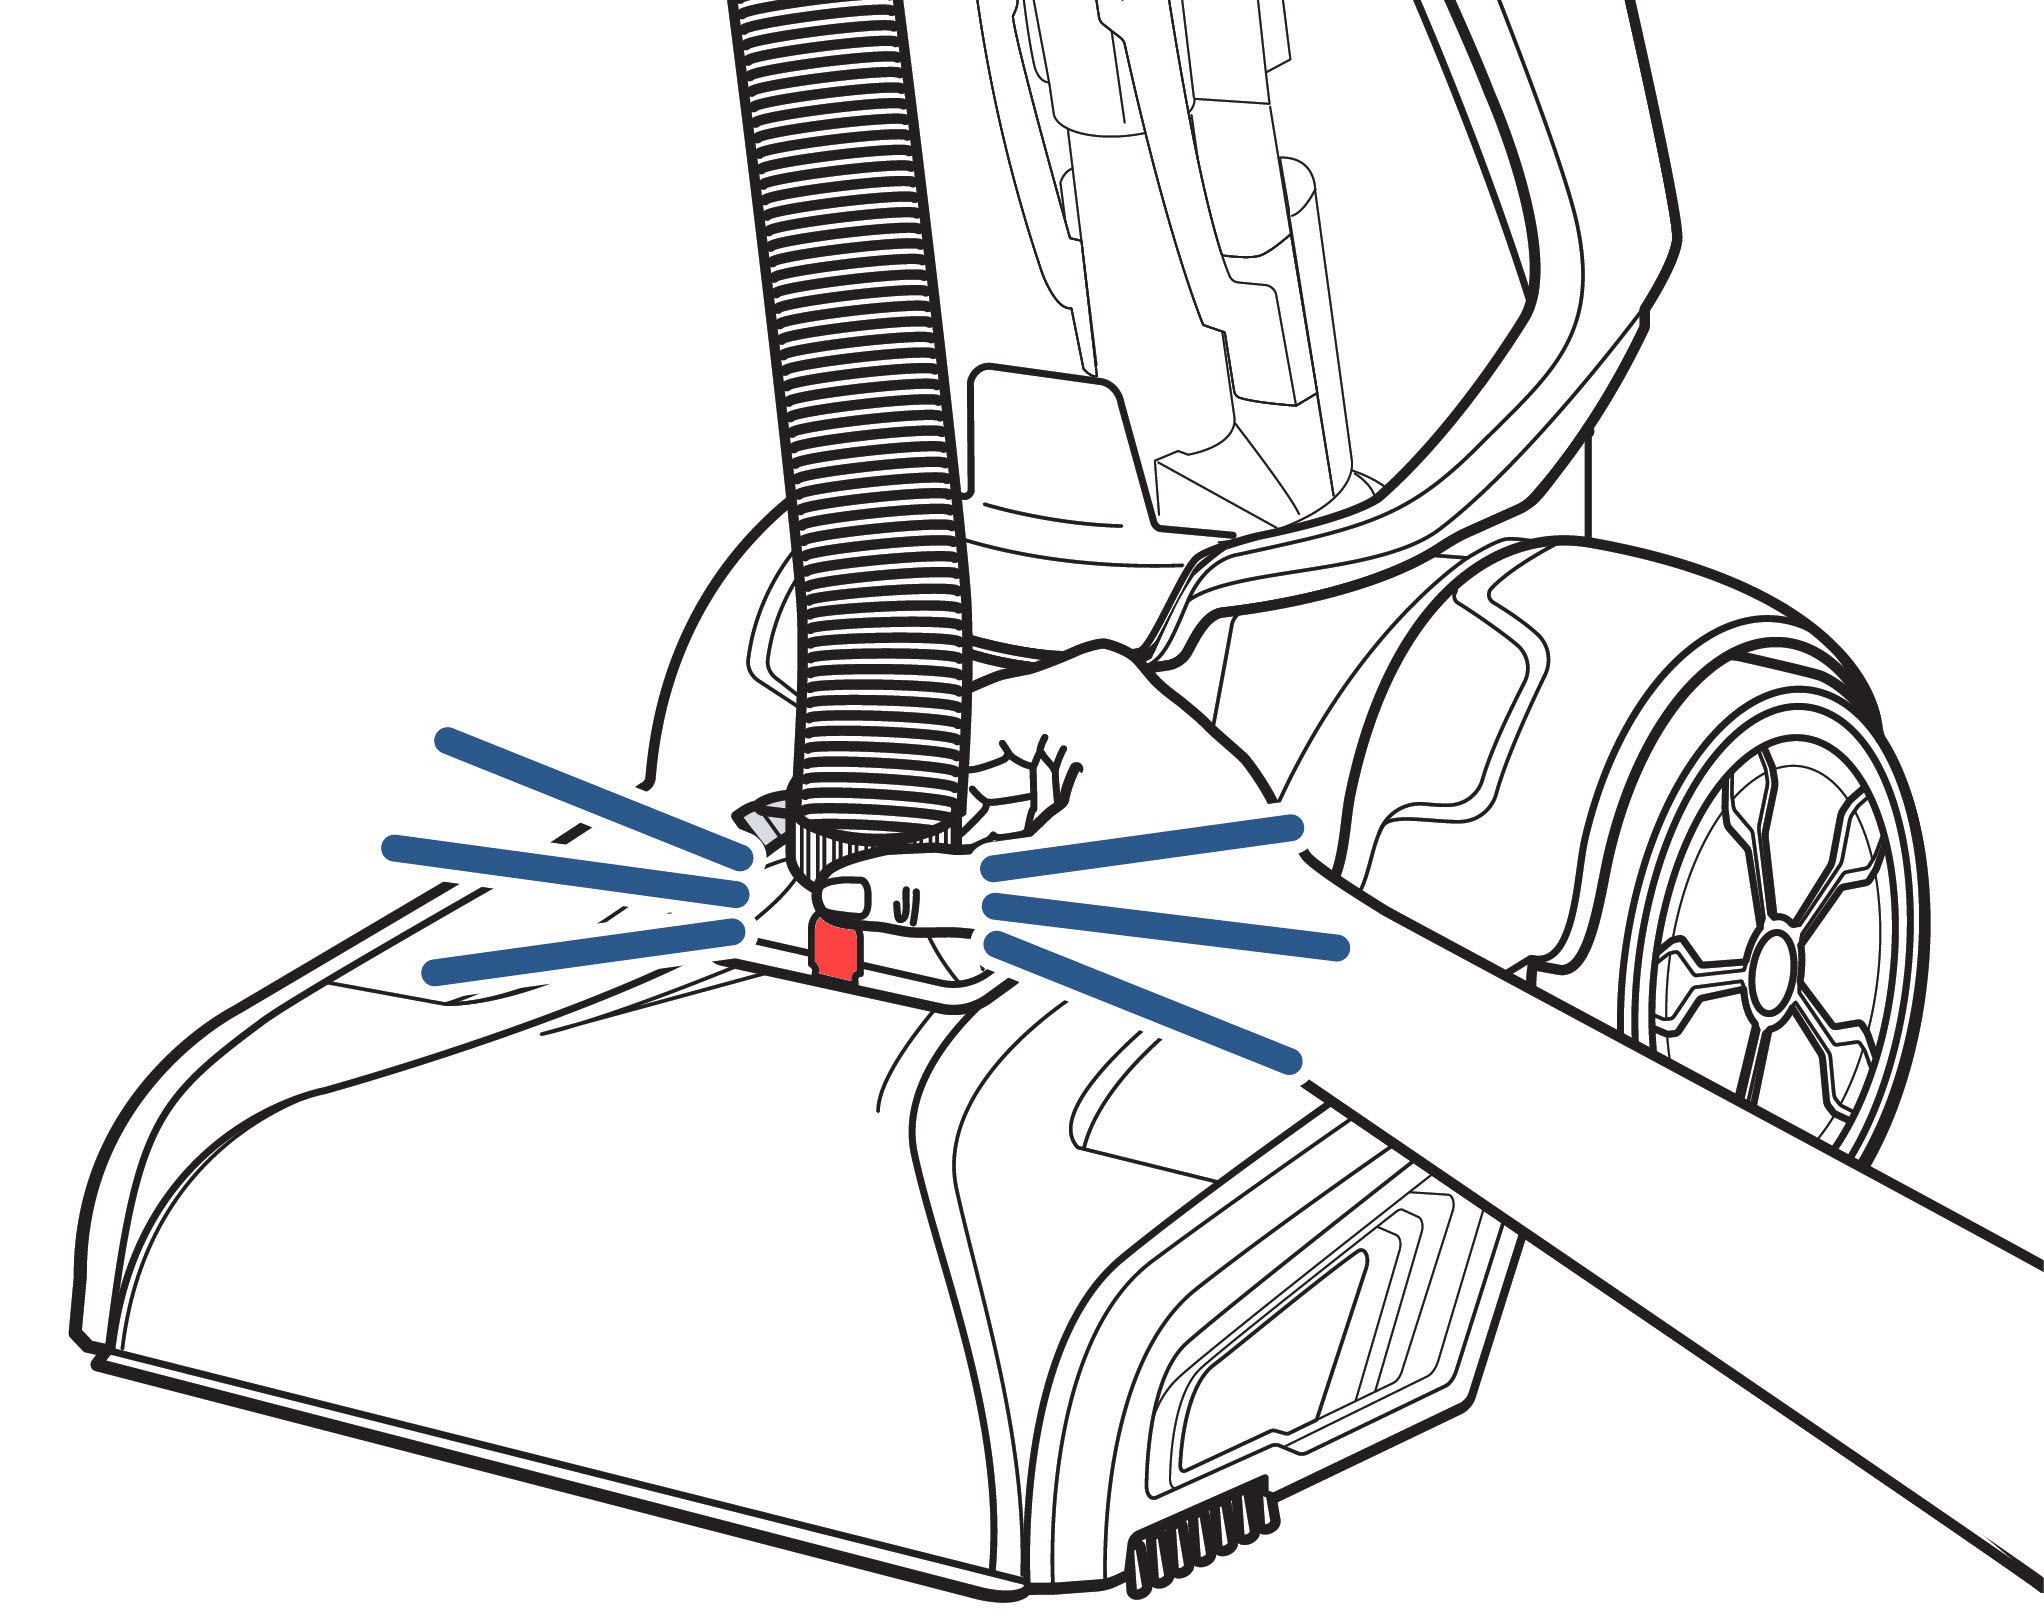
- Insert Hose: Insert the hose with the colored release clip facing away from the machine until it snaps into place.
- Attach Tool: Attach your desired tool to the other end of the hose.
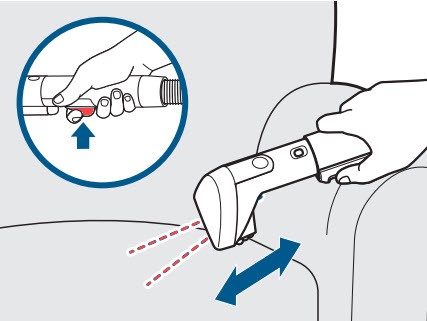
6.2 Cleaning Technique
- Spraying the Stain: Hold the tool a few inches above the spot or stain and press the spray trigger to treat the stain.
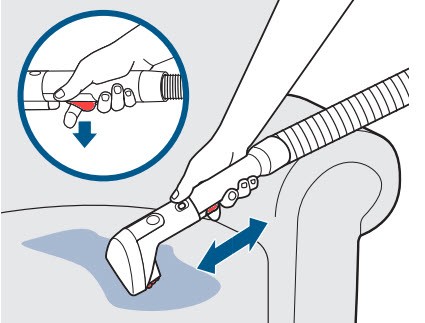
- Scrubbing the Stain: Release the spray trigger and use the scrubbing portion of the tool to gently scrub the stain.
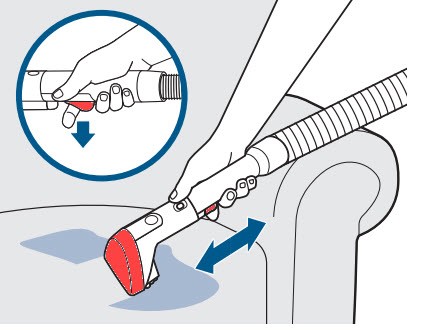
- Suctioning the Mess: Tilt the tool forward, allowing the suction channel to make solid contact with the surface, and slowly move the tool in a backward direction over the mess.
- Repeat: Continue this process until the stain is removed.
Opening the hose door allows for attachment of the hose and tools.
Proper hose attachment is essential for using the tools effectively.
Spraying the stain with the tool prepares it for scrubbing and suctioning.
Scrubbing the stain with the tool helps to loosen and lift dirt and debris.
Suctioning with the tool removes the stain and excess cleaning solution.
6.3 Safety Note
The brush rolls will continue to spin while the machine is upright, even while using the hose and tool attachments. Ensure your machine is placed on a surface that will not be damaged by the rotating brush rolls.
7. Emptying the Dirty Water Tank
Regularly emptying the dirty water tank is essential for maintaining optimal cleaning performance.
7.1 Recognizing a Full Tank
If the dirty water tank becomes full during cleaning, you may notice a change in the pitch of your machine’s sound and a loss of suction. These are indicators that the tank needs to be emptied.
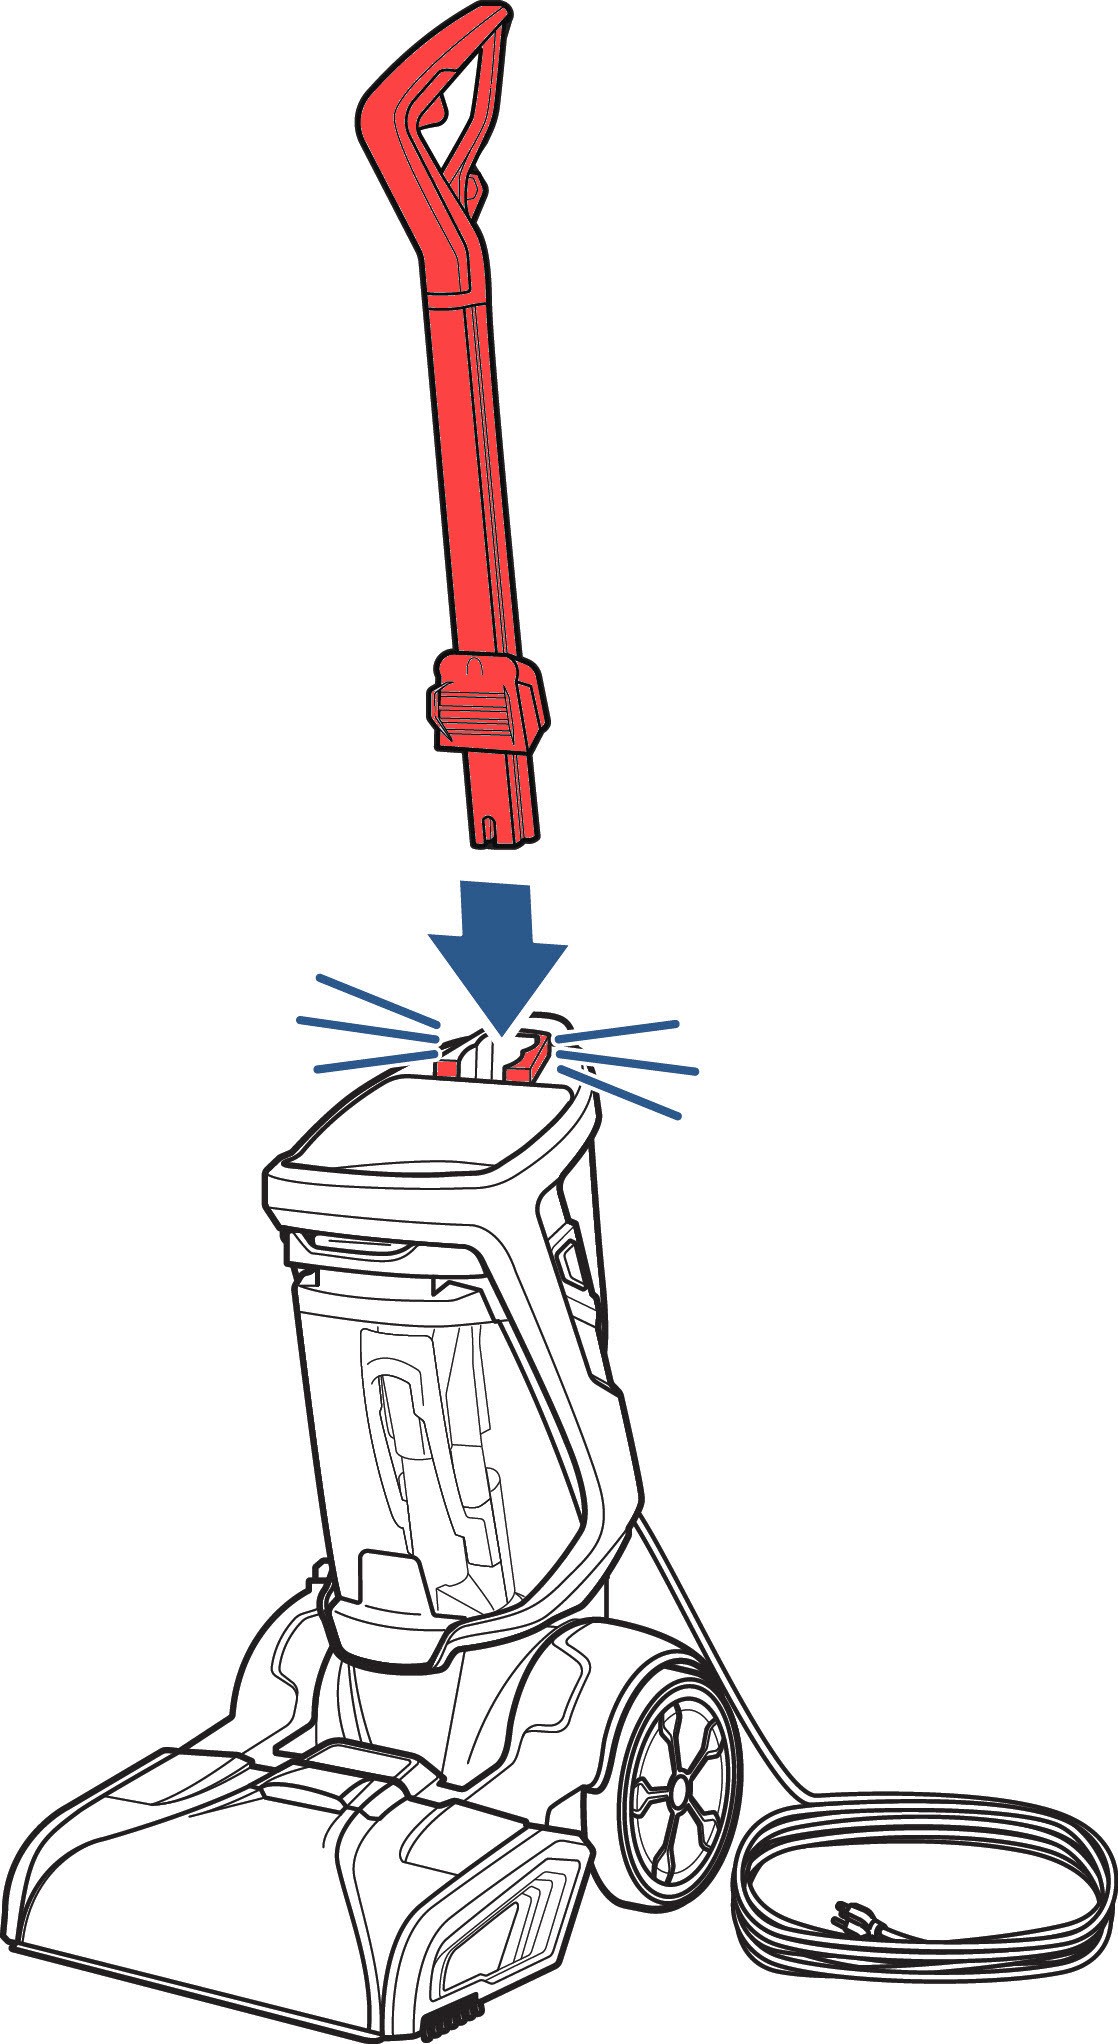
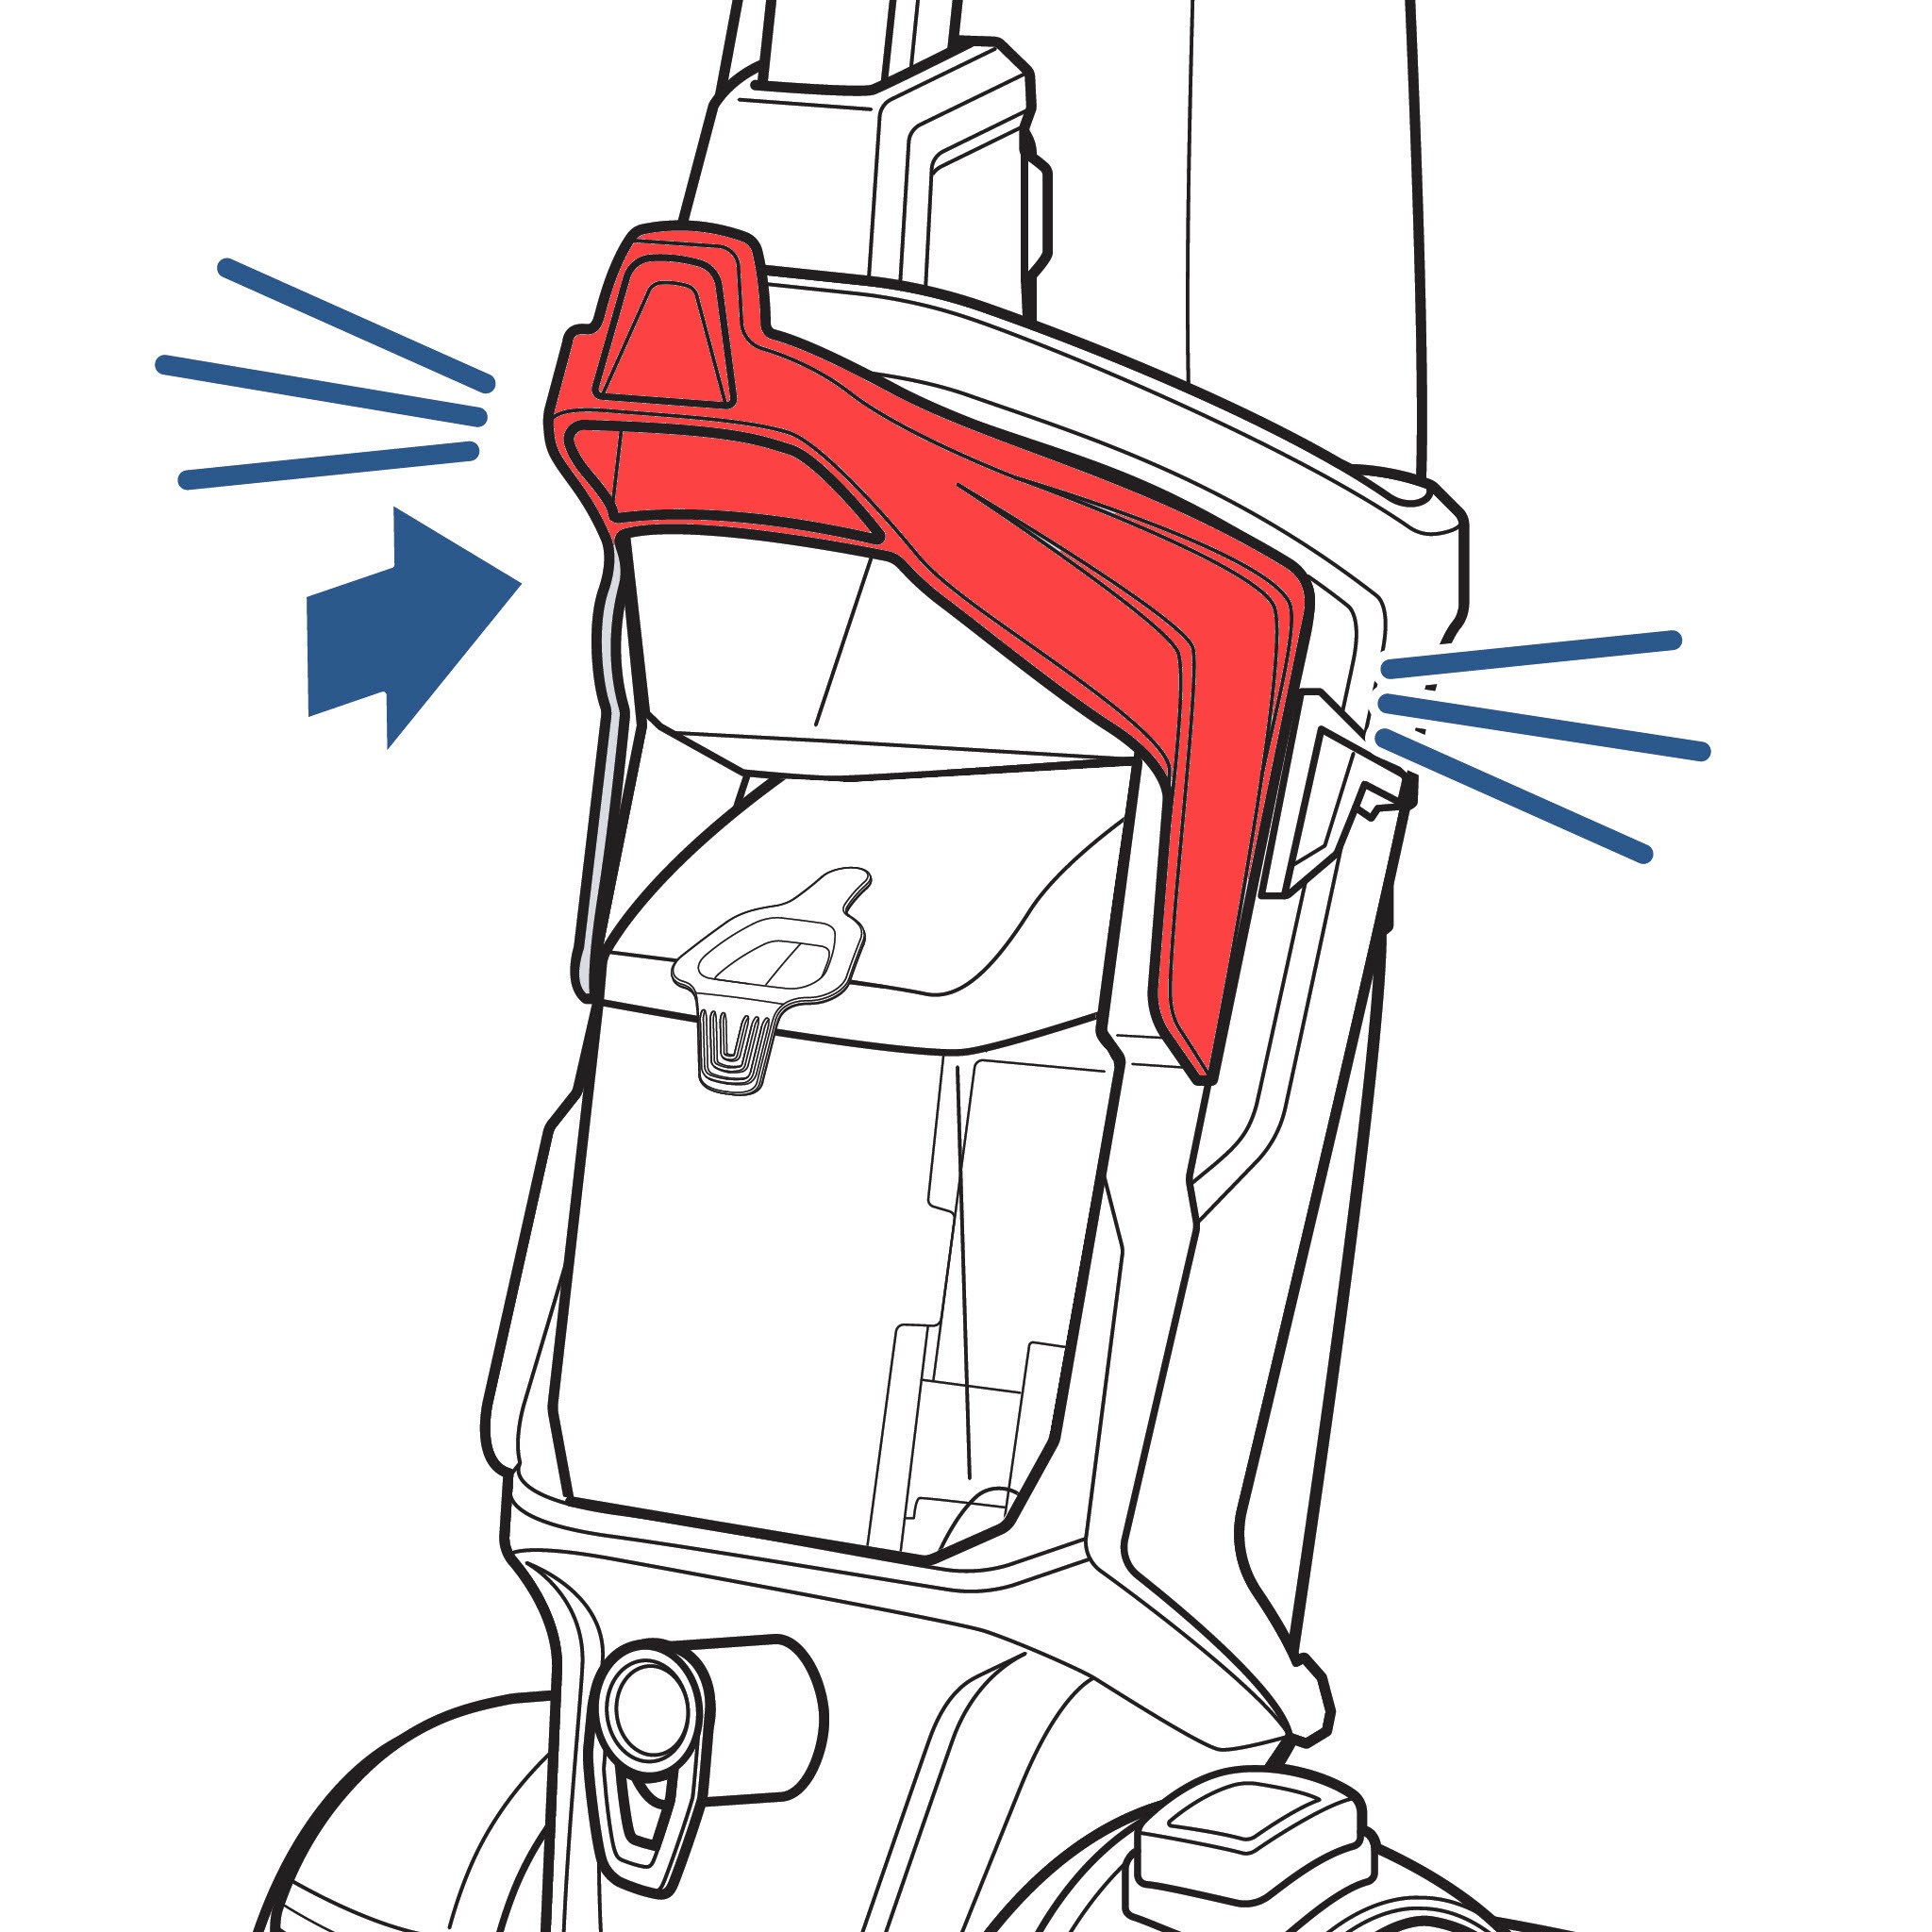
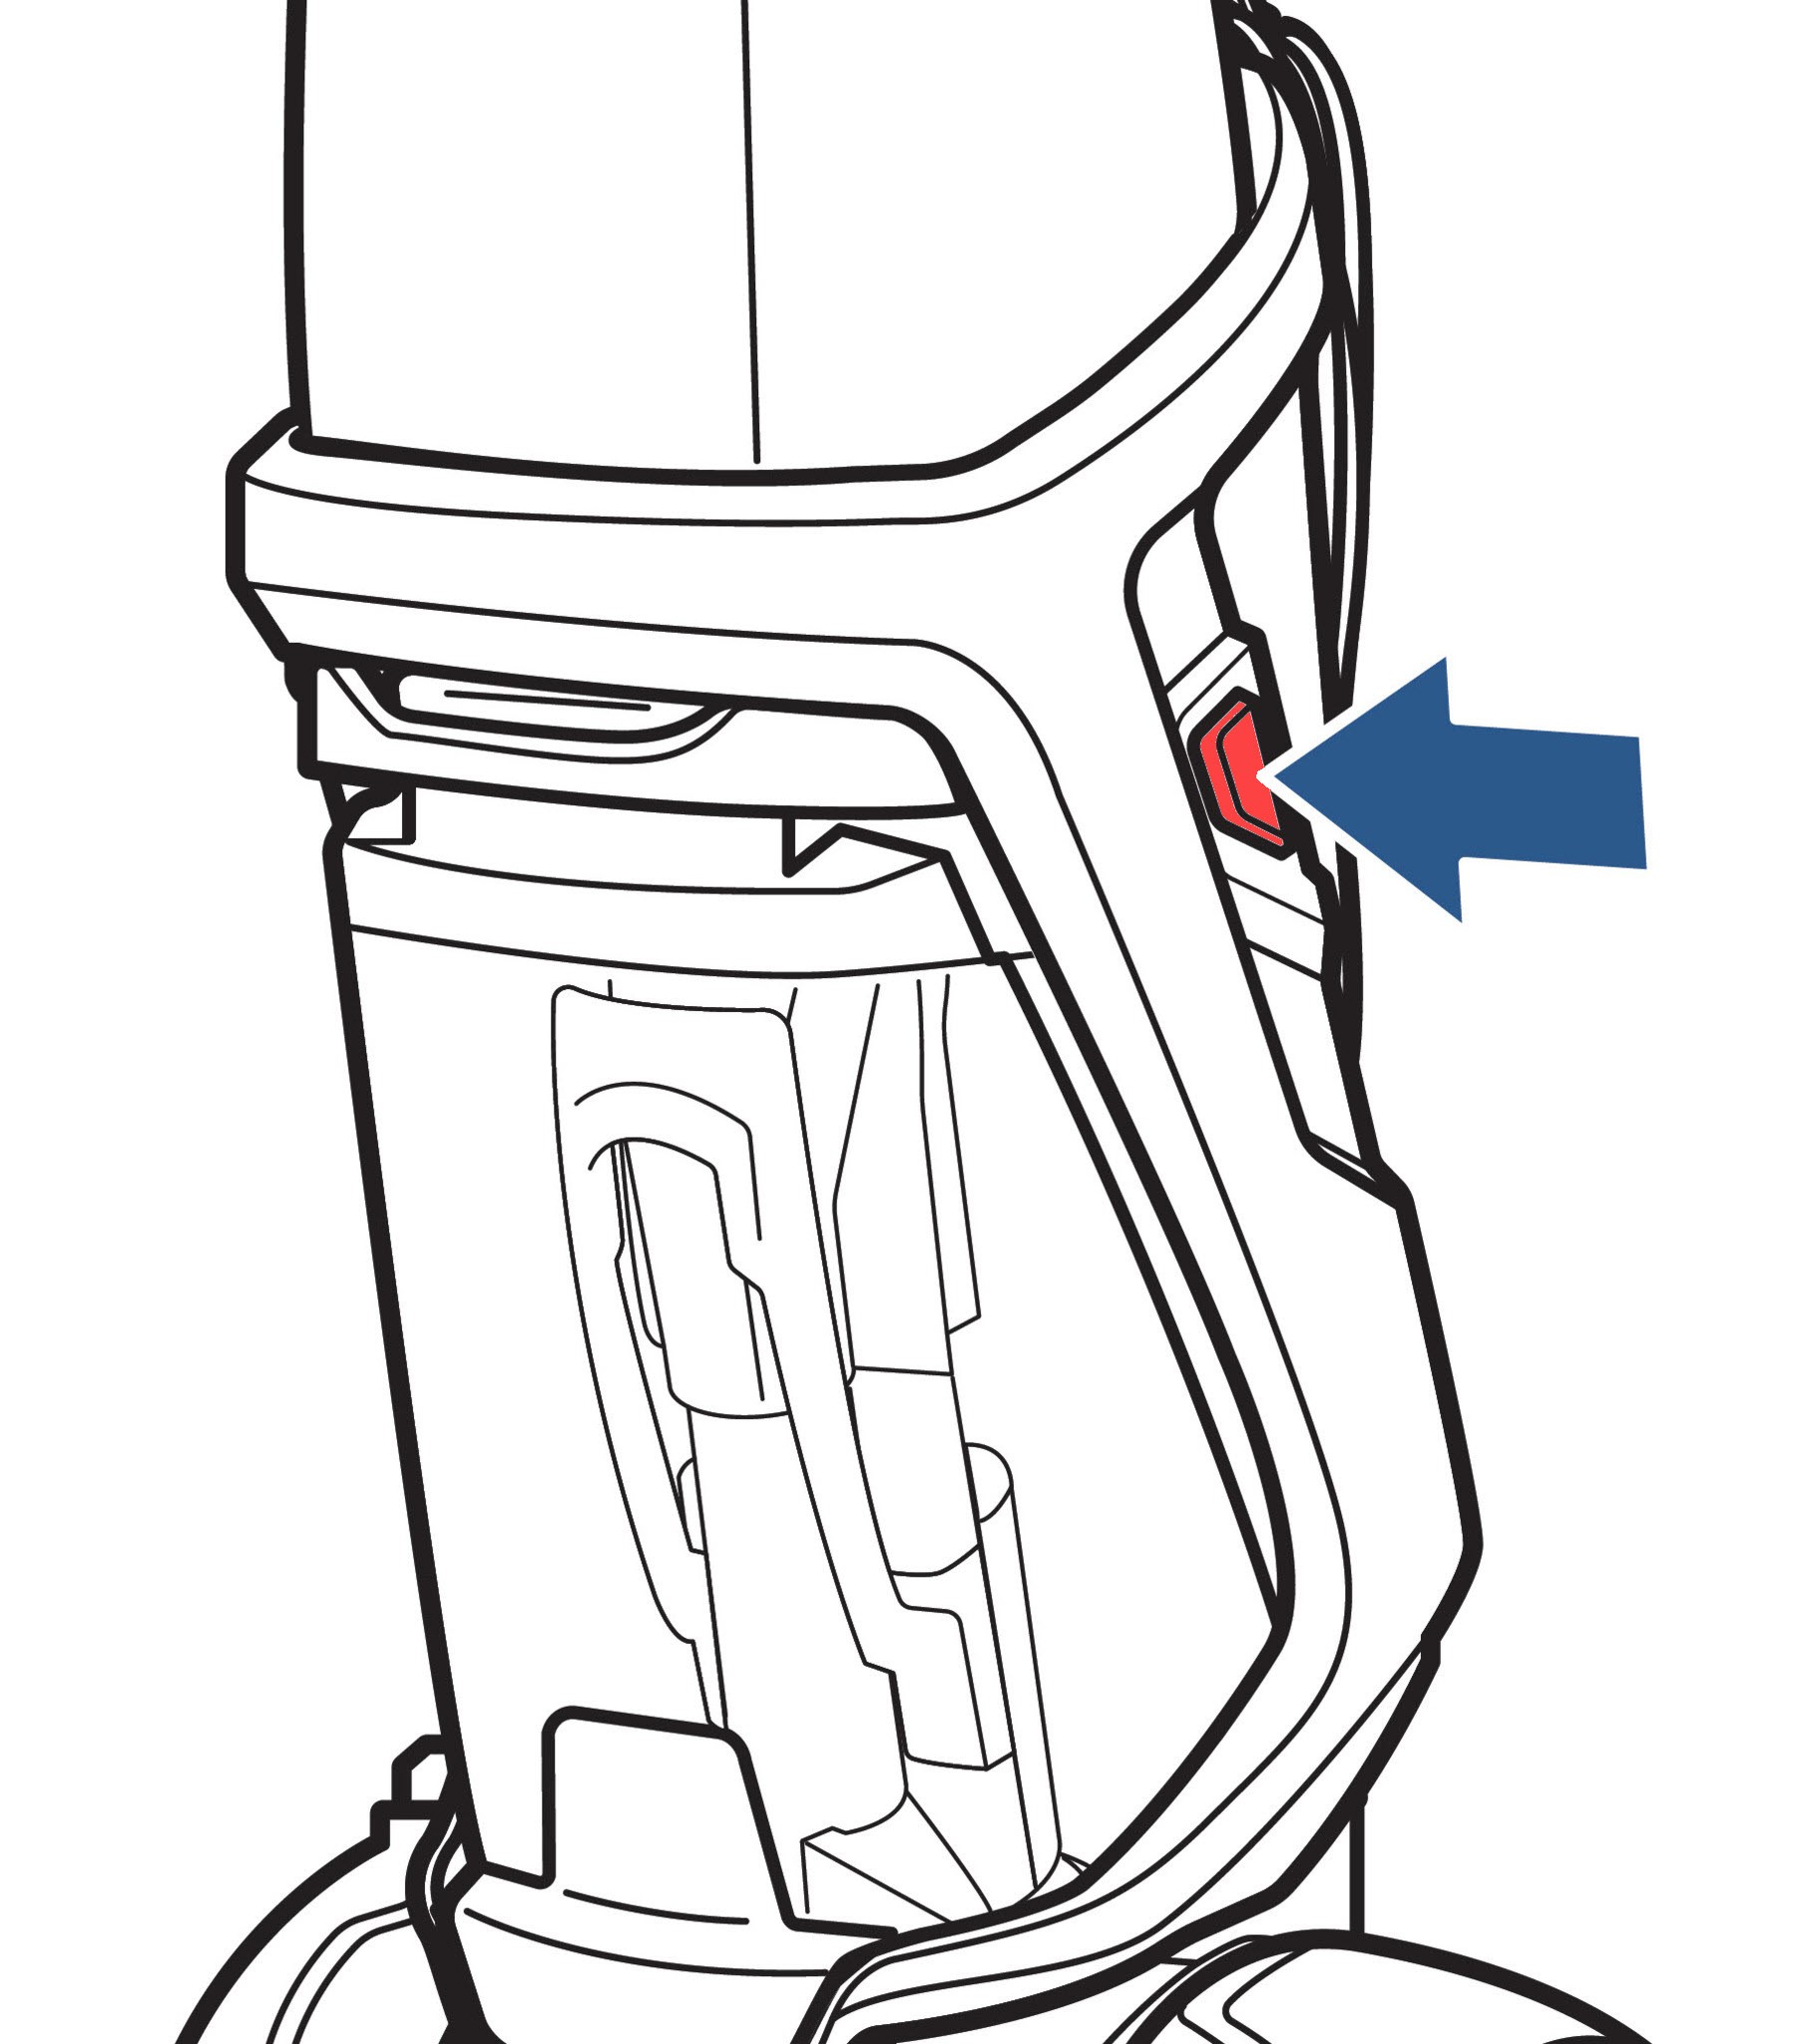
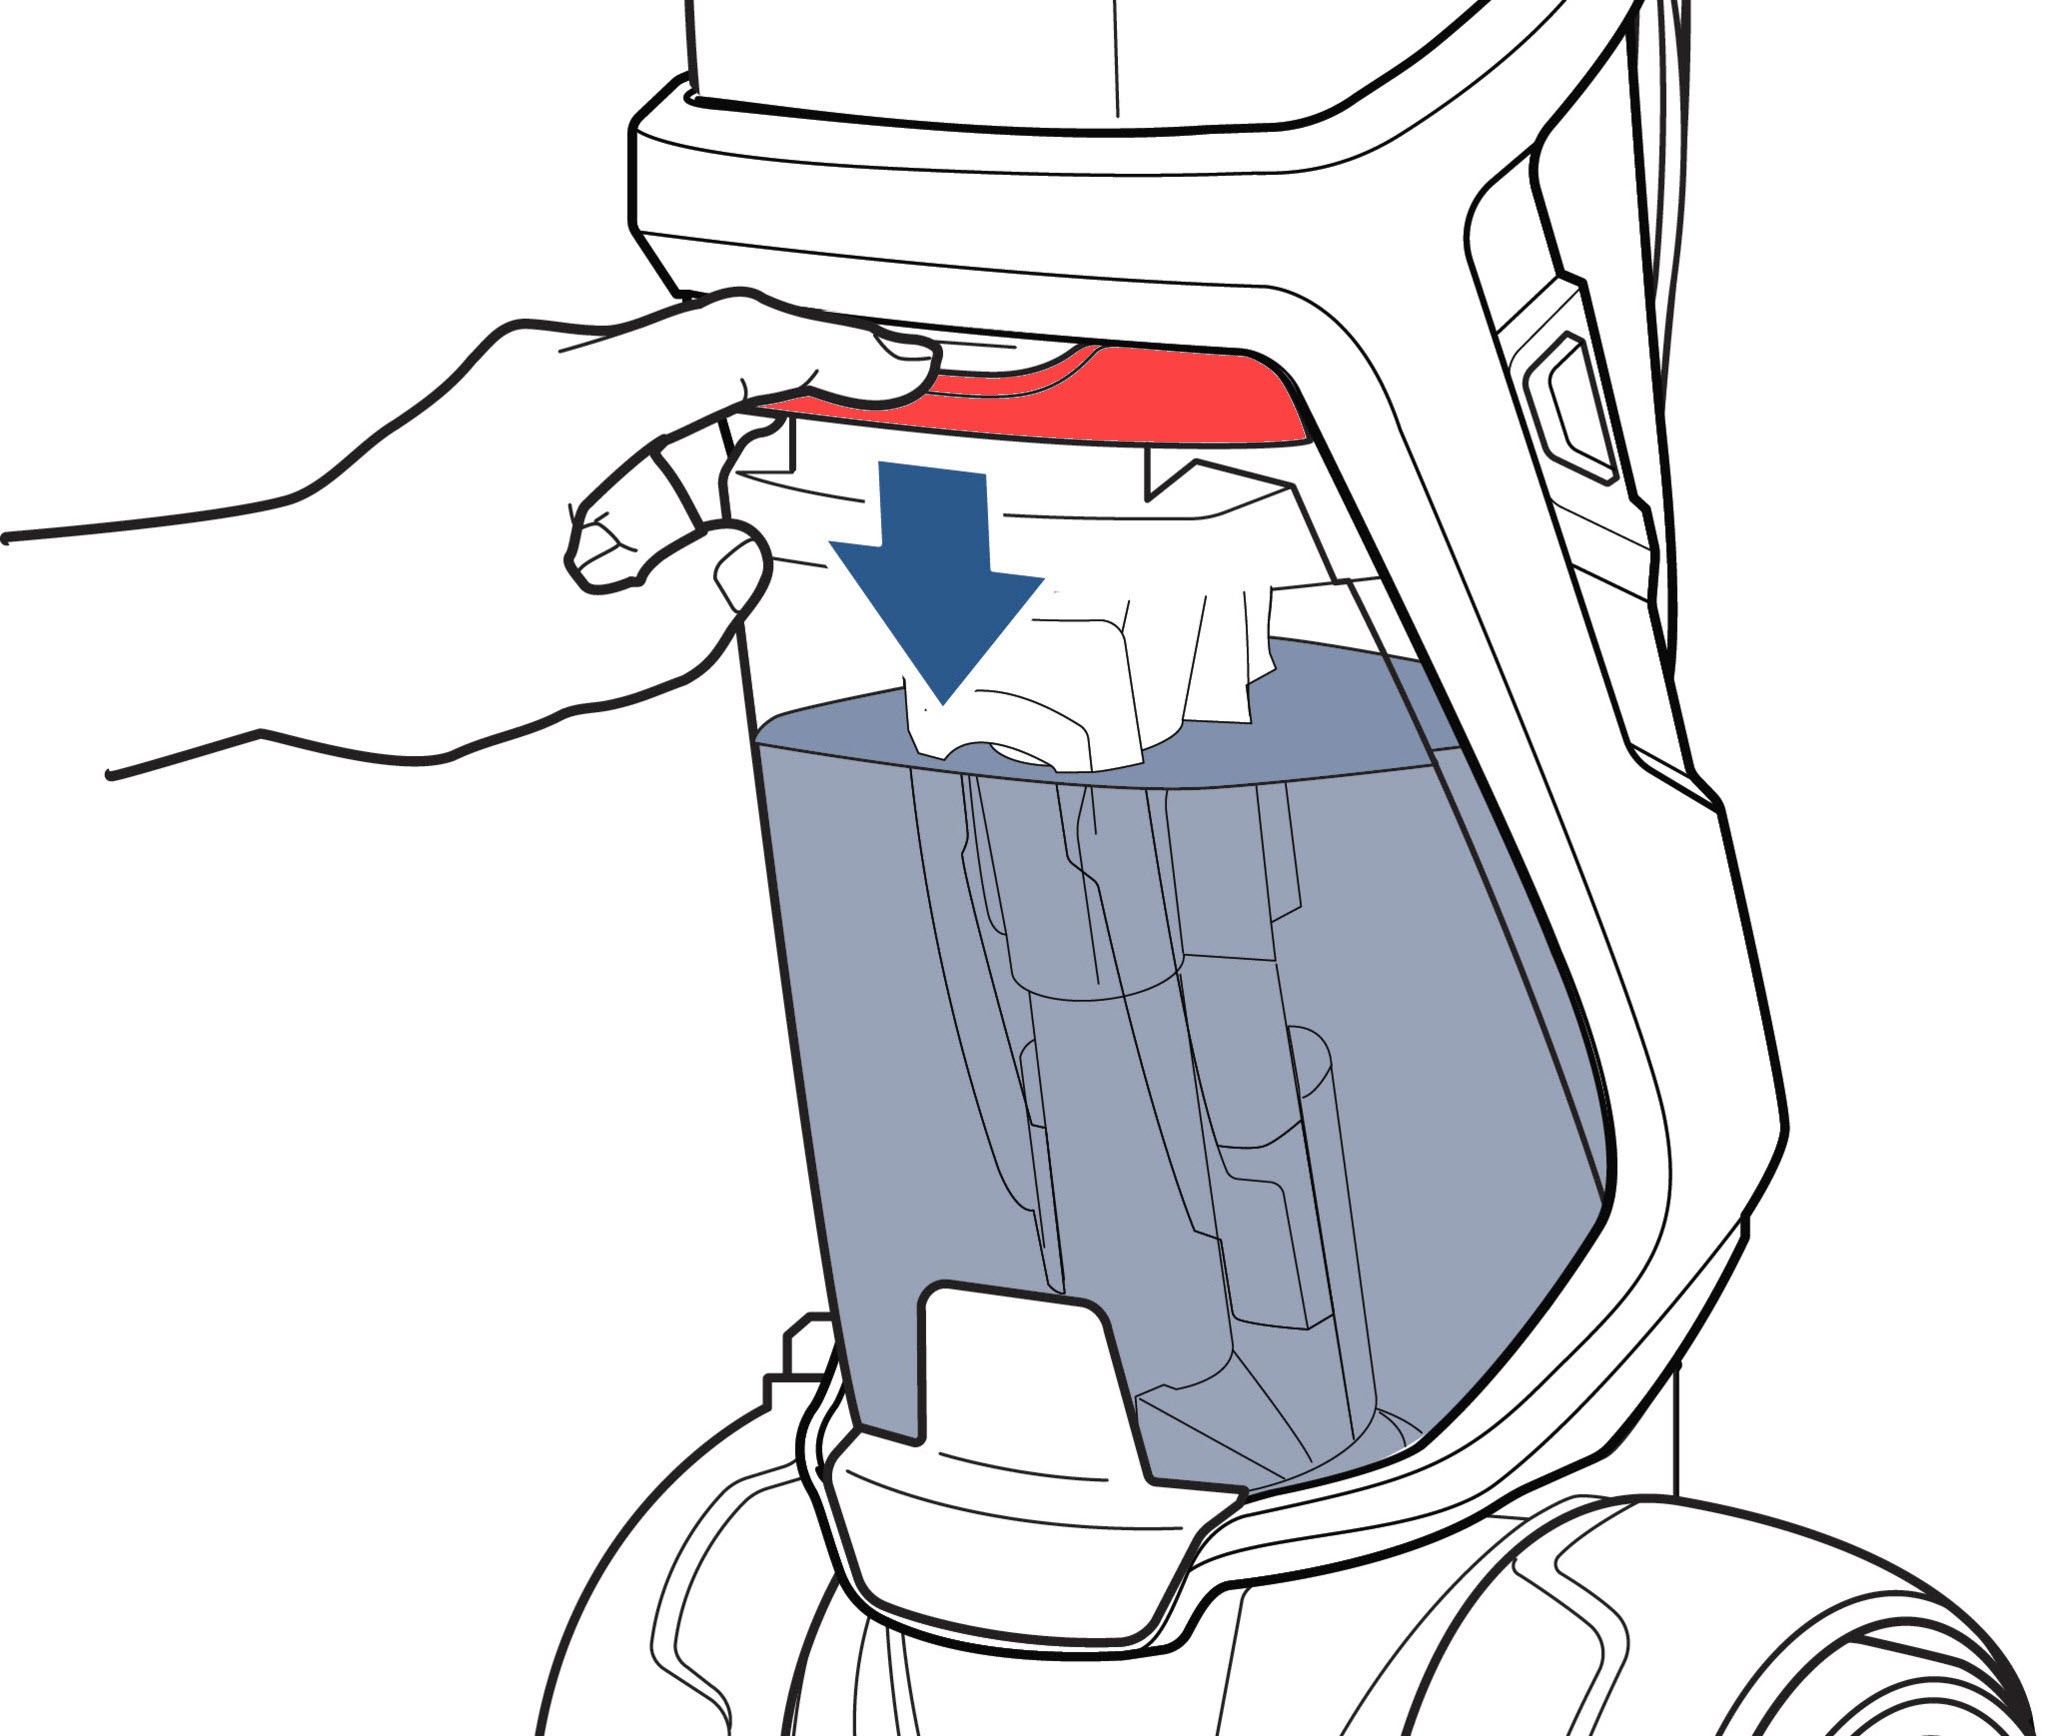
7.2 Removing the Dirty Water Tank
- Press Tank Handle: Press the tank handle on the dirty water tank downward.
- Tilt Forward: Tilt the tank forward to remove it. Use both hands, one on the handle and one on the tank, to assist in removing the tank from the machine.
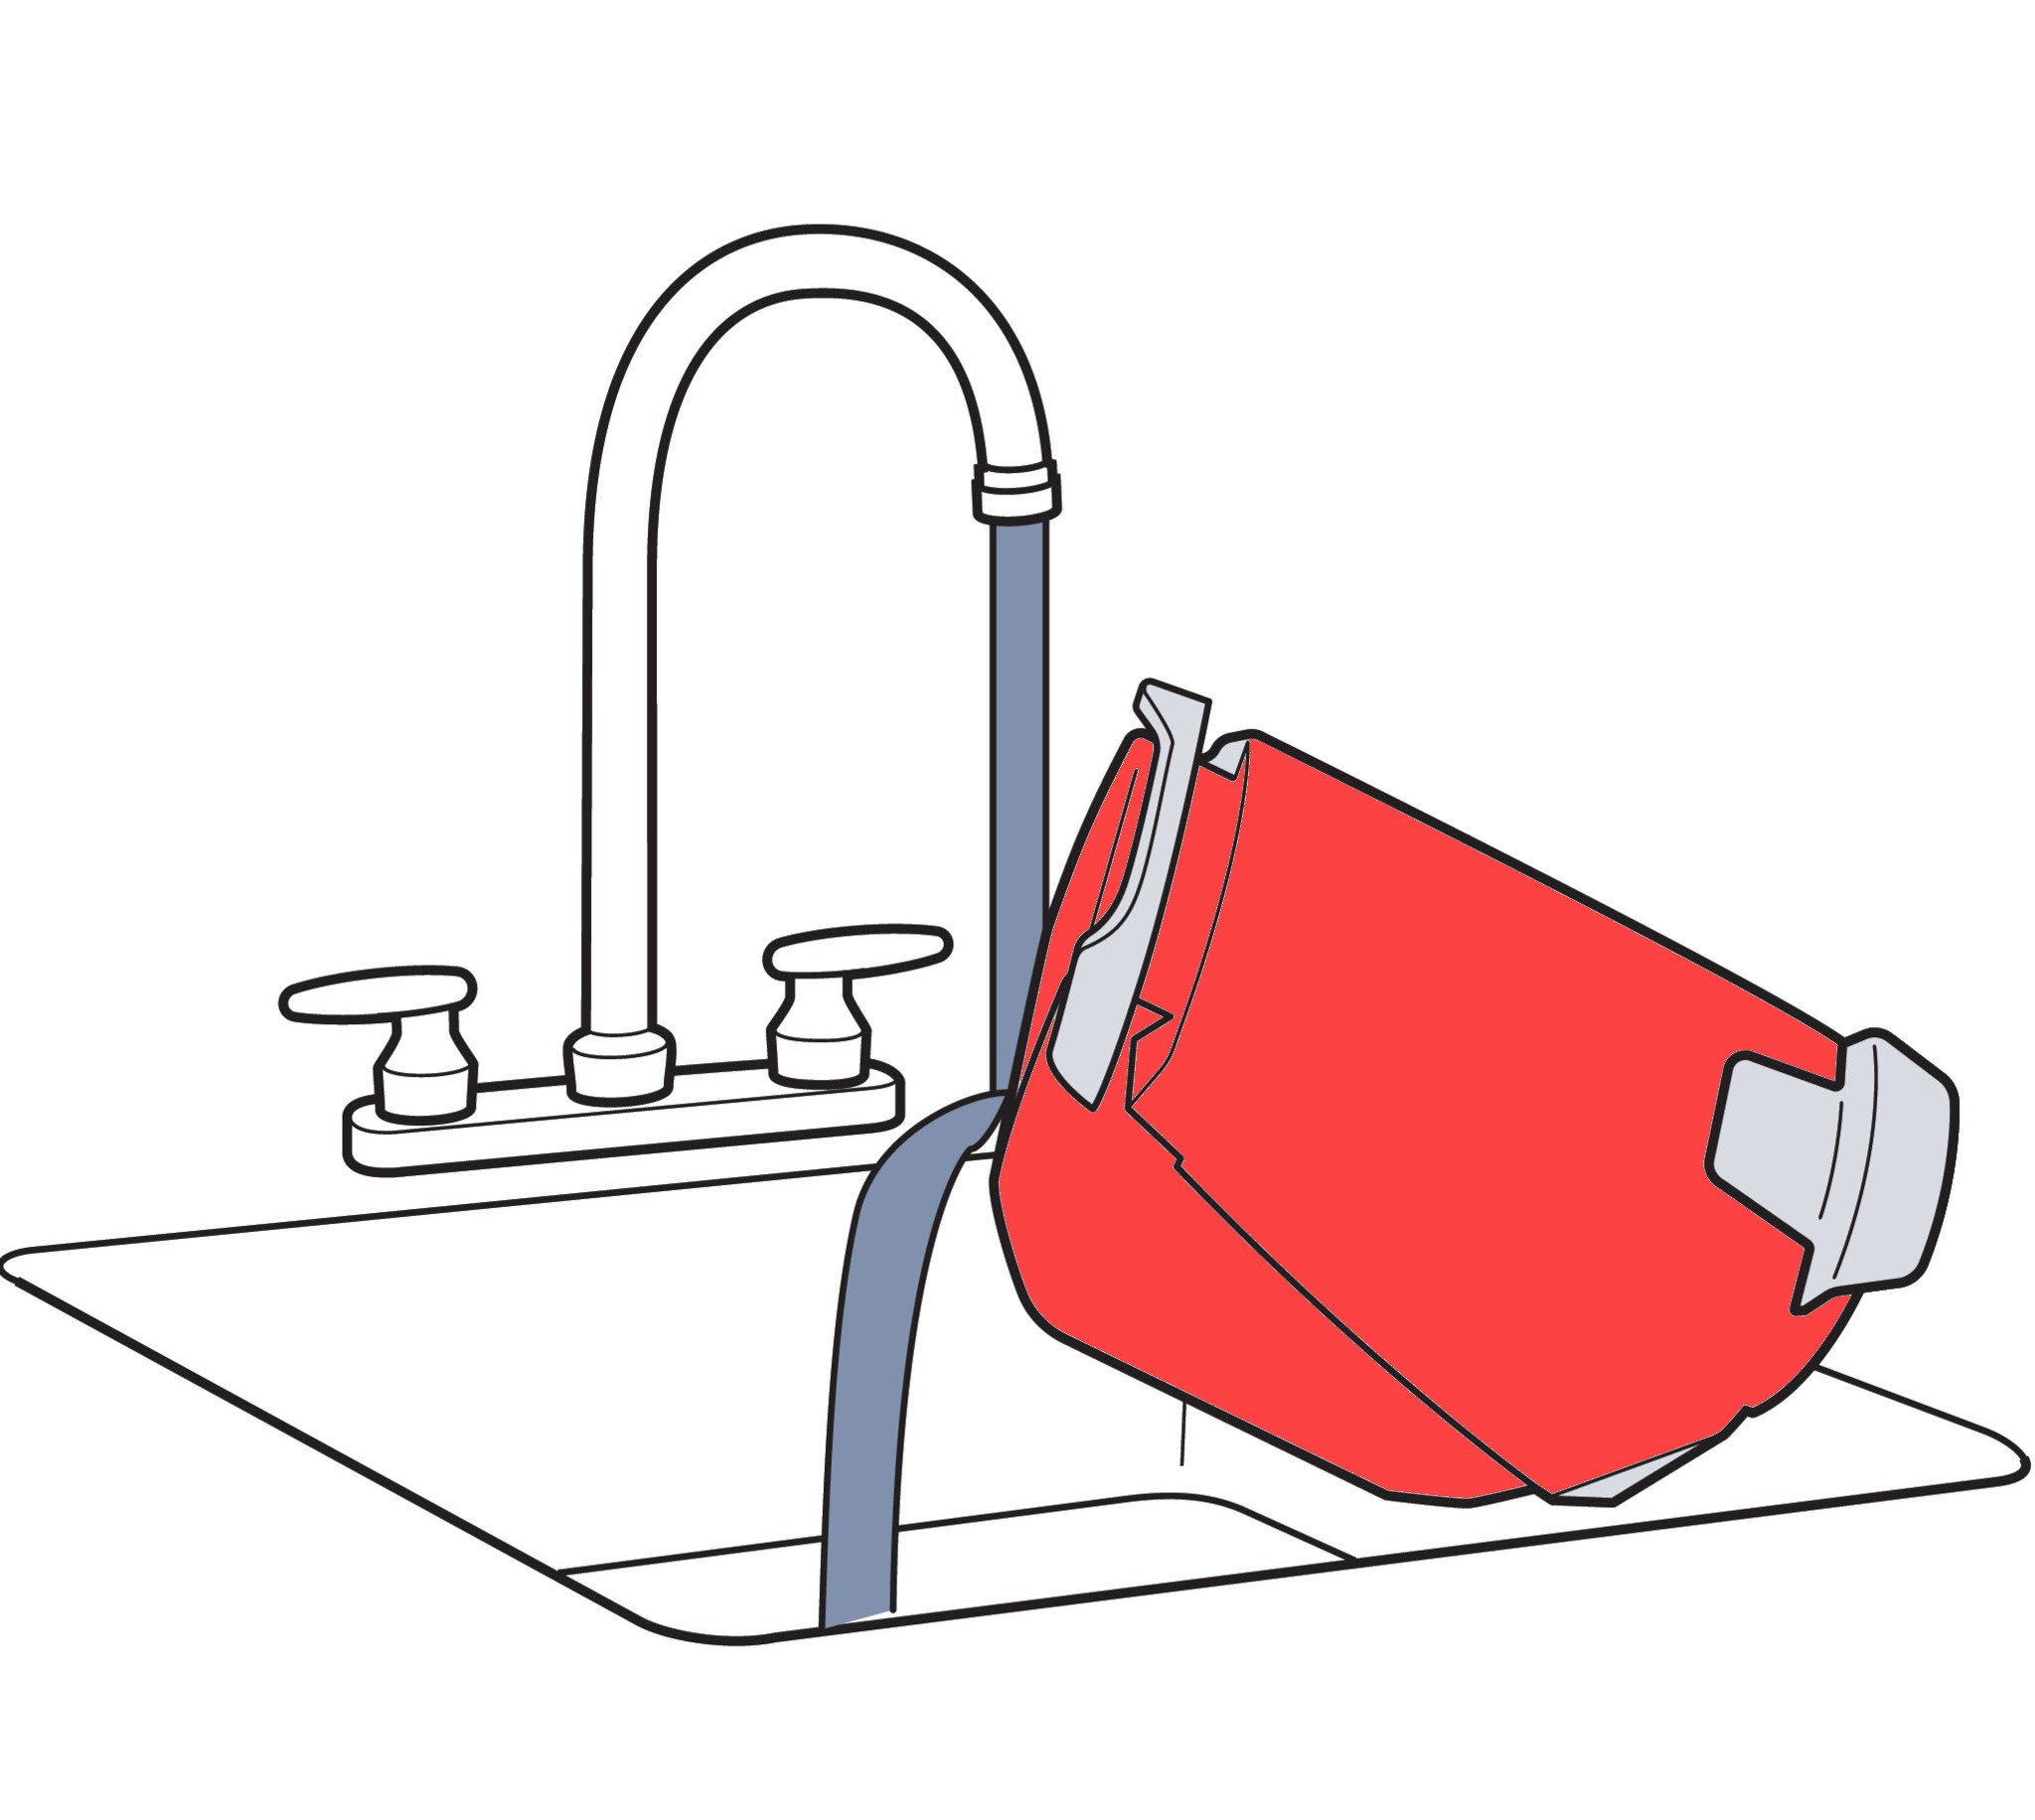
7.3 Emptying and Cleaning the Tank
- Pull Rubber Tab: Empty the dirty water tank by pulling the rubber tab on the top of the tank and slowly tilting the tank.
- Close Rubber Tab: Once the tank is empty, close the rubber tab and ensure it is sealed tight by pressing in both sides firmly. Failure to do so can result in improper machine function or leaking.
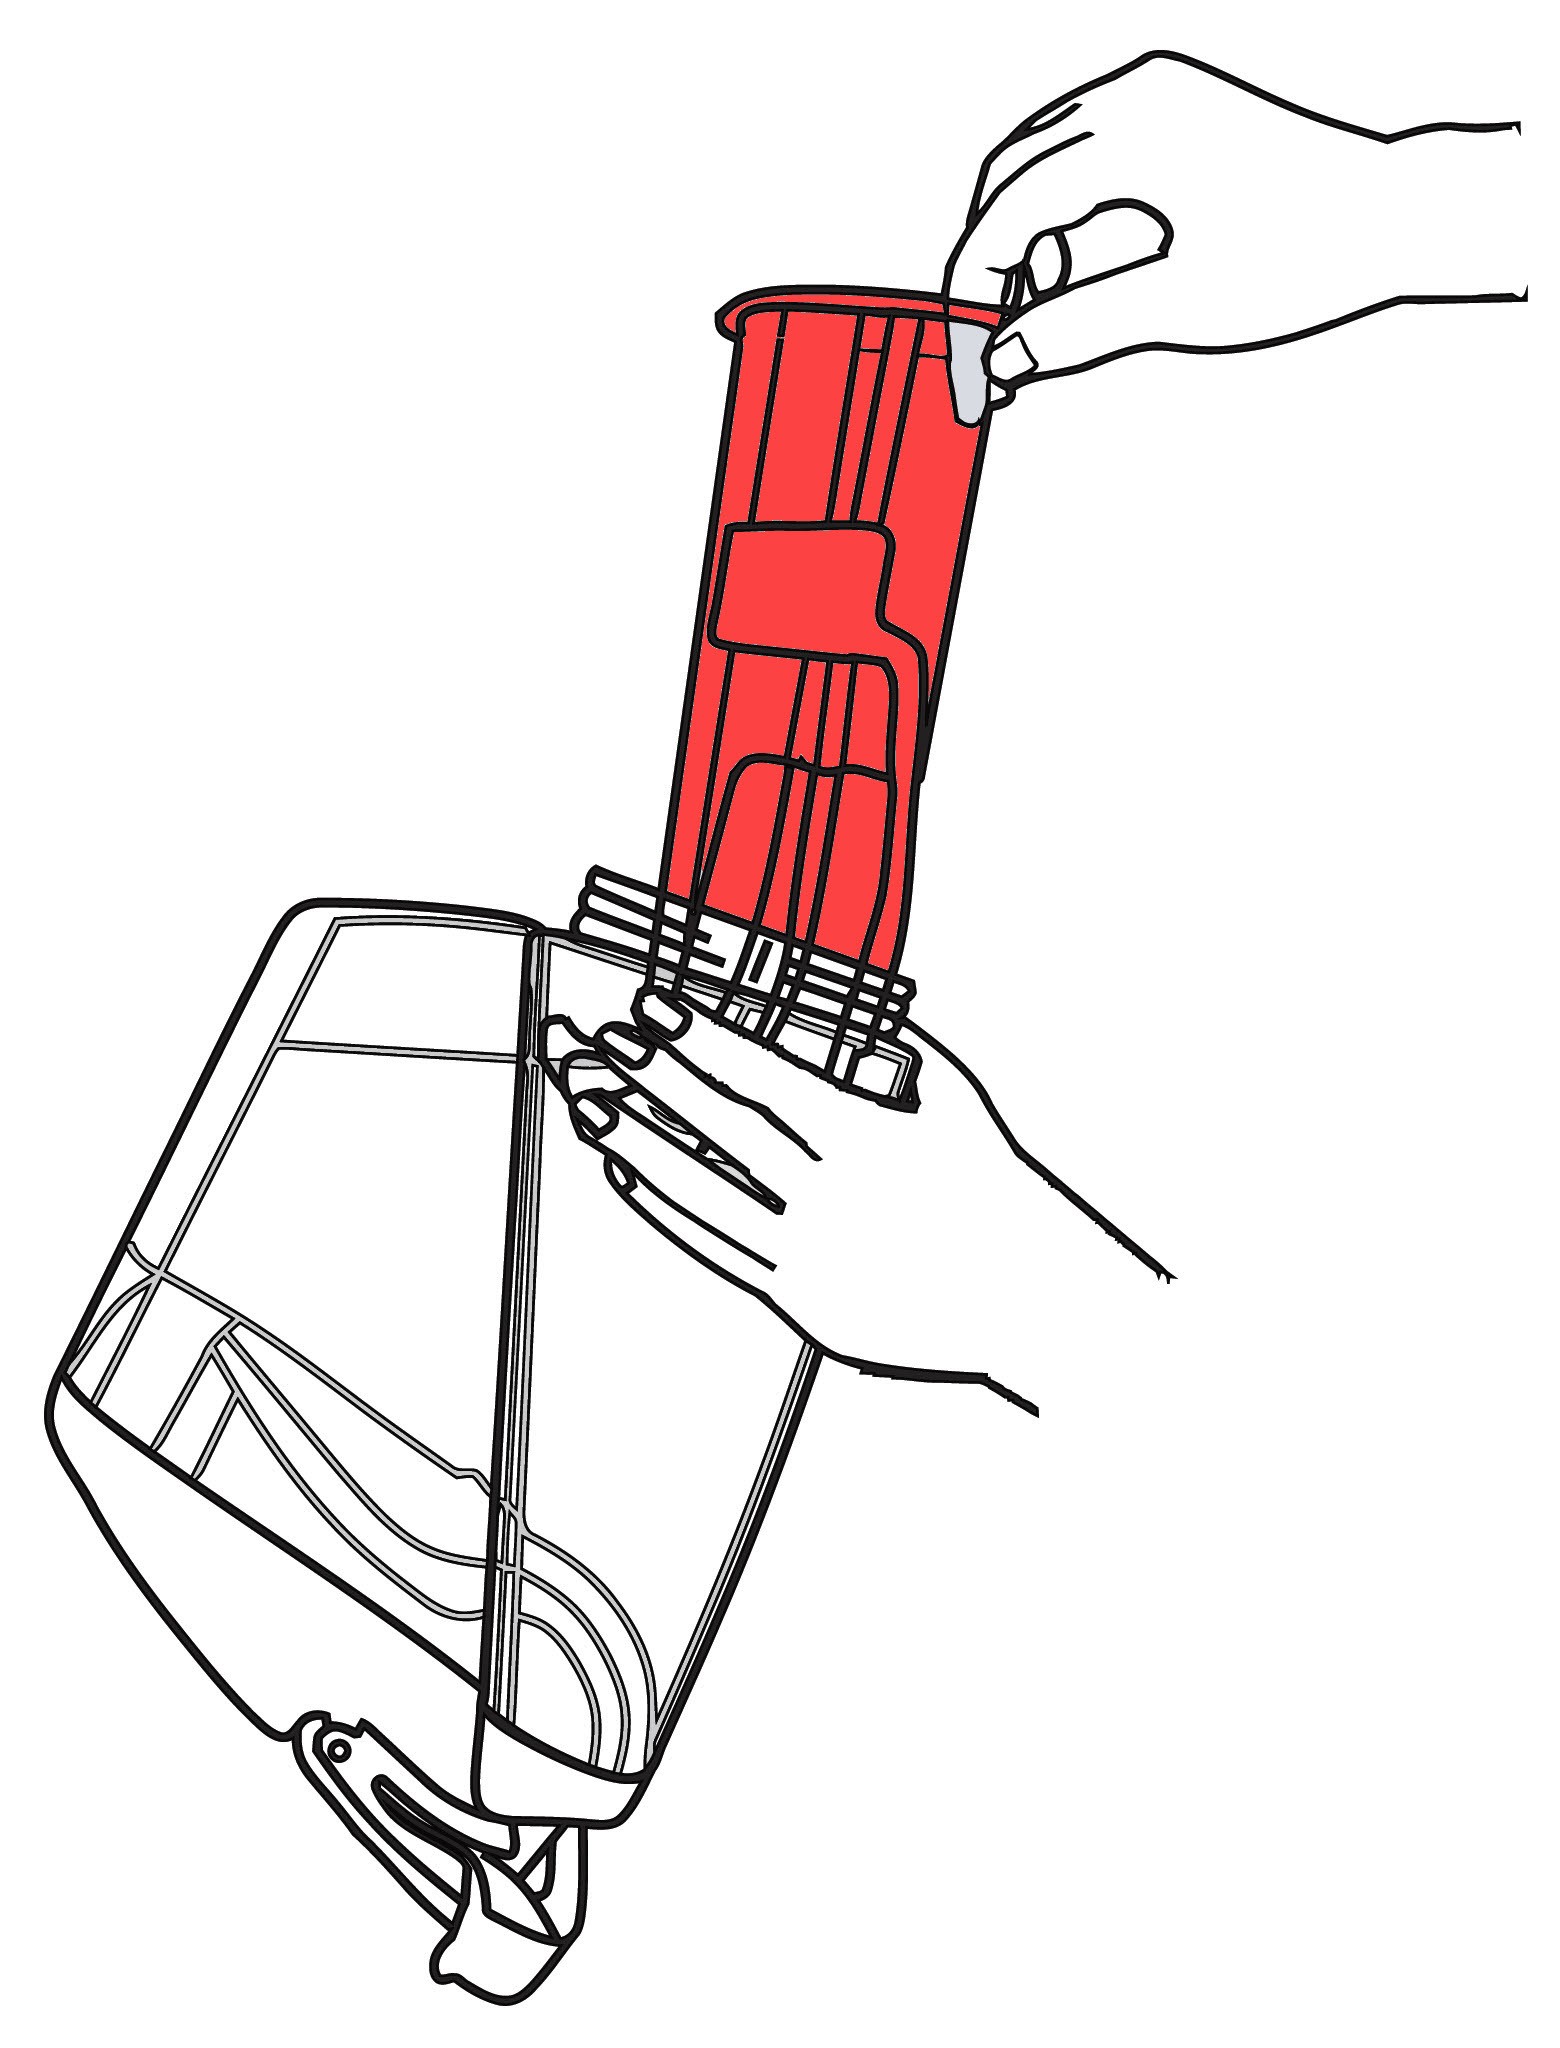
- Unscrew Ring: Unscrew the ring on the bottom of the tank and remove the float stack.
- Rinse Float Stack: Rinse off the float stack, ensuring the colored portion can slide easily.
- Rinse Tank: Rinse out the dirty water tank to remove any leftover residue.
7.4 Reinstalling the Float Stack and Ring
- Align Arrow: Reinstall the float stack by aligning the arrow on the float stack with the one on the tank. You may need to angle the bottom portion of the float stack for it to guide smoothly into the dirty water tank.
- Twist Ring Back On: Twist the ring back onto the tank, aligning the threads, and ensuring it is a tight seal to prevent water from leaking.
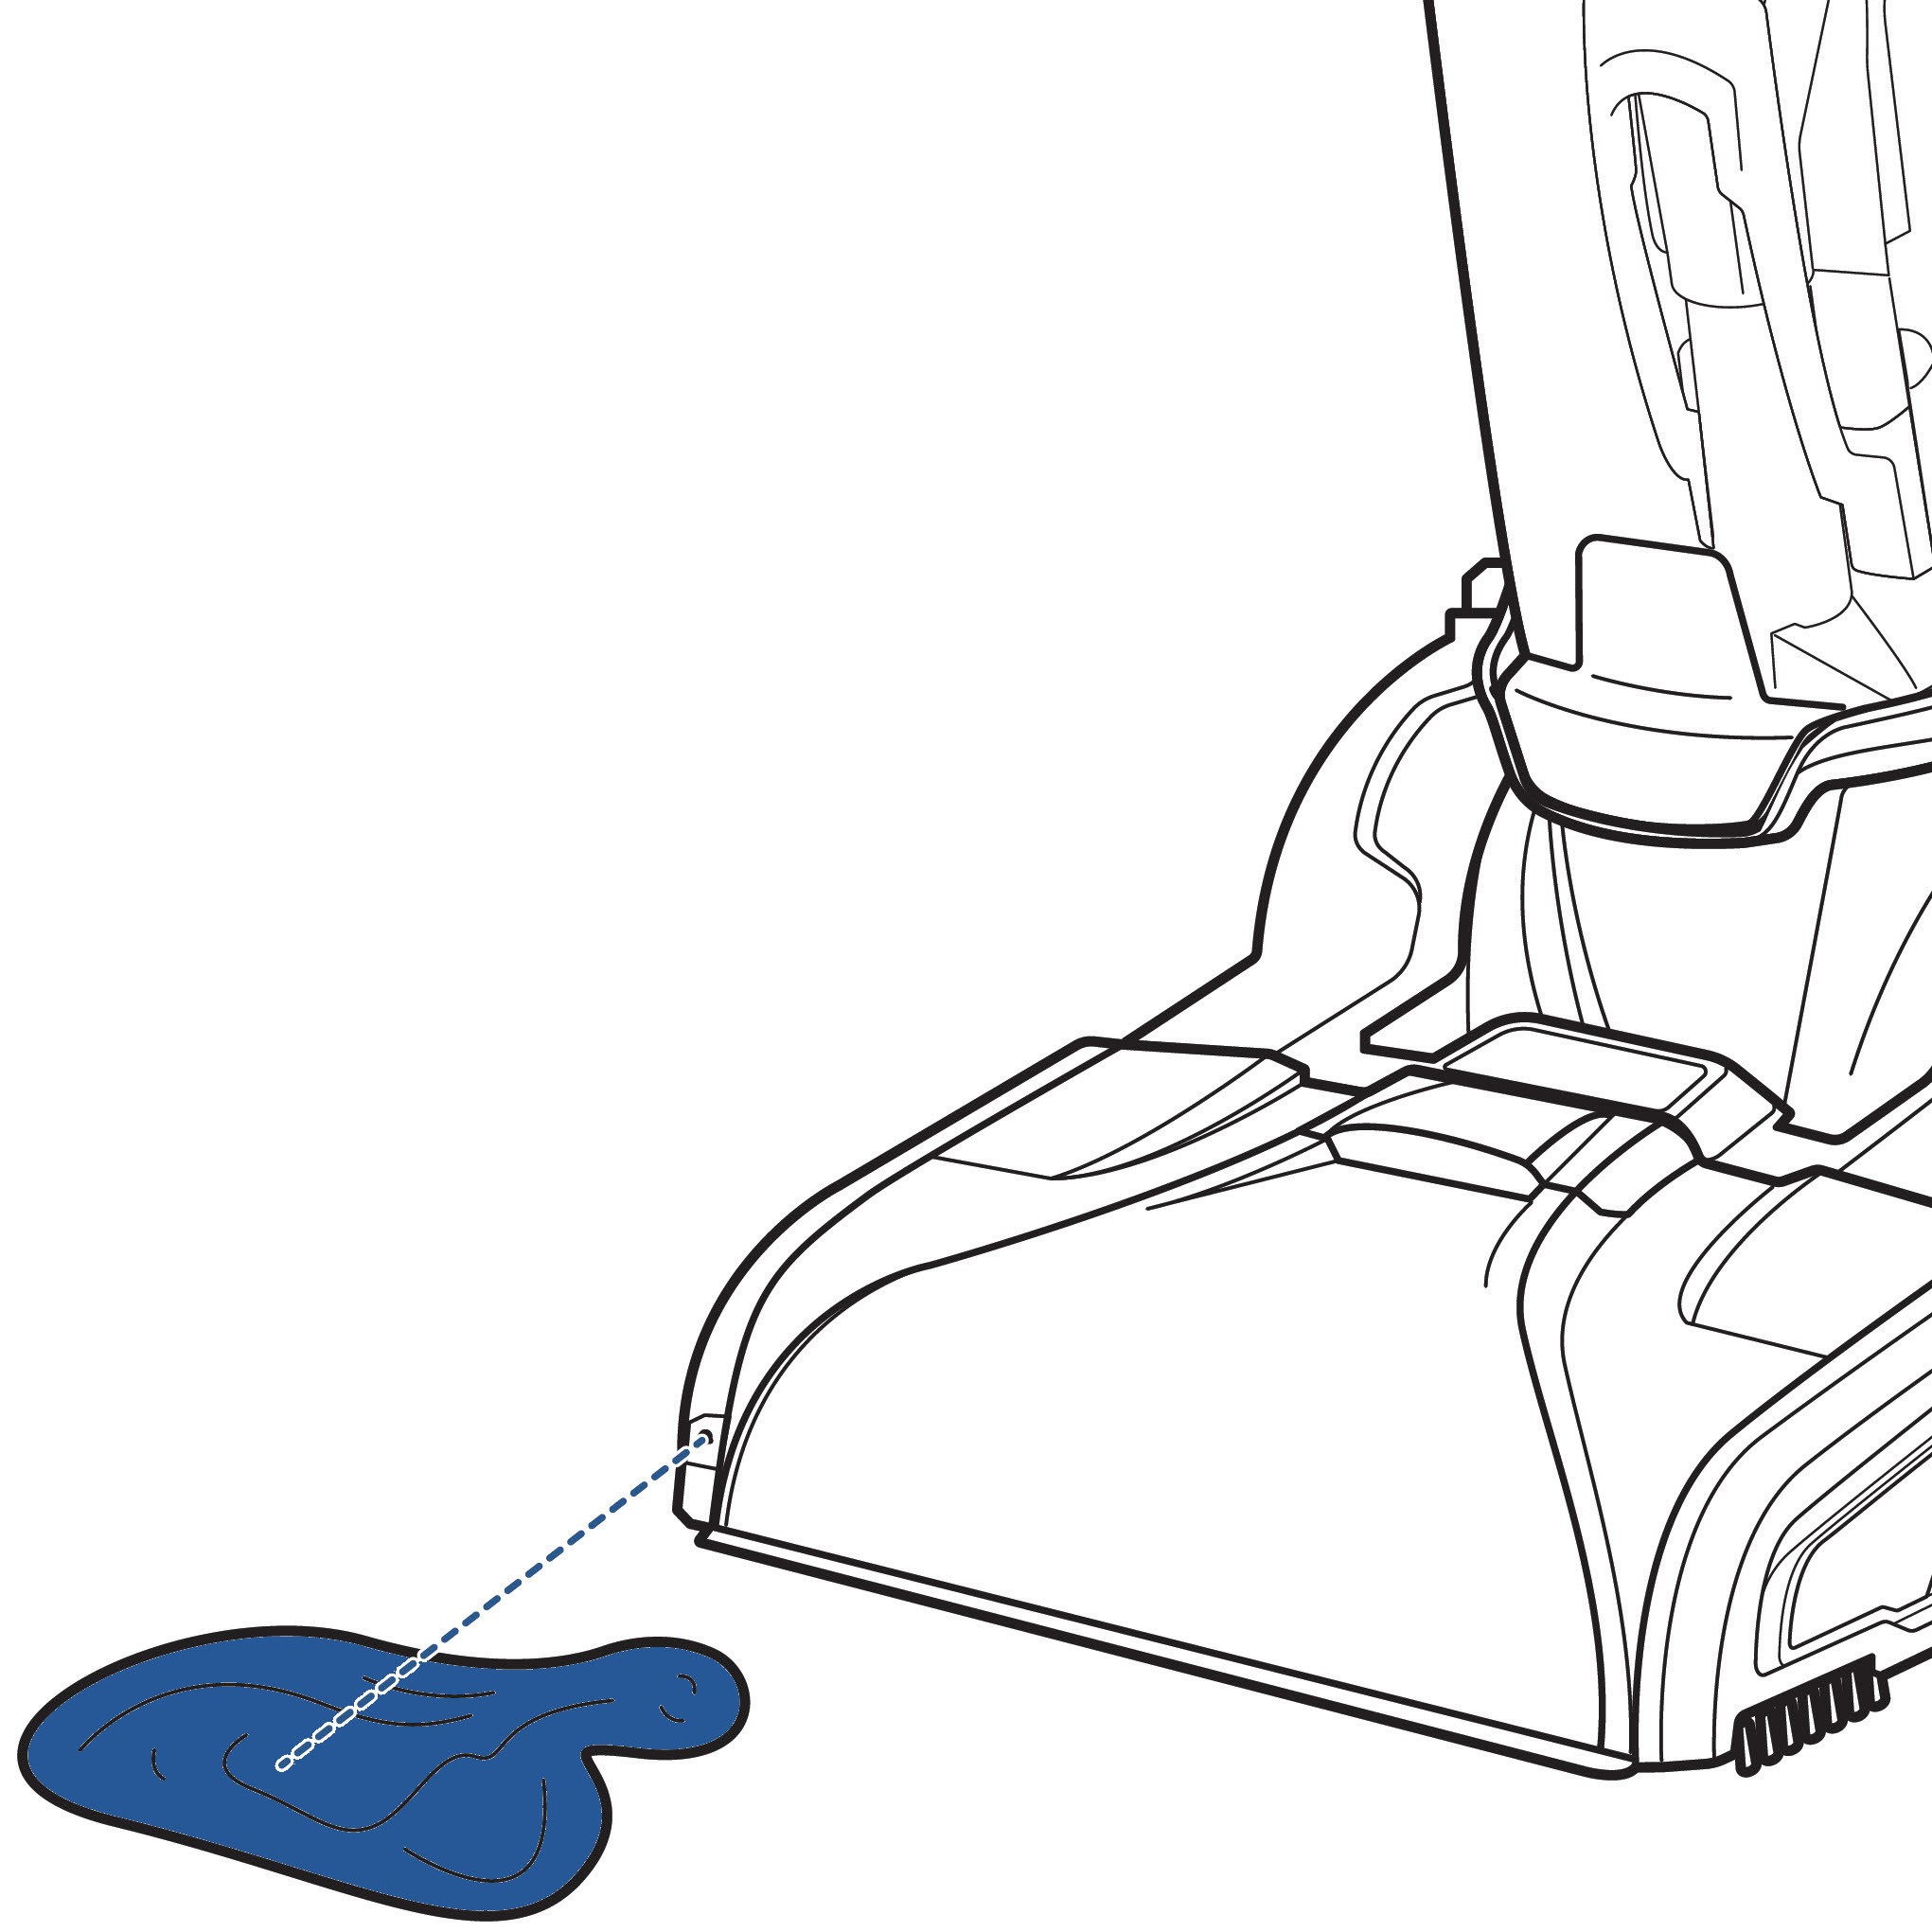
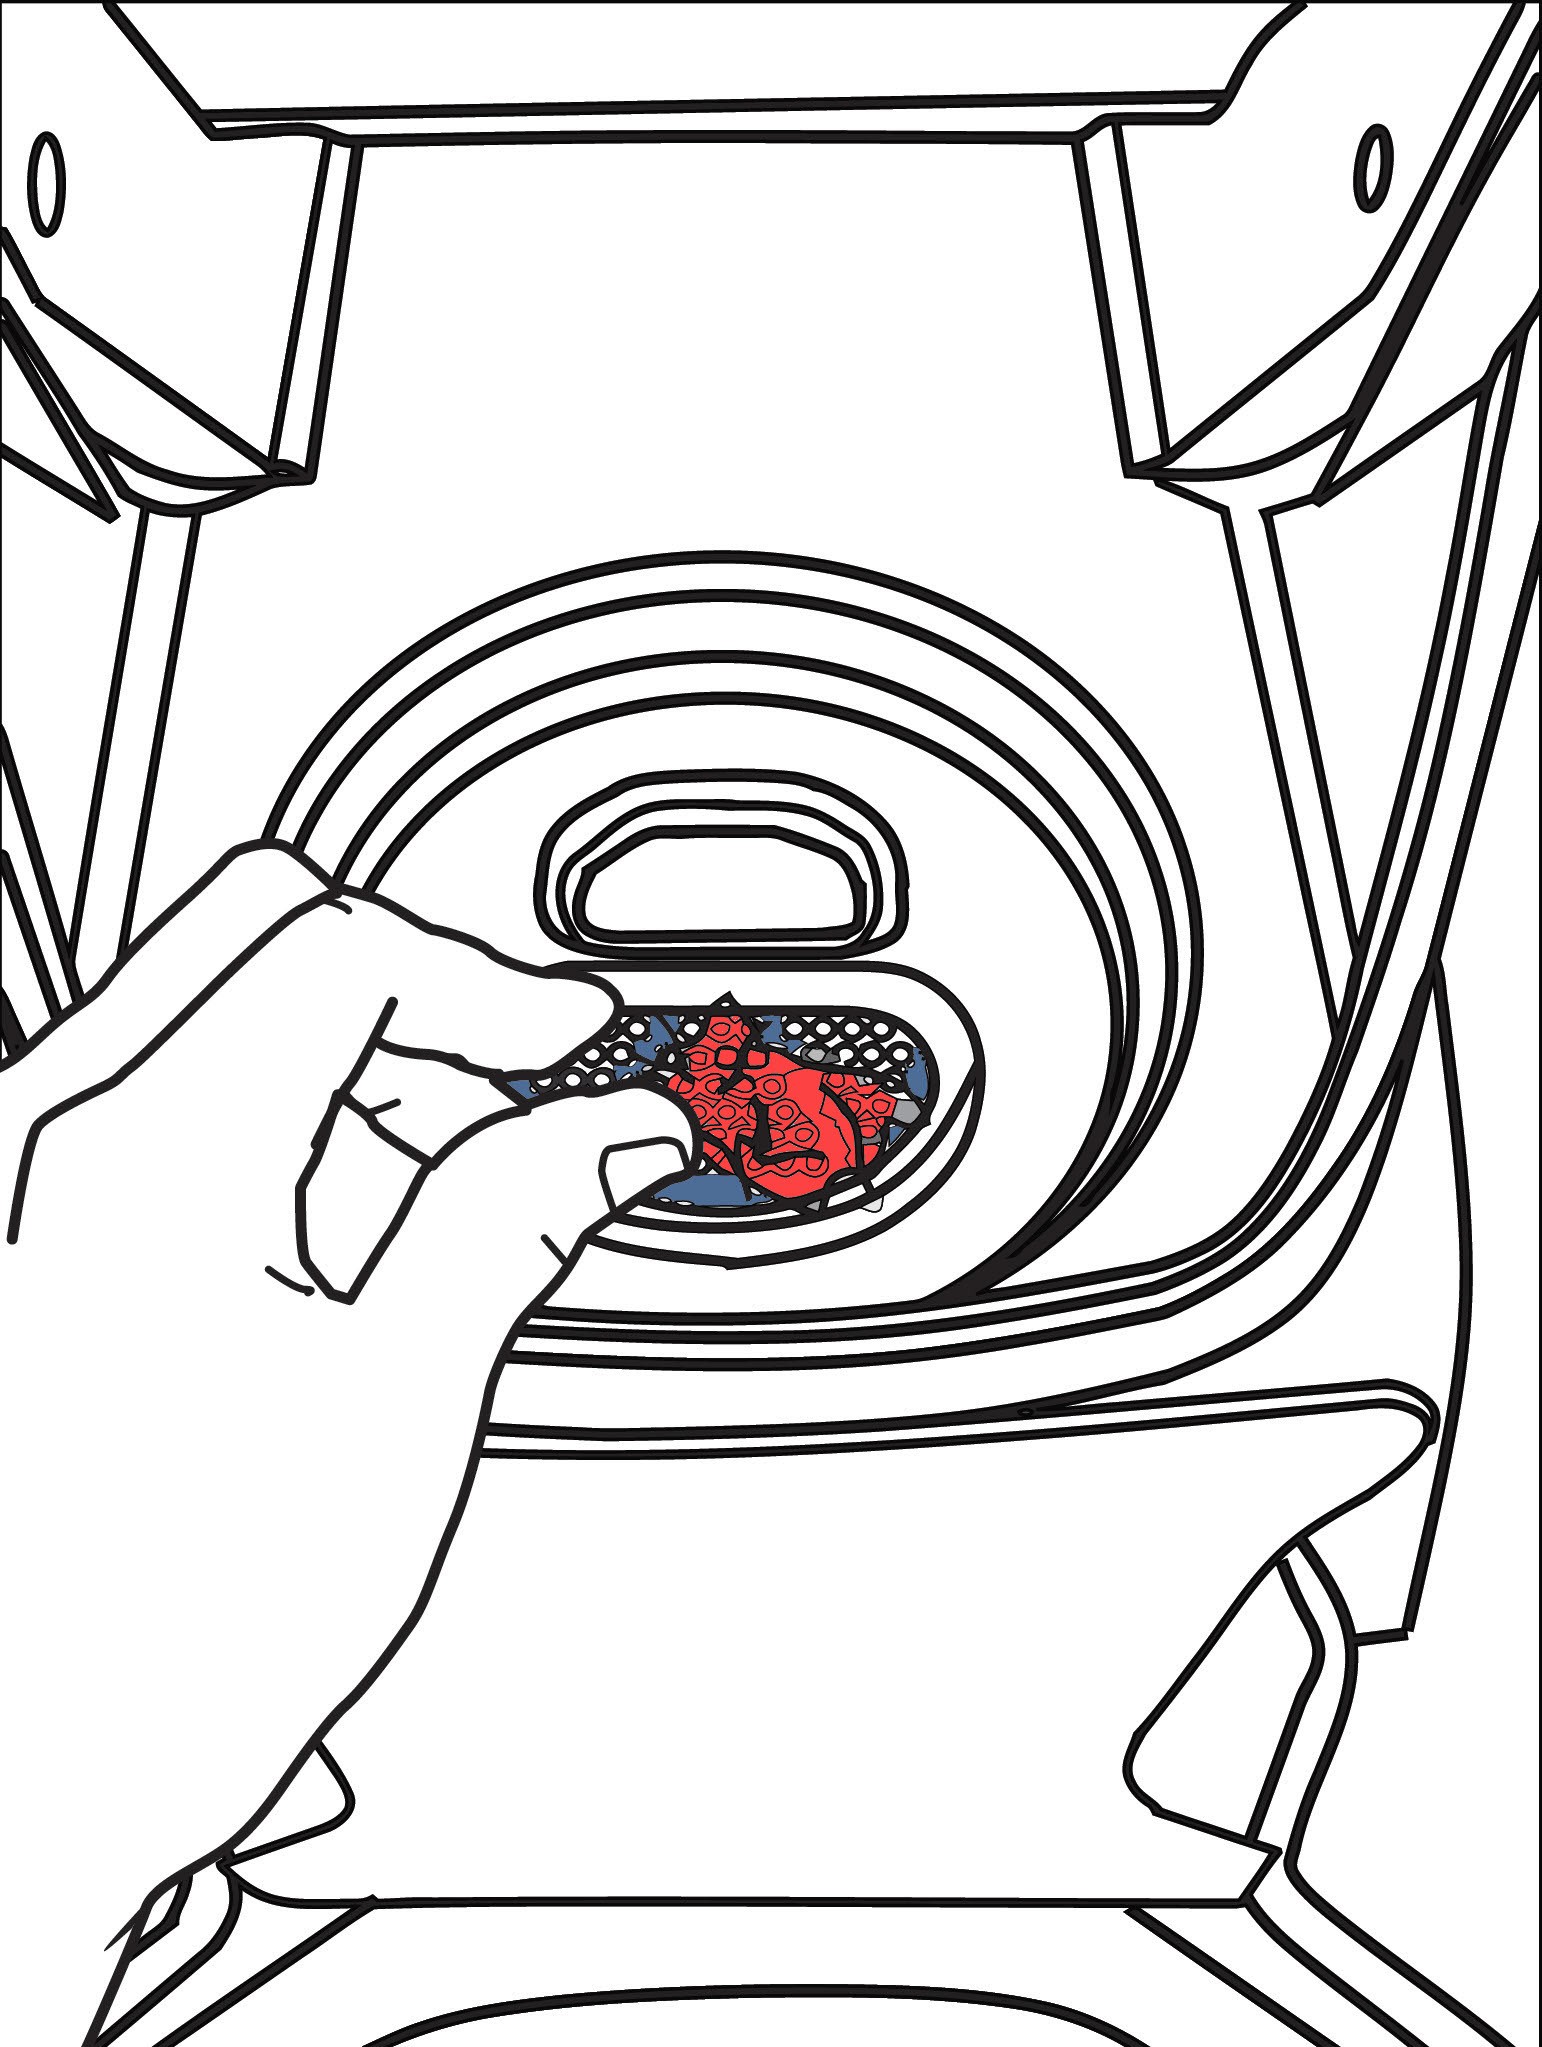
7.5 Cleaning the Red Filter
Before reinstalling the dirty water tank, clean the red filter below where the tank rests on the machine to remove any remaining dirt or debris.
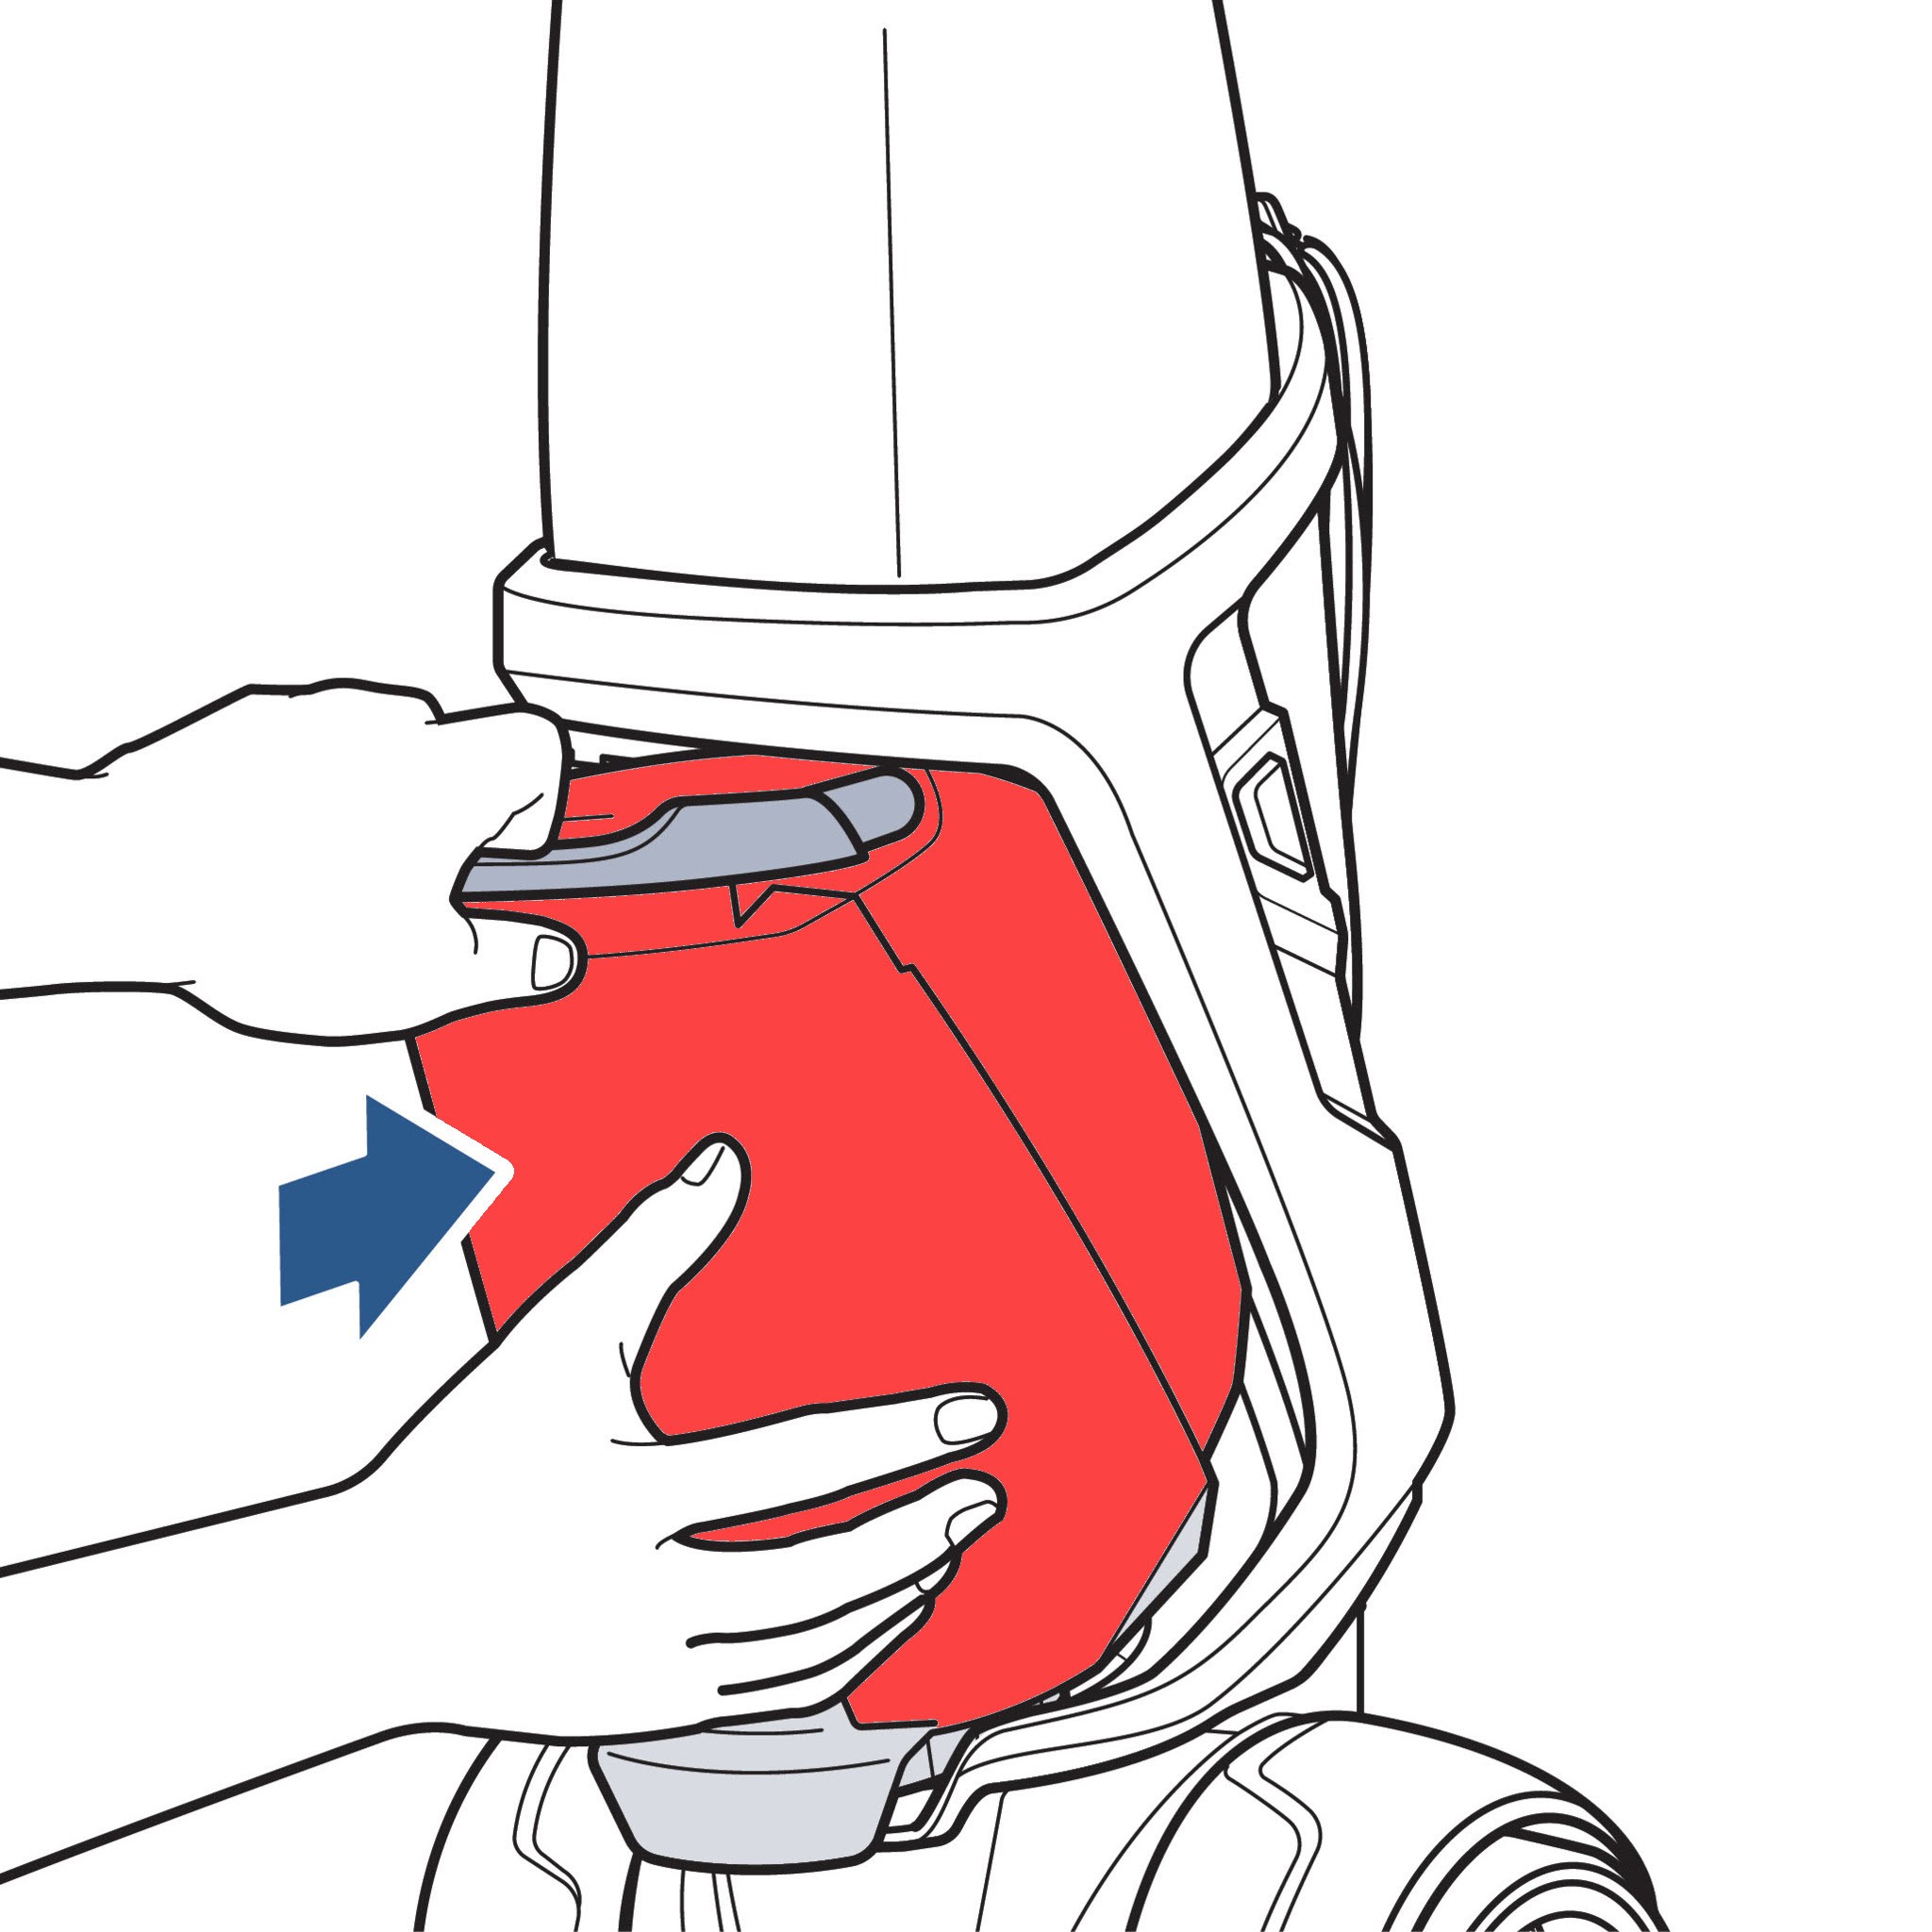
7.6 Reinstalling the Dirty Water Tank
Return the tank to the machine by inserting the bottom end of the tank into the machine first, then angle the top end of the tank toward the machine until it clicks into place.
Releasing the dirty water tank is the first step in emptying and cleaning it.
Emptying the tank prevents loss of suction and maintains cleaning performance.
Removing and cleaning the float stack ensures proper tank function.
Cleaning the filter ensures proper water flow and machine performance.
Properly installing the tank ensures it is securely in place for cleaning.
8. Maintenance and Troubleshooting
Regular maintenance is essential for keeping your Bissell Revolution Pet Pro in top condition.
8.1 Regular Maintenance Tips
- Clean Brush Rolls: Regularly remove and clean the brush rolls to remove hair, debris, and buildup.
- Check Nozzle: Ensure the nozzle is free from obstructions.
- Inspect Hose and Tools: Check the hose and tools for clogs and damage.
- Store Properly: Store the machine in a dry place to prevent mold and mildew.
8.2 Troubleshooting Common Issues
| Issue | Possible Cause(s) | Solution(s) |
|---|---|---|
| Loss of Suction | Dirty water tank is full, clogged hose or nozzle | Empty dirty water tank, check and clear hose and nozzle |
| No Spraying | Clean water tank is empty, spray trigger not fully pressed | Refill clean water tank, ensure spray trigger is fully pressed |
| Machine Won’t Turn On | Not plugged in, power switch not on | Ensure machine is plugged into a working outlet, check power switch |
| Streaking or Poor Cleaning | Incorrect cleaning mode, dirty brush rolls | Select appropriate cleaning mode for the task, clean brush rolls |
| Leaking | Improperly installed tanks, damaged seals | Ensure tanks are properly installed and sealed, inspect and replace seals if damaged |
| Brush Roll Not Spinning | Brush roll obstructed, belt broken | Check brush roll for obstructions and remove them, inspect and replace belt if broken |
| Overheating | Blocked air vents, using the machine for too long | Check and clear air vents, allow the machine to cool down before using it again |
| Unusual Noises | Loose parts, worn bearings | Inspect the machine for loose parts and tighten them, check and replace bearings if worn |
| Clogging | Large debris, improper mixing of solution | Vacuum area before cleaning to remove large debris, ensure cleaning solution is properly mixed according to instructions |
| Odor Problems | Dirty filters, bacteria buildup | Clean or replace filters regularly, use antibacterial cleaning solutions |
| Uneven Cleaning | Uneven brush contact, improper technique | Adjust the machine so brush makes full contact with carpet, use slow, overlapping passes |
9. Maximizing the Life of Your Bissell Revolution Pet Pro
To ensure your Bissell Revolution Pet Pro continues to deliver exceptional cleaning performance, consider these tips:
9.1 Use Recommended Cleaning Solutions
Always use Bissell’s recommended cleaning solutions. Non-approved solutions can damage the machine’s internal components and reduce its effectiveness.
9.2 Regular Cleaning and Maintenance
Establish a routine for cleaning and maintaining your Bissell Revolution Pet Pro. Regular cleaning prevents buildup and ensures all parts function correctly.
9.3 Proper Storage
Store your Bissell Revolution Pet Pro in a clean, dry place. Avoid storing it in areas with extreme temperatures or humidity, as this can damage the machine.
9.4 Promptly Address Issues
If you notice any issues with your Bissell Revolution Pet Pro, address them promptly. Ignoring small problems can lead to more significant issues down the road.
9.5 Avoid Overuse
While the Bissell Revolution Pet Pro is designed for regular use, avoid overusing it. Excessive use can strain the motor and other components, reducing the machine’s lifespan.
9.6 Professional Servicing
Consider having your Bissell Revolution Pet Pro professionally serviced every few years. A professional technician can identify and address any potential issues before they become major problems.
10. FAQ: Mastering Your Bissell Revolution Pet Pro
10.1 How often should I clean my carpets with the Bissell Revolution Pet Pro?
The frequency depends on your household. Homes with pets or children may require more frequent cleaning, such as once a month, while others may only need cleaning every few months.
10.2 Can I use other cleaning solutions with my Bissell Revolution Pet Pro?
It’s best to use Bissell-approved cleaning solutions to prevent damage to the machine and ensure optimal cleaning performance.
10.3 How do I clean the brush rolls on my Bissell Revolution Pet Pro?
Remove the brush rolls and rinse them under warm water. Remove any hair or debris that may be tangled around the brushes. Allow them to dry completely before reinstalling.
10.4 What do I do if my Bissell Revolution Pet Pro is not spraying water?
Check if the clean water tank is full and properly installed. Ensure the spray trigger is fully pressed. If the issue persists, check for clogs in the nozzle or hose.
10.5 How do I empty the dirty water tank on my Bissell Revolution Pet Pro?
Turn off and unplug the machine. Remove the dirty water tank, pull the rubber tab, and pour out the dirty water. Rinse the tank and allow it to dry before reinstalling.
10.6 What is the CleanShot feature and how do I use it?
The CleanShot feature dispenses a concentrated stream of cleaning solution onto tough stains. Press the CleanShot button to activate it, aim at the stain, and release. Allow the solution to sit for a few minutes before cleaning.
10.7 Can I use the Bissell Revolution Pet Pro on hardwood floors?
The Bissell Revolution Pet Pro is designed for carpets and area rugs. Using it on hardwood floors may cause damage. Bissell offers specialized cleaners for hardwood floors.
10.8 How do I store my Bissell Revolution Pet Pro?
Store the machine in a dry, cool place. Ensure all parts are clean and dry before storing to prevent mold and mildew.
10.9 What should I do if my Bissell Revolution Pet Pro starts making unusual noises?
Turn off and unplug the machine. Check for any loose parts or obstructions. If the noise persists, contact Bissell customer support or a qualified repair technician.
10.10 How can I prevent my Bissell Revolution Pet Pro from clogging?
Vacuum the area thoroughly before cleaning to remove large debris. Avoid using excessive amounts of cleaning solution, and regularly clean the machine’s filters and nozzles.
The Bissell Revolution Pet Pro is a fantastic investment for pet owners wanting a clean and fresh home. Mastering how to use Bissell Revolution Pet Pro ensures you get the best results, eliminating even the toughest stains and odors. Remember to follow these guidelines and maintenance tips to keep your machine running smoothly for years.
Are you looking for more ways to keep your home clean and fresh? Visit pets.edu.vn for expert advice, product reviews, and helpful tips on pet care and home maintenance. Contact us at 789 Paw Lane, Petville, CA 91234, United States, or via WhatsApp at +1 555-987-6543. We are here to help you create a happy, healthy home for you and your pets.