Creating a Peter Pan costume is a fantastic project for Halloween, costume parties, or just imaginative play. While the entire outfit brings the character to life, the iconic Peter Pan hat is instantly recognizable and surprisingly simple to make. Whether you are a seasoned crafter or a beginner, this guide will walk you through creating your own Peter Pan hat. We’ll explore both sewing and no-sew methods, starting with a simple sewn version that adds a touch of handmade charm to your Neverland ensemble.
Materials You’ll Need to Sew Your Peter Pan Hat
Before embarking on your crafting adventure, gather these essential materials:
- Green Felt Fabric: Choose a quality felt in a shade of green that captures Peter Pan’s adventurous spirit. Half a yard should be sufficient for most sizes.
- Matching Thread: Select green thread that closely matches your felt for a seamless finish.
- Sewing Machine (or needle for hand sewing): A sewing machine will speed up the process, but you can also hand-sew if preferred.
- Scissors: Sharp fabric scissors are crucial for clean cuts.
- Pins: To hold fabric pieces together before sewing.
- Measuring Tape or Ruler: For accurate measurements.
- Pencil or Fabric Marker: To trace your pattern onto the felt.
- Paper for Pattern (optional): You can create a paper pattern first if you’re unsure about cutting directly onto the felt.
- Red Feather: A jaunty red feather adds the perfect finishing touch to your Peter Pan hat.
- Hot Glue Gun (optional): For adding the feather and reinforcing edges if desired.
Sewing Your Peter Pan Hat: A Simple Guide
Follow these easy steps to sew your very own Peter Pan hat:
-
Measure and Cut a Semi-Circle: The foundation of your Peter Pan hat is a semi-circle of green felt. To determine the size, measure the circumference of the wearer’s head. Divide this measurement by 2 and add a few inches for seam allowance and the desired slouch of the hat. This will be the radius of your semi-circle. For an average adult or older child, a radius of 12-15 inches is a good starting point. Use a large plate or compass to draw a semi-circle on your felt and carefully cut it out.
-
Create the Hat Shape: Fold the straight edge of your semi-circle inwards by about an inch and pin it in place. This folded edge will create a more finished look and provide structure to the hat’s brim. Sew along this folded edge, close to the inner fold, creating a simple hem.
-
Sew the Back Seam: Fold the semi-circle in half along the curved edge, with the right sides of the felt facing inwards. Pin along the straight edges to prepare for sewing the back seam of the hat. Sew along the pinned edge, creating a cone shape. This seam will run down the back of the hat. A straight stitch with a medium stitch length is suitable for felt.
-
Shape the Sides: Now it’s time to create the distinctive pointed sides of the Peter Pan hat. With the hat still inside out, fold up one side of the hat towards the point. Pin this fold in place. Repeat on the other side, ensuring both sides are folded symmetrically to create a balanced point at the front of the hat. You can adjust the depth of the folds to achieve your desired hat shape.
-
Sew the Side Folds: Carefully sew along the pinned folds on each side of the hat. These seams will secure the pointed shape of the hat. Backstitch at the beginning and end of each seam for durability.
-
Add the Feather: The final touch is the iconic red feather. Position the feather on one side of the hat, slightly towards the back of the pointed front. You can attach it securely using a dab of hot glue or by sewing it in place with a few hand stitches.
No-Sew Peter Pan Hat: A Quick Crafting Option
For those who prefer a no-sew approach or need a hat in a hurry, you can easily adapt these steps using hot glue instead of sewing. Simply follow the same shaping instructions, using hot glue to secure the folded edges and seams. Ensure the glue is cool before handling to avoid burns, and apply pressure to the glued sections to create a strong bond.
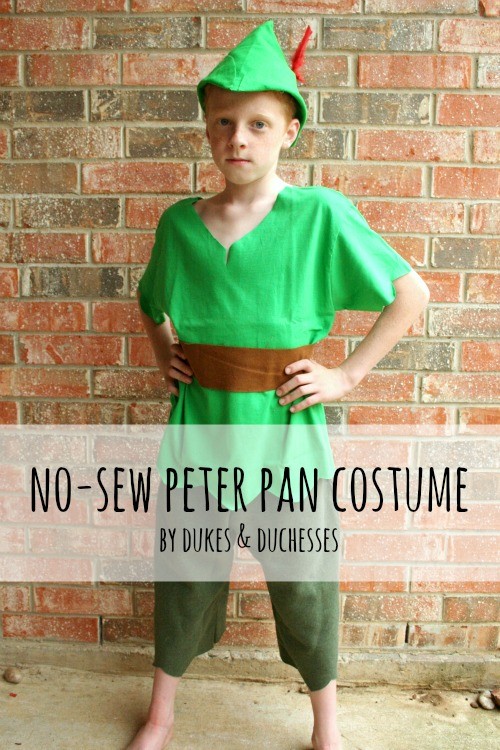
Completing Your Peter Pan Costume
Once your Peter Pan hat is complete, you can easily assemble the rest of the costume. For the shirt, a simple green t-shirt or long-sleeved shirt works perfectly. To create the ragged edges characteristic of Peter Pan’s tunic, use scissors to cut a zig-zag pattern along the bottom hem and sleeve cuffs. Similarly, cut zig-zag edges into green or brown sweatpants, shortening them to mid-calf length for a classic Peter Pan look. A brown felt belt cinched at the waist completes this adventurous outfit. Cut a strip of brown felt long enough to wrap around the waist and use Velcro or hot glue to fasten it at the back.
With your handmade Peter Pan hat and costume, you’re ready to embark on your own Neverland adventures! This DIY project is not only fun and rewarding but also allows for personalization and creativity. Enjoy bringing this beloved character to life!