Operating the Bissell ProHeat Pet series carpet cleaner can be a breeze with the right guidance. At PETS.EDU.VN, we understand the importance of maintaining a clean and healthy home environment, especially when you have furry friends. This comprehensive guide will walk you through every step of effectively using your Bissell ProHeat Pet, ensuring you achieve outstanding results while keeping your pets and family safe. Let’s dive into how to effectively use your carpet cleaner, explore carpet cleaning solutions, and learn the best methods for pet stain removal.
1. Understanding Your Bissell ProHeat Pet
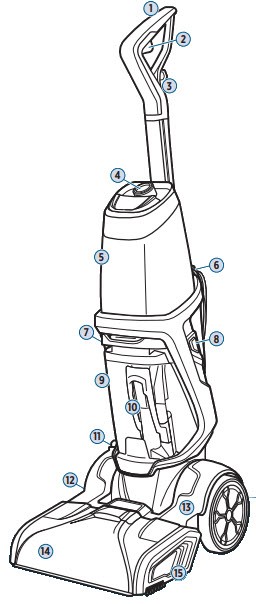
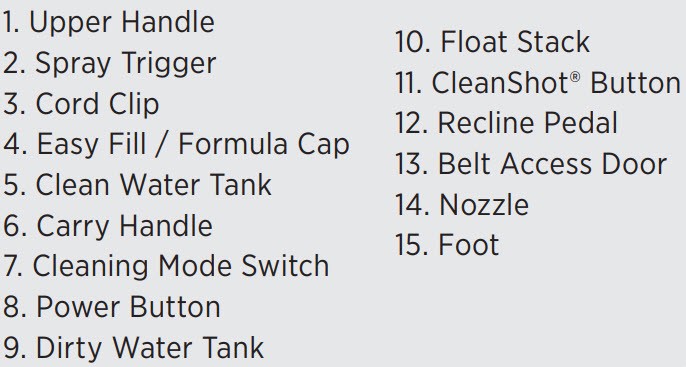
Before you begin, familiarizing yourself with the different parts and features of your Bissell ProHeat Pet is essential. The ProHeat 2X Revolution Pet Pro, for instance, comes with various components designed for optimal cleaning performance. Knowing each part’s function will help you use the machine more effectively and troubleshoot any issues that may arise.
1.1 Key Components of Your Bissell ProHeat Pet
Here’s a breakdown of the essential components:
- Handle: For easy maneuverability and control.
- Clean Water Tank: Holds the clean water and cleaning solution mixture.
- Dirty Water Tank: Collects the dirty water extracted from your carpets.
- Power Cord: Provides the necessary electricity to operate the machine.
- Cleaning Mode Switch: Allows you to select the appropriate cleaning mode for your needs (e.g., Express Clean, Deep Clean).
- Spray Trigger: Dispenses the cleaning solution onto the carpet.
- Brush Roll: Agitates and cleans the carpet fibers.
- Hose and Tools: For cleaning upholstery, stairs, and hard-to-reach areas.
2. Assembling Your Bissell ProHeat Pet
Proper assembly is crucial for the optimal functioning of your Bissell ProHeat Pet. Follow these steps to ensure your machine is correctly put together:
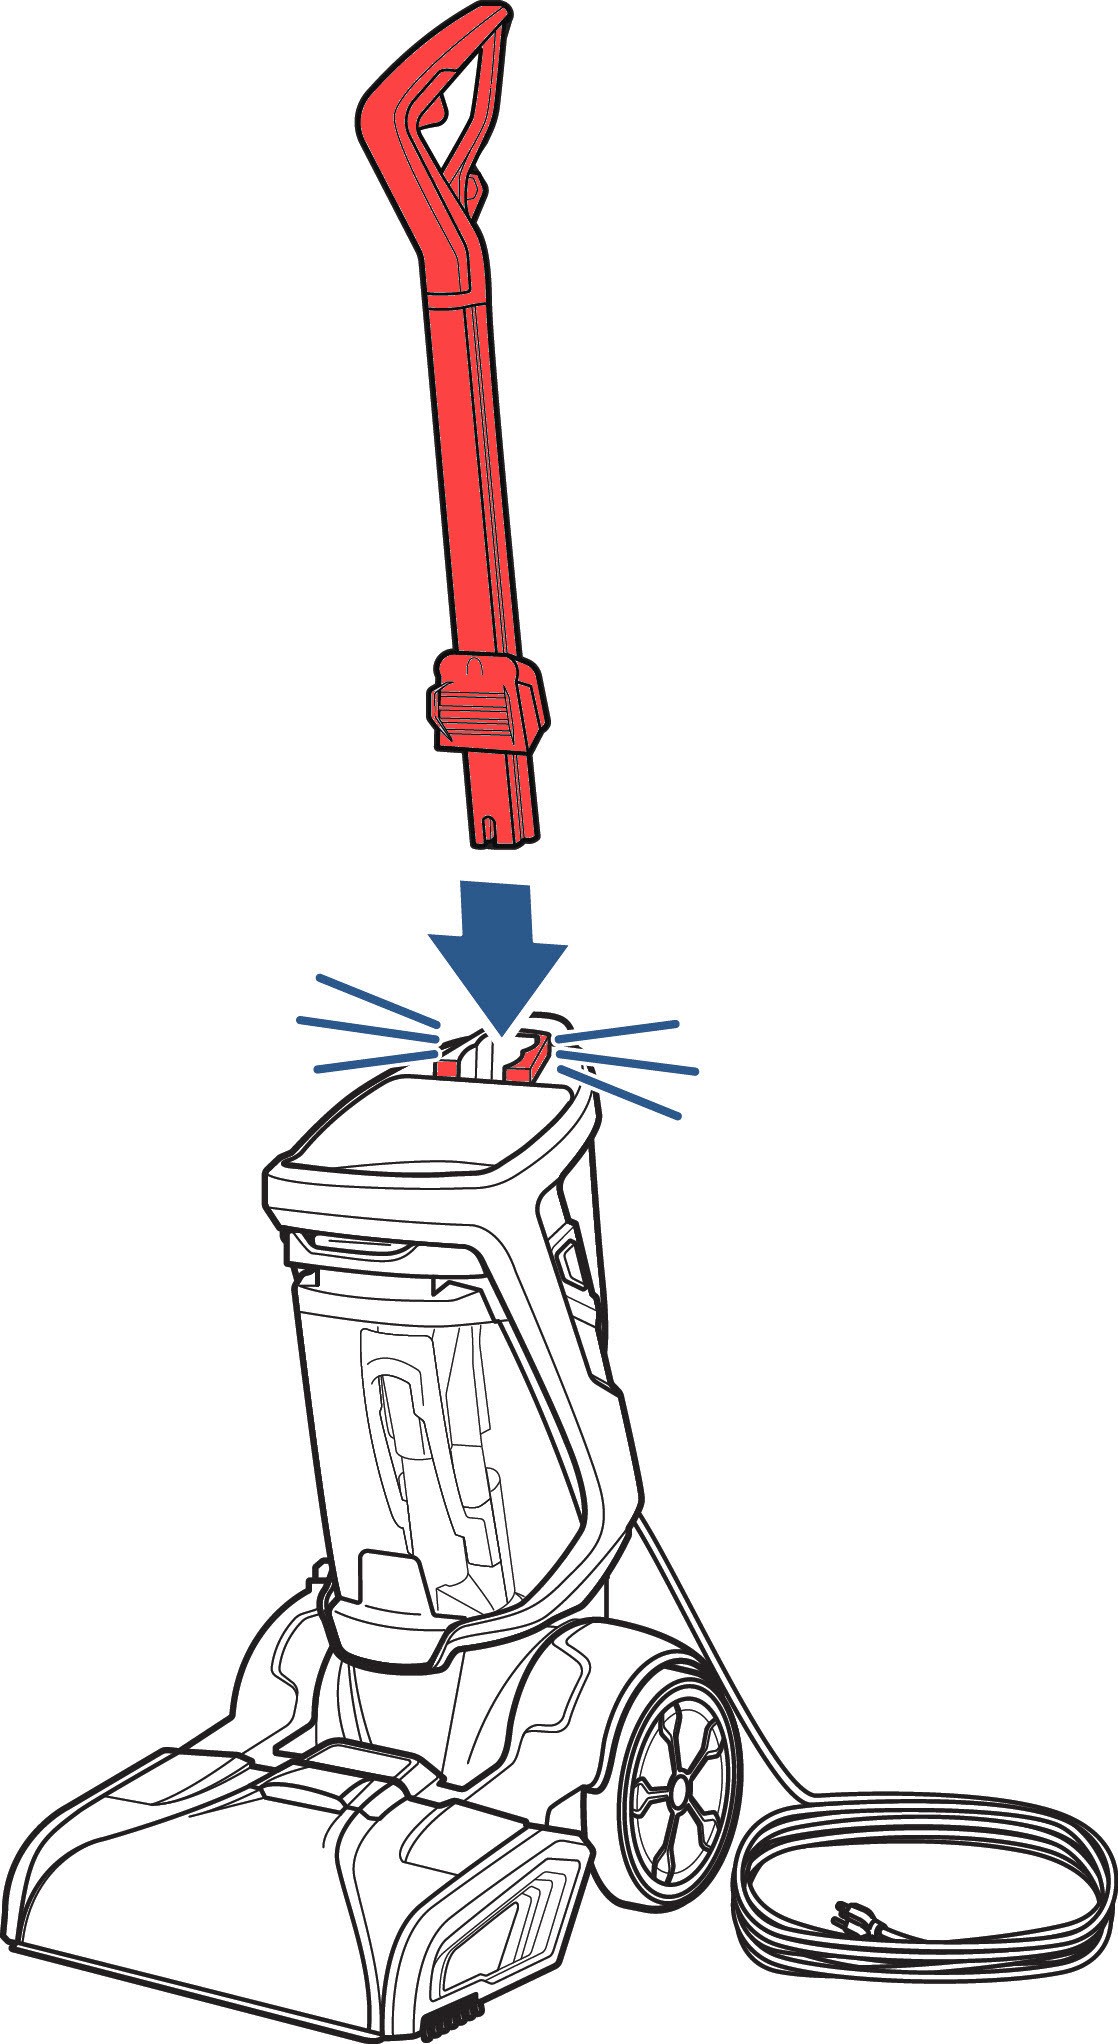
2.1 Attaching the Handle
Firmly insert the handle into the top of the machine until you hear a click. This ensures that the handle is securely attached and will not come loose during use.
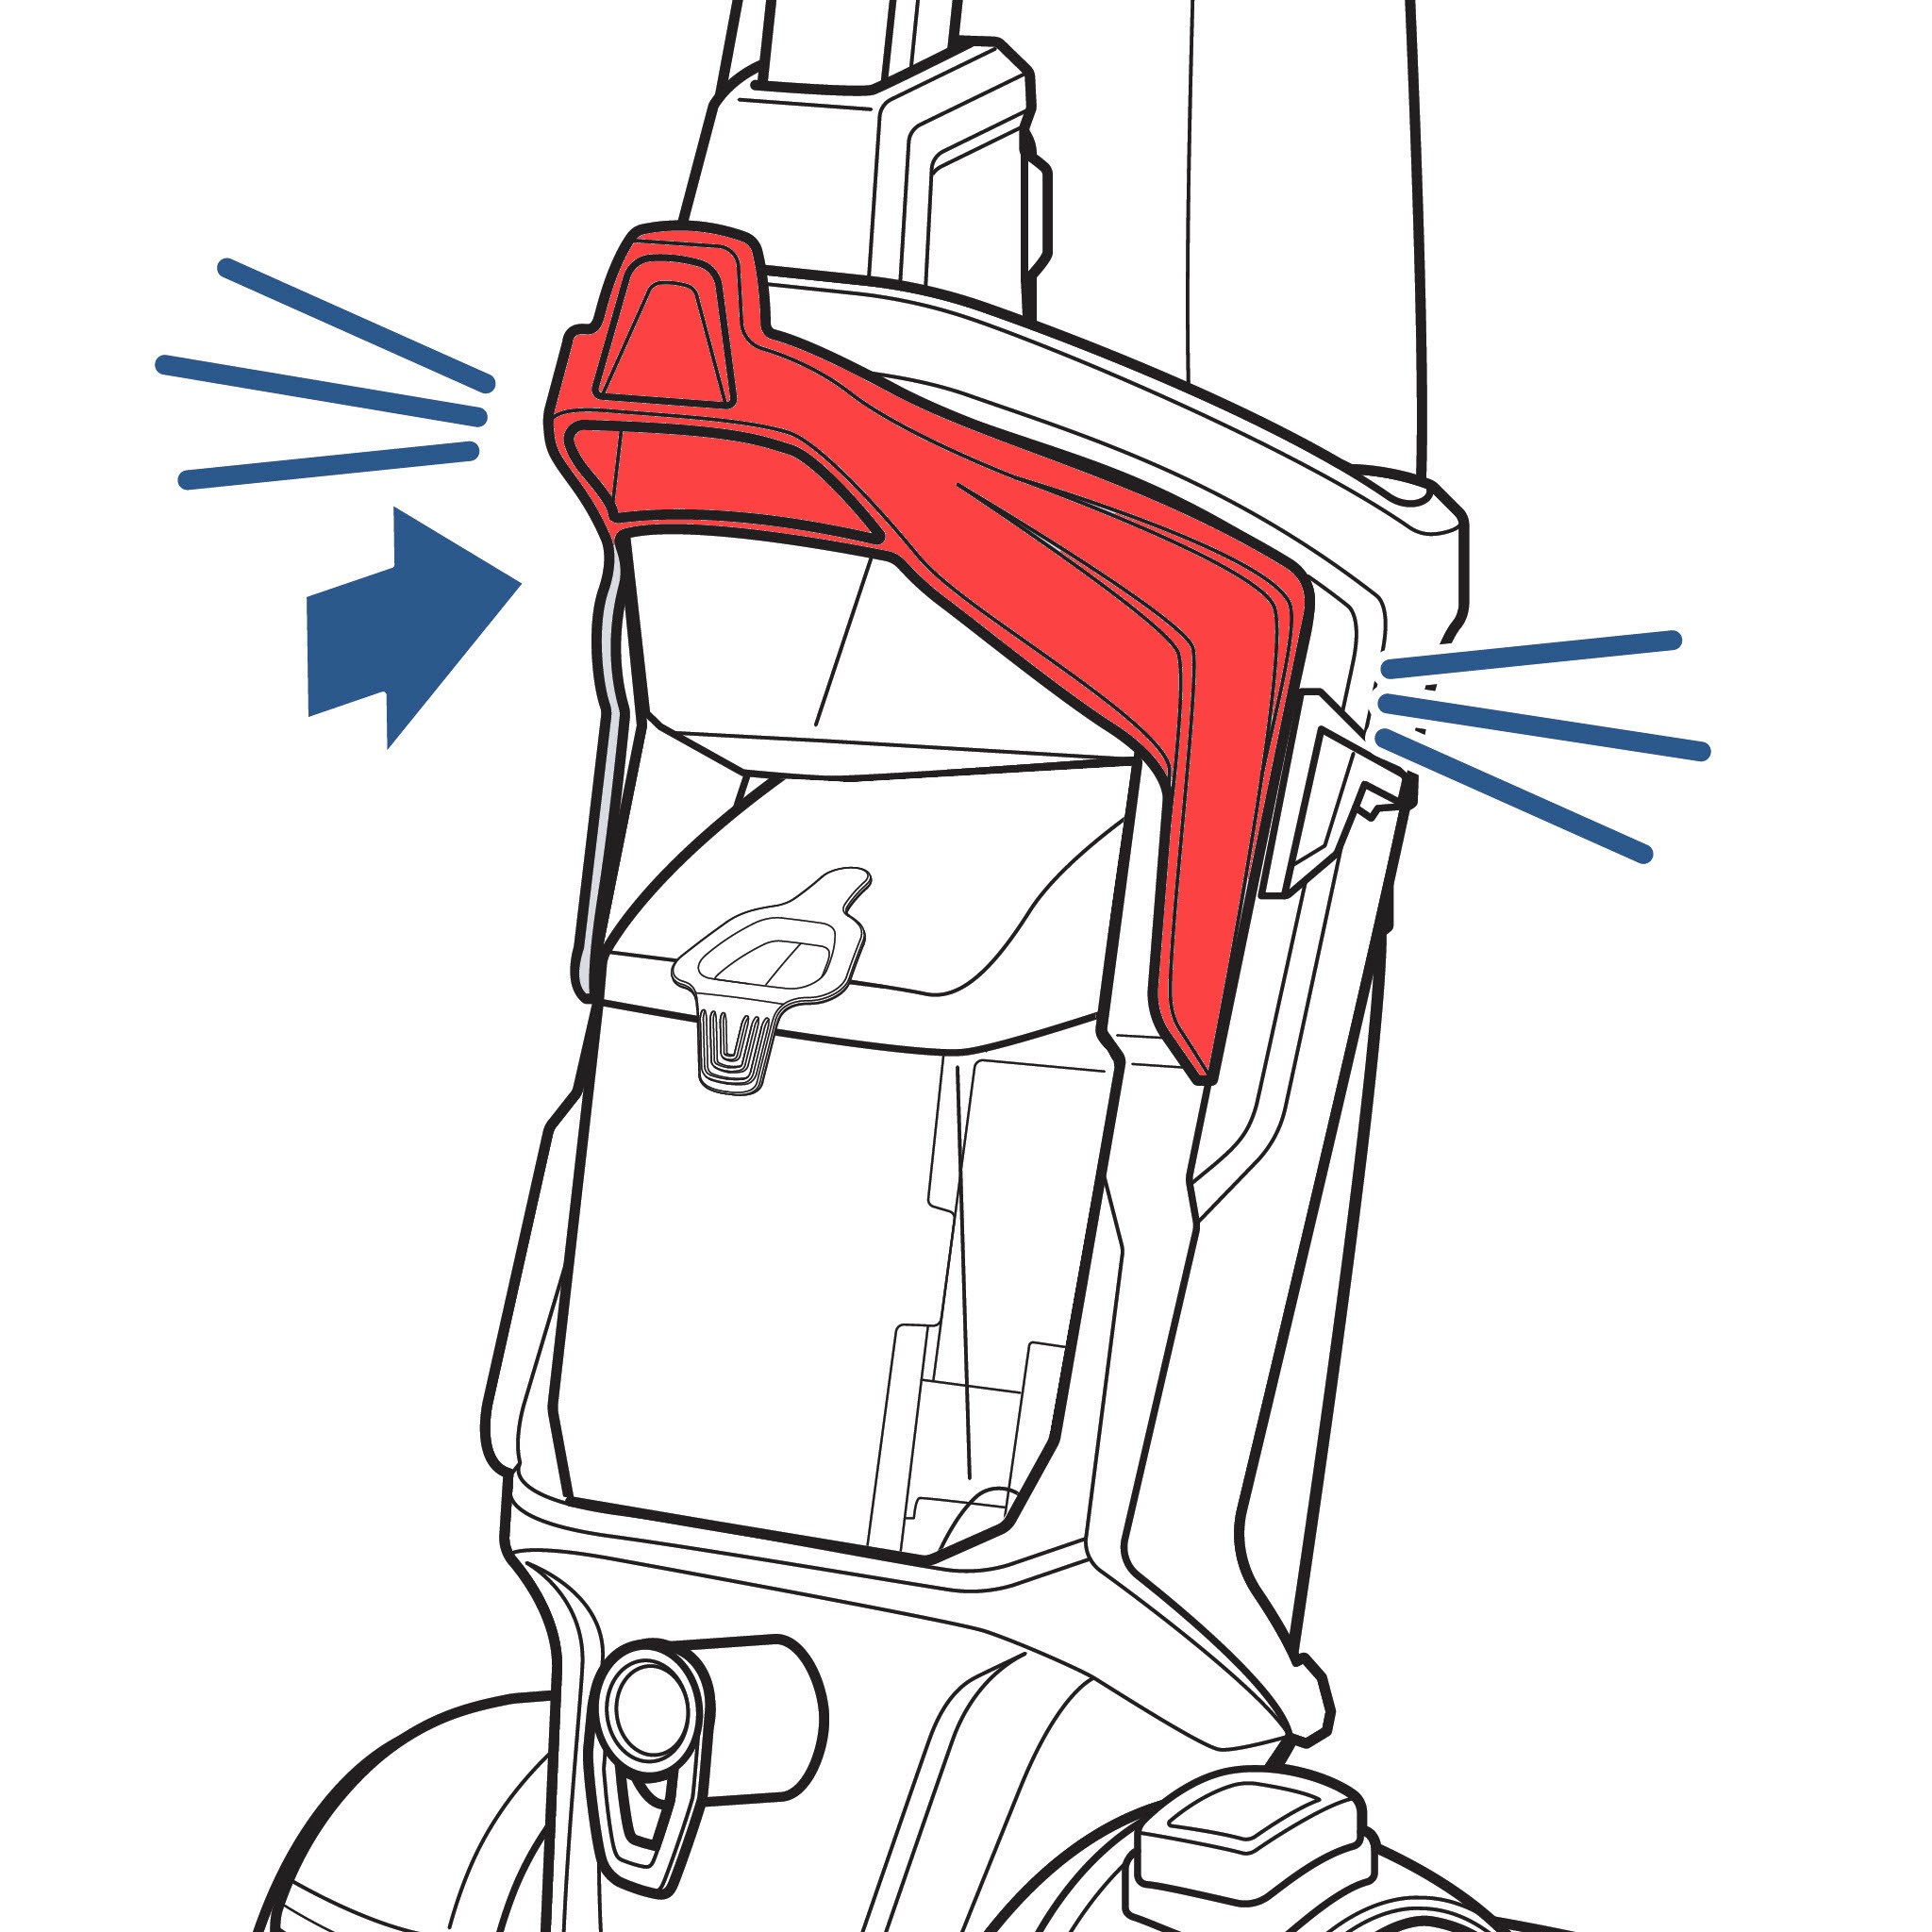
2.2 Securing the Carry Handle
Align the carry handle with the slots on either side of the base until it clicks into place. This handle is essential for lifting and moving the machine.
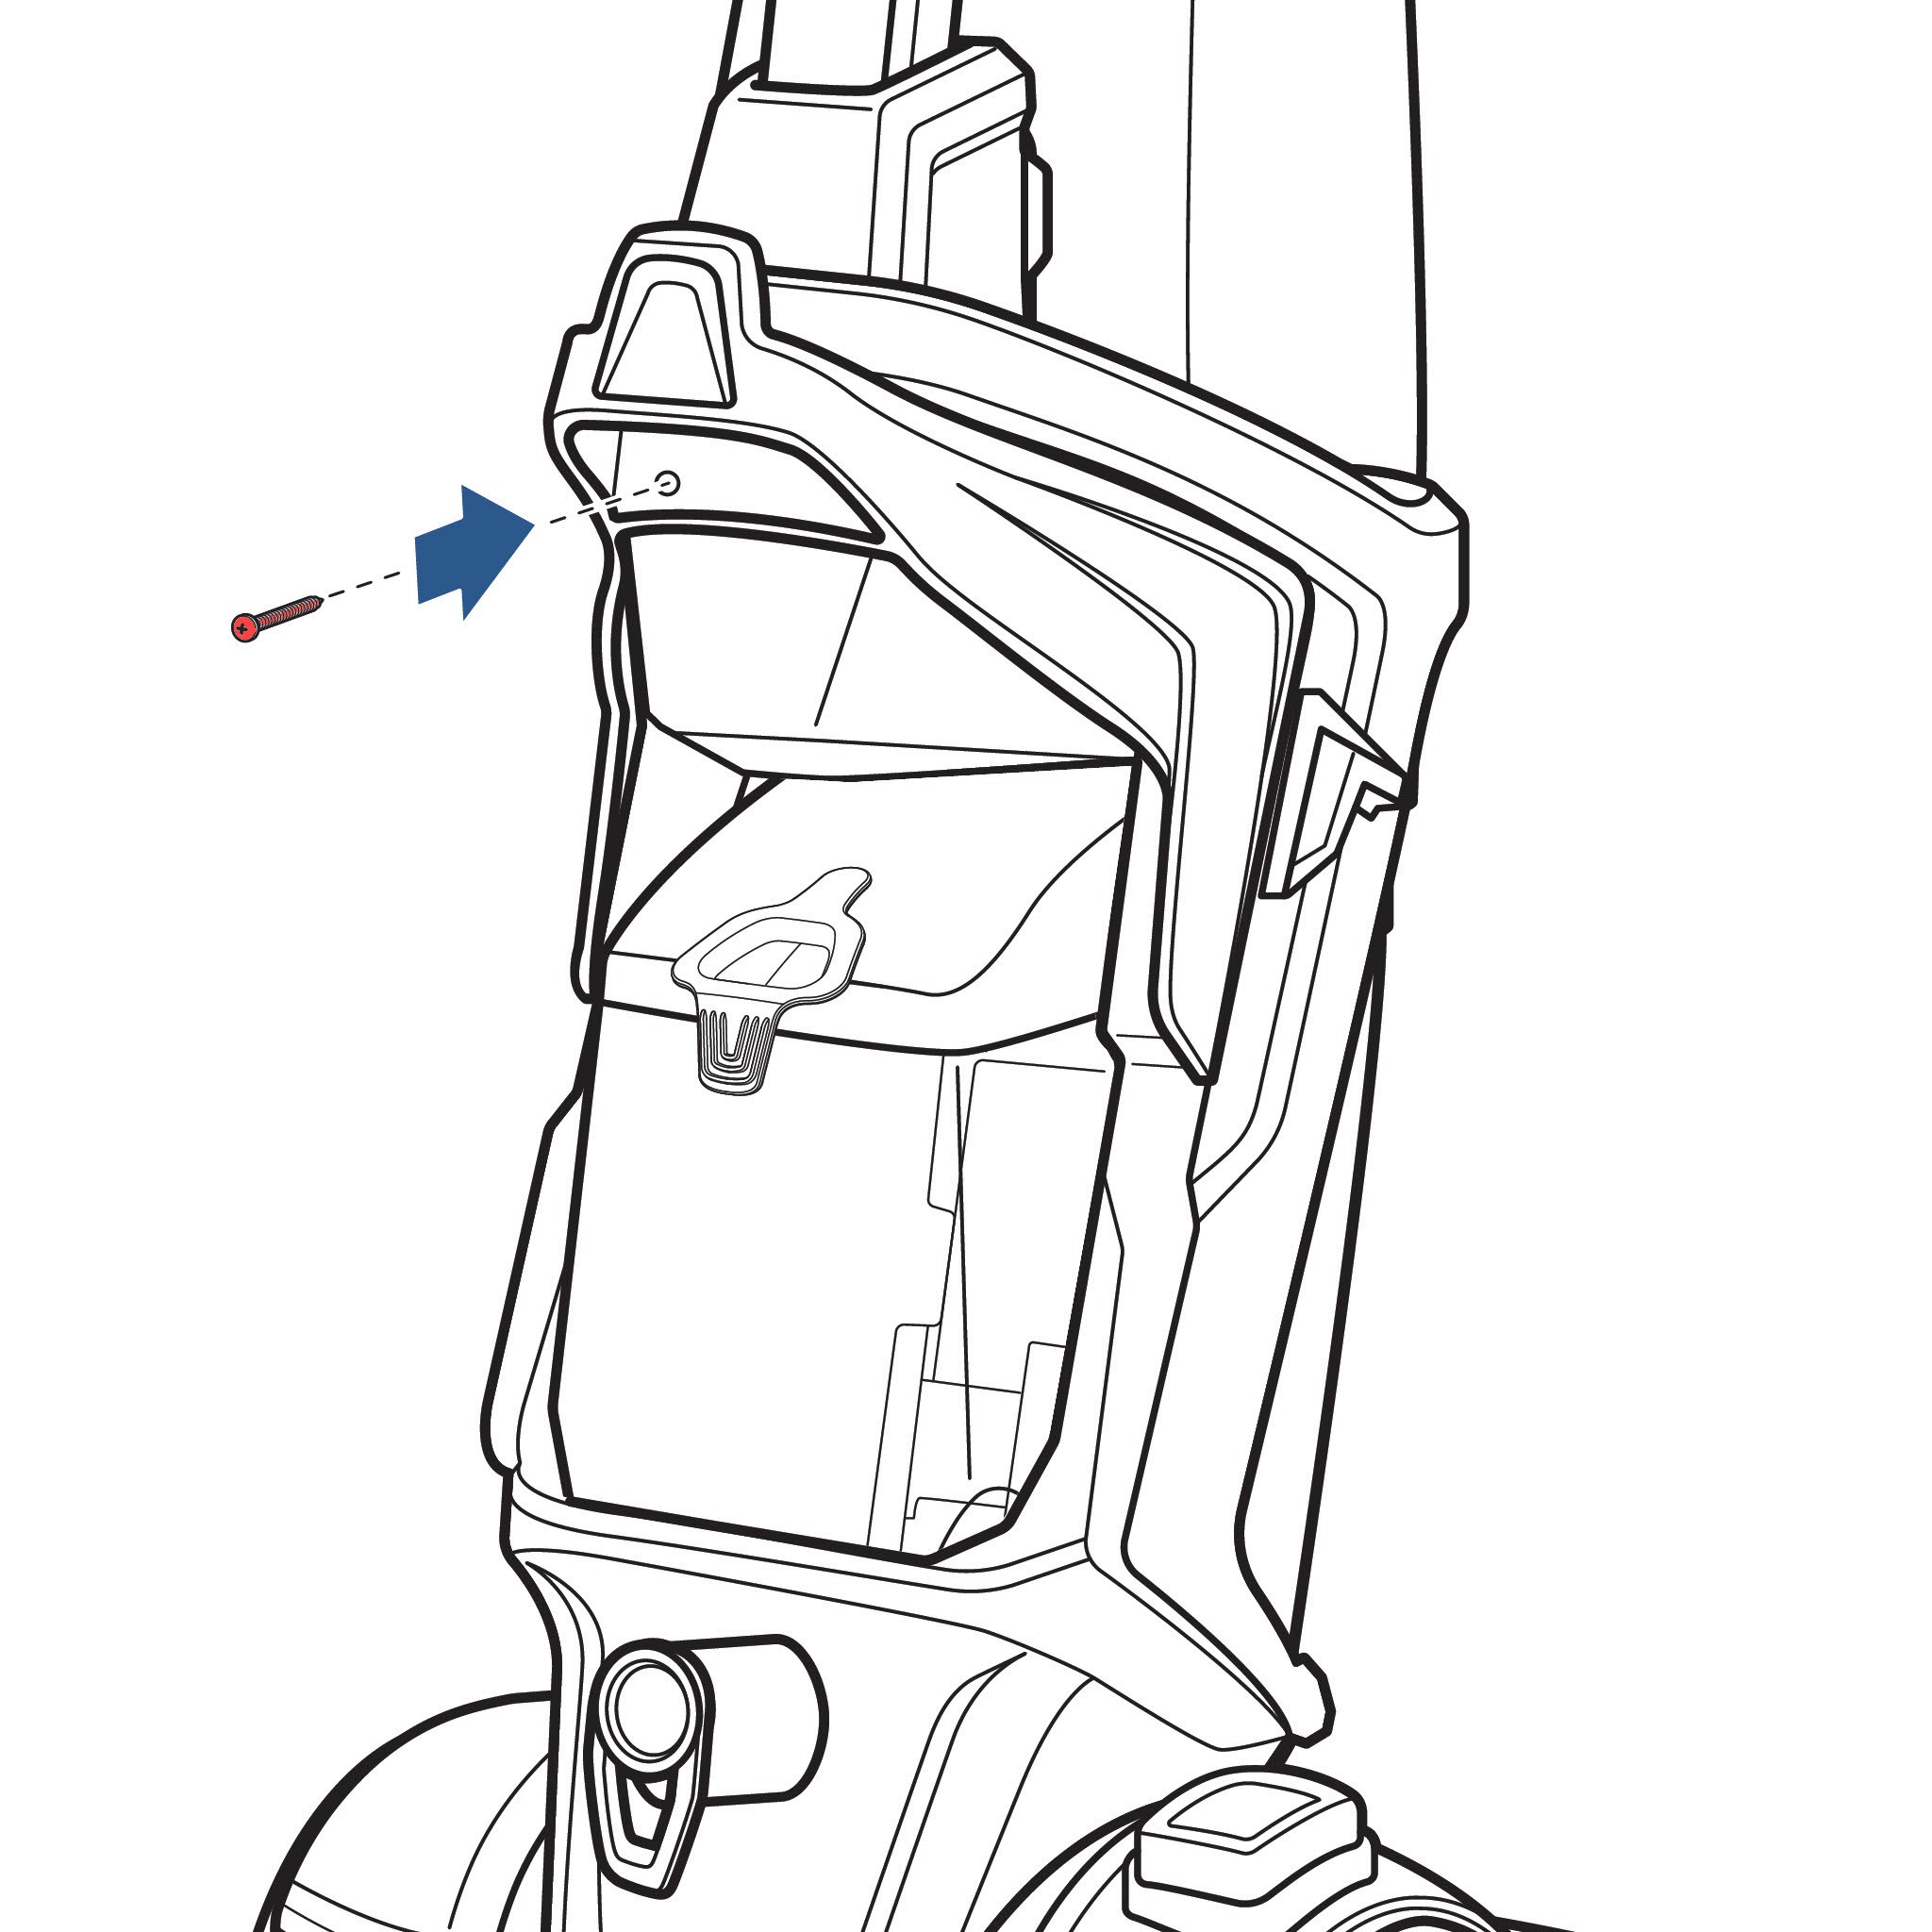
2.3 Fastening the Carry Handle with a Screw
Use the screw taped to the handle and a Phillips-head screwdriver to secure the carry handle tightly. This ensures the handle remains stable and reliable.
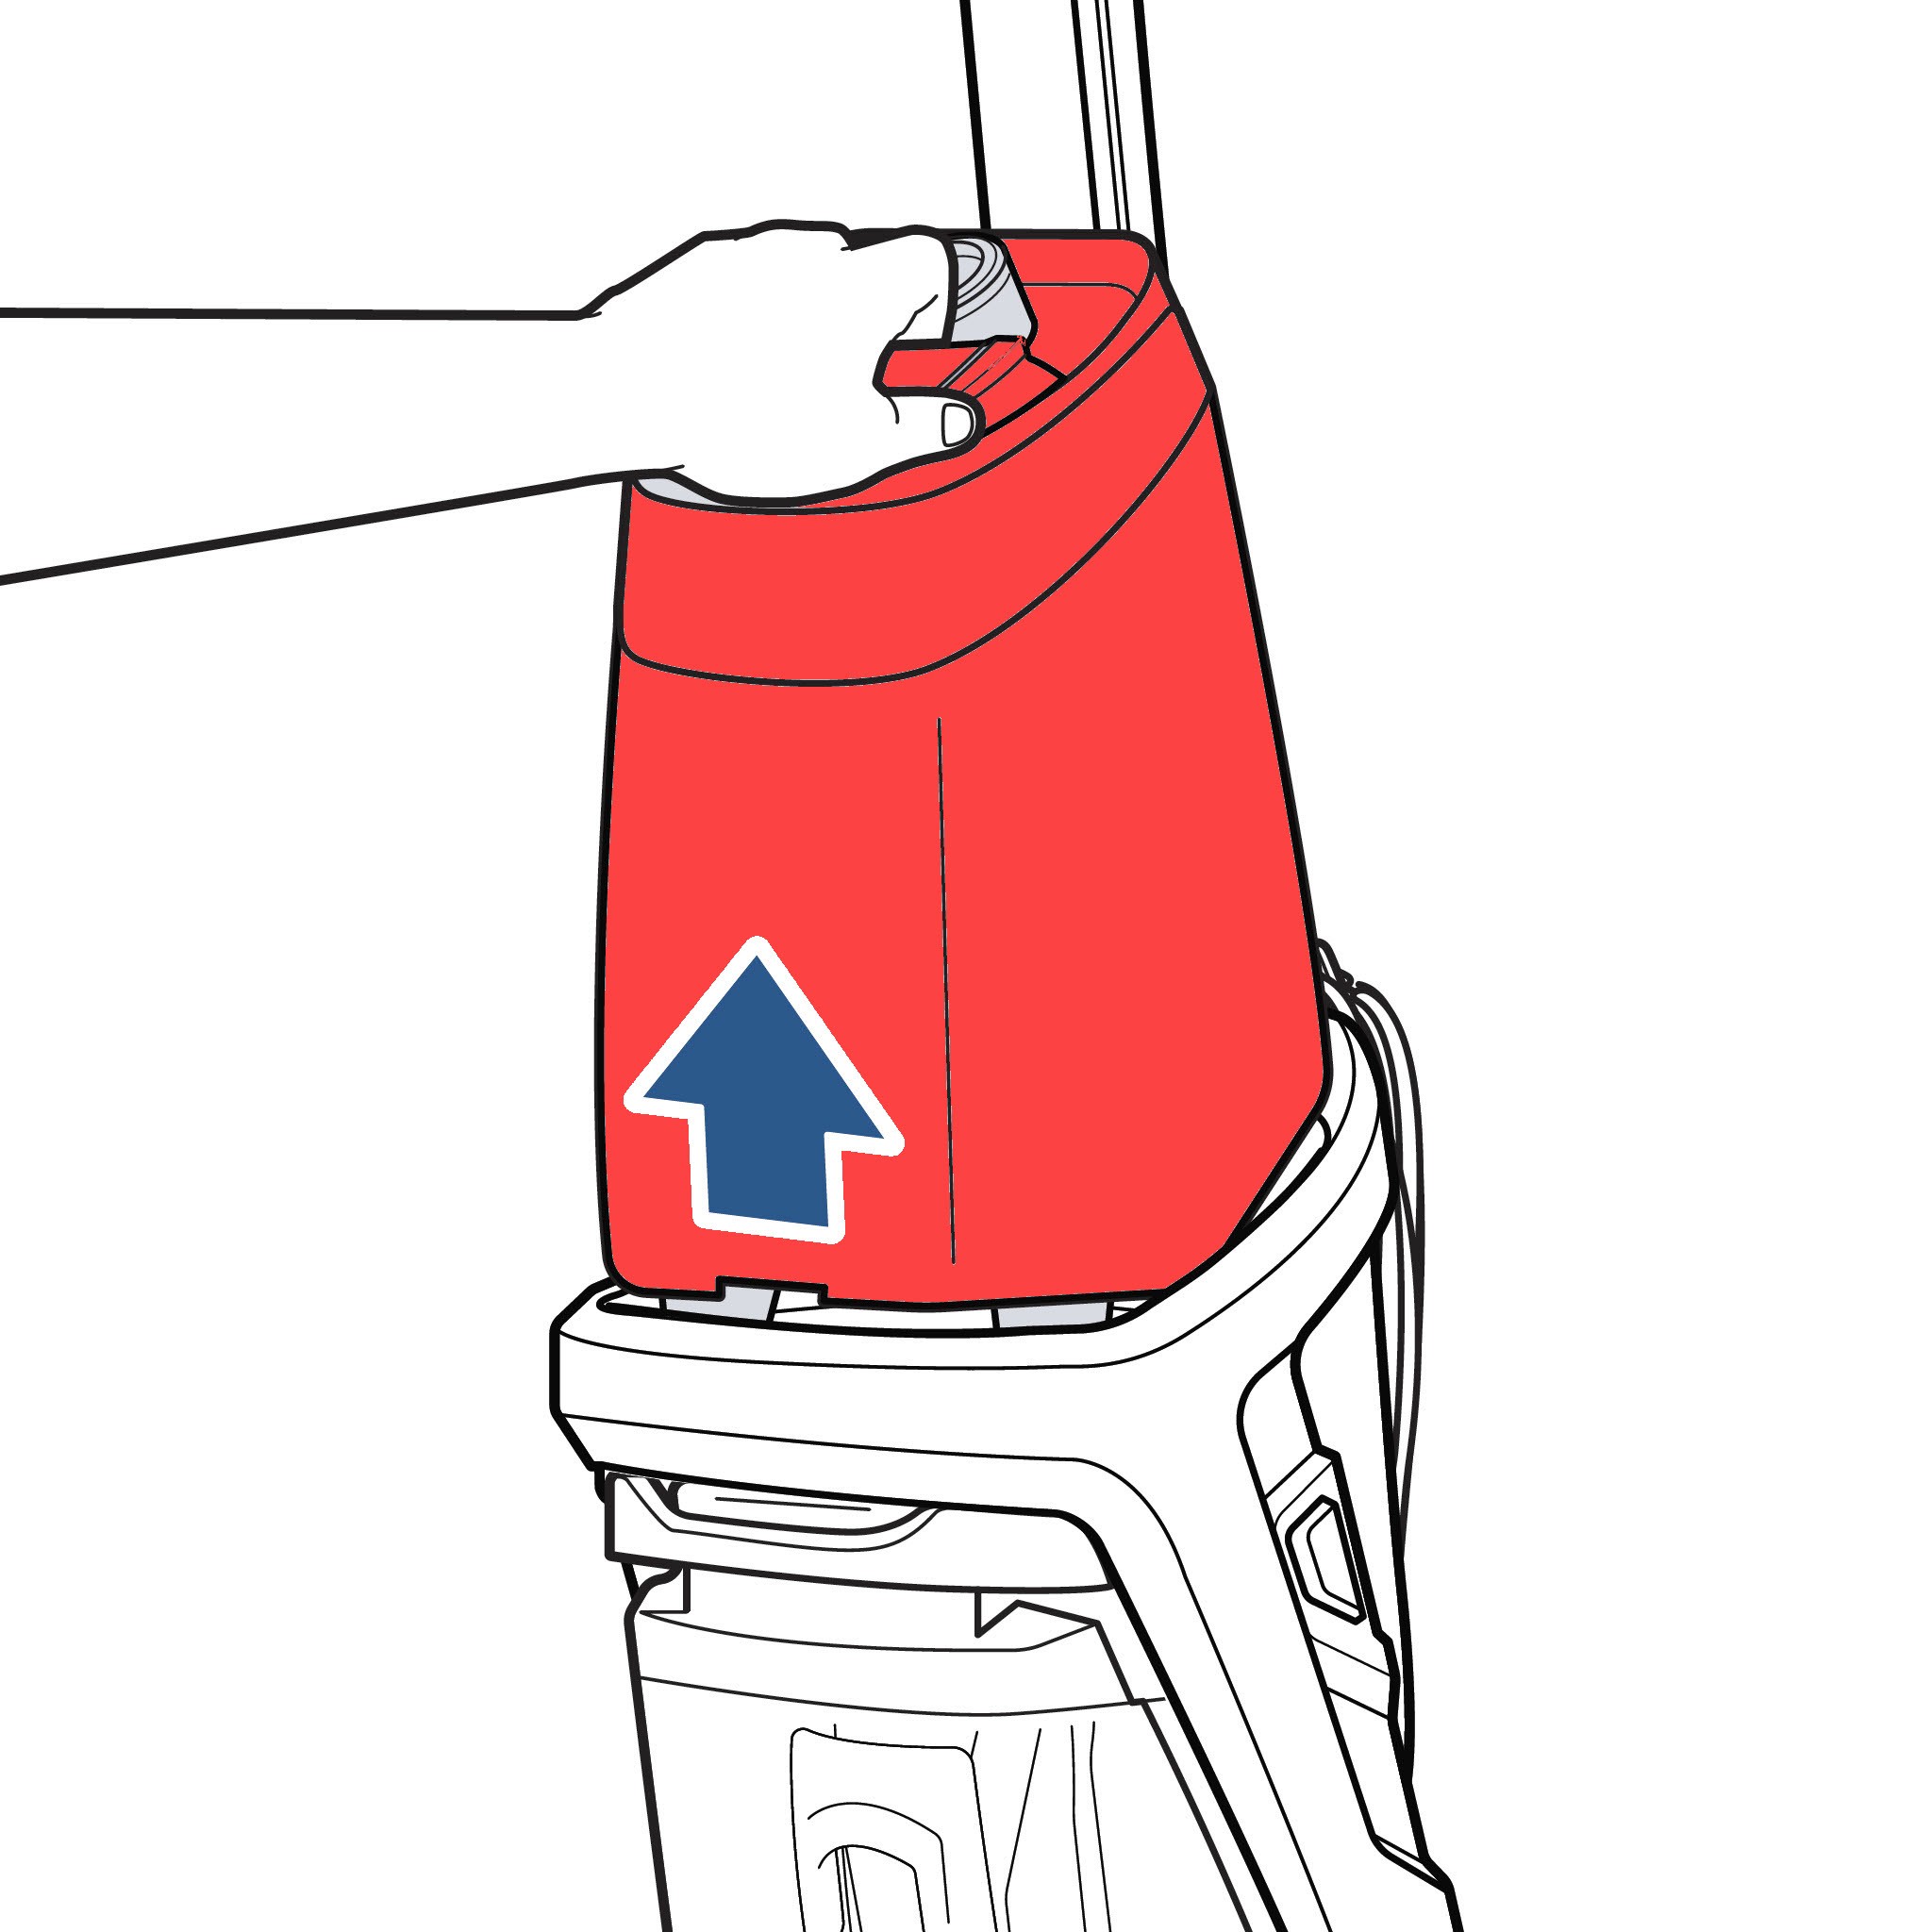
2.4 Installing the Clean Water Tank
Align your clean water tank with the grooves on the machine and slide it into place. Make sure it is firmly seated to prevent leaks during operation.
3. Selecting the Right Cleaning Mode
Choosing the appropriate cleaning mode is crucial for achieving the best results. The Bissell ProHeat Pet offers different modes to suit various cleaning needs.
3.1 Understanding the Cleaning Modes
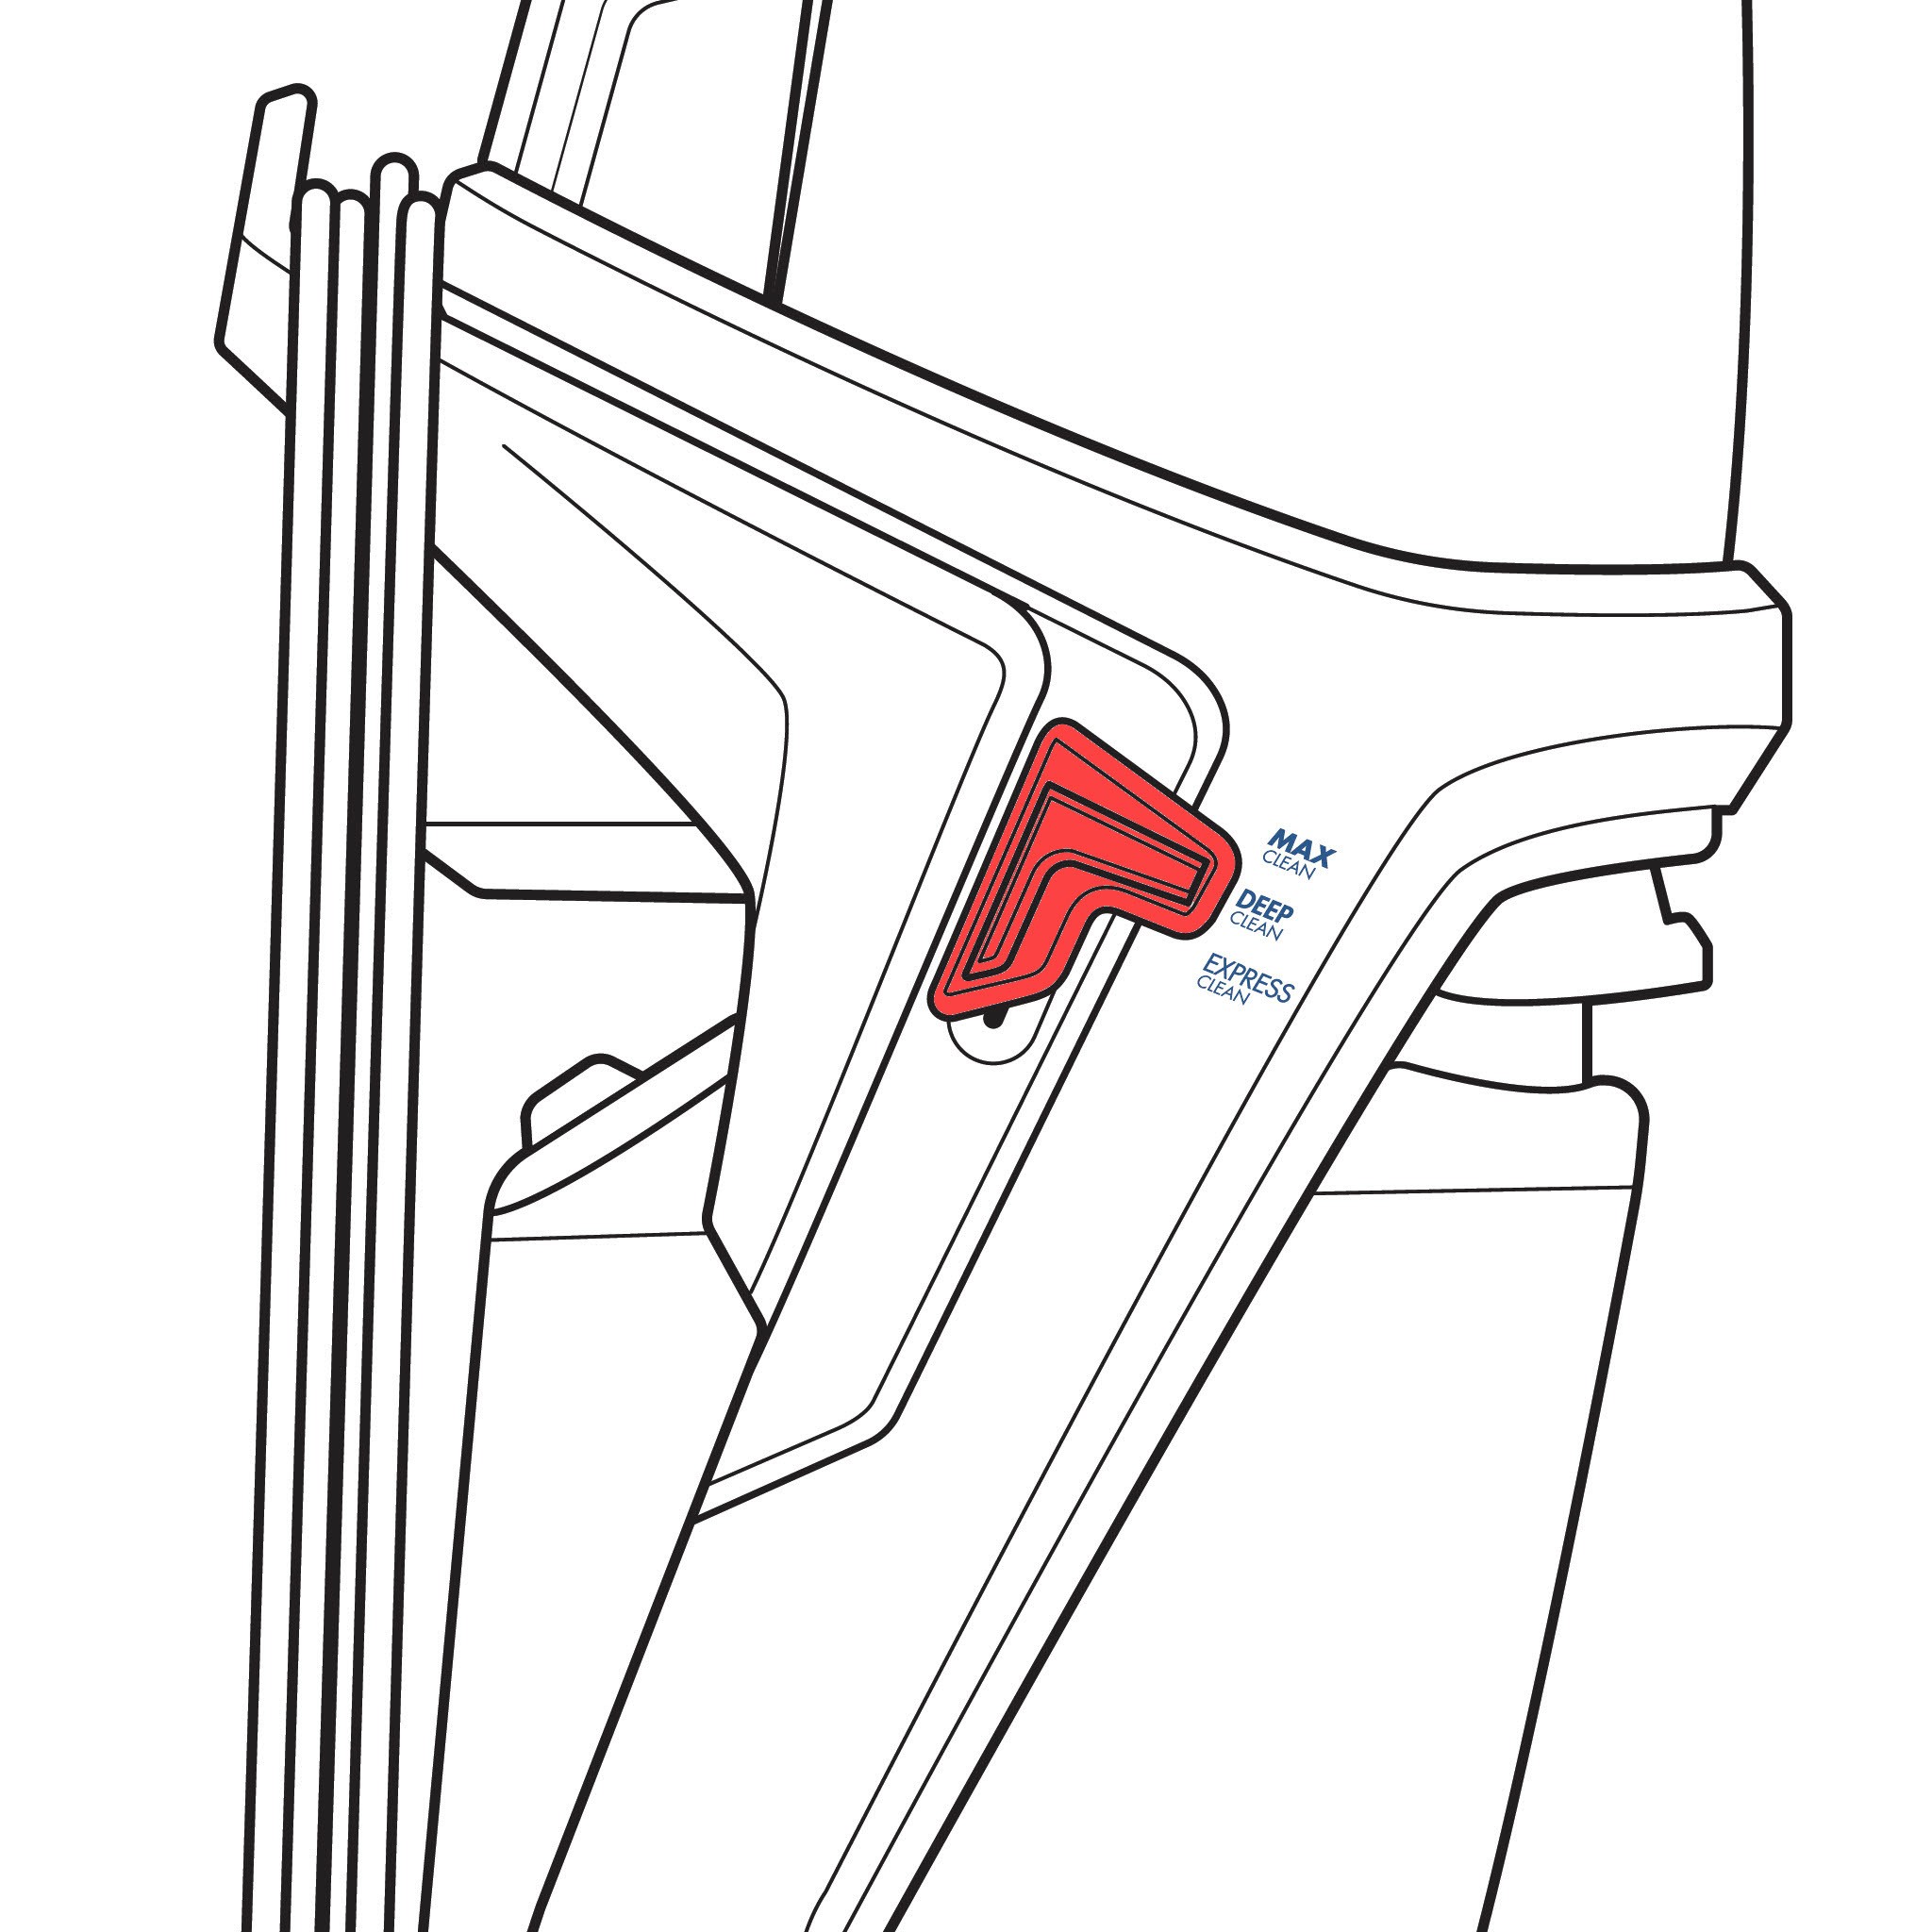
The cleaning mode switch on the side of your machine allows you to toggle between three modes:
- Express Clean: Ideal for light cleaning and quick drying. This mode uses less water and is perfect for maintaining your carpets between deep cleans.
- Max Clean/Deep Clean: Designed for a thorough deep clean. This mode dispenses significantly more water and is best for heavily soiled carpets.
3.2 Choosing the Right Mode
Consider the following factors when selecting a cleaning mode:
- Level of Soiling: For lightly soiled carpets, use Express Clean. For heavily soiled carpets with stubborn stains, use Max Clean/Deep Clean.
- Drying Time: If you need your carpets to dry quickly, opt for Express Clean. If drying time is not a concern, Max Clean/Deep Clean will provide a more thorough clean.
- Type of Stain: For general cleaning and light stains, Express Clean is sufficient. For pet stains, odors, and tough stains, Max Clean/Deep Clean is recommended.
4. Filling the Clean Water Tank
Properly filling the clean water tank is essential for effective cleaning. Follow these steps to ensure the correct mixture of water and cleaning solution.
4.1 Removing the Clean Water Tank
Remove the clean water tank from the machine. This is typically done by lifting it from the top.
4.2 Unscrewing the Cap
Unscrew the cap from the tank to access the fill lines.
4.3 Understanding the Fill Lines
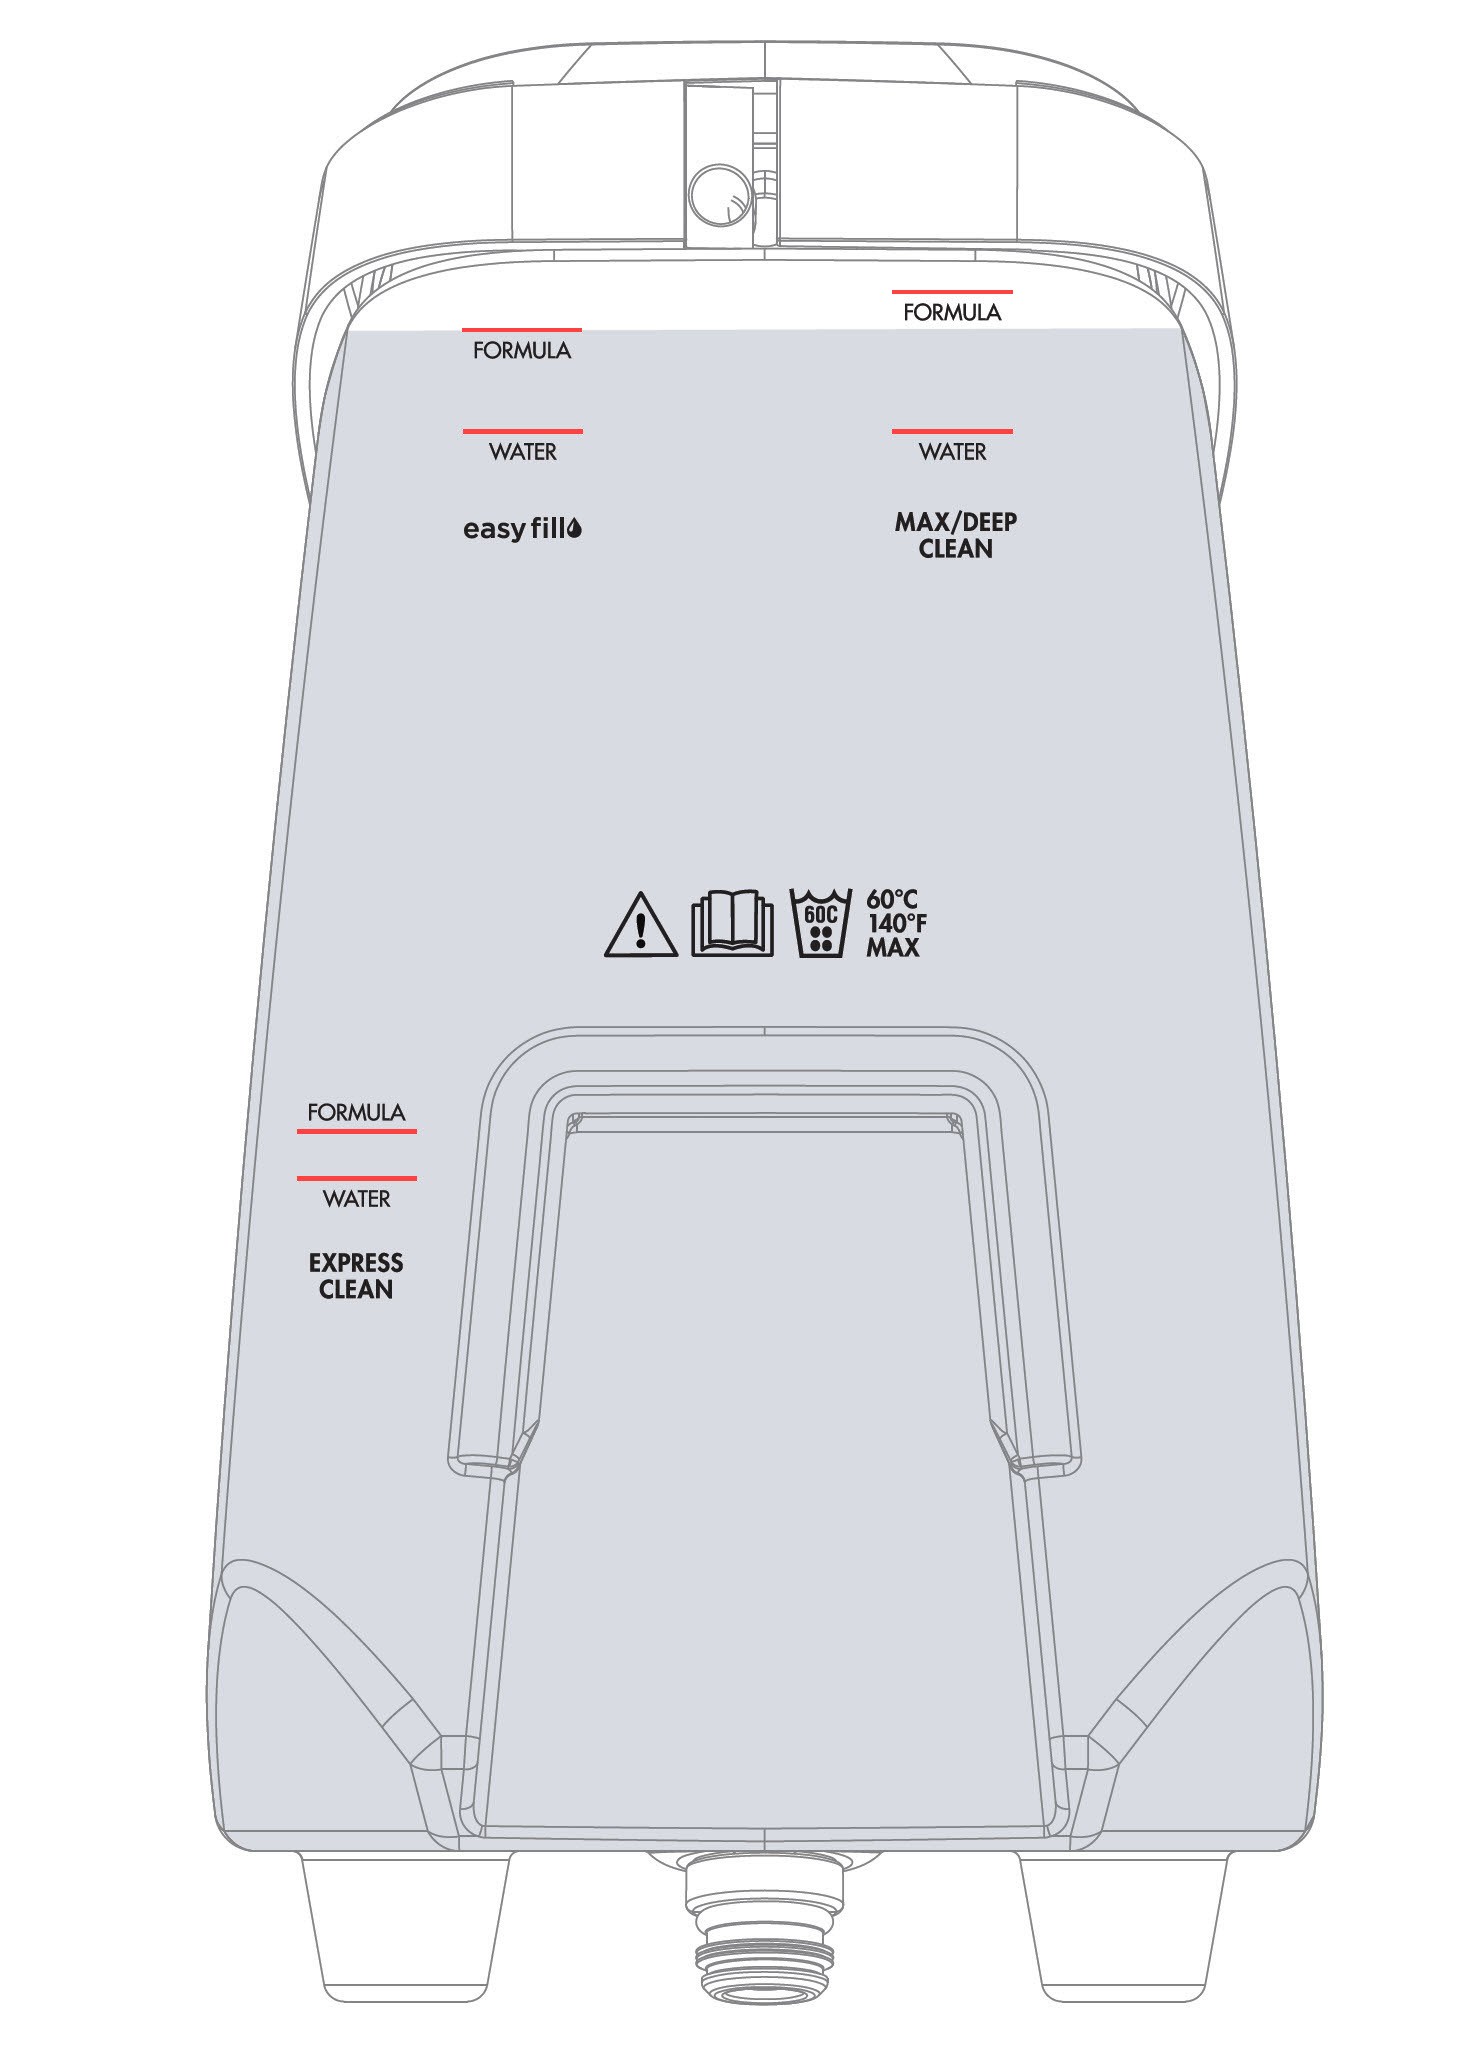
Your clean water tank has different fill lines for water and formula, depending on the cleaning mode you’ve selected.
- Express Clean: Use the fill lines indicated for Express Clean.
- Max/Deep Clean: Use the fill lines indicated for Max/Deep Clean.
- Antibacterial Formula: Use the easy fill lines specifically for antibacterial formulas.
4.4 Filling with Water and Formula
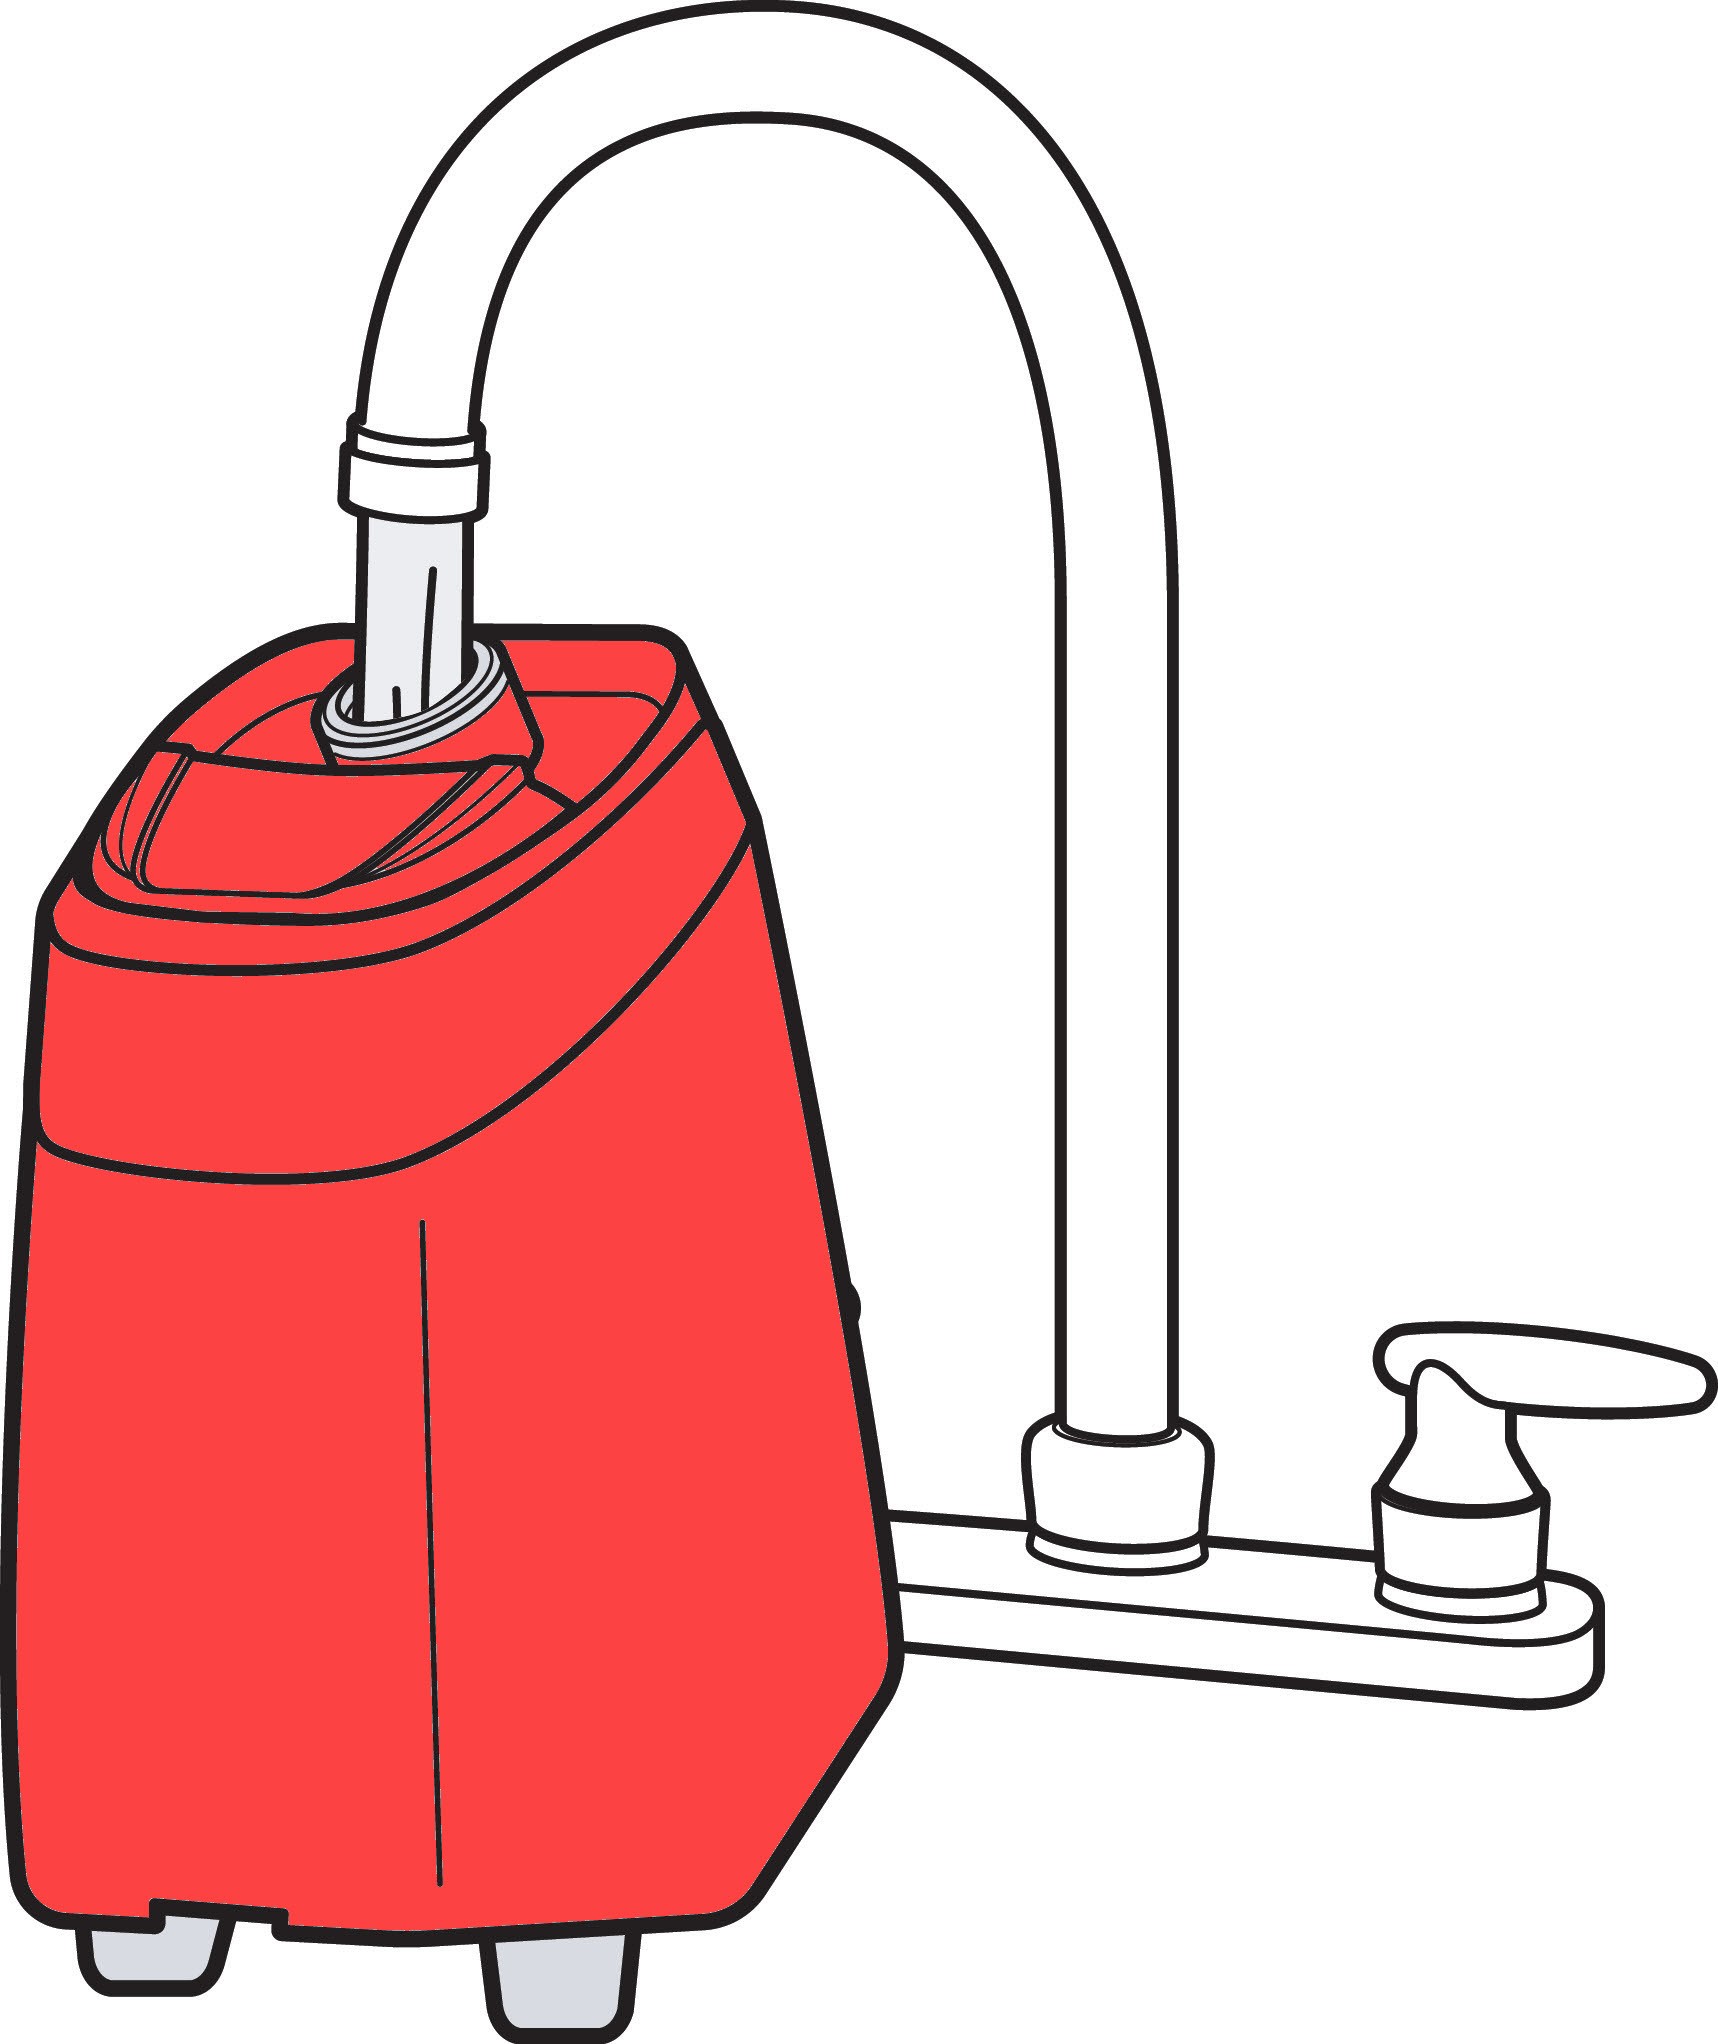
Fill the tank with warm tap water (up to 140°F or 60°C) to the WATER line. Then, add your desired formula to the FORMULA fill line. Using warm water helps to improve cleaning performance. Always use genuine Bissell formulas to optimize the machine’s performance and prevent damage to internal components.
4.5 Using the Easy Fill Feature
Some Bissell ProHeat Pet models come with an easy fill feature for antibacterial formulas. Replace the yellow cap securely onto the clean water tank. Firmly insert the formula bottle into the cap on the tank and squeeze until the formula reaches the easy fill line.
4.6 Compatible Formulas
Always use genuine BISSELL formulas in your machine to reduce possible damage to internal components and to optimize the performance of your machine. Compatible BISSELL formulas include:
- Clean + Refresh
- PET Stain & Odor
- PRO MAX Clean + Protect
- PET PRO OXY Urine Eliminator
- PET Stain Pretreat
- PET PRO OXY Stain Destroyer
- PET Pretreat + Sanitize
- Pet Stain & Odor + Antibacterial
- OXY Boost
- PET OXY Boost
4.7 Replacing the Clean Water Tank
With the clean water tank filled, return the tank to the machine and slide it into place, ensuring that it is seated fully into the machine.
5. Cleaning Carpets and Area Rugs
Now that your machine is assembled and the tank is filled, you’re ready to start cleaning your carpets and area rugs.
5.1 Pre-Cleaning
Before using your deep cleaner, remove any solids with a dry vacuum cleaner. This will prevent objects or material from clogging your machine and will reduce the likelihood of failures with your machine while cleaning.
5.2 Powering On and Reclining
Plug your machine into a properly grounded outlet and ensure the machine is on your desired cleaning mode indicated by the switch on the side of the machine. Press the power button on the side of the machine to turn the machine ON and then press the recline pedal with your foot to begin cleaning.
5.3 Dispensing Cleaning Solution
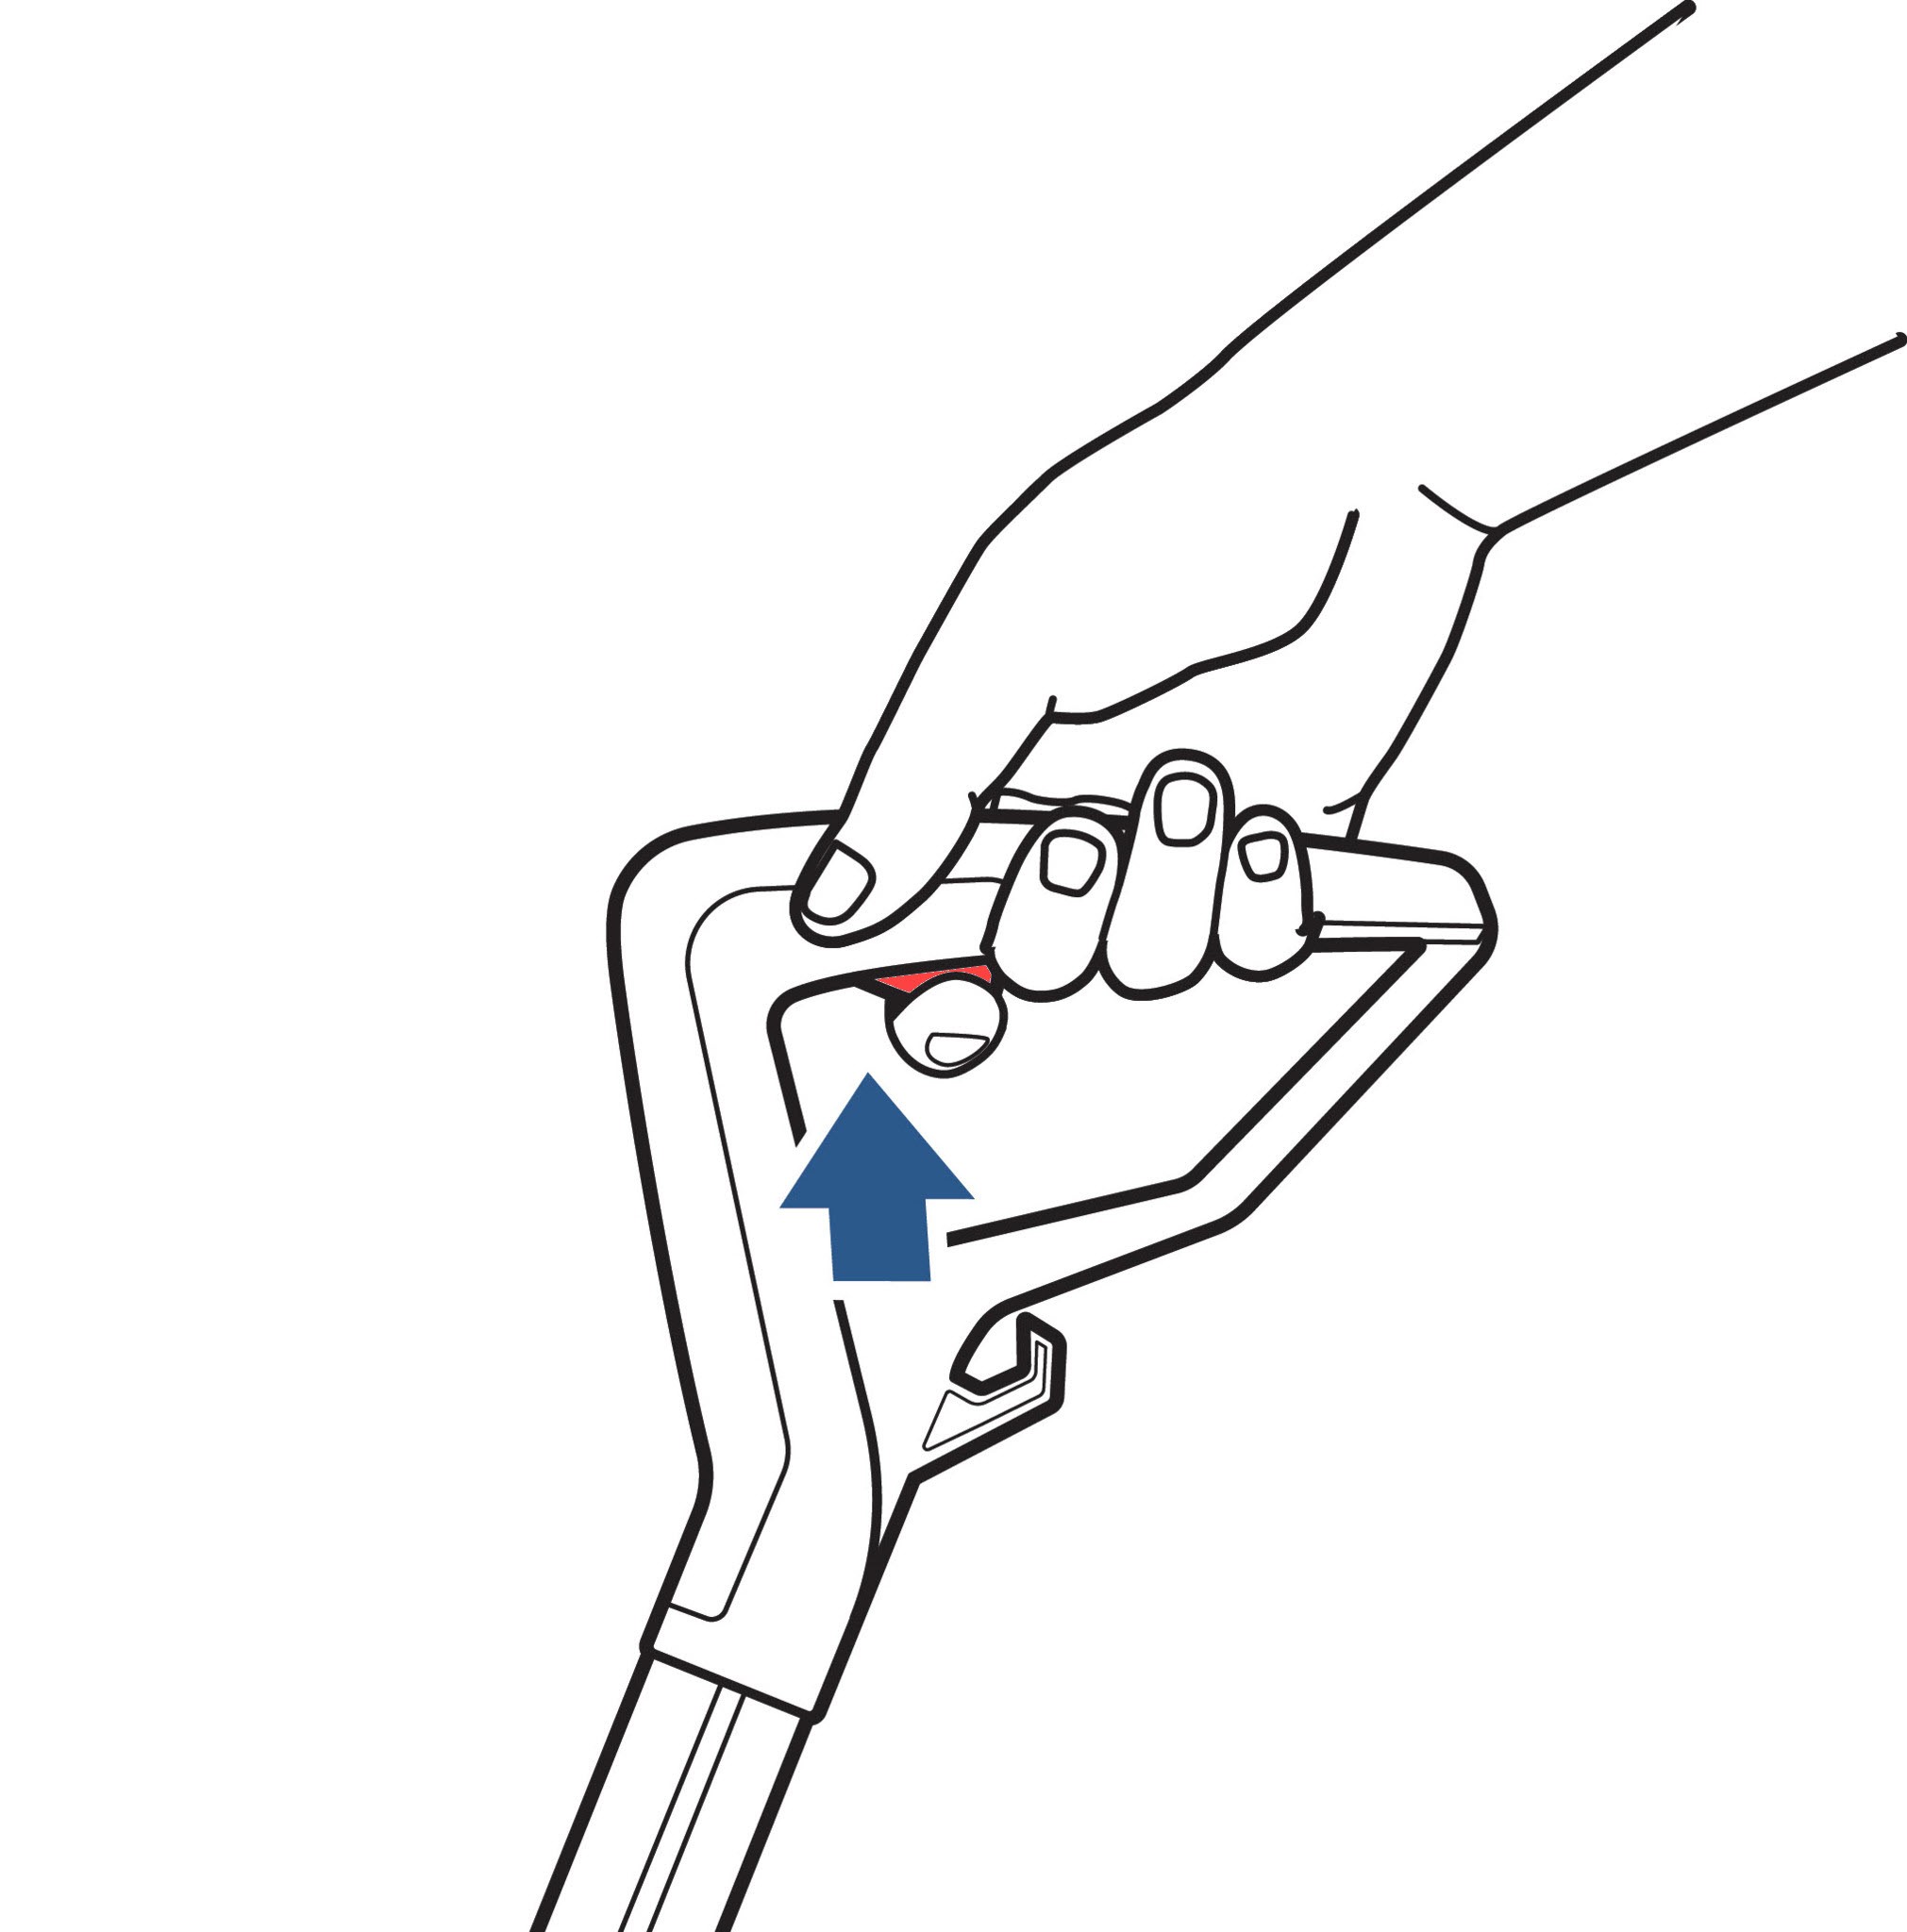
To dispense water and cleaning solution from your machine, hold the spray trigger on the handle. Holding the spray trigger for 10 seconds allows the machine to prime and wet the brush roll before cleaning. Note: machine will only dispense cleaning solution while the spray trigger is being held.
5.4 Cleaning Guidelines
Follow the recommended timing and patterns depending on the cleaning mode in the chart below to optimize the results:
| Cleaning Mode | Spray Trigger Use | Forward Passes | Backward Passes | Drying Time |
|---|---|---|---|---|
| Express Clean | Hold | 2 Slow | 2 Dry | ~30 Minutes |
| Max/Deep Clean | Hold | 1 Slow | 1 Slow | Several Hours |
5.5 Making Passes
Move your machine slowly for best cleaning results. Continue making dry passes (using the machine without the trigger held) until no more water can be seen entering the nozzle on the foot. You may need to re-fill the clean water tank several times during one session of cleaning.
5.6 Using the CleanShot Pretreater
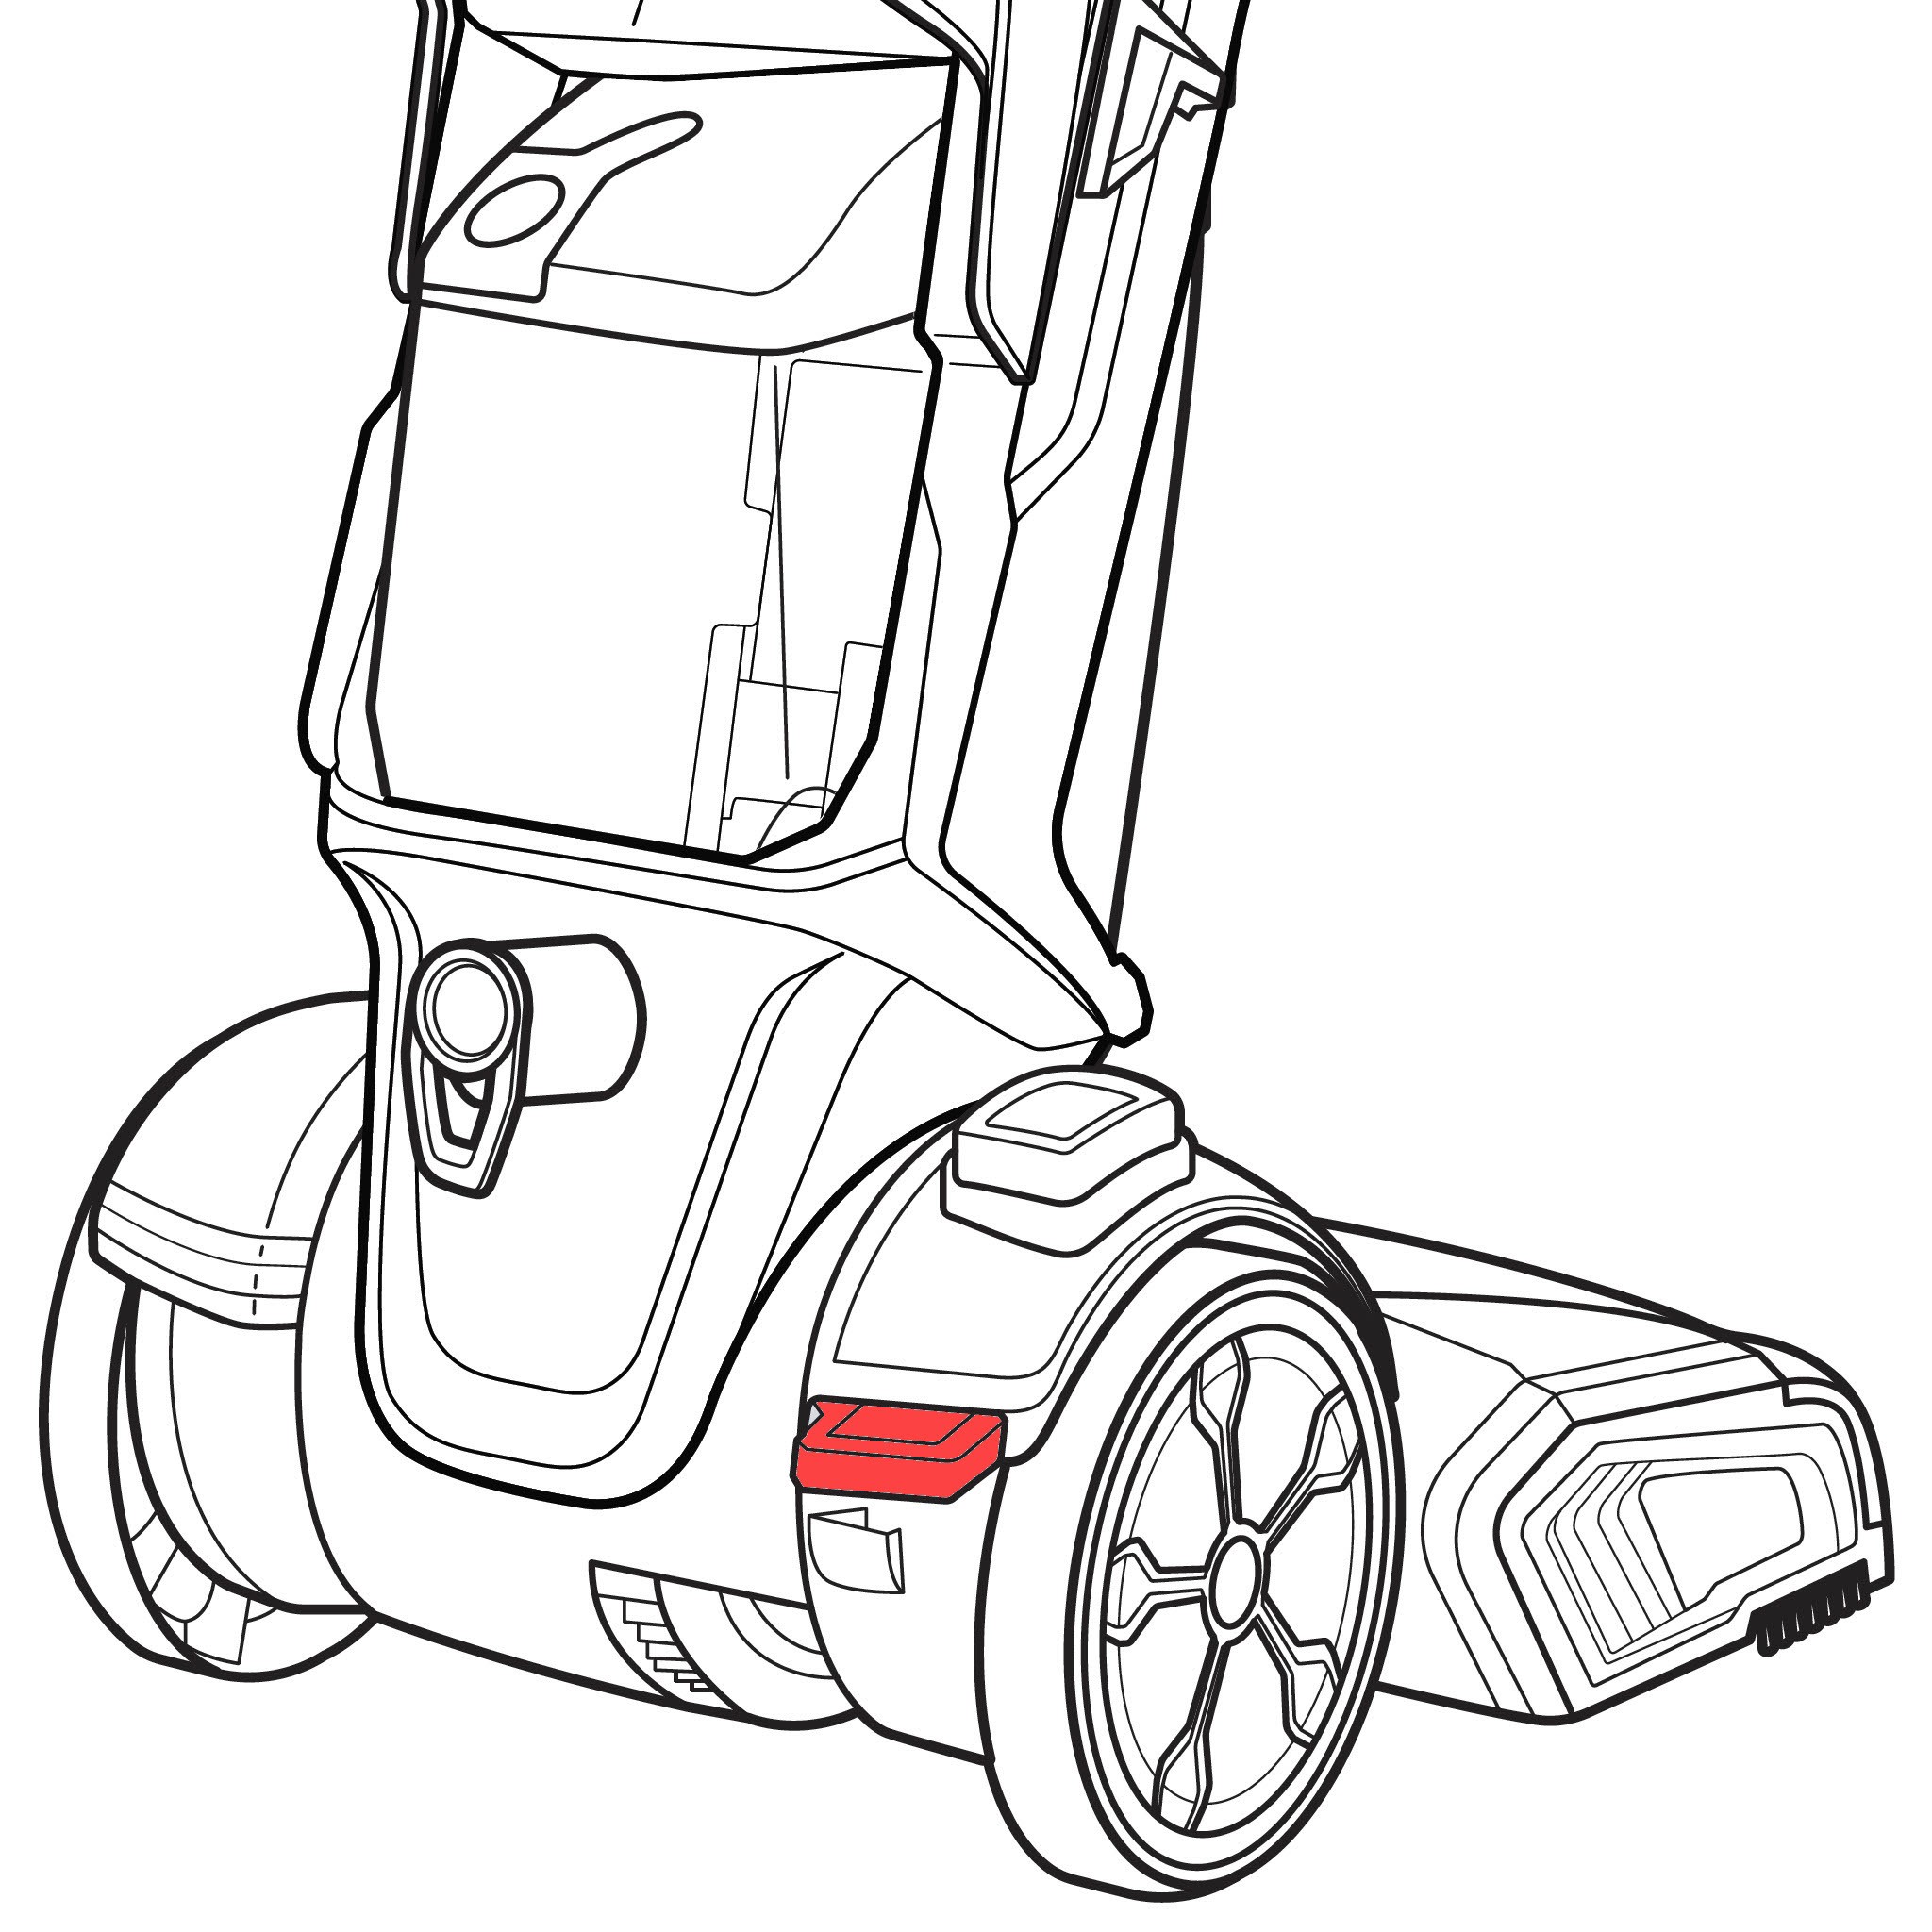
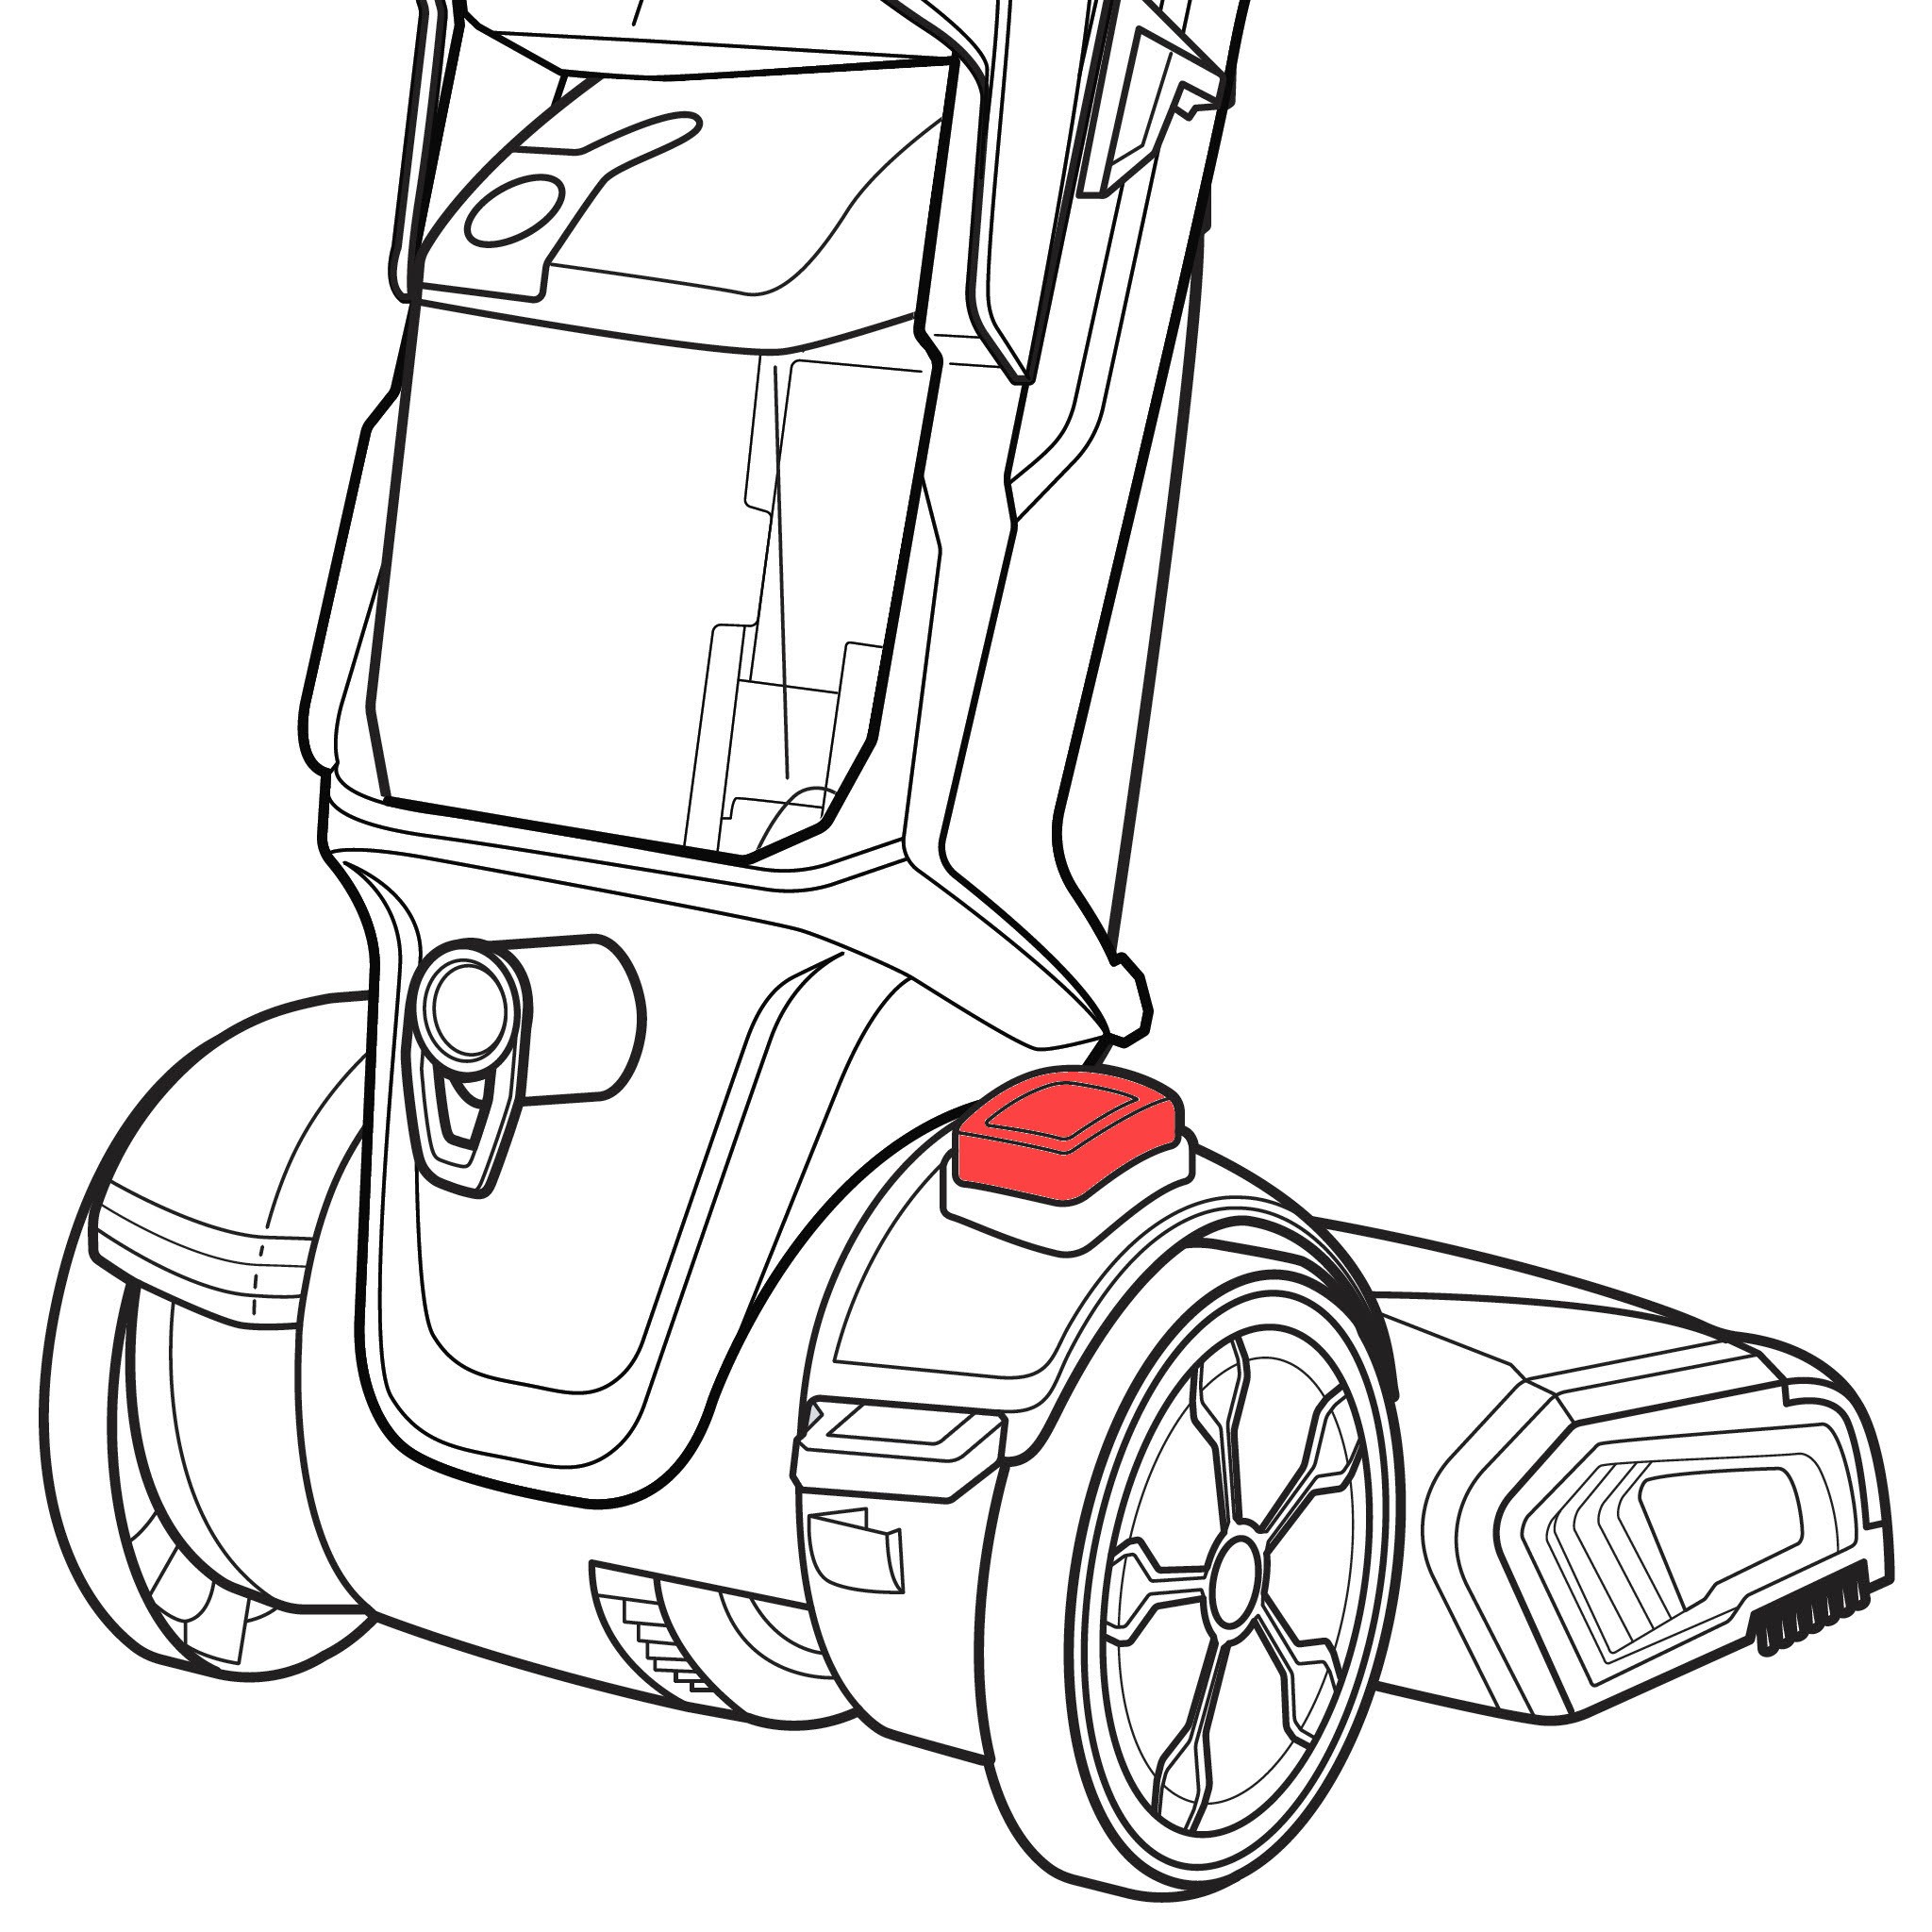
Your machine may also include the CleanShot® Pretreater for use on tougher stains and set in messes. With the machine reclined, press the CleanShot® button, located on the machine foot. The button will display a green icon with an “I” visible when it is ON and a red icon with an “O” when it is OFF. This spray will continue until either the button is turned OFF or the machine is unplugged.
5.7 Treating Stains with CleanShot
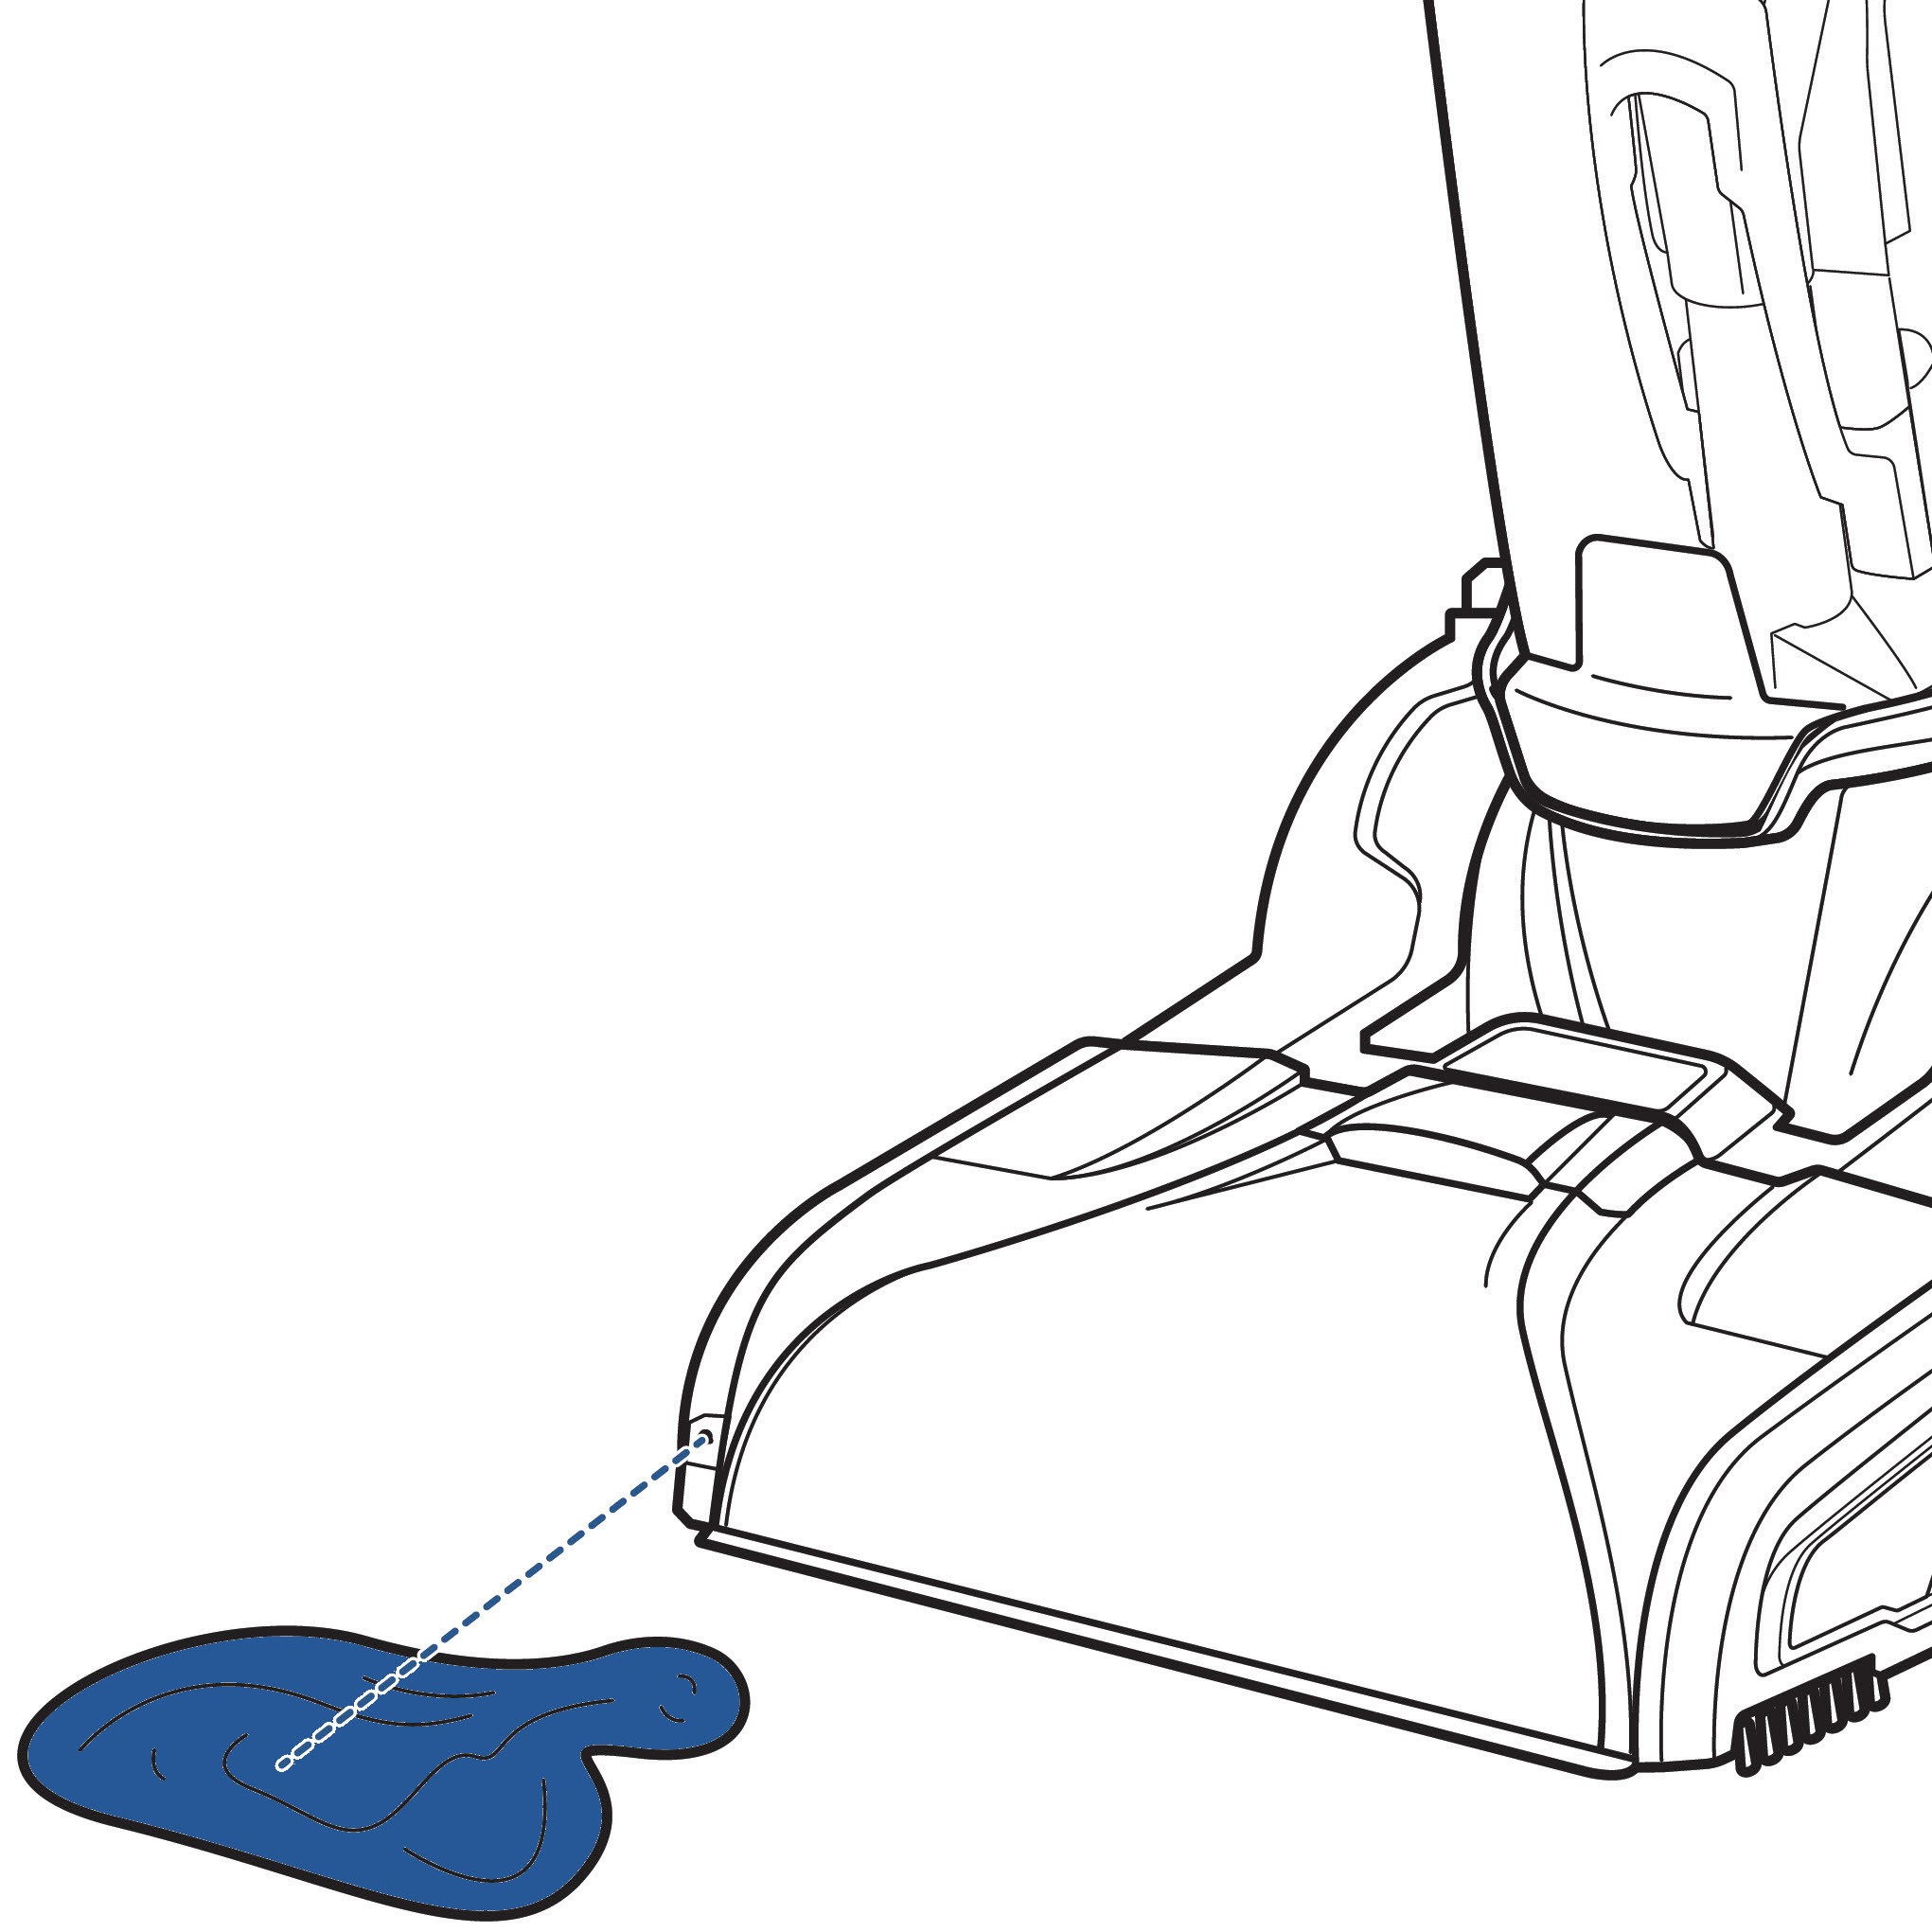
Maneuver the machine as necessary to spray the stain until it is completely soaked. Press the CleanShot® button to turn it OFF and allow the stain to soak for 5 minutes. After the stain has soaked, move the machine over the stain to extract and continue cleaning as indicated by the chart above.
6. Cleaning with Hose & Tools
For cleaning upholstery, stairs, and hard-to-reach areas, the hose and tools attachment are invaluable.
6.1 Attaching the Hose
Tools provided may vary depending on model. Note that the brush rolls will continue to spin while the machine is upright, even while using the hose and tool attachments. Ensure your machine is placed on a surface that will not be damaged by the brush rolls rotating.
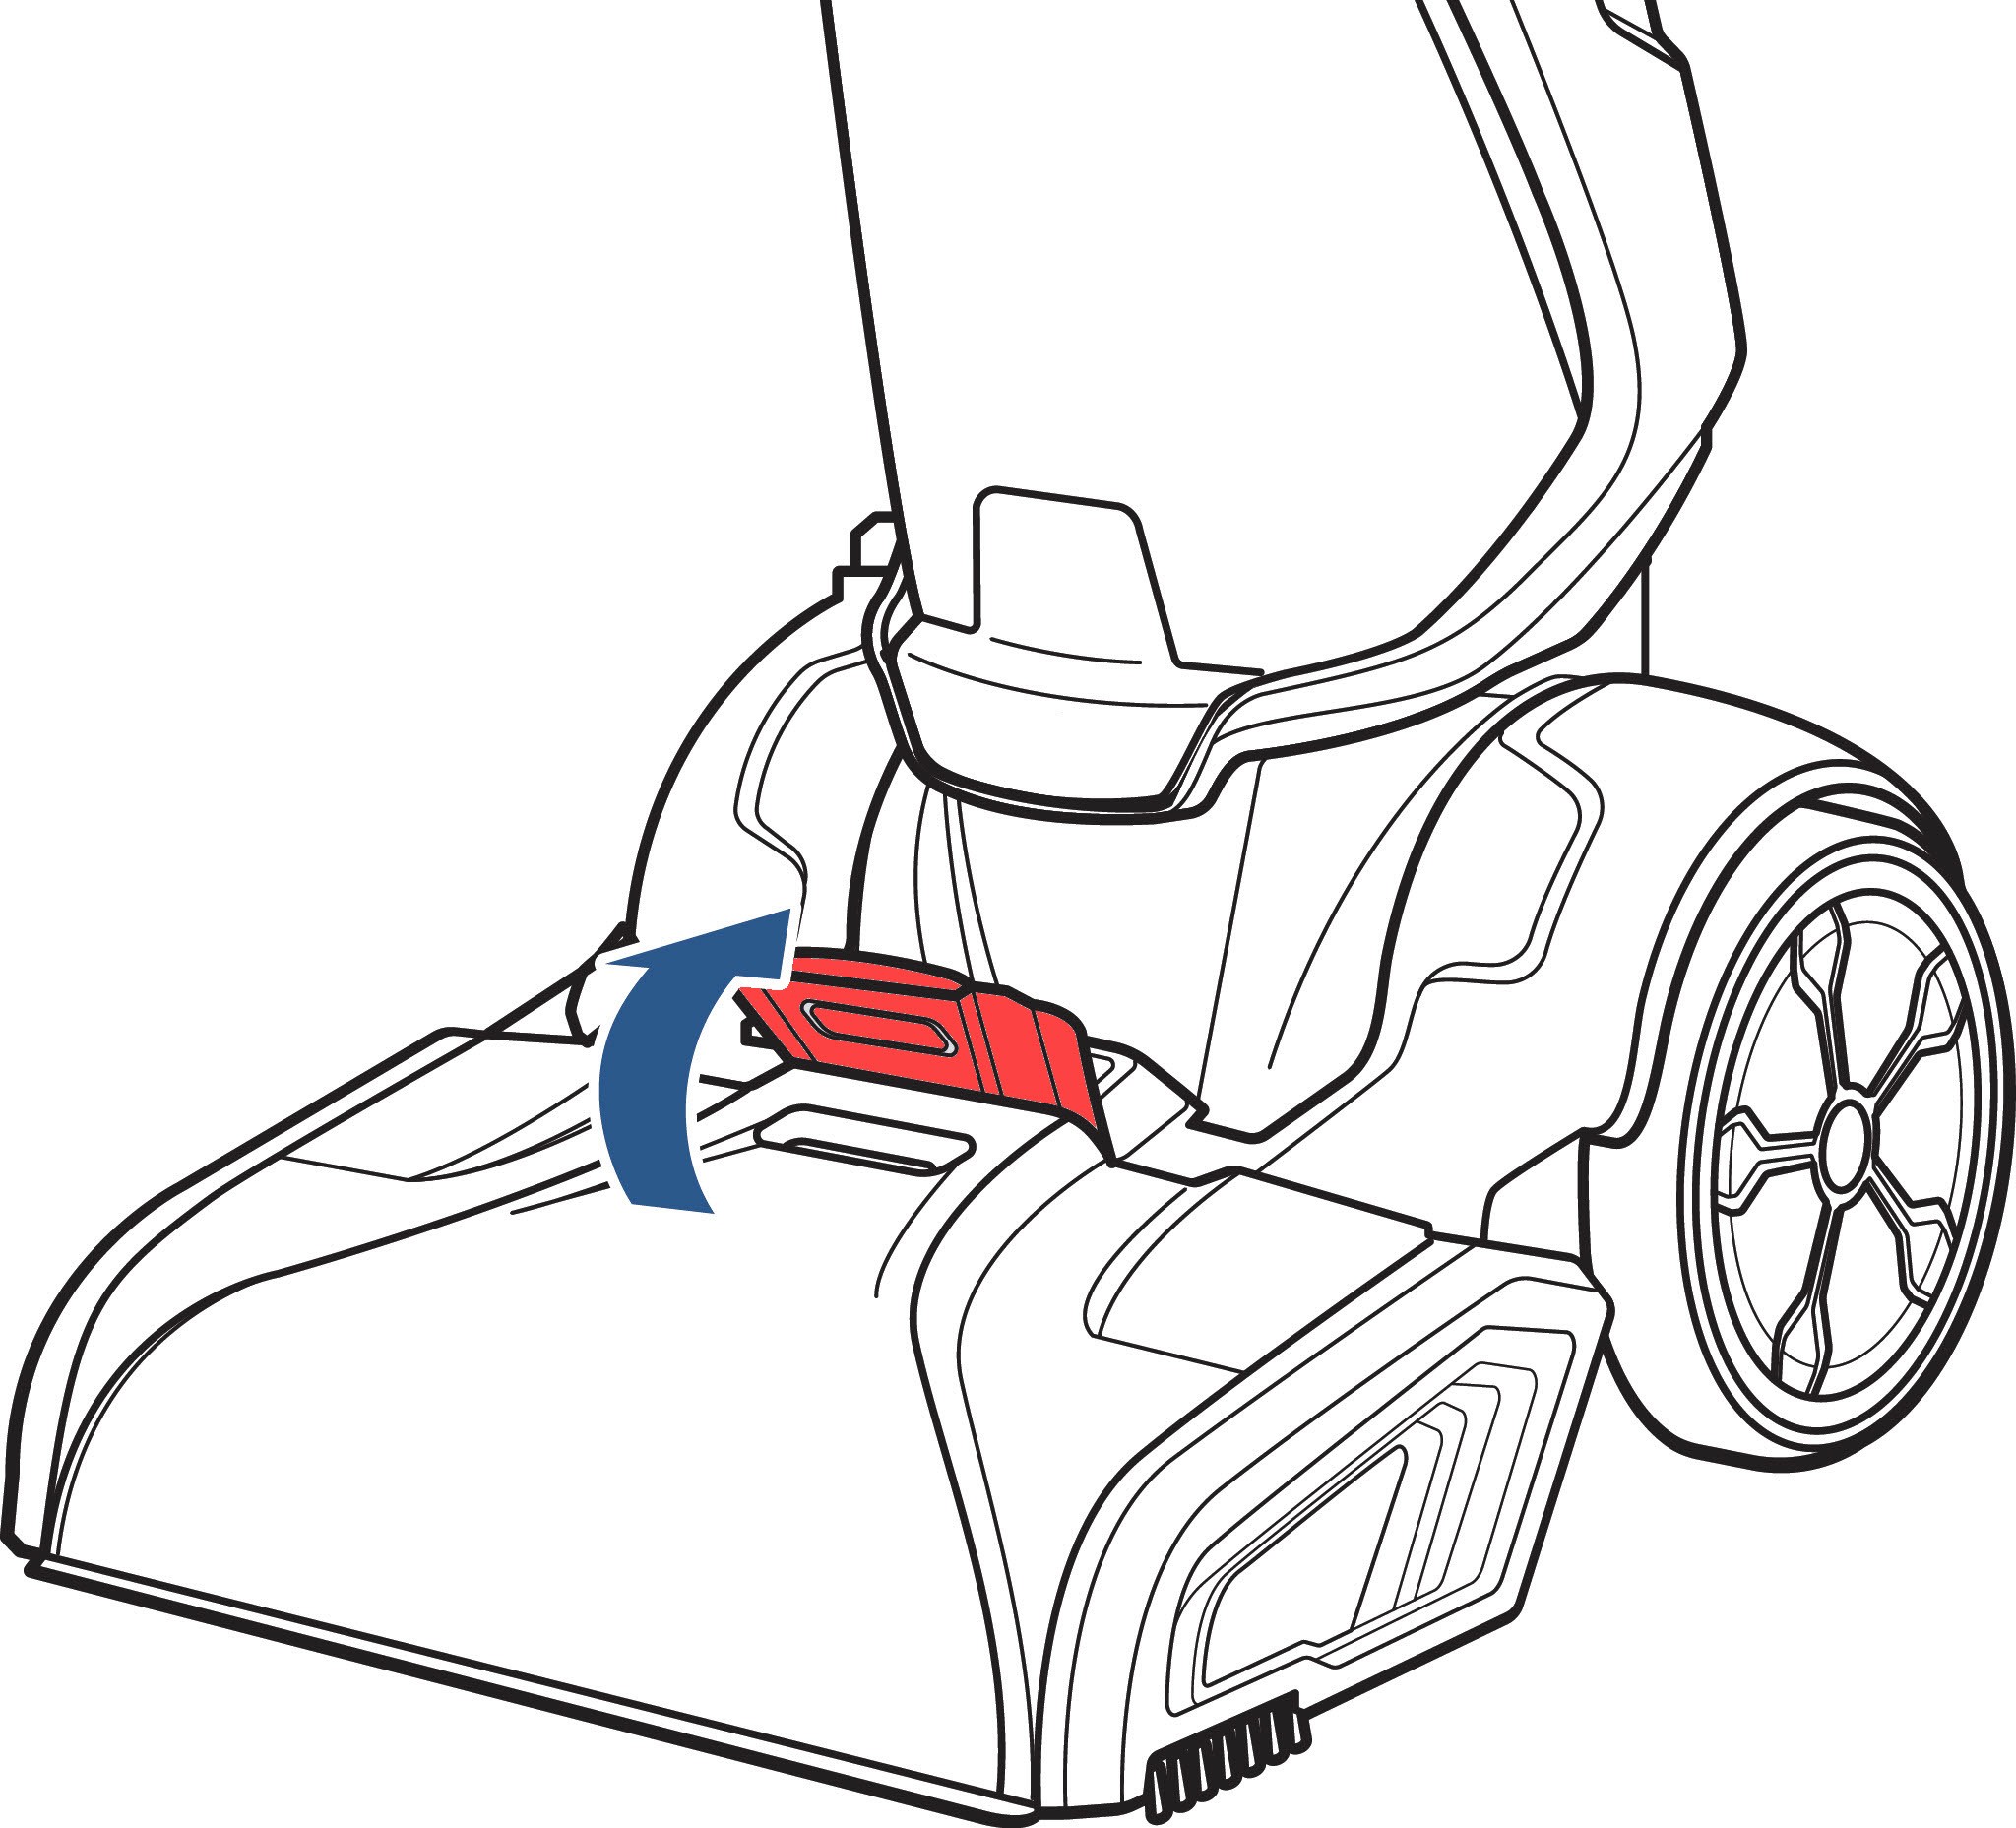
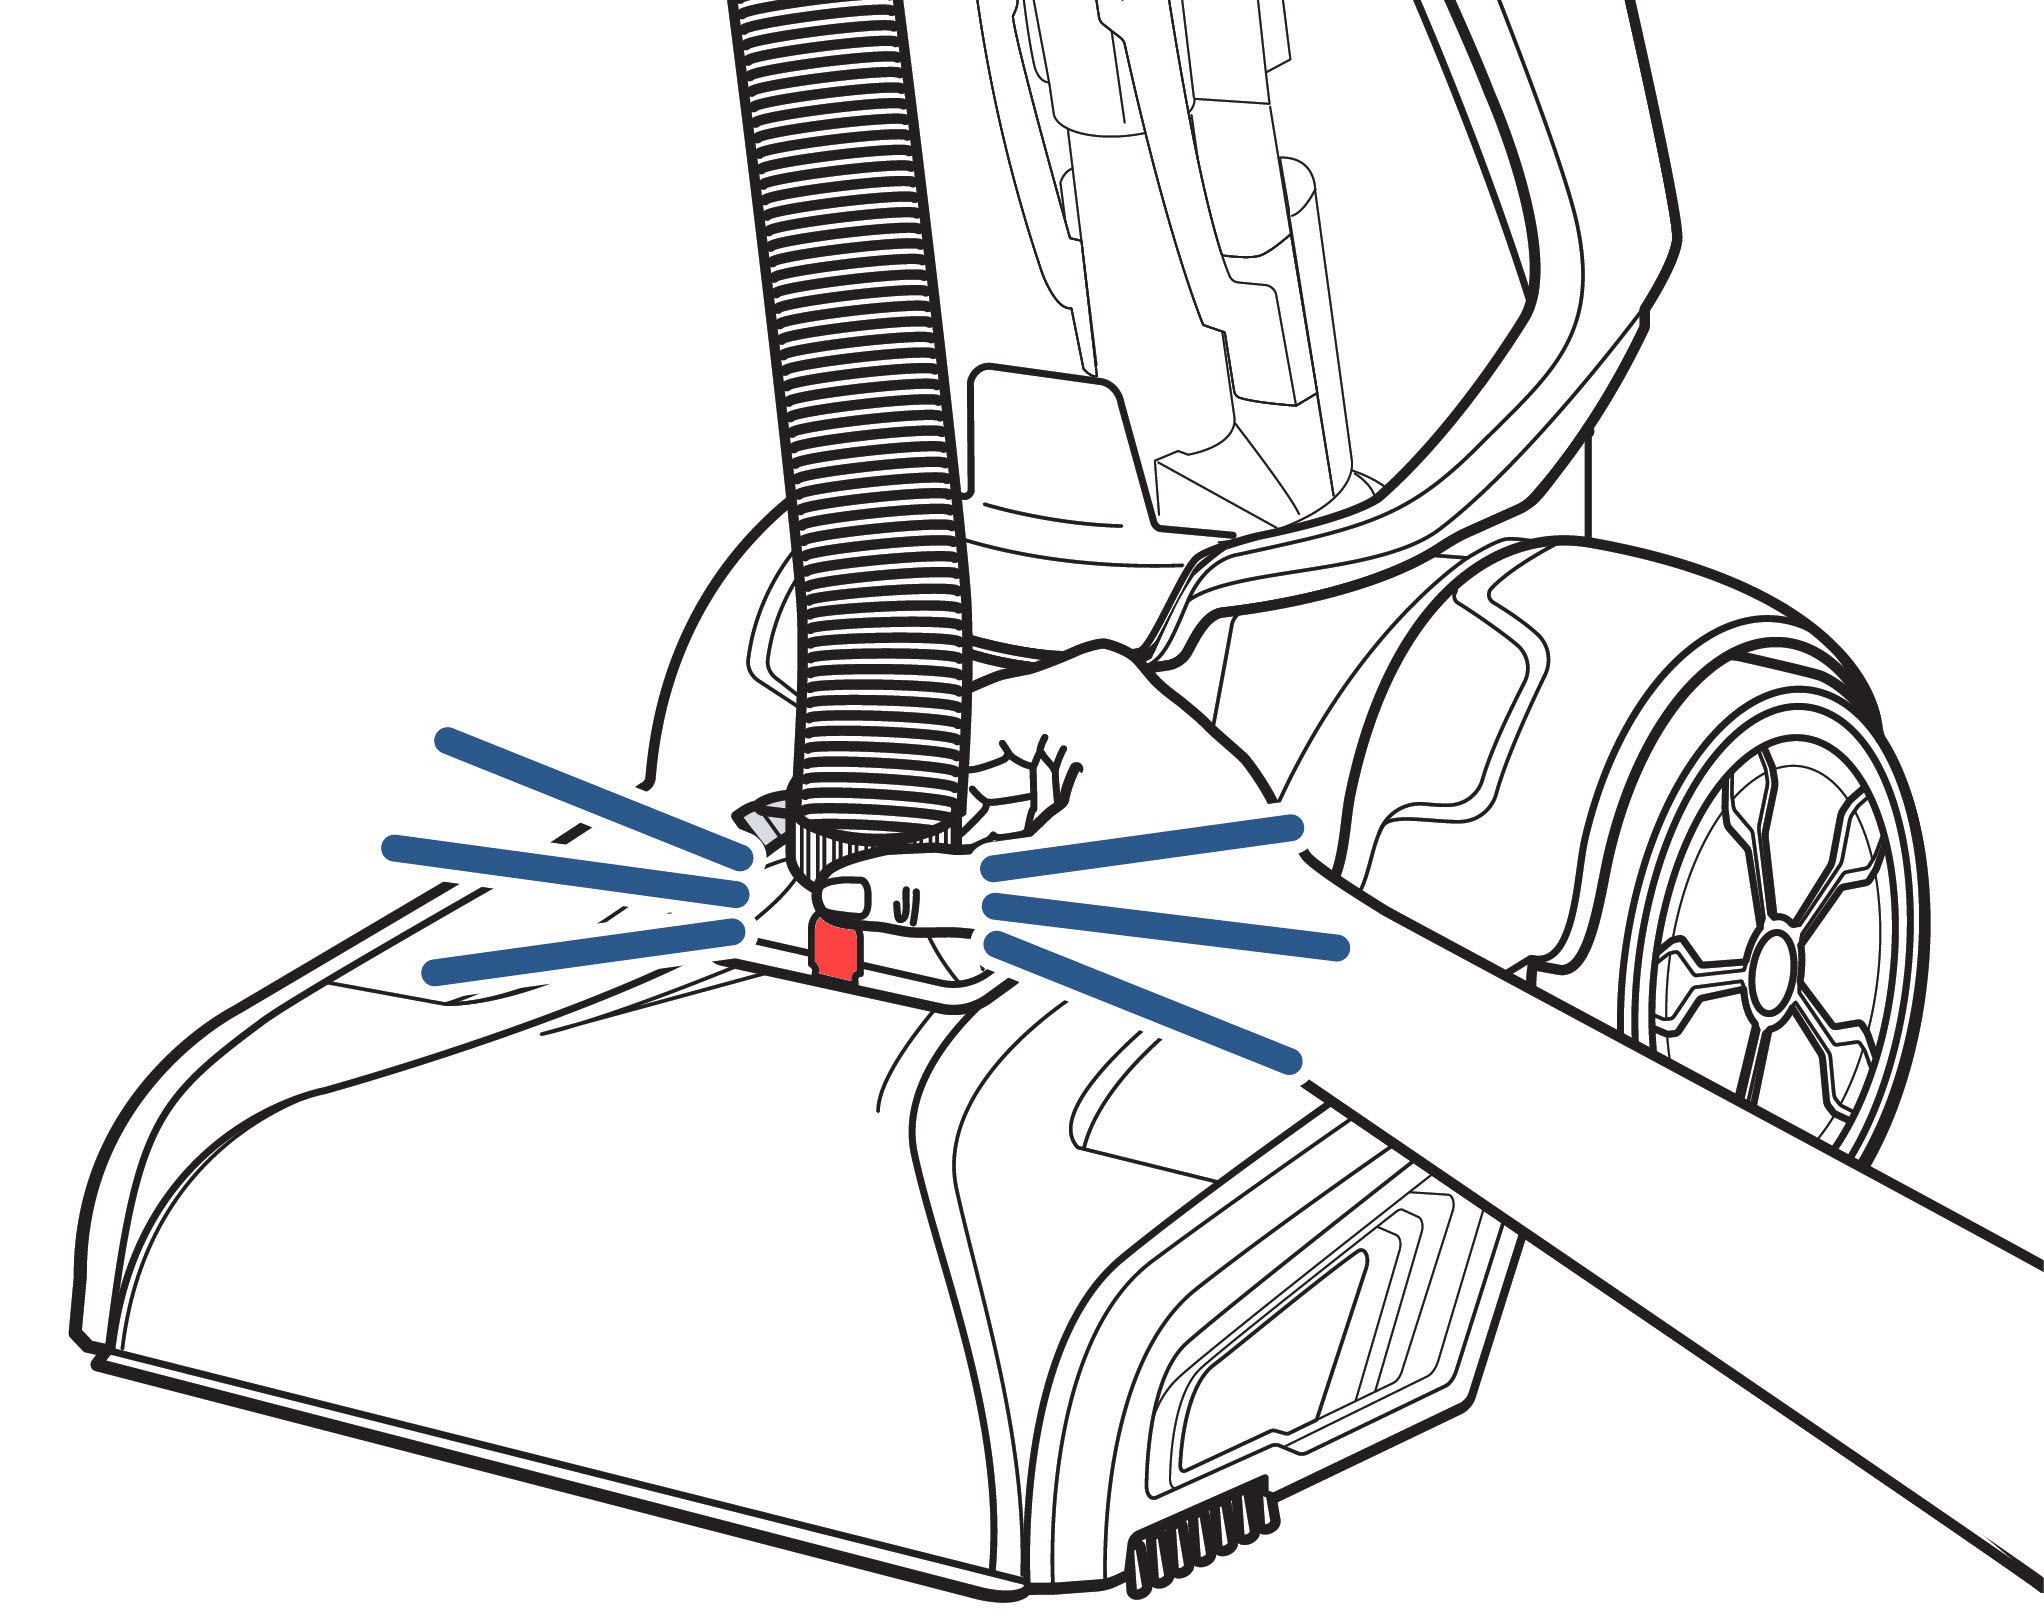
To use the hose with tools, lift the accessory hose door located on the foot of the machine and insert the hose with the colored release clip facing away from the machine until it snaps into place. Then attach your desired tool to the other end of the hose.
6.2 Spraying and Scrubbing
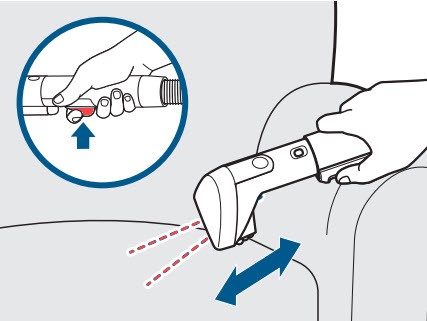
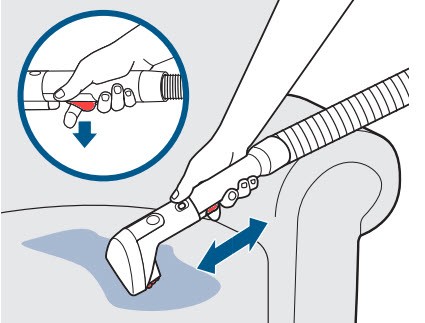
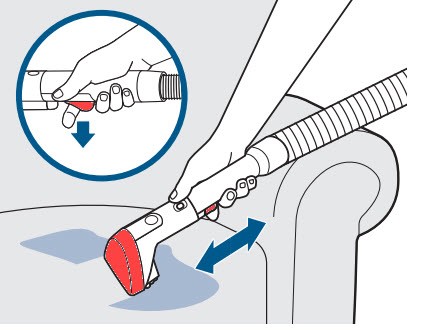
For best results, hold the tool a few inches above the spot or stain and press the spray trigger to treat the stain. Once the stain has been sprayed thoroughly, release the spray trigger and use the scrubbing portion of the tool to gently scrub the stain.
6.3 Suctioning
After scrubbing the stain, suction up the mess by tilting the tool forward allowing the suction channel to make solid contact with the surface and slowly move the tool in a backwards direction over the mess. Continue this process until the stain is removed.
7. Emptying the Dirty Water Tank
Regularly emptying the dirty water tank is essential for maintaining the machine’s suction power and preventing odors.
7.1 Recognizing When to Empty
After cleaning, or when your dirty water tank (located under the clean water tank) is full, empty and clean the dirty water tank. If the dirty water tank gets full during cleaning, you may notice a change in pitch of your machine sound, and a loss of suction. This is an indicator that the dirty water tank needs to be emptied.
7.2 Removing the Dirty Water Tank
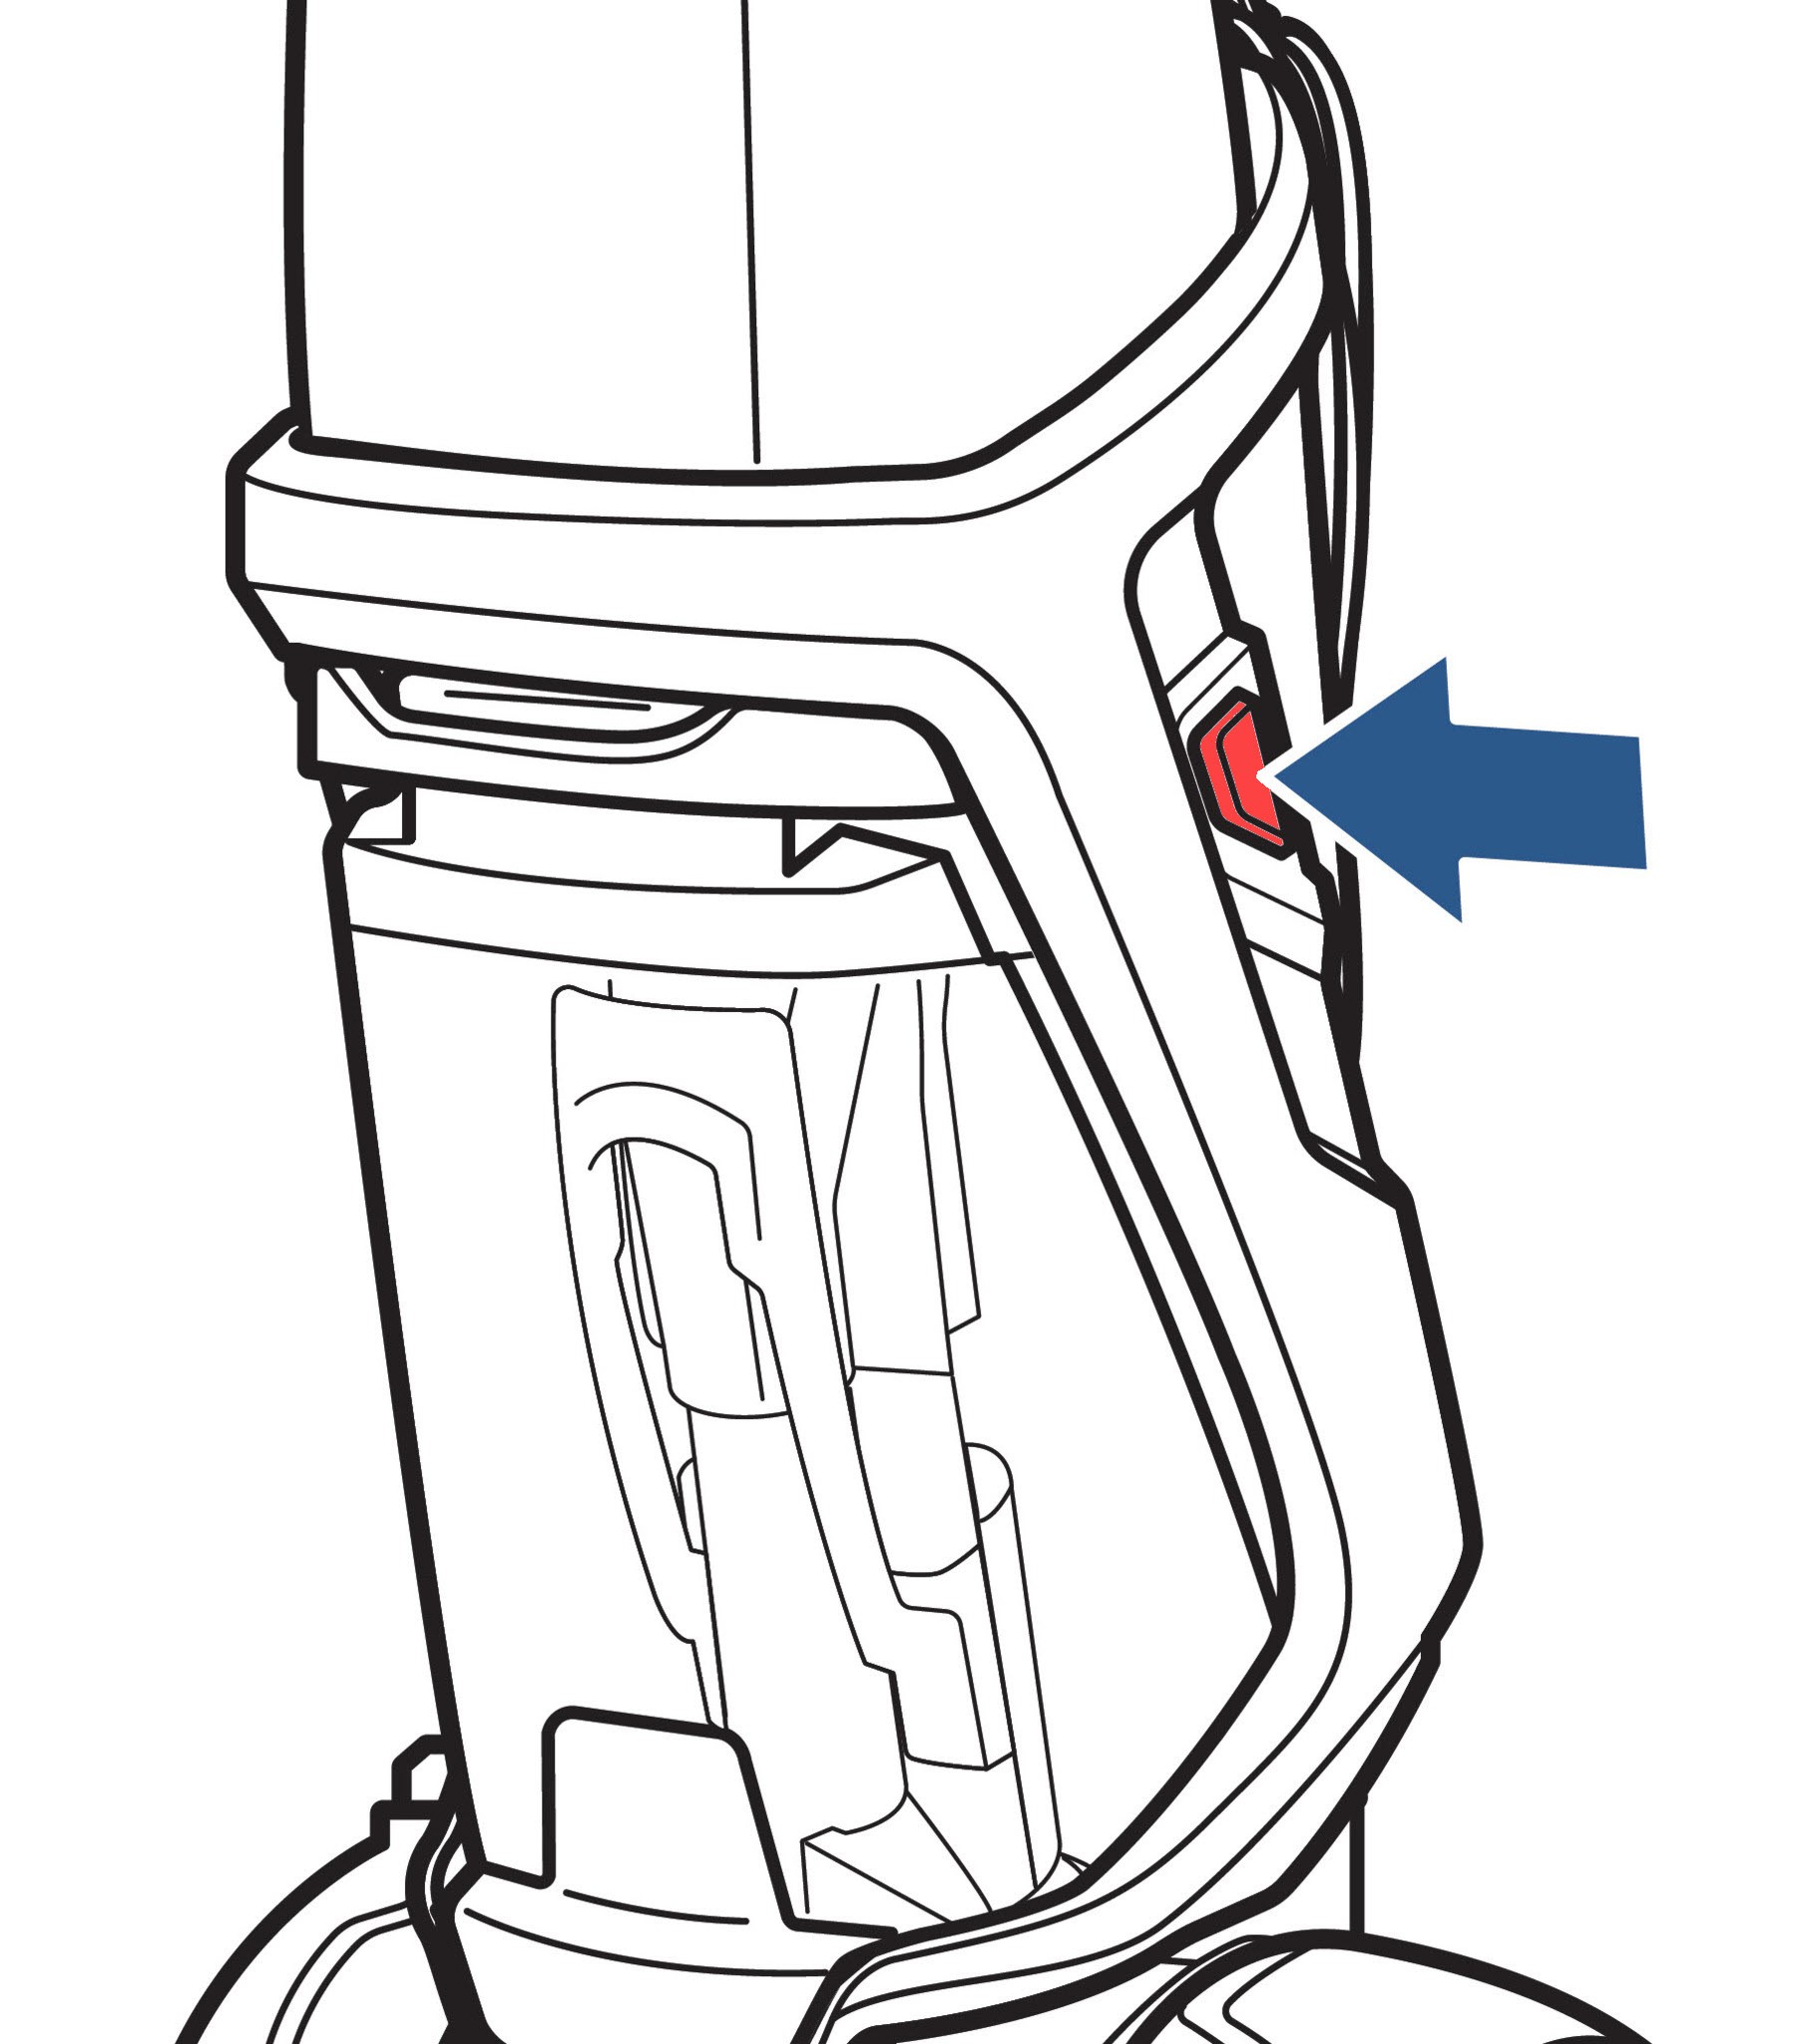
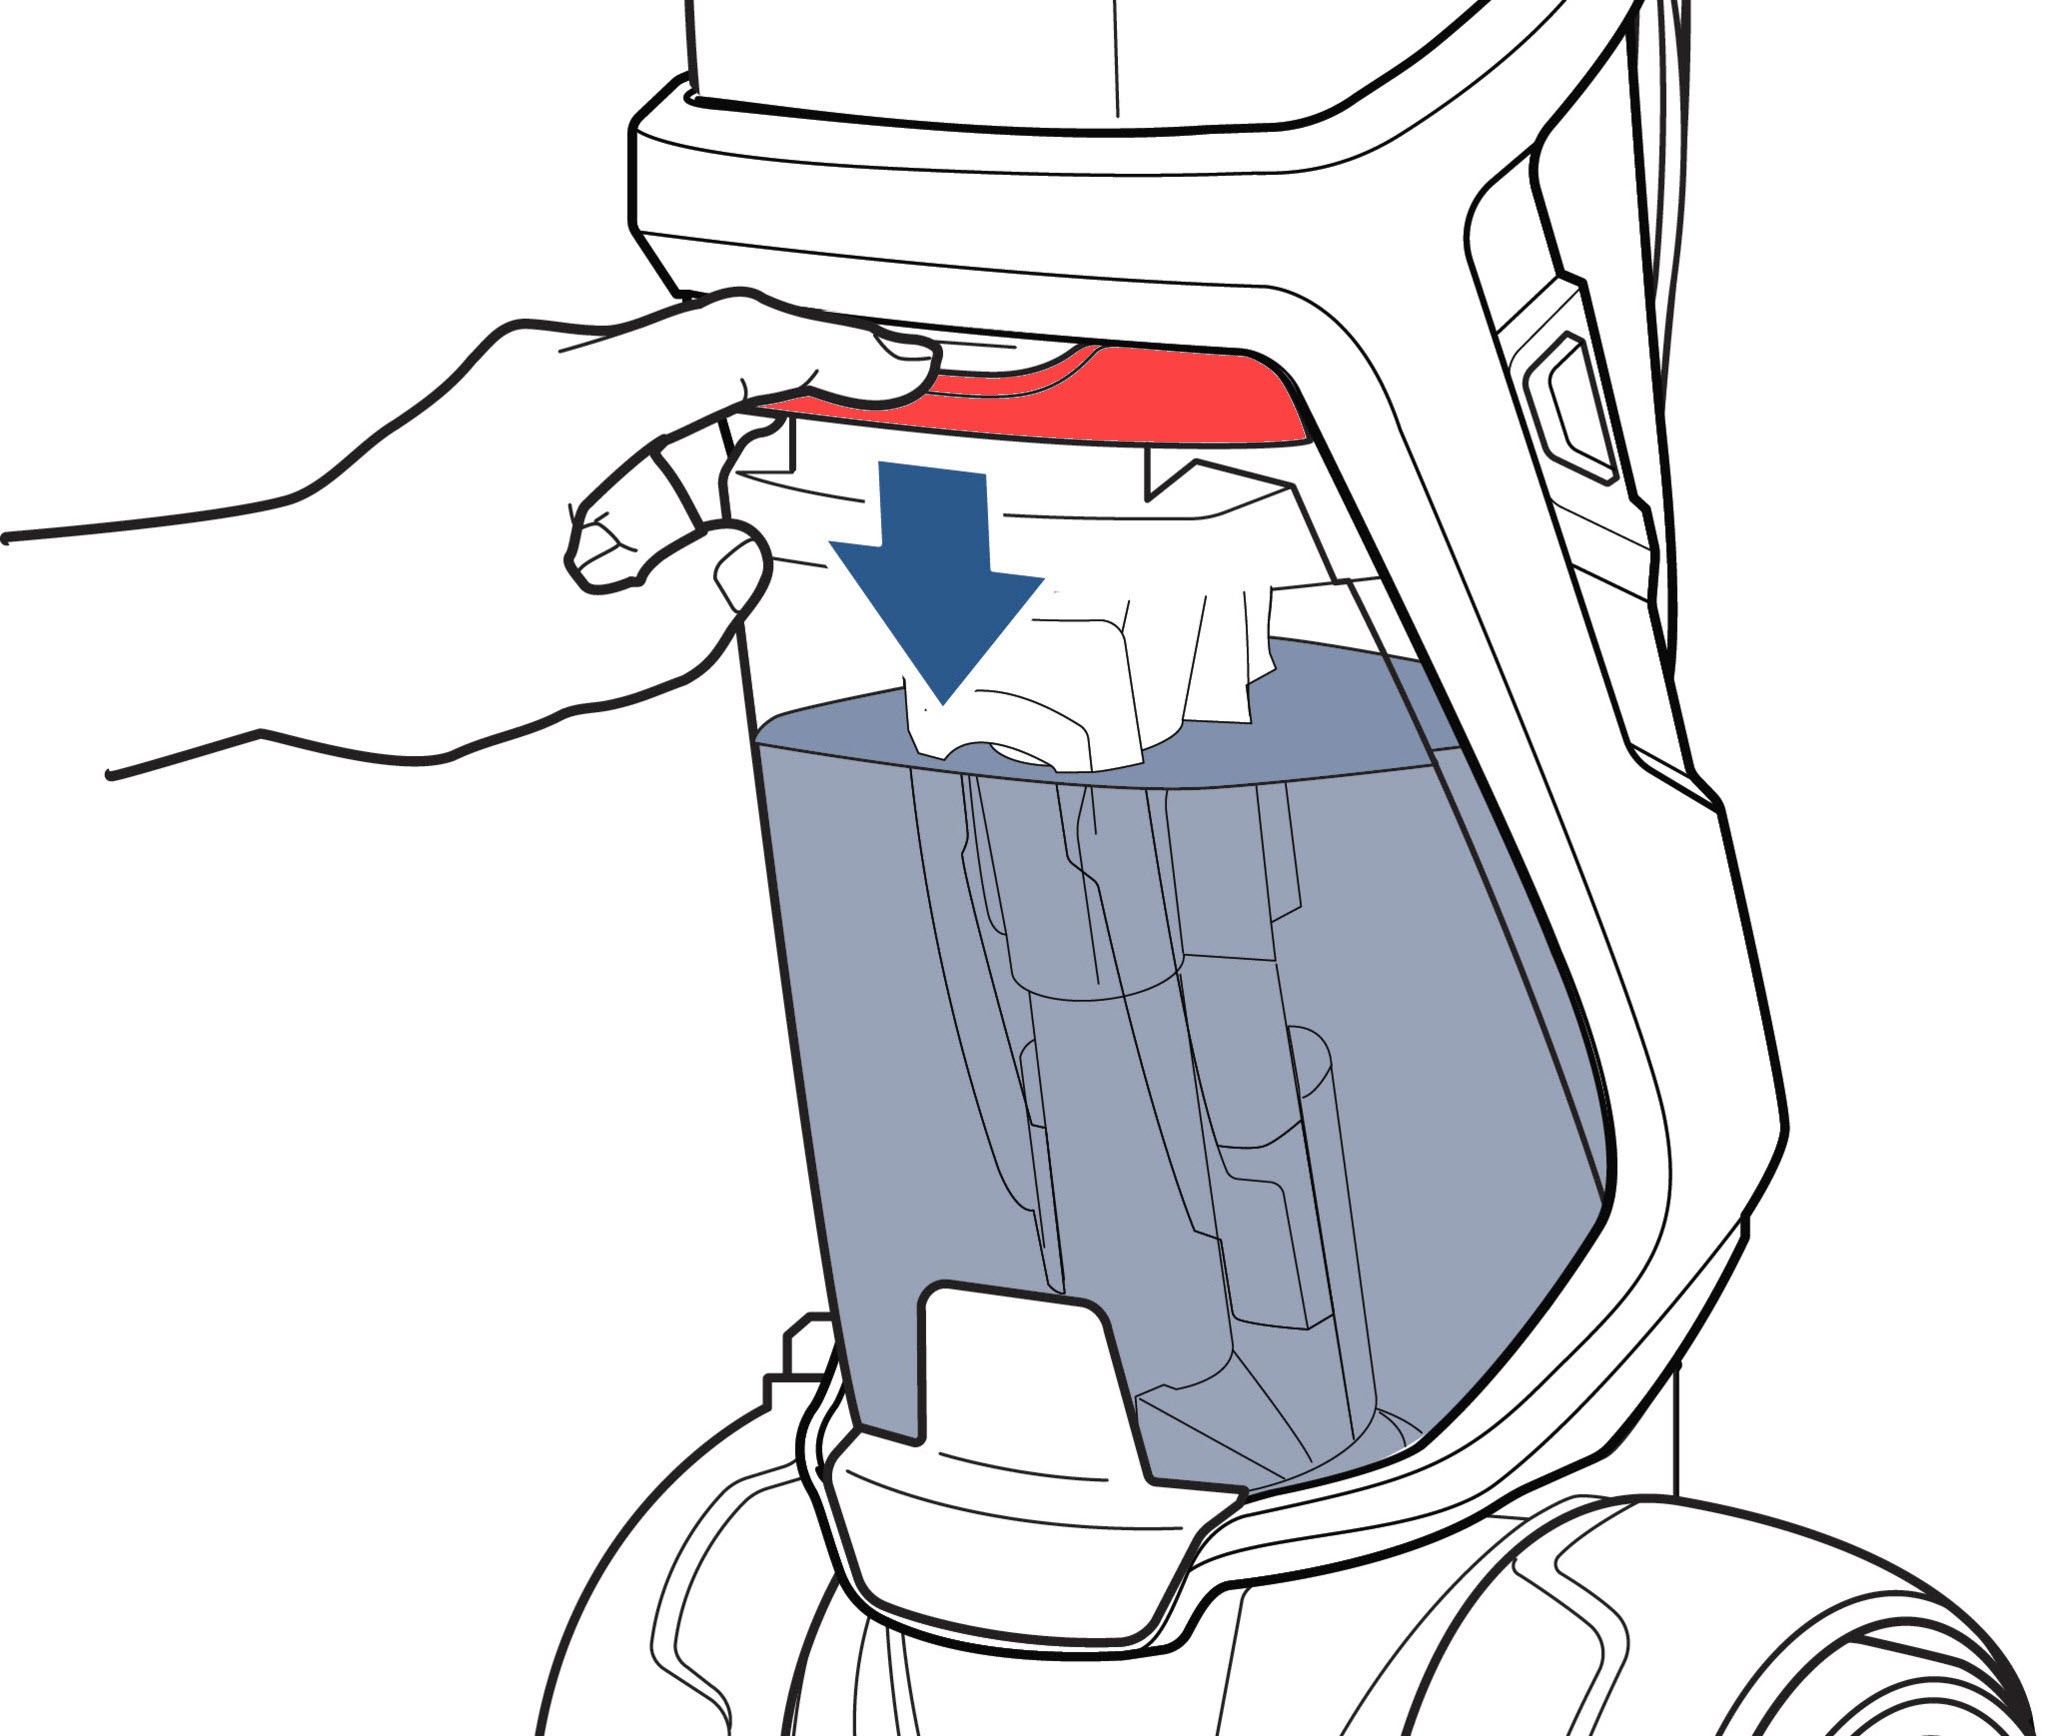
Press the tank handle on the dirty water tank downward and tilt the tank forward to remove. Use both hands, one on the handle and one on the tank, to assist removing the tank from the machine.
7.3 Emptying the Tank
Empty the dirty water tank by pulling the rubber tab on the top of the tank and slowly tilting the tank. Once the tank is empty, close the rubber tab and ensure it is sealed tight by pressing in both sides firmly. Failure to do so can result in improper machine function or leaking.
7.4 Cleaning the Float Stack
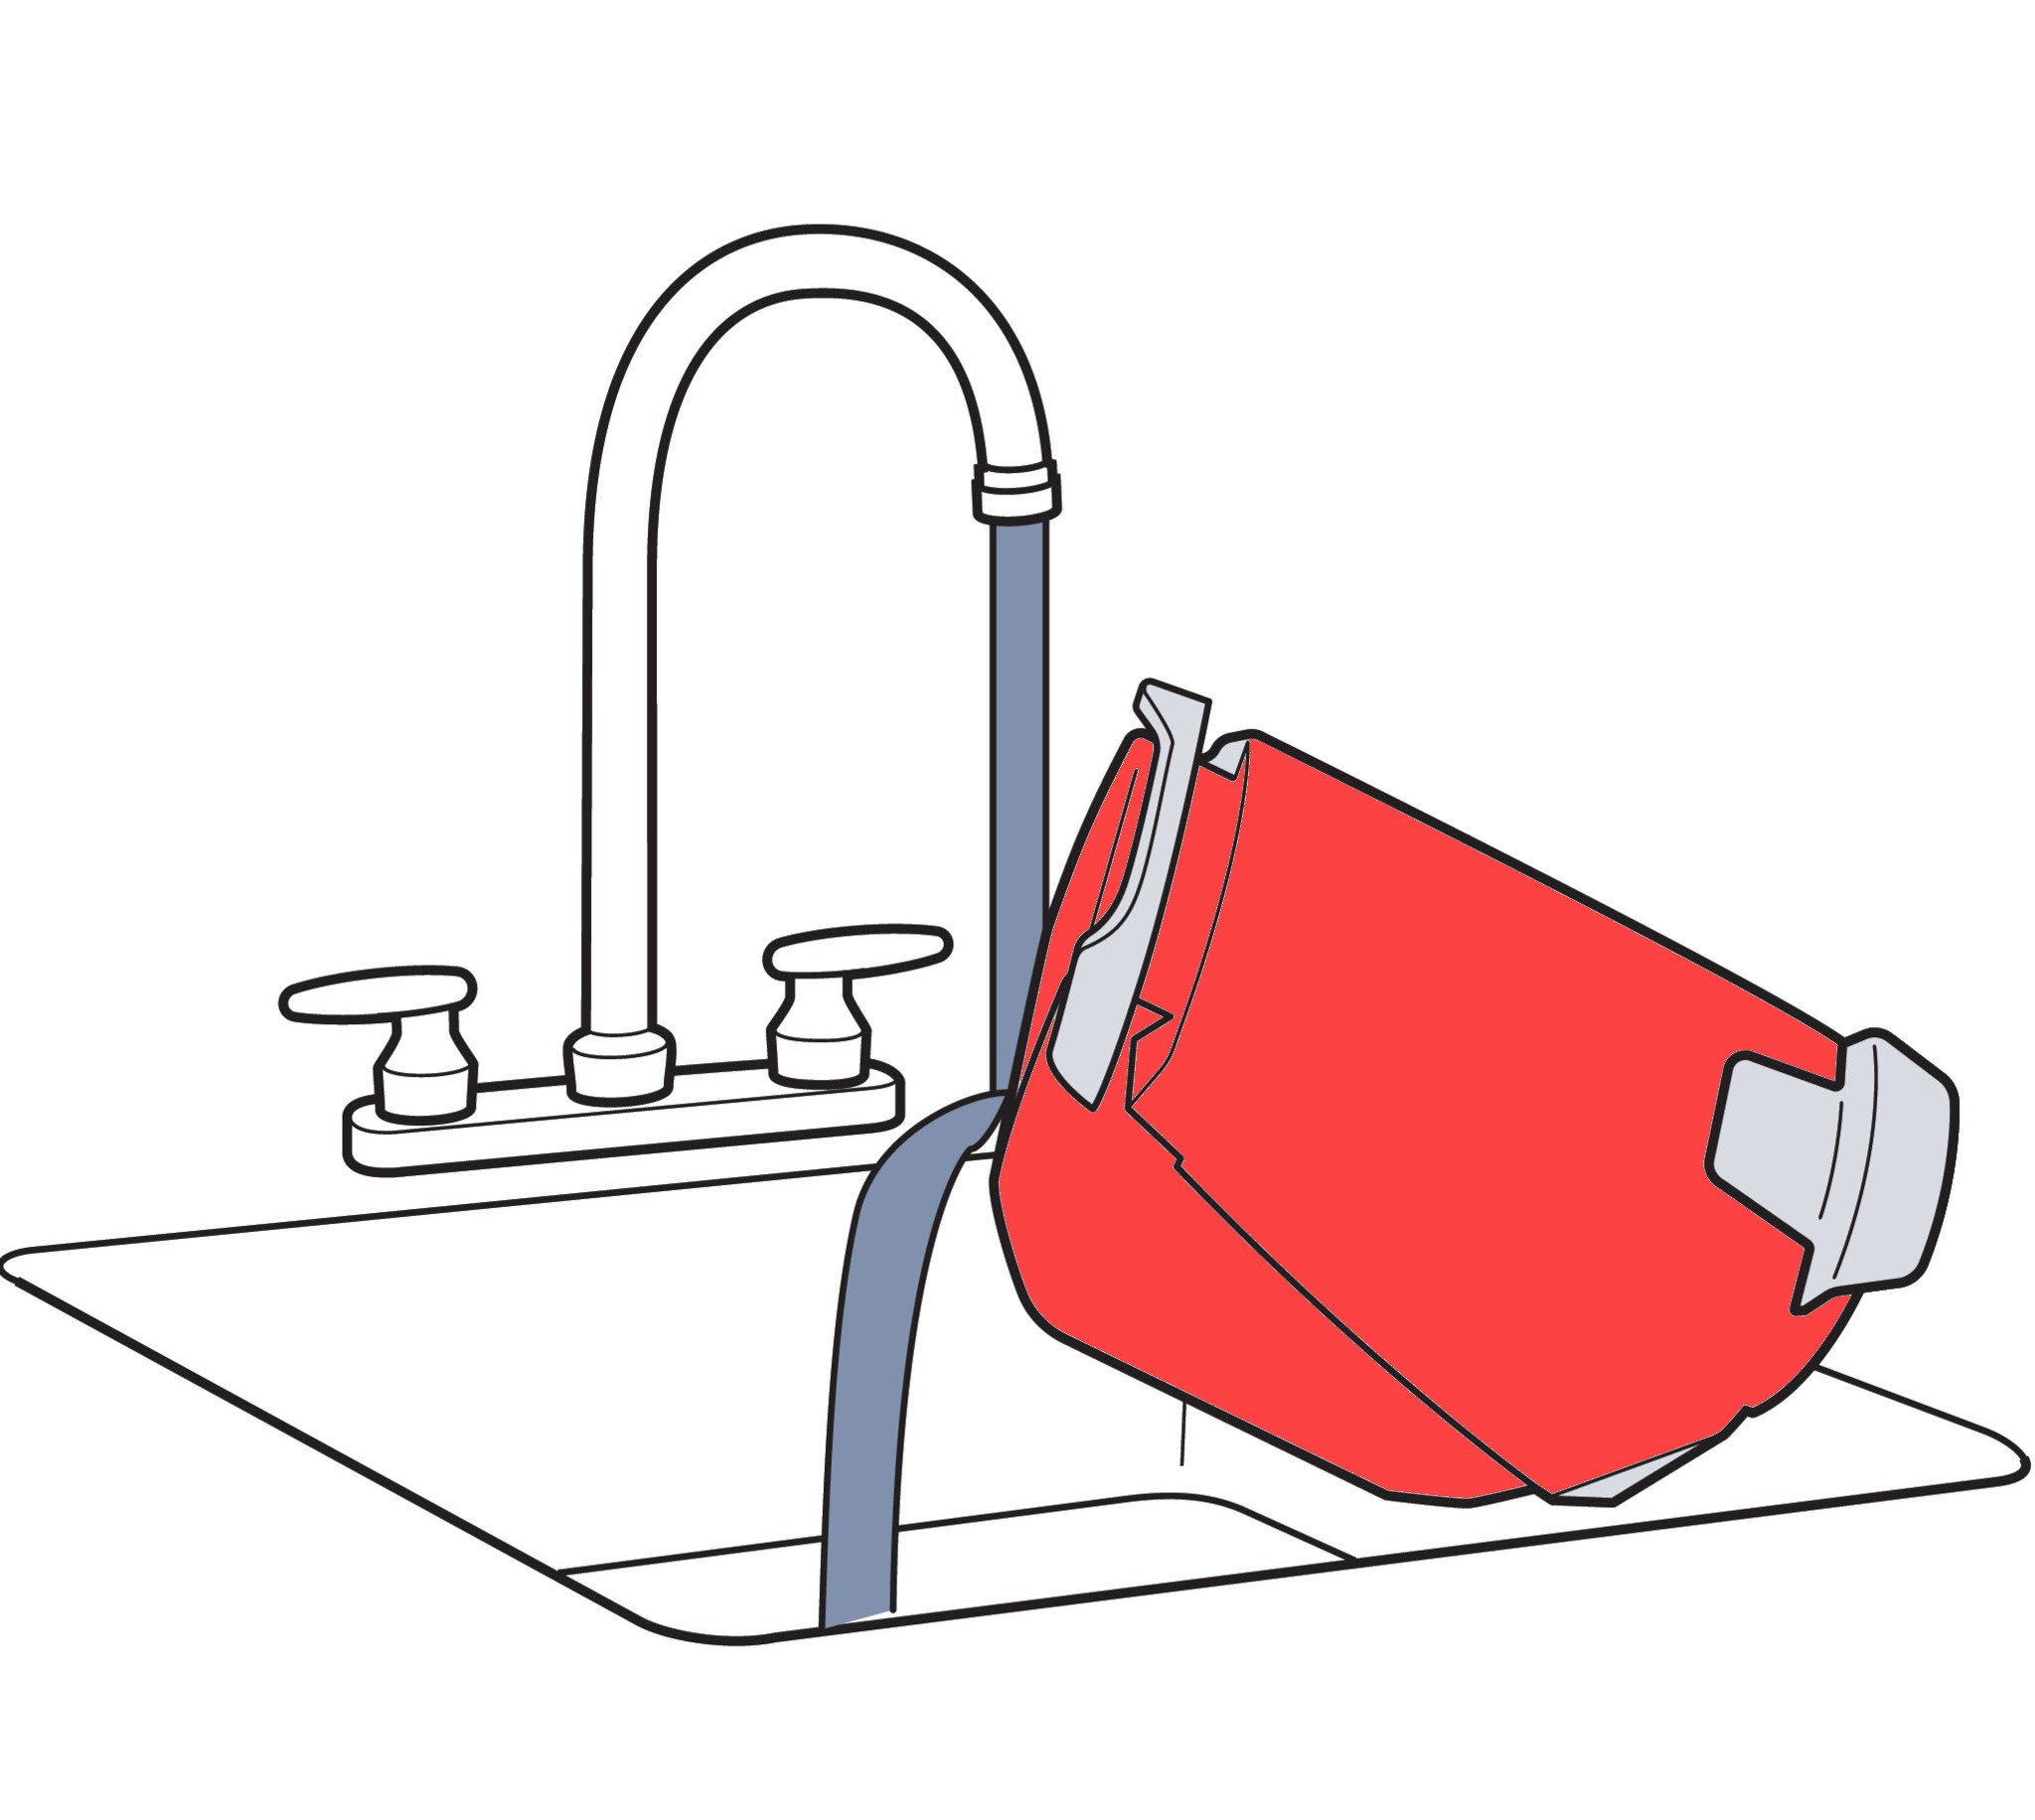
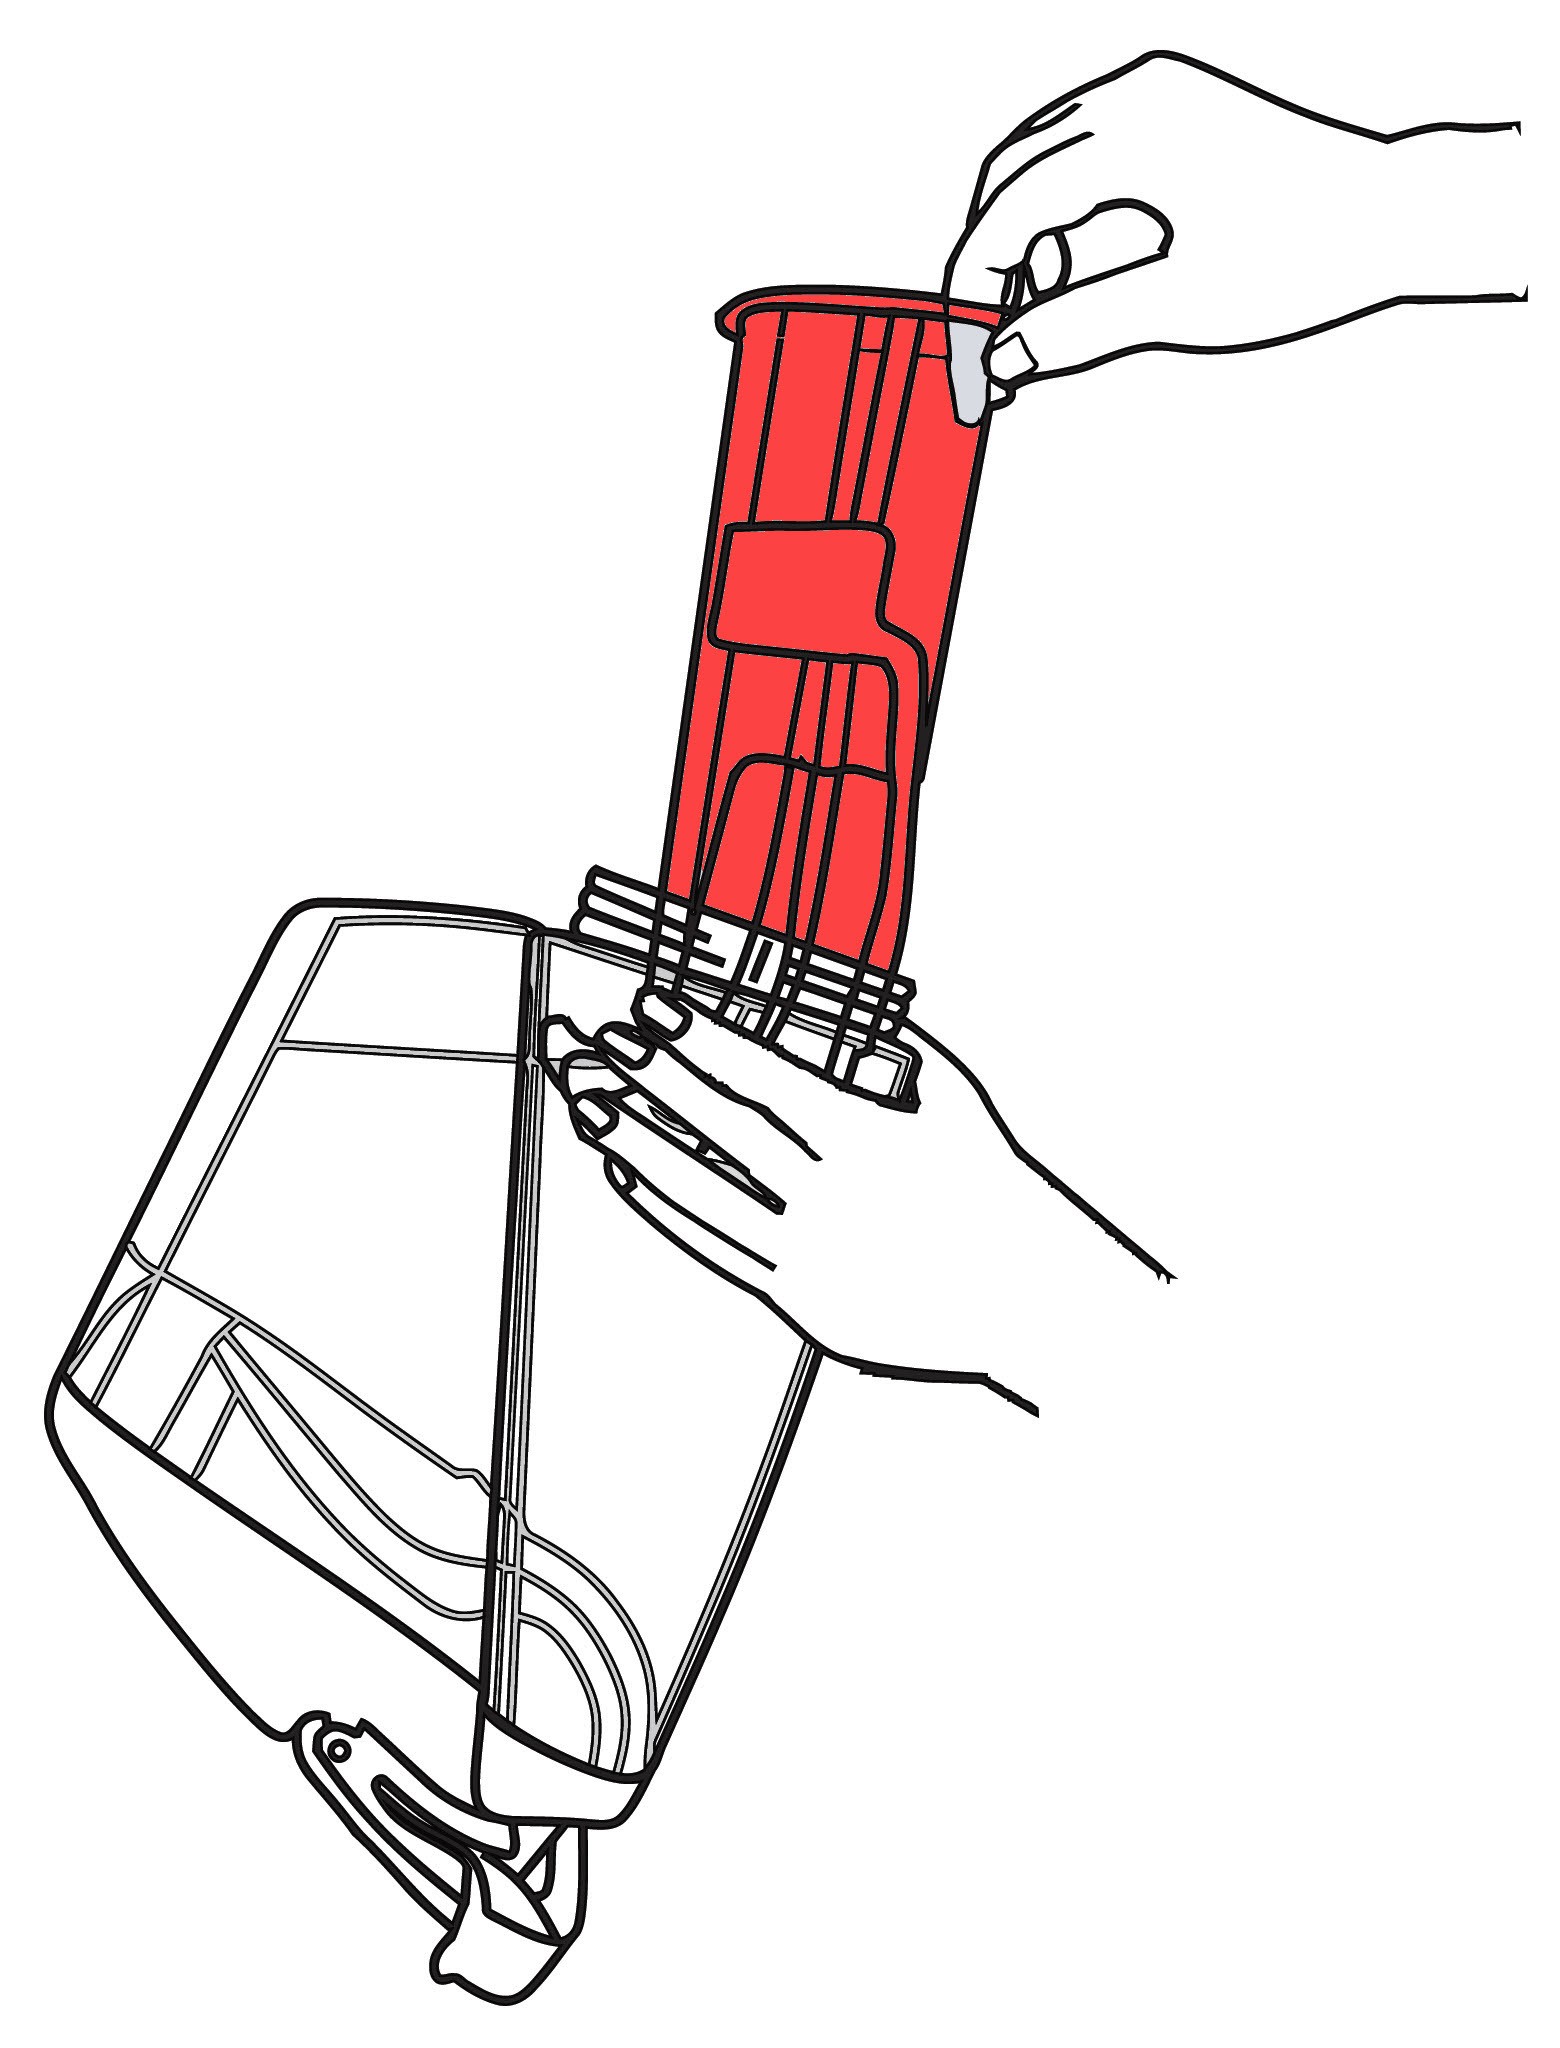
Unscrew the ring on the bottom of the tank and remove the float stack. Rinse it off while ensuring the colored portion of the float stack can slide easily. Rinse out the dirty water tank if it has any leftover residue.
7.5 Reinstalling the Float Stack and Tank
Reinstall the float stack by aligning the arrow on the float stack with the one on the tank. You may need to angle the bottom portion of the float stack for it to guide smoothly into the dirty water tank. Twist the ring back onto the tank, aligning the threads, and ensuring it is a tight seal to prevent water from leaking.
7.6 Cleaning the Red Filter
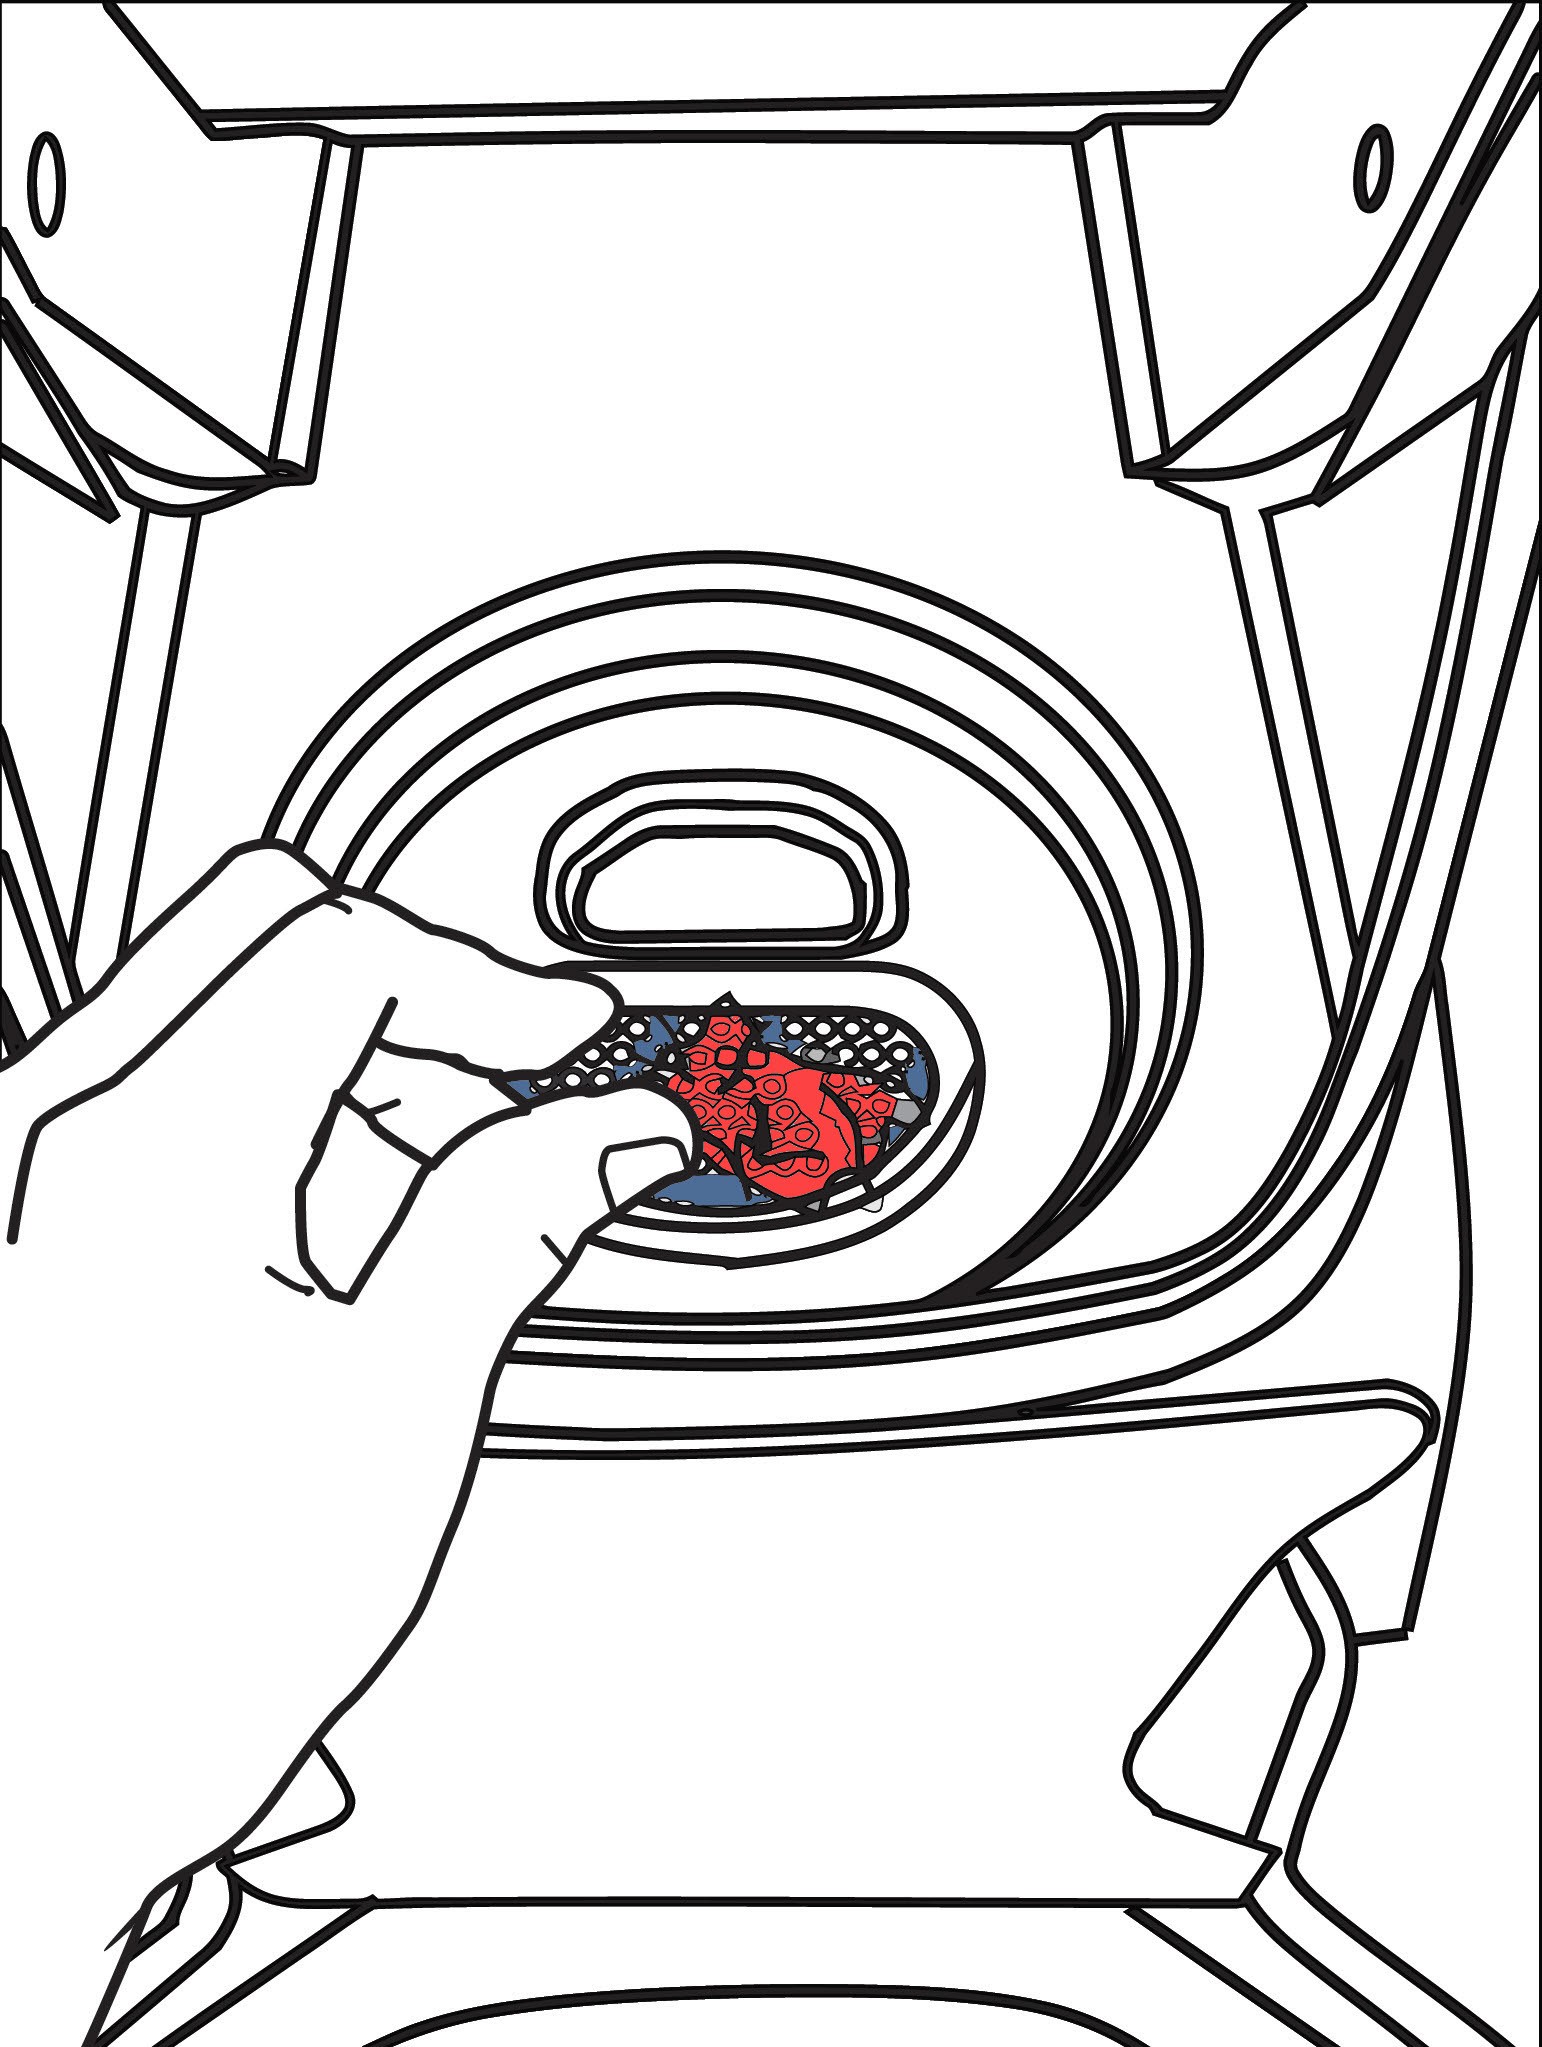
Before reinstalling the dirty water tank back to your machine, clean the red filter below where the tank rests on the machine of any remaining dirt or debris.
7.7 Reinstalling the Dirty Water Tank
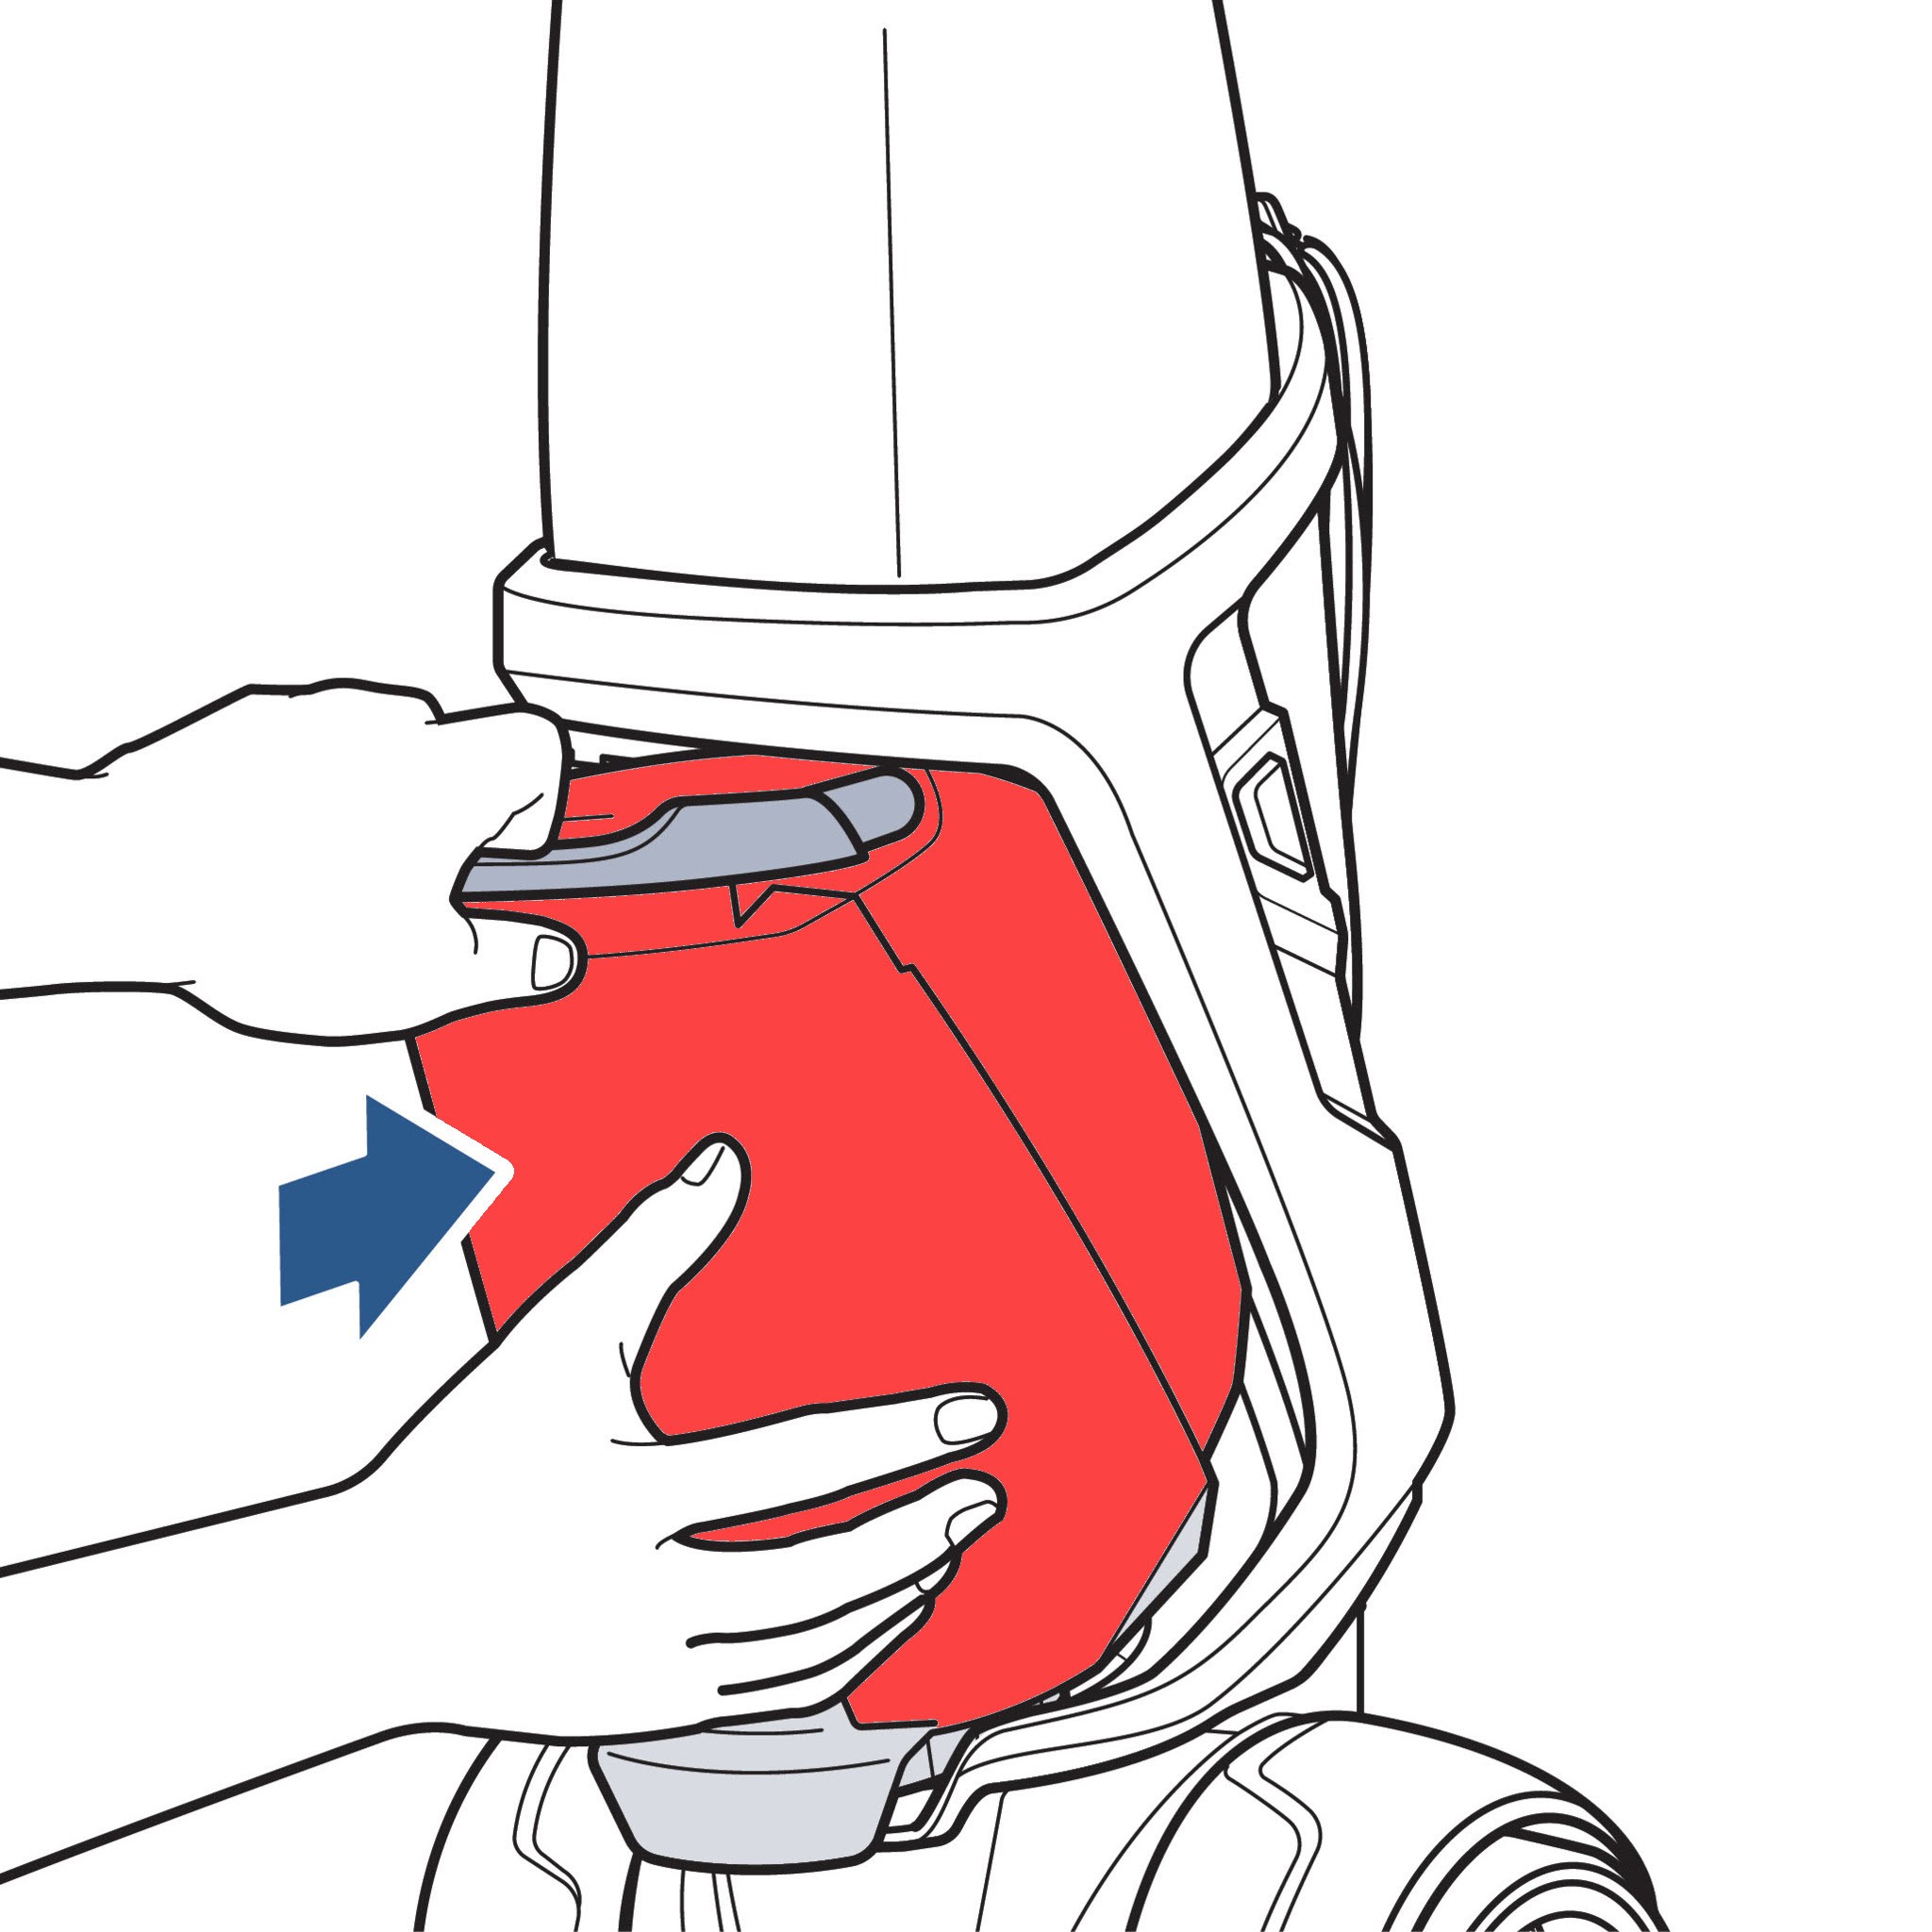
Return the tank to the machine by inserting the bottom end of the tank into the machine first, then angle the top end of the tank toward the machine until it clicks into place.
8. Optimizing Cleaning Performance
To get the most out of your Bissell ProHeat Pet, consider the following tips:
- Regular Cleaning: Clean your carpets regularly to prevent dirt and stains from setting in.
- Pre-Treat Stains: Use a pre-treatment solution for tough stains before using the carpet cleaner.
- Proper Ventilation: Ensure good ventilation in the room to speed up the drying process.
- Follow Instructions: Always follow the manufacturer’s instructions for the best results.
9. Troubleshooting Common Issues
Even with proper use, you may encounter some issues. Here are some common problems and how to resolve them:
| Issue | Possible Cause | Solution |
|---|---|---|
| Machine Not Spraying | Clogged Nozzle | Clean the nozzle with a pin or small brush. |
| Low Suction | Dirty Water Tank Full | Empty the dirty water tank. |
| Streaky Cleaning | Dirty Brush Roll | Clean the brush roll. |
| Machine Overheating | Blocked Airflow | Check and clear any blockages in the hose or machine. |
| Leaking | Improperly Installed Tank | Ensure the tanks are correctly aligned and securely installed. |
10. Why Choose PETS.EDU.VN for Your Pet Care Needs
At PETS.EDU.VN, we’re committed to providing you with the best information and resources for taking care of your beloved pets. Whether you’re dealing with pet stains, seeking the best cleaning solutions, or simply looking for advice on pet care, we’ve got you covered. Our comprehensive guides and expert advice will help you create a clean, healthy, and happy home for both you and your furry friends.
10.1 Benefits of Using PETS.EDU.VN
- Expert Advice: Access reliable and accurate information from pet care professionals.
- Comprehensive Guides: Learn everything you need to know about pet care, from cleaning to health and nutrition.
- Community Support: Connect with other pet owners and share your experiences.
- Product Recommendations: Find the best products for your pet care needs, including cleaning solutions and equipment.
10.2 Additional Resources on PETS.EDU.VN
- Pet Stain Removal Guide: Discover effective methods for removing various types of pet stains.
- Best Cleaning Solutions for Pets: Find the safest and most effective cleaning products for your home.
- Pet Care Tips and Advice: Get expert advice on all aspects of pet care, from grooming to training.
11. Understanding the Science Behind Carpet Cleaning
Carpet cleaning isn’t just about removing visible dirt; it’s about eliminating allergens, bacteria, and other microscopic particles that can affect your health. The Bissell ProHeat Pet utilizes a combination of hot water, cleaning solutions, and powerful suction to achieve a deep clean that goes beyond the surface.
11.1 The Role of Hot Water
Hot water helps to loosen dirt and break down stains, making it easier for the cleaning solution to penetrate the carpet fibers. The ProHeat technology heats the water to an optimal temperature, ensuring maximum cleaning effectiveness.
11.2 The Importance of Cleaning Solutions
Cleaning solutions contain surfactants that reduce the surface tension of water, allowing it to spread more easily and lift dirt and stains. Bissell’s specially formulated solutions are designed to work in synergy with the ProHeat technology, providing a powerful cleaning action while being safe for your pets and family.
11.3 The Power of Suction
Powerful suction is essential for removing the dirty water and cleaning solution from your carpets, leaving them clean and dry. The ProHeat Pet’s high-powered suction ensures that minimal moisture remains in the carpet fibers, reducing drying time and preventing the growth of mold and mildew.
12. Addressing Specific Pet-Related Cleaning Challenges
Pets bring joy to our lives, but they also bring unique cleaning challenges. From pet hair to urine stains, dealing with pet-related messes requires specific strategies and solutions.
12.1 Removing Pet Hair
Pet hair can be difficult to remove from carpets and upholstery. Regular vacuuming and the use of specialized tools can help. The Bissell ProHeat Pet’s hose and tool attachments are perfect for reaching tight spaces and removing embedded pet hair.
12.2 Dealing with Urine Stains
Urine stains require immediate attention to prevent permanent damage and lingering odors. Use a specialized pet urine stain remover and follow the instructions carefully. The Bissell ProHeat Pet’s deep cleaning mode can help to lift and remove urine stains effectively.
12.3 Eliminating Pet Odors
Pet odors can be persistent and unpleasant. Use a cleaning solution that contains odor-neutralizing agents to eliminate odors at their source. Regular cleaning and ventilation can also help to keep your home smelling fresh.
13. Maintaining Your Bissell ProHeat Pet for Longevity
Proper maintenance is crucial for ensuring the longevity and performance of your Bissell ProHeat Pet. Follow these tips to keep your machine in top condition:
- Clean the Brush Roll: Regularly clean the brush roll to remove pet hair and debris.
- Rinse the Tanks: Rinse the clean and dirty water tanks after each use to prevent the buildup of residue.
- Check the Hose and Tools: Inspect the hose and tools for blockages and clean them as needed.
- Store Properly: Store the machine in a dry, clean place to prevent damage.
14. Understanding Different Types of Carpet Fibers and How to Clean Them
Not all carpets are created equal. Different types of carpet fibers require different cleaning approaches to prevent damage and ensure optimal results.
14.1 Synthetic Fibers
Synthetic fibers like nylon, polyester, and olefin are durable and stain-resistant, making them relatively easy to clean. Use a general-purpose carpet cleaning solution and follow the manufacturer’s instructions.
14.2 Natural Fibers
Natural fibers like wool and cotton are more delicate and require specialized cleaning solutions and techniques. Avoid using harsh chemicals and excessive heat, as these can damage the fibers.
14.3 Blended Fibers
Blended fibers combine synthetic and natural fibers, offering a balance of durability and comfort. Use a cleaning solution that is safe for both types of fibers and follow the manufacturer’s instructions.
15. The Environmental Impact of Carpet Cleaning
Carpet cleaning can have an environmental impact, depending on the cleaning solutions and techniques used. Opt for eco-friendly cleaning solutions that are biodegradable and free of harsh chemicals.
15.1 Eco-Friendly Cleaning Solutions
Eco-friendly cleaning solutions are made from plant-based ingredients and are free of phosphates, chlorine, and other harmful chemicals. These solutions are safe for your pets, your family, and the environment.
15.2 Sustainable Cleaning Practices
Sustainable cleaning practices include using minimal water and energy, reducing waste, and properly disposing of cleaning solutions. By adopting sustainable cleaning practices, you can minimize your environmental impact and create a healthier home.
16. Exploring Advanced Features in Bissell ProHeat Pet Models
Some Bissell ProHeat Pet models come with advanced features that enhance their cleaning performance and convenience.
16.1 HeatWave Technology
HeatWave Technology maintains a consistent water temperature throughout the cleaning process, ensuring optimal cleaning effectiveness.
16.2 Dual DirtLifter PowerBrushes
Dual DirtLifter PowerBrushes agitate and lift dirt and stains from carpet fibers, providing a deep and thorough clean.
16.3 SmartClean Technology
SmartClean Technology automatically adjusts the cleaning mode and suction power based on the level of soiling, providing customized cleaning for different areas of your home.
17. Integrating Carpet Cleaning into Your Regular Home Maintenance Routine
Carpet cleaning should be an integral part of your regular home maintenance routine. Regular cleaning can help to prevent dirt and stains from setting in, extend the life of your carpets, and create a healthier home environment.
17.1 Establishing a Cleaning Schedule
Establish a cleaning schedule based on your lifestyle and the level of traffic in your home. High-traffic areas may require more frequent cleaning than low-traffic areas.
17.2 Preparing for Cleaning
Before cleaning, remove furniture and other obstacles from the area and vacuum thoroughly to remove loose dirt and debris.
17.3 Post-Cleaning Care
After cleaning, allow your carpets to dry completely before replacing furniture and resuming normal activities. Use fans or open windows to speed up the drying process.
18. Frequently Asked Questions (FAQs) about Bissell ProHeat Pet Operation
Here are some frequently asked questions about operating your Bissell ProHeat Pet:
1. How often should I clean my carpets with the Bissell ProHeat Pet?
- It depends on foot traffic and pet activity. Generally, cleaning every 3-6 months is recommended.
2. Can I use other cleaning solutions with my Bissell ProHeat Pet?
- It’s best to use Bissell-approved formulas to avoid damaging the machine.
3. Why is my Bissell ProHeat Pet not spraying?
- Check if the tank is full, the nozzle is clogged, or the hose is properly connected.
4. How do I clean the brush roll on my Bissell ProHeat Pet?
- Remove the brush roll and clear any debris or hair.
5. What’s the best way to remove pet urine stains with the Bissell ProHeat Pet?
- Use a pet-specific cleaning solution and the deep clean mode.
6. How do I prevent my carpets from getting too wet during cleaning?
- Use the Express Clean mode and make dry passes to extract excess moisture.
7. Can I use the Bissell ProHeat Pet on hardwood floors?
- No, it’s designed for carpets and rugs. Use a specialized hardwood floor cleaner instead.
8. What should I do if my Bissell ProHeat Pet starts making unusual noises?
- Turn off the machine and check for any obstructions or issues with the motor. Contact Bissell support if needed.
9. How do I store my Bissell ProHeat Pet properly?
- Ensure all parts are dry and store in a cool, dry place.
10. Where can I find replacement parts for my Bissell ProHeat Pet?
* You can purchase replacement parts at [Parts & Accessories](https://www.bissell.com/parts) .19. Success Stories: Real-Life Transformations with Bissell ProHeat Pet
Hear from satisfied customers who have transformed their homes with the Bissell ProHeat Pet.
19.1 Testimonial 1: Sarah’s Story
“I have two dogs and a cat, and my carpets were always a mess. The Bissell ProHeat Pet has been a lifesaver. It’s easy to use, and my carpets look and smell amazing.”
19.2 Testimonial 2: John’s Experience
“I was skeptical about carpet cleaners, but the Bissell ProHeat Pet exceeded my expectations. It removed years of stains and dirt, and my carpets look brand new.”
19.3 Testimonial 3: Emily’s Recommendation
“As a pet owner, I highly recommend the Bissell ProHeat Pet. It’s the best carpet cleaner I’ve ever used, and it’s made a huge difference in my home.”
20. Conclusion: Achieving a Clean and Healthy Home with Bissell ProHeat Pet
The Bissell ProHeat Pet series offers a powerful and effective solution for keeping your carpets clean and healthy, even with pets. By following the steps outlined in this comprehensive guide, you can achieve outstanding results and create a fresh, inviting home for both you and your furry friends.
Remember, for more in-depth information and specialized services, visit PETS.EDU.VN. Our team is dedicated to providing you with the best pet care solutions, ensuring your beloved animals live happy and healthy lives.
Ready to transform your home and enjoy a cleaner, healthier environment? Visit pets.edu.vn today to explore more pet care tips, product recommendations, and expert advice. Contact us at 789 Paw Lane, Petville, CA 91234, United States. Whatsapp: +1 555-987-6543. Let us help you create the perfect home for you and your pets.
