Give your furry friend a boost with these easy-to-build DIY pet stairs! If your dog or cat is getting older, smaller, or just needs a little help reaching their favorite spots, these pet stairs are the perfect solution. Forget about expensive pet store options – you can create these sturdy and stylish stairs for under $30 in just about 3 hours. This guide will walk you through each step, making it a fun and rewarding project for any pet lover.
TIP: For detailed building plans, keep reading! Below, you’ll find a comprehensive list of tools, materials, and a cut list to make your DIY pet stairs project a breeze.
Cost: $28 (estimated)
Time: 3 hours
Difficulty: Moderate (Easy cuts, some time needed for cleat layout)
Before you get started, gather your tools and materials:
Tools:
- Tape Measure
- Framing Square
- Speed Square
- Drill/Driver
- Miter Saw
- Circular Saw
- Pneumatic Nail Gun (Optional, but recommended for speed and ease)
Materials:
- (1) ½” x 2′ x 4′ Birch Plywood (for Sides and Treads)
- (1) 1 x 2 x 8′ Lumber (for Cleats and Support Bar)
- (1) 1 x 6 x 6′ Lumber (for Risers and Support Bar)
- (3) ½” x 2″ x 4′ Boards (for optional Side Trim – for a more finished look)
- Wood Glue
- 1¼ inch Finish Nails (for Risers, Treads, and Support Bars)
- 1 inch Finish Nails (for Cleats)
- ¾ inch Finish Nails (for optional Trim)
- Fabric for Stair Runner (optional – for comfort and style)
- Drawer Liner (optional – for cushioning under the runner)
- Hand Stapler and 3/8-inch staples (optional – to attach runner)
Cut List:
- ½ inch Plywood Sides – 2 pieces @ 17¼” Height x 24″ Width
- ½ inch Plywood Treads – 3 pieces @ 13¼” Width x 8″ Depth
- 1×6 Risers – 3 pieces @ 13¼ inches
- 1×2 Support Bar – 1 piece @ 13¼ inches
- 1×6 Support Bar – 1 piece @ 13¼ inches
- ½” x 2″ Trim – Cut to Fit (Optional)
- 1×2 Cleats:
- 1×2 Riser Cleats – 6 pieces @ 5½ inches
- 1×2 Bottom Tread Cleats – 2 pieces @ 8 inches
- 1×2 Middle Tread Cleats – 2 pieces @ 8 inches
- 1×2 Top Tread Cleats – 2 pieces @ 5 inches
Now, let’s get building! Follow these simple steps to create your own pet stairs:
Steps to Build Your DIY Pet Stairs
1. Cut the Parts According to the Cut List
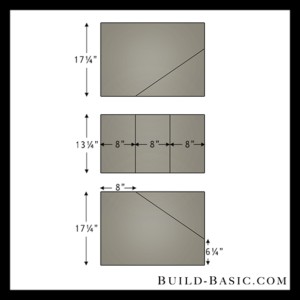
Start by precisely cutting all your wood pieces based on the provided cut list. Use a miter saw for the 1×2 and 1×6 lumber. For the plywood, utilize a circular saw. To divide the 2×4 foot plywood sheet, refer to the diagram below. Remember to account for the saw blade’s kerf (approximately 1/8 inch per cut). This means your plywood pieces should end up being about 17 inches and 13½ inches wide, all 24 inches long. Cut the middle plywood section into three 8-inch deep pieces for the treads. Accurate cuts are crucial for sturdy and well-fitting pet stairs.
2. Shape the Sides of the Pet Stairs
To create the angled sides, lay both plywood side pieces face up. Measure and mark a point 6 inches up from the bottom-front corner and another point 8 inches across from the top-back corner on each side piece. Connect these two marks with a straight line. This line will guide your cut to create the sloped shape of the pet stair sides, making it easier for your pet to climb.
3. Cut the Angled Sides Using a Circular Saw
Carefully cut along the marked lines on each plywood side piece using a circular saw. For a cleaner, straighter cut, consider using a guide or fence for your circular saw. A simple fence can be made by clamping a straight board parallel to your cut line. To determine the correct distance for your fence, measure the distance from the saw blade to the edge of the saw’s footplate. Position the fence at this measured distance from your marked cut line. This ensures the saw runs straight along the desired angle.
4. Position and Attach the First Riser Cleat
Place the plywood side pieces face down on your work surface. Using a speed square, draw a vertical line ¾ inch from the front edge on the inside of each side piece. Take a 5½-inch riser cleat and align it within this marked line on each side. Apply wood glue to the back of the cleat and then secure it in place using a pneumatic nail gun and 1-inch finish nails. These cleats will support the risers and treads, so ensure they are securely attached.
5. Layout the Remaining Cleats for the Pet Stairs
Refer to the diagram provided and use your speed square to accurately position the remaining cleats on both side pieces. Proper cleat placement is essential for ensuring the steps are evenly spaced and structurally sound. Take your time with this step to guarantee the correct spacing for the risers and treads.
6. Install the Cleats Step-by-Step
Starting from the bottom and working your way up, apply wood glue to the back of each cleat. Position it according to your layout and then nail it securely in place. Continuously use your speed square as you go to make sure each cleat is perfectly square. This ensures that the risers and treads will be level and the stairs will be stable.
7. Verify Cleat Spacing for Treads and Support Bar
Once you’ve installed all the cleats, double-check the spacing, especially for the top tread cleat. There should be a ½ inch gap above the top cleat where the tread will sit. Additionally, ensure there is a ¾ inch gap behind the top cleat. This space is specifically for the support bar that will be installed later, adding extra stability to the pet stairs.
8. Attach the First Riser to the Cleats
Apply wood glue to the face of the front cleat and to one end of the first 1×6 riser piece. Set the end of the riser against the cleat, ensuring it fits snugly against the inside of the side wall. Use a speed square to hold the riser perpendicular to the side piece, and then nail through the face of the riser into the cleat using a pneumatic nail gun and 1¼ inch finish nails. Repeat this process to attach the same riser to the opposite side piece.
9. Install the Remaining Risers
Position the second riser piece against the next set of vertical cleats. Apply wood glue to the faces of the cleats and to both ends of the riser before placing it. Nail through the face of the riser and into the cleats to secure it. Repeat this step to install the uppermost riser. Each riser adds structure and defines the height of each step for your pet stairs.
10. Place the First Tread onto the Cleats and Riser
Apply wood glue to the top edges of the horizontal cleats and the top edge of the lowest riser. Set the first tread piece in place on the lowest cleats. The front edge of the tread should be flush with the face of the lowest riser, while the back edge should rest against the middle riser. Nail through the face of the tread and into each cleat with two nails to secure the tread.
11. Attach the Remaining Treads to Complete the Steps
Repeat Step 10 to install the remaining treads. When you reach the top tread, it should sit flush with the face of the riser below it and also flush with the back edge of the side pieces. With all treads in place, your pet stairs are really starting to take shape!
12. Add the 1×2 Support Bar for Top Tread Stability
Position the 1×2 support bar between the side pieces and against the underside of the top tread. Nail two 1 ¼ inch nails through each side piece and into the ends of the 1×2 support bar to secure it. This support bar adds significant strength and stability to the top tread, ensuring it can safely hold your pet’s weight. If you are not planning to add trim and want to hide the nail holes, you could use a Kreg Jig to create pocket holes in the 1×2 support bar for concealed fastening.
13. Add the 1×6 Support Bar for Base Reinforcement
Place the 1×6 support bar between the side pieces, ensuring it’s flush with their bottom and back edges. Nail through the side pieces and into the ends of this 1×6 board with 1 ¼ inch nails to secure it. This bottom support bar provides a solid base for the pet stairs, increasing overall sturdiness and preventing wobbling.
14. Cut and Attach the Optional Trim for a Finished Look
For a more polished and decorative appearance, you can add trim. Lay the ½” x 2″ trim pieces in place around the perimeter of each side piece and mark where you need to make cuts. Use a miter saw to cut the trim pieces to fit precisely. Apply wood glue to the back of each trim piece and nail it in place using ¾-inch finish nails. Note that not all miter cuts are 45 degrees; specialized miters will be needed near the front edge of the top tread (approximately 17½ degrees) and near the bottom tread (around 28 degrees). After attaching the trim, fill any nail holes with wood filler and sand smooth before finishing.
15. Secure the Optional Stair Runner for Comfort and Style
To add comfort and prevent slipping, consider adding a stair runner. Cut pieces of fabric and drawer liner (or padding) to fit each tread. Leave a small border (about half an inch) around each piece of fabric. Secure the fabric and drawer liner to the treads using a hand stapler. Stapling allows for easy removal and replacement of the runner if needed for cleaning or changing styles. This final touch makes the pet stairs more comfortable and appealing for your pet.
Congratulations! You’ve successfully built your own DIY pet stairs. Your pet will surely appreciate the easier access to their favorite elevated spots. These pet stairs are not only functional but also a testament to your DIY skills and care for your beloved companion. Enjoy your newly built pet stairs!