Making pet rocks is a fantastic and imaginative activity, perfect for crafting enthusiasts of all ages. At PETS.EDU.VN, we will explore creating charming and unique companions. Unleash your creativity and discover the joy of crafting personalized, low-maintenance friends. Crafting pet rocks is a delightful venture and you can also delve into the world of rock painting ideas, decorative stones and handmade pets.
Table of Contents
- Gathering Your Supplies for Pet Rock Perfection
- Choosing the Right Rocks: A Foundation for Fun
- Cleaning and Preparing Your Rocks: A Clean Slate
- Designing Your Pet Rock: Unleash Your Imagination
- Painting Techniques: Bringing Your Pet Rock to Life
- Adding Features: Eyes, Noses, and More
- Creating a Home: Pet Rock Habitat Ideas
- Naming and Registering Your Pet Rock: Making it Official
- Pet Rock Care and Training: A Humorous Guide
- Advanced Pet Rock Crafting: Beyond the Basics
- Pet Rock Health and Wellness: Keeping Your Friend Happy
- Troubleshooting Common Issues: Pet Rock Problems Solved
- Pet Rocks in Education: Learning Through Crafting
- Pet Rock Parties: A Unique Celebration
- Frequently Asked Questions About Making Pet Rocks
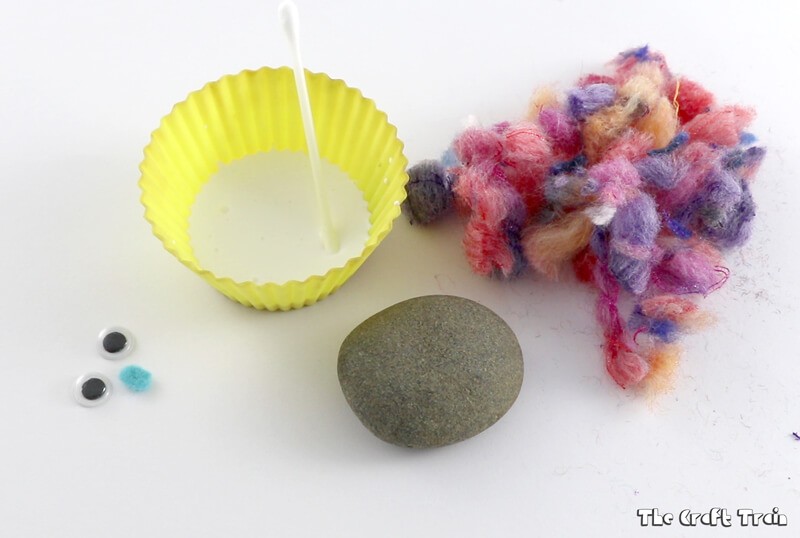
1. Gathering Your Supplies for Pet Rock Perfection
The first step in creating your perfect pet rock is gathering the necessary supplies. This delightful craft requires minimal materials, making it accessible and enjoyable for everyone. Here’s a comprehensive list to ensure you have everything you need:
- Rocks: Smooth, flat rocks work best for easy decorating.
- Acrylic Paints: A variety of colors to bring your pet to life.
- Paintbrushes: Different sizes for detailed work and broader strokes.
- Googly Eyes: Add character and personality to your pet rock.
- Craft Glue: Strong adhesive for attaching eyes and other features.
- Felt Scraps: For creating ears, noses, or other embellishments.
- Yarn or Pom-Poms: To give your pet rock fluffy hair or a tail.
- Markers: Fine-tipped markers for adding details and outlines.
- Clear Sealant: To protect your artwork and give it a glossy finish.
- Newspaper or Craft Mat: To protect your work surface from paint spills.
- Water Container: For cleaning your brushes.
- Paper Towels: For wiping up spills and dabbing brushes.
- Pencils: For sketching your design before painting.
- Optional: Glitter, beads, sequins, and other decorative items for extra flair.
Table: Essential Supplies for Pet Rock Crafting
| Supply | Description | Usage |
|---|---|---|
| Smooth Rocks | Flat, even surfaces for easy painting. | Base for your pet rock. |
| Acrylic Paints | Various colors for creative designs. | Coloring and decorating the rock. |
| Paintbrushes | Different sizes for detail and coverage. | Applying paint to the rock. |
| Googly Eyes | Adds personality and character. | Creating the pet’s eyes. |
| Craft Glue | Strong adhesive for attaching features. | Securing eyes, felt, and other embellishments. |
| Felt Scraps | For ears, noses, and other small details. | Adding texture and dimension to the pet. |
| Yarn/Pom-Poms | For fluffy hair or tails. | Enhancing the pet’s appearance with soft elements. |
| Markers | Fine-tipped for outlines and details. | Adding fine lines and intricate designs. |
| Clear Sealant | Protects paint and adds a glossy finish. | Preserving the artwork and adding a professional touch. |
| Protective Cover | Newspaper or craft mat. | Protecting your work surface from paint spills. |
| Water Container | For rinsing brushes. | Cleaning paintbrushes between colors. |
| Paper Towels | For wiping spills and dabbing brushes. | Keeping your workspace clean and managing paint application. |
| Pencils | For sketching designs. | Planning your design before painting. |
| Decorations | Glitter, beads, sequins for extra flair. | Adding sparkle and unique details to your pet rock. |
With these supplies in hand, you’re ready to start transforming ordinary rocks into extraordinary pets. This list ensures you have a smooth and enjoyable crafting experience. Visit PETS.EDU.VN for more creative ideas and tips on making the most of your pet rock project.
2. Choosing the Right Rocks: A Foundation for Fun
Selecting the right rocks is essential for a successful and enjoyable pet rock crafting experience. The type, size, and texture of the rock can significantly impact the final result. Here’s a guide to help you choose the perfect rocks for your project:
- Smoothness: Opt for rocks with smooth surfaces. Smooth rocks are easier to paint and decorate, allowing for better adhesion of paint and other embellishments.
- Shape: Flat, oval, or round rocks are ideal. These shapes provide a good canvas for creating various characters and designs. Avoid rocks with sharp edges or irregular shapes, as they can be difficult to work with.
- Size: Choose a size that fits comfortably in your hand. Smaller rocks are great for making miniature pets, while larger rocks can be used for more detailed and elaborate designs.
- Texture: Look for rocks with a fine-grained texture. Rocks with rough or porous surfaces may absorb too much paint, making it difficult to achieve a smooth, even finish.
- Color: While you’ll be painting over the rocks, consider the natural color. Lighter-colored rocks may require fewer coats of paint to achieve the desired look.
Where to Find Rocks:
- Beaches and Rivers: These are excellent places to find smooth, naturally polished rocks. Always check local regulations before collecting rocks from natural environments.
- Craft Stores: Many craft stores sell bags of pre-washed and sorted rocks specifically for painting and crafting.
- Garden Centers: Garden centers often carry decorative rocks and pebbles that are suitable for pet rock projects.
- Your Backyard: You might be surprised at the variety of rocks you can find right in your own backyard.
Table: Rock Selection Guide for Pet Rock Crafting
| Feature | Ideal Characteristics | Why It Matters |
|---|---|---|
| Smoothness | Smooth surface | Easier to paint and decorate, better adhesion. |
| Shape | Flat, oval, or round | Provides a good canvas for various designs. |
| Size | Fits comfortably in your hand | Suitable for both miniature and detailed designs. |
| Texture | Fine-grained | Ensures a smooth, even paint finish. |
| Color | Lighter colors | Requires fewer coats of paint. |
By carefully selecting the right rocks, you set the foundation for a successful and enjoyable pet rock crafting experience. Consider the characteristics listed above and choose rocks that inspire your creativity. For more ideas and tips on making the most of your pet rock project, visit PETS.EDU.VN.
 Selection of smooth rocks for crafting a pet rock with diverse shapes.
3. Cleaning and Preparing Your Rocks: A Clean Slate
Before you begin painting and decorating, it’s essential to clean and prepare your rocks properly. This step ensures that the paint adheres well and that your finished pet rock looks its best. Here’s a step-by-step guide to cleaning and preparing your rocks:
- Rinse the Rocks: Start by rinsing the rocks under running water to remove any loose dirt, sand, or debris.
- Scrub with Soap: Use a scrub brush and mild dish soap to thoroughly clean the rocks. Pay attention to any areas with stubborn dirt or grime.
- Rinse Again: Rinse the rocks thoroughly with clean water to remove all traces of soap.
- Dry Completely: Allow the rocks to air dry completely. This may take several hours or even overnight. You can also use a clean towel to pat them dry, but make sure they are completely dry before proceeding to the next step.
- Optional: Prime the Rocks: For a smoother painting surface and better color vibrancy, you can prime the rocks with a coat of white or light-colored primer. Apply a thin, even layer of primer and let it dry completely before painting.
Why Cleaning is Important:
- Better Adhesion: A clean surface allows the paint to adhere properly, preventing it from peeling or flaking off.
- Smoother Finish: Removing dirt and debris ensures a smoother, more even paint finish.
- Longer Lasting: Properly prepared rocks will help your pet rock creations last longer and maintain their appearance over time.
Table: Steps for Cleaning and Preparing Rocks
| Step | Description | Why It’s Important |
|---|---|---|
| Rinse the Rocks | Remove loose dirt and debris under running water. | Clears initial surface impurities. |
| Scrub with Soap | Thoroughly clean the rocks with a scrub brush and mild dish soap. | Eliminates stubborn dirt and grime for a pristine surface. |
| Rinse Again | Ensure no soap residue remains by rinsing with clean water. | Prevents interference with paint adhesion. |
| Dry Completely | Allow rocks to air dry fully or pat dry with a clean towel. | Prevents moisture from affecting paint adherence and finish. |
| Optional: Prime Rocks | Apply a thin layer of white or light-colored primer. | Provides a smoother painting surface and enhances color vibrancy. |
By following these steps, you’ll ensure that your rocks are clean, dry, and ready for painting. This preparation will help you achieve a professional-looking finish and create pet rocks that you’ll be proud to display. For more tips and ideas on crafting the perfect pet rock, visit PETS.EDU.VN.
4. Designing Your Pet Rock: Unleash Your Imagination
Designing your pet rock is where your creativity truly comes to life. This step involves deciding on the character, theme, and overall look of your new companion. Here are some tips and ideas to help you unleash your imagination and create a unique and delightful pet rock:
- Brainstorm Ideas: Start by brainstorming different ideas for your pet rock. Consider animals, cartoon characters, abstract designs, or even miniature landscapes.
- Sketch Your Design: Use a pencil to sketch your design onto the rock. This allows you to plan out the placement of colors, features, and other details before you start painting.
- Choose a Theme: Selecting a theme can help guide your design process. Some popular themes include:
- Animals: Cats, dogs, birds, fish, or any other animal you love.
- Insects: Ladybugs, bees, butterflies, or other colorful insects.
- Monsters: Friendly monsters with fun and quirky features.
- Abstract Art: Geometric patterns, colorful swirls, or other abstract designs.
- Nature Scenes: Miniature landscapes with trees, flowers, and other natural elements.
- Consider the Rock’s Shape: Use the shape of the rock to inspire your design. A long, narrow rock might be perfect for a caterpillar, while a round rock could become a cute little owl.
Inspiration and Ideas:
- Look at Pictures: Browse online resources, books, and magazines for inspiration. Pay attention to colors, patterns, and character designs that appeal to you.
- Use Stencils: Stencils can be helpful for creating precise shapes and designs, especially if you’re not confident in your drawing skills.
- Get Inspired by Nature: Look to the natural world for inspiration. Leaves, flowers, and other natural elements can make beautiful and unique pet rock designs.
Table: Design Ideas for Pet Rocks
| Theme | Description | Example Designs |
|---|---|---|
| Animals | Recreate your favorite animals in miniature form. | Cats, dogs, birds, fish, lions, tigers, bears |
| Insects | Design colorful and unique insect-themed rocks. | Ladybugs, bees, butterflies, caterpillars, ants, dragonflies |
| Monsters | Create friendly and quirky monsters with fun features. | One-eyed monsters, furry monsters, colorful monsters, smiling monsters |
| Abstract Art | Use geometric patterns and colorful swirls for a modern look. | Polka dots, stripes, spirals, geometric shapes, colorful gradients |
| Nature Scenes | Paint miniature landscapes with trees, flowers, and natural elements. | Trees, flowers, rivers, mountains, sunsets, gardens |
By unleashing your imagination and carefully planning your design, you can create a pet rock that is truly one-of-a-kind. Experiment with different ideas, themes, and techniques to find what works best for you. Visit PETS.EDU.VN for even more inspiration and tips on designing the perfect pet rock.
5. Painting Techniques: Bringing Your Pet Rock to Life
Painting is the heart of the pet rock crafting process, and mastering a few basic techniques can help you bring your designs to life. Here are some essential painting techniques and tips to ensure your pet rock looks vibrant and professional:
- Choose the Right Paint: Acrylic paints are ideal for painting rocks. They are water-based, easy to use, and dry quickly.
- Apply Thin Coats: Apply thin, even coats of paint rather than one thick coat. This prevents the paint from clumping or taking too long to dry.
- Let Each Coat Dry: Allow each coat of paint to dry completely before applying the next. This ensures a smooth, even finish and prevents colors from bleeding together.
- Use the Right Brushes: Use different sizes of paintbrushes for different tasks. Small, fine-tipped brushes are perfect for detail work, while larger brushes are better for covering large areas.
- Mix Colors: Experiment with mixing colors to create custom shades and hues. Use a palette or a piece of cardboard to mix your paints.
- Use a Base Coat: Applying a base coat of white or light-colored paint can help your colors appear more vibrant, especially on darker rocks.
Techniques for Detail Work:
- Dot Painting: Use a small brush or a toothpick to create dots of paint. This technique is great for adding texture and detail to your designs.
- Line Work: Use a fine-tipped brush or a paint marker to create thin, precise lines. This is perfect for outlining shapes and adding fine details.
- Blending: Blend colors together while they are still wet to create smooth transitions and gradients. Use a soft brush to gently blend the edges of the colors together.
Table: Painting Techniques for Pet Rocks
| Technique | Description | Tips |
|---|---|---|
| Thin Coats | Apply paint in thin, even layers. | Prevents clumping and ensures faster drying. |
| Drying Time | Allow each coat to dry completely before applying the next. | Prevents colors from bleeding and ensures a smooth finish. |
| Brush Selection | Use different brush sizes for different tasks. | Small brushes for details, larger brushes for coverage. |
| Color Mixing | Mix colors to create custom shades and hues. | Use a palette or cardboard for mixing. |
| Base Coat | Apply a base coat of white or light color. | Enhances color vibrancy, especially on darker rocks. |
| Dot Painting | Create dots of paint for texture and detail. | Use a small brush or toothpick. |
| Line Work | Use a fine-tipped brush or paint marker for thin lines. | Perfect for outlining shapes and adding fine details. |
| Blending | Blend colors together while wet to create smooth transitions. | Use a soft brush to gently blend the edges. |
With these painting techniques, you can bring your pet rock designs to life with vibrant colors and intricate details. Practice and experiment with different techniques to find what works best for you. For more creative ideas and tips on painting pet rocks, visit PETS.EDU.VN.
6. Adding Features: Eyes, Noses, and More
Adding features like eyes, noses, and other embellishments is what truly brings your pet rock to life and gives it its unique personality. Here are some ideas and tips for adding these details:
- Googly Eyes: Googly eyes are a classic choice for pet rocks. They’re easy to attach with craft glue and add instant character.
- Felt Shapes: Cut shapes from felt scraps to create ears, noses, mouths, or other features. Felt adds texture and dimension to your pet rock.
- Yarn or Pom-Poms: Use yarn or pom-poms to create hair, tails, or other fluffy details. These can be glued onto the rock for a soft and whimsical look.
- Beads and Sequins: Add beads and sequins for extra sparkle and flair. These can be glued onto the rock to create decorative accents.
- Paint Details: Use fine-tipped paintbrushes or paint markers to add painted details like whiskers, spots, or patterns.
Attaching Features:
- Craft Glue: Use a strong craft glue to attach features to your pet rock. Make sure to apply the glue evenly and press the feature firmly onto the rock until it adheres.
- Hot Glue: Hot glue can also be used to attach features, but be careful when using it, as it can be hot and may not be suitable for young children.
- Self-Adhesive Features: Some craft stores sell self-adhesive googly eyes and felt shapes, which can be a convenient option for easy attachment.
Table: Adding Features to Pet Rocks
| Feature | Description | Tips |
|---|---|---|
| Googly Eyes | Adds instant character and personality. | Use different sizes and colors for variety. |
| Felt Shapes | Creates ears, noses, mouths, and other details. | Cut shapes from felt scraps and glue them onto the rock. |
| Yarn/Pom-Poms | Adds hair, tails, or other fluffy details. | Glue onto the rock for a soft and whimsical look. |
| Beads/Sequins | Adds sparkle and flair. | Glue onto the rock to create decorative accents. |
| Paint Details | Adds whiskers, spots, patterns, and other painted details. | Use fine-tipped paintbrushes or paint markers. |
By adding these features, you can transform a simple rock into a lovable pet with its own unique personality. Experiment with different materials and techniques to find what works best for you. Visit PETS.EDU.VN for more creative ideas and tips on crafting the perfect pet rock.
7. Creating a Home: Pet Rock Habitat Ideas
Every pet needs a home, and your pet rock is no exception. Creating a special habitat for your pet rock adds to the fun and imaginative play. Here are some ideas for crafting the perfect home for your new companion:
- Cardboard Box Home: Decorate a small cardboard box to create a cozy home for your pet rock. You can paint the box, add fabric scraps for bedding, and even create miniature furniture.
- Terrarium: Use a small terrarium or glass jar to create a miniature landscape for your pet rock. Add soil, pebbles, small plants, and other natural elements to create a realistic habitat.
- Wooden Box: A small wooden box can be transformed into a charming pet rock home. Paint the box, add a door and windows, and decorate the inside with fabric and miniature accessories.
- Felt Pouch: Sew a simple felt pouch to create a soft and portable home for your pet rock. This is a great option for taking your pet rock on the go.
Decorating the Habitat:
- Fabric Scraps: Use fabric scraps to create bedding, curtains, or other decorative elements for your pet rock’s home.
- Miniature Furniture: Add miniature furniture like chairs, tables, and beds to create a cozy living space.
- Natural Elements: Use natural elements like twigs, leaves, and pebbles to create a realistic and natural-looking habitat.
- Paint and Markers: Use paint and markers to add decorative details to the home, such as windows, doors, and patterns.
Table: Pet Rock Habitat Ideas
| Habitat Type | Description | Materials Needed |
|---|---|---|
| Cardboard Box | A decorated cardboard box for a cozy home. | Cardboard box, paint, fabric scraps, miniature furniture |
| Terrarium | A miniature landscape in a glass container. | Terrarium or glass jar, soil, pebbles, small plants, natural elements |
| Wooden Box | A charming wooden box with doors and windows. | Wooden box, paint, fabric, miniature accessories |
| Felt Pouch | A soft and portable felt pouch for on-the-go adventures. | Felt, thread, scissors, sewing machine or needle |
By creating a special home for your pet rock, you enhance the imaginative play and make your new companion feel even more special. Get creative with different materials and decorations to create a habitat that reflects your pet rock’s personality. Visit PETS.EDU.VN for more ideas and tips on crafting the perfect pet rock experience.
8. Naming and Registering Your Pet Rock: Making it Official
Naming your pet rock is an important step in making it feel like a real member of the family. Once you’ve named your pet, you can even “register” it to make it official. Here’s how to name and register your pet rock:
- Choose a Name: Select a name that reflects your pet rock’s personality and appearance. Consider names that are funny, cute, or descriptive.
- Write a Birth Certificate: Create a birth certificate for your pet rock. Include the name, date of birth (the day you created it), and any other fun facts you want to add.
- Register Your Pet Rock Online: Several websites allow you to register your pet rock and receive an official certificate. This is a fun way to make your pet rock feel extra special.
Creative Naming Ideas:
- Descriptive Names: Use names that describe your pet rock’s appearance, such as “Rocky,” “Pebbles,” or “Speckles.”
- Funny Names: Choose a funny name that makes you laugh, such as “Sir Rockington,” “ Dwayne The Rock,” or “Rock Star.”
- Character Names: Name your pet rock after a favorite character from a book, movie, or TV show.
- Human Names: Give your pet rock a human name, such as “Bob,” “Alice,” or “George.”
Table: Naming and Registering Your Pet Rock
| Step | Description | Tips |
|---|---|---|
| Choose a Name | Select a name that reflects your pet rock’s personality. | Consider descriptive, funny, character, or human names. |
| Write a Birth Certificate | Create a birth certificate with name, date of birth, and fun facts. | Make it creative and personalized. |
| Register Online | Register your pet rock on a website for an official certificate. | Search for pet rock registration websites for options. |
By naming and registering your pet rock, you make it an official member of your family and add to the fun and imaginative play. Get creative with the naming process and enjoy celebrating your new pet. Visit PETS.EDU.VN for more ideas and tips on making the most of your pet rock adventure.
9. Pet Rock Care and Training: A Humorous Guide
Taking care of a pet rock is delightfully simple, yet can be approached with humor and imagination. Here’s a humorous guide to pet rock care and training:
- Feeding: Pet rocks don’t need food, but you can pretend to feed them small pebbles or glitter.
- Watering: No water is required, but you can pretend to give them a “rock bath” by gently wiping them with a damp cloth.
- Exercise: Pet rocks don’t need exercise, but you can take them on adventures around the house or garden.
- Training: Training a pet rock is all about imagination. You can teach them tricks like “sit” (by placing them in a specific spot) or “roll over” (by gently rolling them).
Humorous Training Tips:
- Positive Reinforcement: Use positive reinforcement by praising your pet rock when it performs a trick correctly.
- Consistency: Be consistent with your training commands to avoid confusing your pet rock.
- Patience: Remember that pet rocks learn at their own pace, so be patient and don’t get discouraged.
Table: Pet Rock Care and Training Guide
| Aspect | Description | Humorous Tips |
|---|---|---|
| Feeding | Pretend to feed them small pebbles or glitter. | Offer a variety of “rock snacks” for a balanced diet. |
| Watering | Pretend to give them a “rock bath” with a damp cloth. | Use a gentle touch to avoid “erosion.” |
| Exercise | Take them on adventures around the house or garden. | Avoid strenuous activities to prevent “rock fatigue.” |
| Training | Teach them tricks like “sit” or “roll over.” | Use positive reinforcement and patience for best results. |
While pet rocks don’t require real care and training, engaging in these activities with a sense of humor can enhance the fun and imaginative play. Enjoy the simplicity and silliness of caring for your new pet. For more ideas and tips on pet rock fun, visit PETS.EDU.VN.
10. Advanced Pet Rock Crafting: Beyond the Basics
Once you’ve mastered the basics of pet rock crafting, you can take your creations to the next level with advanced techniques and ideas. Here are some ways to go beyond the basics:
- 3D Features: Use modeling clay or polymer clay to create 3D features like horns, wings, or elaborate hairstyles.
- Mixed Media: Incorporate a variety of materials like wire, beads, and fabric to add texture and dimension to your pet rocks.
- Detailed Painting: Use advanced painting techniques like shading, highlighting, and layering to create realistic and intricate designs.
- Themed Collections: Create themed collections of pet rocks, such as a set of zodiac signs, a collection of famous historical figures, or a series of characters from your favorite book or movie.
Advanced Techniques:
- Sculpting: Use modeling clay or polymer clay to sculpt intricate details onto your pet rock. Bake the clay according to the manufacturer’s instructions to harden it.
- Wire Wrapping: Use wire to create decorative accents or to attach features to your pet rock. Wrap the wire around the rock and secure it with glue.
- Decoupage: Use decoupage techniques to cover your pet rock with paper, fabric, or other materials. Apply a layer of decoupage glue to the rock, then press the material onto the glue and seal with another layer of glue.
Table: Advanced Pet Rock Crafting Techniques
| Technique | Description | Materials Needed |
|---|---|---|
| 3D Features | Use modeling clay or polymer clay to create three-dimensional features. | Modeling clay or polymer clay, oven (for polymer clay), craft glue |
| Mixed Media | Incorporate various materials for added texture and dimension. | Wire, beads, fabric scraps, craft glue |
| Detailed Painting | Use advanced painting techniques for realistic designs. | Acrylic paints, fine-tipped brushes, paint palette |
| Themed Collections | Create sets of pet rocks based on a common theme. | Varies depending on the theme |
By exploring these advanced techniques, you can elevate your pet rock crafting skills and create truly unique and impressive creations. Experiment with different materials and techniques to find what inspires you. For more advanced ideas and tips, visit PETS.EDU.VN.
11. Pet Rock Health and Wellness: Keeping Your Friend Happy
While pet rocks don’t require traditional health care, maintaining their appearance and preventing damage is key to keeping your friend “happy.” Here’s how to ensure your pet rock stays in top condition:
- Regular Cleaning: Gently wipe your pet rock with a soft, damp cloth to remove dust and dirt.
- Protective Coating: Apply a clear sealant or varnish to protect the paint and embellishments from chipping or fading.
- Avoid Harsh Chemicals: Keep your pet rock away from harsh chemicals or cleaning products that could damage the paint or materials.
- Safe Storage: Store your pet rock in a safe place where it won’t be knocked over or damaged.
Tips for Preventing Damage:
- Handle with Care: Handle your pet rock gently to avoid chipping the paint or breaking off any features.
- Avoid Direct Sunlight: Prolonged exposure to direct sunlight can cause the paint to fade, so keep your pet rock out of direct sunlight.
- Repair Damage Promptly: If your pet rock does get damaged, repair it promptly to prevent further damage. Use craft glue to reattach any loose features or touch up the paint as needed.
Table: Pet Rock Health and Wellness Guide
| Aspect | Description | Tips |
|---|---|---|
| Regular Cleaning | Gently wipe with a soft, damp cloth. | Avoid excessive moisture to prevent damage. |
| Protective Coating | Apply clear sealant or varnish. | Reapply periodically for continued protection. |
| Avoid Chemicals | Keep away from harsh chemicals. | Store in a safe place to prevent accidental exposure. |
| Safe Storage | Store in a secure location. | Prevent falls and potential damage. |
By following these simple steps, you can ensure that your pet rock stays in good condition and continues to bring you joy for years to come. Treat your pet rock with care and enjoy its enduring companionship. For more pet rock care tips, visit PETS.EDU.VN.
12. Troubleshooting Common Issues: Pet Rock Problems Solved
Even with the simplest of crafts, you might encounter a few issues while making your pet rocks. Here are some common problems and how to solve them:
- Paint Peeling: If the paint is peeling off your pet rock, it could be due to a dirty surface or improper paint adhesion. Make sure to clean the rock thoroughly before painting and use a primer for better adhesion.
- Glue Not Sticking: If the glue isn’t sticking, make sure you’re using a strong craft glue and that the surfaces are clean and dry. Apply pressure while the glue dries to ensure a strong bond.
- Features Falling Off: If features like googly eyes or felt shapes are falling off, use a stronger adhesive like hot glue or epoxy. Make sure to apply the glue evenly and press the feature firmly onto the rock.
- Paint Fading: If the paint is fading, protect your pet rock from direct sunlight and apply a clear sealant or varnish to protect the paint from UV damage.
Table: Troubleshooting Pet Rock Problems
| Problem | Possible Cause(s) | Solution(s) |
|---|---|---|
| Paint Peeling | Dirty surface, improper paint adhesion. | Clean the rock thoroughly, use a primer, apply thin coats of paint. |
| Glue Not Sticking | Weak glue, dirty or wet surfaces. | Use strong craft glue, ensure surfaces are clean and dry, apply pressure. |
| Features Falling Off | Weak adhesive, inadequate application. | Use hot glue or epoxy, apply glue evenly, press firmly. |
| Paint Fading | Exposure to direct sunlight, lack of protection. | Protect from sunlight, apply clear sealant or varnish. |
By addressing these common issues, you can ensure that your pet rocks stay in great condition and continue to bring you joy. For more tips and solutions, visit PETS.EDU.VN.
13. Pet Rocks in Education: Learning Through Crafting
Pet rock crafting isn’t just a fun activity; it can also be a valuable educational tool. Here are some ways to incorporate pet rocks into learning:
- Science: Use pet rocks to teach about geology, rock types, and the properties of different materials.
- Art: Use pet rocks to teach about color theory, painting techniques, and design principles.
- Language Arts: Use pet rocks to inspire creative writing, storytelling, and descriptive language exercises.
- Math: Use pet rocks to teach counting, sorting, and basic arithmetic.
Educational Activities:
- Rock Identification: Have students identify different types of rocks based on their color, texture, and other characteristics.
- Storytelling: Have students create stories about their pet rocks, focusing on character development, plot, and setting.
- Math Games: Use pet rocks as manipulatives to teach basic math concepts like addition, subtraction, multiplication, and division.
Table: Pet Rocks in Education
| Subject | Learning Objectives | Activities |
|---|---|---|
| Science | Understanding geology and rock types. | Rock identification, studying rock properties. |
| Art | Exploring color theory and painting techniques. | Painting pet rocks, designing patterns, experimenting with colors. |
| Language Arts | Developing creative writing and storytelling skills. | Writing stories about pet rocks, creating character profiles. |
| Math | Learning counting, sorting, and basic arithmetic. | Using pet rocks for counting exercises, sorting by characteristics. |
By incorporating pet rocks into educational activities, you can make learning fun, engaging, and hands-on. Encourage creativity, critical thinking, and problem-solving skills through this simple yet versatile craft. For more educational ideas, visit pets.edu.vn.
14. Pet Rock Parties: A Unique Celebration
Hosting a pet rock party is a fun and unique way to celebrate a birthday, holiday, or any special occasion. Here’s how to plan a memorable pet rock party:
- Invitations: Send out invitations with a pet rock theme. Ask guests to bring their own rocks or provide them at the party.
- Craft Supplies: Set up a crafting station with all the necessary supplies, including rocks, paints, brushes, googly eyes, felt, glue, and other embellishments.
- Activities: Plan a variety of pet rock-related activities, such as rock painting, naming contests, and pet rock obstacle courses.
- Decorations: Decorate the party area with a pet rock theme, using rock-shaped balloons, tablecloths, and banners.
- Favors: Send guests home with pet rock-themed party favors, such as mini paint sets, googly eyes, or personalized pet rock certificates.
Party Activities:
- Rock Painting Contest: Host a rock painting contest and award prizes for the most creative, funny, and original designs.
- Pet Rock Obstacle Course: Create a miniature obstacle course for pet rocks using household items like blocks, cardboard tubes, and small toys.
- Naming Ceremony: Have a naming ceremony where each guest introduces their pet rock and shares its name and backstory.
Table: Pet Rock Party Planning Guide
| Aspect | Description | Tips |
|---|---|---|
| Invitations | Pet rock-themed invitations. | Ask guests to bring their own rocks or provide them. |
| Craft Supplies | Set up a crafting station with |