Keeping your Bissell PowerForce PowerBrush Pet carpet cleaner in top condition is essential for tackling pet messes and maintaining a fresh home. Regular cleaning and maintenance not only extend the life of your appliance but also ensure it operates at peak performance, effectively removing dirt, grime, and pet hair from your carpets and upholstery. This guide provides a comprehensive, step-by-step process on how to clean your Bissell PowerForce PowerBrush Pet, ensuring it’s always ready for the next cleanup.
Step 1: Preparation – Power Off and Unplug
Before commencing any cleaning or maintenance, the first and most crucial step is to ensure your Bissell PowerForce PowerBrush Pet is turned off and completely unplugged from the power outlet. This safety measure is vital to prevent any risk of electric shock and ensures safe handling of the appliance during the cleaning process.
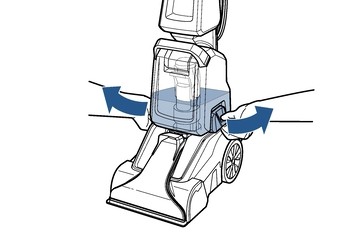
Step 2: Removing and Emptying the Dirty Water Tank
Locate the dirty water tank, which is designed to collect the dirty water extracted from your carpets. To remove it, gently pull out and lift up on the side latches that secure the tank in place. Once unlatched, lift the tank handle to fully detach it from the machine.
Step 3: Rinsing the Dirty Water Tank
On the top of the dirty water tank, you’ll find a rubber tab. Open this tab to access the tank’s opening. Carefully pour out the dirty water, disposing of it appropriately. After emptying, rinse the tank thoroughly with clean water to remove any remaining debris or residue. Ensure to close the rubber tab securely after rinsing.
Step 4: Cleaning the Float Stack
To clean the float stack, which prevents overfilling, locate the ring at the bottom of the dirty water tank. Unscrew this ring to release the float stack. Once loosened, carefully remove the float stack from the tank.
Step 5: Rinsing and Checking the Float Stack
Rinse the float stack under running water to eliminate any accumulated dirt or debris. It’s crucial to ensure that the float inside the stack moves freely up and down; this mechanism is vital for the proper functioning of your Bissell PowerForce PowerBrush Pet.
Step 6: Drying and Reassembling the Float Stack and Tank
Allow both the float stack and the dirty water tank to air dry completely before reassembling. Important: Do not place the dirty water tank or the float stack in a dishwasher for cleaning, as high temperatures can damage these components. Once dry, place the float stack back into the dirty water tank, carefully aligning the arrow marked on the float with the notch inside the tank. Secure it by twisting the ring back into place at the bottom of the tank.
Step 7: Cleaning the Red Filter
Below where the dirty water tank sits, you will find a red filter. Check this filter for any debris, such as pet hair or carpet fibers, and remove any blockages to ensure optimal performance and airflow.
Step 8: Removing and Rinsing the Nozzle
To remove the nozzle, grip the top firmly and pull it away from the machine. After removing the nozzle, rinse it thoroughly under water to clear any clogs or trapped debris.
Step 9: Cleaning the Brush Roll Cover
Use a cloth to wipe the brush roll cover clean. This area can accumulate pet hair and dirt, which can reduce the effectiveness of your carpet cleaner. Regularly cleaning this component helps maintain optimal brush performance.
Step 10: Reattaching the Nozzle
Allow the nozzle to dry completely before reattaching it to your Bissell PowerForce PowerBrush Pet. To replace it, align the top part of the nozzle into the designated channel located in front of the red filter. Using both hands, push the bottom portion of the nozzle firmly into place until it is securely attached.
Step 11: Reassembling the Dirty Water Tank
Return the cleaned and dried dirty water tank to its position on the machine. Ensure it is correctly placed and then secure it using the side latches until they click into place. This ensures the tank is firmly attached and ready for use.
Step 12: Cord Storage and Final Storage
Wrap the power cord around the designated cord wrap area on the machine for neat and safe storage. Store your Bissell PowerForce PowerBrush Pet in a protected, dry area until its next use.
By following these detailed steps, you can effectively clean and maintain your Bissell PowerForce PowerBrush Pet carpet cleaner. Regular maintenance ensures your machine remains hygienic, efficient, and ready to tackle any pet messes, keeping your home clean and fresh for longer.