Pet steps can be a game-changer for pets of all ages and sizes, especially for smaller breeds, senior dogs or cats, or those with joint issues. These handy little stairs make it easier for your furry friends to reach their favorite spots – be it the couch, bed, or even a window perch – without straining themselves. Buying pre-made pet steps can be costly, but the good news is that building your own is a surprisingly straightforward and budget-friendly DIY project. This guide will walk you through each step of creating sturdy and stylish pet steps that your companion will love, all for under $30 and in just a few hours.
Materials and Tools You’ll Need
Before you start building, gather all the necessary materials and tools. This will make the process smoother and more efficient.
Cost: Approximately $28
Time: About 3 hours
Difficulty: Moderate (easy cuts, but precise layout is key)
Tools:
- Tape Measure
- Framing Square
- Speed Square
- Drill/Driver
- Miter Saw
- Circular Saw
- Pneumatic Nail Gun (optional, but recommended for speed and ease)
Materials:
- (1) ½” x 2′ x 4′ Birch Plywood: For the sides and treads. Birch plywood offers a good balance of strength and a paintable surface.
- (1) 1 x 2 x 8′ Lumber: To create cleats that support the treads and risers, and a support bar for the back. Pine or fir works well for this.
- (1) 1 x 6 x 6′ Lumber: For the risers (vertical pieces between treads) and another support bar for the back.
- (3) ½” x 2″ x 4′ Boards (Optional): For trimming the sides to add a finished look. You can choose a wood that complements your home decor.
- Wood Glue: Essential for strong and durable joints.
- 1¼ inch Finish Nails: To attach the risers, treads, and support bars.
- 1 inch Finish Nails: To attach the cleats.
- ¾ inch Finish Nails (optional): To attach the trim, if you choose to use it.
- Fabric (optional): To make a stair runner for added comfort and grip. Consider carpet scraps or durable fabric remnants.
- Drawer Liner (optional): To provide cushioning under the runner and prevent slipping.
- Hand Stapler and 3/8-inch staples (optional): To secure the runner to the steps.
Cut List:
- ½ inch Plywood Sides: 2 pieces @ 17¼” Height x 24″ Width
- ½ inch Plywood Treads: 3 pieces @ 13¼” Width x 8″ Depth
- 1×6 Risers: 3 pieces @ 13¼ inches
- 1×2 Support Bar: 1 piece @ 13¼ inches
- 1×6 Support Bar: 1 piece @ 13¼ inches
- ½” x 2″ Trim: Cut to fit (measure as you go for best results)
- 1×2 Cleats:
- Riser Cleats: 6 pieces @ 5½ inches
- Bottom Tread Cleats: 2 pieces @ 8 inches
- Middle Tread Cleats: 2 pieces @ 8 inches
- Top Tread Cleats: 2 pieces @ 5 inches
Step-by-Step Guide to Building Pet Steps
Now that you have everything ready, let’s get building! Follow these detailed steps to construct your DIY pet steps.
1. Cut the Parts
Start by cutting all the wood pieces according to the cut list. Use a miter saw for the 1×2 and 1×6 lumber for accurate and straight cuts. For the plywood, utilize a circular saw.
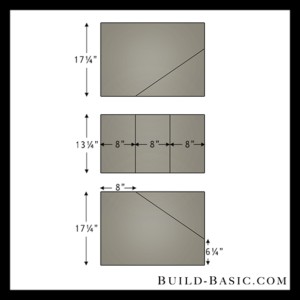
To cut the plywood efficiently, first divide the 2×4 foot plywood sheet as shown in the diagram. Remember to account for the saw blade’s kerf (approximately 1/8 inch loss per cut). This should result in two pieces that are roughly 17 inches wide and one piece around 13½ inches wide, all 24 inches long. From the 13½ inch wide section, cut three 8-inch deep treads.
2. Shape the Sides
Next, you’ll shape the sides of the pet steps. Place the two plywood side pieces face up on your work surface. To create the angled shape, measure and mark 6 inches up from the bottom-front corner and 8 inches across from the top-back corner on each side piece. Draw a line connecting these marks. This line will be your cut line for the angled side profile.
3. Cut the Sides
Carefully cut along the marked lines on both plywood side pieces using a circular saw. For a cleaner and straighter cut, especially with plywood, consider using a guide or fence for your circular saw.
A simple makeshift fence can be created by measuring the distance from your saw blade to the edge of the saw’s footplate. Then, measure and mark this distance from your cut line in two places perpendicular to the line. Clamp a straight board along these marks, ensuring it is parallel to your intended cut. Run the base of your circular saw along this clamped board to guide it for a straight and accurate cut.
4. Place the First Cleat
Now, it’s time to start assembling the steps. Lay the plywood side pieces face down on your work surface. Using a speed square, mark a vertical line ¾ inch from the front edge on the inside face of each side piece. This line will help you position the first riser cleat accurately.
Take a 5½-inch riser cleat and align it inside the marked line on one side piece. Apply wood glue to the back of the cleat and then nail it into place using a pneumatic nail gun and 1-inch finish nails. Repeat this for the other side piece, ensuring the cleats are positioned symmetrically on both sides.
5. Layout the Remaining Cleats
Refer to the diagram provided in the materials section for the placement of the remaining cleats. Using your speed square and the diagram as a guide, carefully mark the positions for all the riser cleats and tread cleats on the inside faces of both side pieces. Accurate cleat placement is crucial for the stability and evenness of the steps.
6. Install the Cleats
Starting from the bottom and working your way up, install the remaining cleats. Apply wood glue to the back of each cleat before positioning it on the marked lines and nailing it in place. Use your speed square frequently to ensure that each cleat is installed square and level. This will ensure that the risers and treads sit correctly and the steps are structurally sound.
7. Finish Installing the Cleats – Check Spacing
As you install the top tread cleat, it’s important to check the spacing. Ensure there is a ½ inch gap above the top cleat where the top tread will sit flush. Also, verify there’s a ¾ inch gap behind the top cleat to accommodate the 1×2 support bar that will be installed later. These gaps are essential for proper assembly and structural integrity.
8. Attach the First Riser
Apply wood glue to the face of the front-most riser cleat on both sides and to one end of the first 1×6 riser piece. Carefully set the end of the riser against the glued cleat so that it snugly fits within the inside of the side walls.
Using a speed square to ensure the riser is perfectly vertical, nail through the face of the riser and into the cleat on both sides using a pneumatic nail gun and 1¼ inch finish nails. This securely attaches the first riser and begins to create the step structure.
9. Attach the Remaining Risers
Repeat the previous step to install the remaining two risers. Position the second riser against the next set of vertical cleats. Apply wood glue to the faces of the cleats and to both ends of the riser before nailing it into place. Ensure each riser is square using your speed square before securing it with nails. Repeat this process for the uppermost riser.
10. Place the First Tread
Apply wood glue to the top edges of the horizontal cleats for the first step and to the top edge of the lowest riser you just installed. Place the first tread (½ inch plywood) onto the lowest cleats. Align the front edge of the tread so it’s flush with the face of the lowest riser, and the back edge should rest against the middle riser.
Nail through the face of the tread and into each cleat underneath using finish nails. This secures the first tread and creates the first step for your pet steps.
11. Attach the Remaining Treads
Repeat the previous step to install the remaining two treads. For each tread, apply wood glue to the top edges of the cleats and the riser below. Position the tread, ensuring the front edge is flush with the riser face below it and the back edge rests correctly. Nail the treads securely to the cleats.
When you install the top tread, it should be flush with the face of the riser below it and also flush with the back edge of the side pieces. This completes the basic step structure.
12. Add the 1×2 Support Bar
For added stability, place the 1×2 support bar horizontally between the side pieces and against the underside of the top tread, at the back. Nail through each side piece and into the ends of the 1×2 support bar with 1¼ inch nails. This bar provides crucial support to the top step.
If you plan to add trim later (as in step 14), nailing through the sides is perfectly acceptable as the nail holes will be covered. If you prefer a cleaner, nail-free look on the sides, you could use a Kreg Jig to create pocket holes in the 1×2 support bar and attach it with screws from the inside, concealing the fasteners.
13. Add the 1×6 Support Bar
Place the 1×6 support bar horizontally between the side pieces, flush with their bottom and back edges. This bar adds significant rigidity to the entire structure and prevents racking. Nail through the side pieces and into the ends of the 1×6 board using 1¼ inch nails to secure it in place.
14. Cut and Attach the Trim (Optional)
For a more refined and finished appearance, you can add trim to the sides of the pet steps. Using the ½” x 2″ trim boards, measure and mark each cut as you work around the perimeter of each side piece. Use a miter saw to cut the trim pieces to fit. Remember that not all miters will be 45 degrees; you may need to adjust angles for a perfect fit, especially near the front edge of the top tread and the bottom tread.
Apply wood glue to the back of each trim piece and nail it into place using ¾-inch finish nails. Fill any nail holes with wood filler, let it dry, and then sand smooth before painting or finishing.
15. Secure the Runner (Optional)
To make the steps more comfortable and slip-resistant for your pet, you can add a stair runner. Cut pieces of fabric and drawer liner (or padding) to fit each step, leaving a small border around the edges. Layer the fabric over the drawer liner and position them on each tread.
Use a hand stapler to secure the runner to the treads. Stapling makes it easy to remove and replace the runner for cleaning or if you want to change the look later. This runner provides extra grip and cushioning, making the steps safer and more enjoyable for your pet to use.
Finishing Touches and Customization
Once your pet steps are built, you can customize them further to match your home décor and your pet’s needs. Consider painting or staining the wood to complement your furniture. You can also add non-slip strips to the treads for extra safety, even if you choose not to use a full runner.
These DIY pet steps are a practical and affordable solution to help your furry friends navigate your home with ease. By following these steps, you can create a sturdy and pet-friendly set of stairs that will provide years of happy climbing for your beloved companion.