Have you ever longed for the quirky charm of a Chia Pet but wished for something a bit more… you? If the catchy jingle “ch-ch-ch-chia” brings a smile to your face and you’re craving a unique twist on this nostalgic novelty, then you’re in for a treat!
Chia Pets, with their terracotta charm and sprouting seeds, have been a beloved pop culture icon since the late seventies and continue to sprout joy today. You’ve likely seen them, owned them, or at least chuckled at the commercials. But what if you could elevate the concept? What if you could create a Chia Pet alternative that’s not only elegant but also deeply personal?
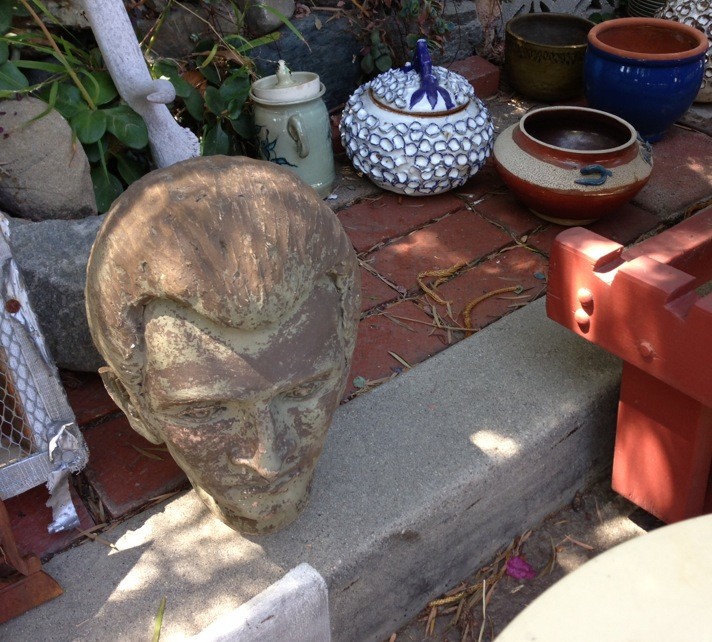
Recently, while browsing an estate sale, I stumbled upon an intriguing find that sparked a creative idea. There it was, partially hidden, a peculiar head-shaped object. Something about it drew me in. Its contours hinted at the familiar grooves of a Chia Pet, and a thought blossomed: “Could I grow sprouts on that amazing head? Can You Make A Chia Pet Of Yourself in a way, using a unique form?”
A quick negotiation later, and this enigmatic object was mine. It wasn’t quite a bust, not exactly a statue, but definitely… something special. Bringing it home, my initial vision involved classic Chia seeds. I even picked some up from Trader Joe’s, ready to embrace the traditional route.
However, reality sprouted a slight detour. Chia seeds thrive in consistent warmth, ideally above 70 degrees Fahrenheit. My garden, even in moderately warm days, experiences cooler nighttime temperatures. Displaying my creation outdoors, as I envisioned, meant Chia seeds were off the table.
This unexpected hurdle turned out to be a blessing in disguise. As I envisioned the final result, a new aesthetic emerged. I wanted something more subtle, more refined than the typical, sometimes kitschy, Chia Pet look. I admired the fun of Chia Pets, but for this project, I aimed for garden art that whispered elegance, not a vibrant green spectacle. I wanted sophistication, not a chlorophyll-rich caricature.
Exploring alternatives, I considered succulents, having some leftover from another gardening endeavor. I envisioned a lush, succulent “hairdo.” But a quick test revealed it just wasn’t the right fit. The succulents, laid atop the head, looked, well, utterly ridiculous.
My recent fascination with moss offered a promising solution. Laughing off the succulent experiment, I gathered various moss varieties from my yard, adding a few tiny succulents for subtle accents. And so, a unique, mossy vision for my personalized “Chia Pet” began to take root. Here’s how you can bring this elegant DIY project to life and make a chia pet of yourself or any form you desire:
Step-by-Step Guide to Creating Your Own Moss “Chia Pet”
This guide will walk you through transforming an ordinary object into a stunning piece of garden art, a sophisticated alternative to traditional Chia Pets. Whether you choose a head, a garden gnome, or a simple orb, the process remains delightfully simple.
Step 1: Find Your Form and Hydrate
Begin by selecting your base object. Estate sales, thrift stores, or even your own garden can yield unique finds. A head shape offers a classic “Chia Pet” feel, but feel free to experiment! Garden gnomes, animal statues, or even simple geometric shapes can work beautifully. Once you have your object, lightly mist it with water. This moisture will help the soil adhere in the next step.
Step 2: Apply a Base Layer of Soil
Next, apply a thin layer of enriched soil to the moistened object. Use just enough soil to provide a base for the moss to grip and grow. Don’t overdo it; a little goes a long way. After applying the soil, mist it liberally with water again to ensure it’s damp and ready for the moss.
Step 3: Press Moss Firmly into Place
Now comes the moss! Take sections of moss and firmly press them onto the soil-covered object. Before applying each section, mist the back of the moss with water. After attaching each section, thoroughly wet it again. Pressing firmly ensures good contact with the soil, promoting successful moss growth.
Helpful Hints for Moss Application:
- Location Matters: Consider the portability of your project while working. I initially started at an outdoor table but realized moving it later would be tricky until the moss was established. It might be easier to complete the mossing process in its final display location.
- Moss Variety: Using different types of moss creates a more natural, mottled look. I used three varieties for texture. However, the type of moss is entirely your preference.
Step 4: Add Succulent Accents (Optional)
To add subtle visual interest, incorporate a few small succulent pieces. The size of your succulents should be proportionate to your base object. Succulents are remarkably resilient. Often, simply breaking off a piece and planting it directly into soil is enough for it to grow. No rooting in water needed! Just tuck them into the moss for a touch of contrasting texture and color.
Step 5: Final Mist and You’re Done!
Thoroughly mist your newly created moss “Chia Pet” until it’s well soaked. And just like that, your unique garden art is complete!
Follow-Up Care for Your Moss Creation
In the initial weeks, consistent watering is key to help the moss establish itself. Keep it well-misted. Once the moss takes firm hold, you can reduce watering frequency. Moss is surprisingly drought-tolerant and thrives with minimal care.
To enhance the presentation, consider the surrounding area. The bare ground around my moss head seemed a bit stark initially. To create a more cohesive look, I used extra moss and unplanted succulents to fill in the base around the head, softening the transition to the garden.
Another technique for achieving a quicker mossy look is to use a moss “sludge.” While I opted for direct moss application for faster results, you can explore moss sludge for a different approach. For detailed instructions on creating moss sludge, check out resources like GROW YOUR OWN MOSS FOR GRAFFITI AND MORE!.
The Story Behind the Head: More Than Just Garden Art
Beyond the DIY process, this project took on a deeper meaning when I learned the story behind the head-shaped object itself. Chatting with the estate sale organizer revealed a poignant history.
The head was crafted by her mother, a Ukrainian immigrant, artist, and avid gardener, who used her father as the model. This personal touch transformed the object from a mere estate sale find into a cherished piece with a family narrative.
But the story deepened further. Her parents had separately fled Ukraine during the Holocaust. Her father’s escape was a tale of incredible resilience. Captured and crammed into a train car with countless others, escape seemed impossible. The only potential exit was a tiny, unreachable window high on the wall.
Against the odds, he and his best friend were determined. Boosted by fellow prisoners, they squeezed through the window and jumped. He awoke, injured and alone, to the sound of an approaching train. He never saw his friend again, unsure of his fate.
He escaped, immigrated to America, and built a new life. He met his wife, a “crazy, quirky and beautiful woman,” and together they created a family and a life filled with love and laughter. His stories, even of hardship, were told with joy, a testament to his indomitable spirit.
Learning this history transformed my perception of the head. It became more than just a garden ornament; it became a symbol of survival, resilience, and love. It’s a “Chia Survivor,” a “Chia Hero,” embodying a powerful story within its mossy surface.
And to address any potential concern about repurposing this meaningful object, the estate sale organizer, the daughter of the artist, wholeheartedly approved of my garden art vision. She believed her mother, especially, would have loved the transformation.
Now, every glance at “the head” in my garden brings a reminder of its journey, a journey from personal creation to survival story to garden art. It’s a potent symbol of embracing life “headfirst,” a reminder that our actions and creations can touch lives in profound and unexpected ways, even long after we are gone. Make your touches meaningful, create memories you’ll be proud to leave behind!
-Laura