Experiencing leaks from your Bissell Powerforce Powerbrush Pet, TurboClean, or PowerClean PowerBrush Pet carpet cleaner can be frustrating. Water puddles on your floor when you’re trying to clean up pet messes is the last thing you need! If you’re noticing water leaking from the bottom of your machine or the clean water tank, don’t worry, you’re not alone, and often, the fix is simple. This guide will walk you through common causes and easy troubleshooting steps to get your Bissell PowerForce PowerBrush Pet back in action and leak-free.
Understanding Why Your Bissell PowerForce PowerBrush Pet Might Be Leaking
Before we dive into troubleshooting, it’s important to understand why your Bissell PowerForce PowerBrush Pet might be leaking. These machines are gravity-fed, meaning they use gravity to dispense water and cleaning solution. A common misconception is that the machine is faulty when leaking occurs when it’s turned off or unplugged.
Gravity-Fed System Behavior: If you leave solution in the clean water tank and accidentally squeeze the trigger while the machine is off, you might see water leaking from the bottom. This is normal behavior for a gravity-fed system. To prevent this, avoid squeezing the trigger when the machine isn’t powered on.
However, if the leaking persists even when you’re not squeezing the trigger or when the machine is in use, there might be a simple assembly issue. Let’s troubleshoot that now.
Step-by-Step Guide to Stop Leaks in Your Bissell PowerForce PowerBrush Pet
Follow these steps to address potential leaks from your Bissell PowerForce PowerBrush Pet. These steps involve disassembling and reassembling the handle components and checking the clean water tank.
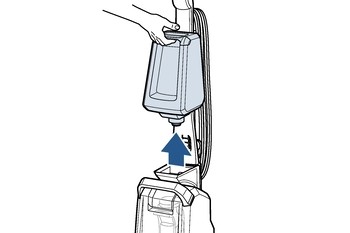
Step 1: Remove the Clean Water Tank and Upper Handle
First, ensure your safety by turning off and unplugging your Bissell PowerForce PowerBrush Pet.
To remove the clean water tank:
- Locate the clean water tank handle.
- Gently pull upwards on the handle to detach the tank.
- Set the clean water tank aside.
Next, remove the upper handle:
- Unwrap the power cord and set it aside to prevent obstruction.
- Find the black button located below the upper power cord wrap on the handle.
- Press and hold the black button while simultaneously pulling upwards on the upper handle to detach it.
Step 2: Remove the Middle Handle
Now, let’s remove the middle handle of your Bissell PowerForce PowerBrush Pet.
- Locate the black button situated below the lower power cord wrap.
- Press and hold this black button.
- While pressing the button, pull upwards on the middle handle to release and remove it.
Step 3: Reinstall the Handles Correctly
Proper handle installation is crucial for the correct assembly of your Bissell PowerForce PowerBrush Pet and can prevent leaks.
First, reinstall the middle handle:
- Slide the middle handle back onto the lower body of the machine.
- Push down firmly until you hear a click, indicating it’s securely in place.
Next, reinstall the upper handle:
- Slide the upper handle into the top of the middle handle.
- Push down until you hear another click, confirming it is properly connected.
Step 4: Inspect the Clean Water Tank for Damage
While the clean water tank is removed, take a moment to inspect it. Look for any cracks, damage, or debris around the tank or the tank cap. Ensure the cap is tightly sealed. A damaged tank can certainly lead to leaks.
Step 5: Reinstall the Clean Water Tank
After inspecting the tank and ensuring the handles are correctly reinstalled, it’s time to put the clean water tank back on your Bissell PowerForce PowerBrush Pet.
- Align the clean water tank with the machine.
- Gently slide the tank back into place until it is securely seated.
Step 6: Test for Leaks and Suction
Now that you’ve reassembled the handles and reinstalled the clean water tank, it’s time to test your Bissell PowerForce PowerBrush Pet for leaks and suction.
- Fill the clean water tank with water and a suitable Bissell cleaning solution, following the machine’s instructions.
- Plug in your machine and turn it on.
- Test the suction by placing your hand near the foot of the machine. You should feel strong suction.
- Observe the machine for any leaks, especially around the base and the clean water tank area.
Still Leaking? Get Further Support
If you’ve followed these steps and your Bissell PowerForce PowerBrush Pet is still leaking, it might indicate a more complex issue. Don’t worry, BISSELL offers excellent customer support.
Click the “Get Advanced Help” button on the support page for further assistance specific to your product and issue. You can also explore related articles on the BISSELL support website for more troubleshooting tips and information.
We hope these steps helped resolve the leaking issue with your Bissell PowerForce PowerBrush Pet! Happy cleaning!